Seav LG 2205 Скачать руководство пользователя страница 6

                                                                                                                                                                  Rev. 3.0    13 – 06 - 2016 

ELECTRONIC CONTROL UNIT LRX 2205 


Single-phase electronic control unit with incorporated radio 

receiver for the automation of sliding and swinging gates and 

rolling shutters, at power levels of up to 1500 Watts. 

- Mod. 

  LG 2205 

: Without radio receiver


- Mod. 

( LR    2205 ) 

: 306     Mhz


- Mod. 

( LR 2205 / 330 )

  : 330     Mhz


- Mod. 

( LR 2205 / 418 ) 

: 418     Mhz


- Mod.   

LRS 2205 

: 433.92     Mhz


- Mod.   

LRS 2205  SET 

: 433.92 Mhz  “narrow band”


- Mod.   

LRH 2205 

: 868.3 Mhz  “narrow band”


(    )

  Product  intended  for  those  countries  where  its  use  is 

permitted 


TECHNICAL DATA: 


- Power supply 

: 230 V a/c  50-60 Hz  2100 W max.


- Flashing beacon output  : 230 V a/c 500 W max.


- Motor output 

: 230 V a/c 1500 W max.


- Photoelectric cells  

  power supply 

: 24 V a/c 3 W max.


- Low voltage safety   

  features and commands : 24 V c/c


- Operating temperature  : -10 

÷

55 °C


- Radio receiver 

: see model


- Op. transmitters 

: 12-18 Bit or Rolling Code


- Max stored TX codes 

: 75


- Box dimensions 

: 110 x 121 x 47 mm.


- Container 

:  ABS V-0  (IP54).


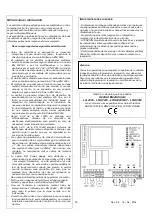
TERMINAL BOARD CONNECTIONS: 


CN1: 

1   : 230 V a/c line input (Phase). 

2   : 230 V a/c line input (Neutral). 

3   : Clean contact output for Flashing Beacon/Courtesy Light. 

4   : Clean contact output for Flashing Beacon/Courtesy Light. 

5   : Opening motor output. 

6   : Shared motor output. 

7   : Closing motor output. 


CN2: 

1   : Input IN3 = FCAP opening stop limit (NC). 

     : Input IN3 = DS2 safety device inverts during closure, 

2   : Shared GND input. 

3   : Input IN4 = FCCH closing stop limit (NC). 

     : Input IN4 = DS3 safety device inverts during closure, 

                          Stop during opening (NC). 

4   : Photoelectric cell control and power supply (24 V a/c). 

5   : Photoelectric cell control and power supply (GND). 

6   : Input IN1 = P/P open-close command button (NA). 

       Input IN1 = UP open only command button (NA). 

7   : Shared GND input. 

8   : Input IN2 = DS1 safety device inverts during closure (NC). 

       Input IN2 = DOWN close only command button (NA). 

       Input IN2 = BL device. Emergency lock (NC). 

9   : Earth antenna input. 

10 : Antenna hot pole input. 


OPERATIONAL DATA:


Step-by-Step keypad operation: 


The  following  operation  is  obtained  using  the  low  voltage 

keypad to control the shutter: 

the first press opens the gate until the motor timer reaches zero 

or  until  the  opening  stop  limit  is  reached,  the  second  press 

closes the gate; if a button is pressed before the opening stop 

limit  is  reached,  the  control  unit 

stops 

motion  during  both 

opening and closing. A further command restarts motion in the 

opposite direction.


Operation using different models of radio control: 


Different  models  of  radio  control  may  be  programmed:  by 

storing a code (1 button) a cyclic step by step operation (Open - 

Stop  -  Close)  may  be  achieved,  and  by  storing  two  different 

codes  (2  buttons)  separate  commands  are  created,  one  for 

opening  and  one  for  closing.  Storing  three  different  codes  (3 

“BeFree”  series  buttons)  produces  three  separate  commands: 

the first for Open, the second for Stop and the third for Close. 

Operation using a 1-button radio control: 


The following type of operation is obtained using a radio control 

with  a  single  button:  the  first  press  controls  the  opening 

movement of the shutter until the motor timer stops. The second 

press controls the closing movement of the shutter. If the button 

is pressed before the motor stops running, the control unit will 

stop  the  shutter  from  moving  and  the  button  will  need  to  be 

pressed again to reactivate the motor in the opposite direction.


Operation using a 2-button radio control: 


The following type of operation is obtained using a radio control 

with  2  buttons:  the  first  button  (“Up”,  corresponding  to  the 

opening  movement)  controls  opening  until  the  motor  stops 

running  and  the  second  button  (“Down”,  corresponding  to  the 

closing  movement)  controls  the  closure  of  the  shutter.  If  the 

opening  movement  is  interrupted  with  another  “Up”  command, 

the motor will continue to run in the upward movement direction. 

If,  however,  the  movement  is  interrupted  with  a  “Down” 

command, the control unit will stop the motor.


The procedure is the same for the closing movement phase. 


Operation using a 3-button radio control (BeFree series): 

The following type of operation is obtained using a radio control 

from  the 

BeFree

  series:  the  Up  button  controls  the  opening 

movement until the set motor time has elapsed, the Stop button 

makes  the  shutter  stop  and  the  Down  button  controls  the 

closure  of  the  shutter.  If  a  stop  command  is  sent  during  the 

opening  or  closing  movement,  the  control  unit  causes  this 

movement to stop. If a command which is the opposite direction 

to  the current  movement  is sent  during  the  opening  or closing 

movement,  the  control  unit  causes  the  shutter  to  change 

direction.


Automatic closing: 

The  control  unit  can  close  the  shutter  automatically  without 

sending additional commands. 

The selection of this operation mode is described in the Pause 

Time programming mode. 


DS1 safety device operation: 

DS1  operation  anticipates  the  connection  of  a  general  safety 

device with contact (NC). If not used, this input must be bridged.


Action  is  not  taken  into  account  during  the  opening  stage  but 
causes inverted motor action during the closing stage. 

Another 

safety  device  operating  mode  is  described  in  the 

extended menu when programming DS1 = INV or DS1 = 

Lock. 


GB 

Содержание LG 2205

Страница 1: ...l moto sia nella fase di apertura sia in quella di chiusura Un ulteriore comando determina la ripresa del moto in senso opposto Funzionamento con differenti modelli di radiocomandi È possibile la programmazione di differenti modelli di radiocomandi memorizzando un codice 1 tasto si ottiene un funzionamento ciclico Passo Passo Apertura Stop Chiusura memorizzando due codici 2 tasti differenti si ott...

Страница 2: ... Il rilascio del comando provocherà l arresto immediato del moto Ripetere l operazione se si desidera ripristinare la configurazione precedente 2 CODE Codice del radiocomando La centrale permette di memorizzare fino a 75 radiocomandi aventi codice diverso fra loro di tipo fisso o rolling code Programmazione del radiocomando 1 o 2 Tasti La programmazione dei codici di trasmissione del radiocomando ...

Страница 3: ...sto SET poi attendere per un tempo uguale a quello desiderato di pausa e premere nuovamente per un istante il tasto SET in questo modo si determinerà la memorizzazione del tempo di chiusura automatica e il LED T PAUSA sarà acceso fisso Se si desidera ripristinare la condizione iniziale senza chiusura automatica posizionarsi sul lampeggio del LED T PAUSA poi premere consecutivamente per 2 volte il ...

Страница 4: ...ezza procedere nel seguente modo assicurarsi di aver abilitato il menù esteso evidenziato dal lampeggio alternato dei Led T PAUSA e Led SEL INPUT 1 2 posizionarsi con il tasto SEL sul lampeggio del LED LED T MOT poi premere il tasto SET nello stesso istante il LED T MOT si accenderà permanentemente e la programmazione sarà conclusa Ripetere l operazione se si desidera ripristinare la configurazion...

Страница 5: ...comando manuale deve essere fatto posizionando la pulsantiera in modo che l utente non venga a trovarsi in posizione pericolosa in accordo al punto 5 2 8 della EN 12453 La centrale non presenta nessun tipo di dispositivo di sezionamento della linea elettrica 230 Vac sarà quindi cura dell installatore prevedere nell impianto un dispositivo di sezionamento E necessario installare un interruttore omn...

Страница 6: ...utton a cyclic step by step operation Open Stop Close may be achieved and by storing two different codes 2 buttons separate commands are created one for opening and one for closing Storing three different codes 3 BeFree series buttons produces three separate commands the first for Open the second for Stop and the third for Close Operation using a 1 button radio control The following type of operat...

Страница 7: ...ickly Send the second code Down corresponding to the closing movement to be stored and the CODE LED will remain lit programming is now complete If the second code is not sent within 10 seconds the control unit exits the programming stage selecting operation using one button on the radio control Programming using a 3 button radio control in the BeFree Series The control unit allows you to store the...

Страница 8: ...use the SEL button to reach a stage where the SEL INPUT 1 2 LED is flashing and press the SET button the SEL INPUT 1 2 LED lights up in a constant manner and programming is complete The IN1 input thus becomes the button connection NA solely for the UP opening phase and IN2 becomes the button connection NA solely for the DOWN closing phase Repeat the operation to restore the previous configuration ...

Страница 9: ...onnection of the flashing beacon or the courtesy light This guarantees the monitoring of breakdowns in compliance with Category 2 of EN 954 1 Whenever one of these malfunctions occurs a qualified professional should be contacted in order to fix it Test Driver Motor The control unit is fitted with two drivers used to control the motor If there is a malfunction the control unit will not enable motio...

Страница 10: ...ngerous situation in compliance with point 5 2 8 of EN 12453 The control unit is not equipped with a 230 V a c electric line sectioning device The installer is responsible for installing a sectioning device in the system An omnipolar switch with overheating category III must be installed The sectioning device must be positioned so that it is protected against accidental closure in compliance with ...

Страница 11: ...on entraîne la reprise du mouvement en sens inverse Fonctionnement avec plusieurs modèles de Radiocommande Possibilité de programmer plusieurs modèles de radiocommande en mémorisant un code 1 touche on obtient un fonctionnement cyclique Pas à Pas Ouverture Stop Fermeture en mémorisant deux codes 2 touches différents on obtient des commandes distinctes la première pour l ouverture et la deuxième po...

Страница 12: ...ire la même opération 2 CODE Code de la radiocommande La centrale permet de mémoriser jusqu à 75 radiocommandes ayant toutes des codes différents de type fixe ou rolling code Programmation de la radiocommande 1 ou 2 Touches Pour programmer les codes de transmission de la radiocommande procéder comme suit appuyer sur la touche SEL la LED CODE commence à clignoter envoyer en même temps le premier co...

Страница 13: ... de la touche SEL sur la LED T PAUSE qui clignote appuyer ensuite un instant sur la touche SET puis attendre pendant un temps équivalent au temps de pause souhaité et appuyer à nouveau sur la touche SET il y a ainsi mémorisation du temps de fermeture automatique et la LED T PAUSE reste allumée en fixe Pour retourner à la condition initiale sans fermeture automatique se positionner sur la LED T PAU...

Страница 14: ...océder comme suit s assurer d avoir bien activé le menu étendu signalé par le clignotement alterné des Leds T PAUSA et Led SEL INPUT 1 2 se positionner à l aide de la touche SEL sur la LED T MOT qui clignote appuyer ensuite sur la touche SET à partir de ce moment là la LED T MOT reste allumée en permanence la programmation est terminée Pour retourner à la configuration précédente refaire la même o...

Страница 15: ...e commande de manière à ce que l utilisateur ne se trouve pas en position de danger en application du point 5 2 8 de la norme EN 12453 La centrale ne présente aucun dispositif de sectionnement de la ligne électrique 230 Vac il appartiendra donc à l installateur de prévoir un dispositif de sectionnement sur l installation Il faut installer un interrupteur à coupure omnipolaire en catégorie III de s...

Страница 16: ... en la fase de apertura como en la de cierre Un mando posterior restablece el movimiento en sentido opuesto Funcionamiento con Diferentes modelos de radiocontroles Se puede realizar la programación de distintos modelos de radiocontroles Memorizando un código 1 tecla se consigue el funcionamiento cíclico Paso Paso Abertura Stop Cierre memorizando dos códigos 2 teclas diferentes se consiguen mandos ...

Страница 17: ...radiocontrol La central permite memorizar hasta 75 radiocontroles que tengan un código diferente entre sí de tipo fijo o rolling code Programación del radiocontrol 1 o 2 Botones La programación de los códigos de transmisión del radiocontrol se efectúa del siguiente modo Presionar la tecla SEL LED CODE comenzará a parpadear al mismo tiempo enviar el primer código Up asociado al sentido de abertura ...

Страница 18: ... ubíquese sobre el LED T PAUSA centelleante luego pulse 2 veces consecutivas el botón SET en un intervalo de tiempo de 2 segundos en el mismo tiempo el Led se apagará y habrá finalizado la operación Durante la programación es posible utilizar el botón del radiocontrol sólo si fue precedentemente memorizado en lugar del botón SET ubicado en la central 7 SEL IN1 2 Selección funcionamiento entradas I...

Страница 19: ...botón SEL sobre el LED LED T MOT centelleante luego pulse el botón SET en ese momento el LED T MOT se encenderá en forma permanente y la programación habrá finalizado Repita la operación si desea restablecer la configuración anterior RESET Cuando sea oportuno restablecer la configuración de fábrica de la central pulse los botones SEL y SET simultáneamente en ese momento se producirá el encendido s...

Страница 20: ... de modo que cuando el usuario acceda al mismo no se encuentre en una posición peligrosa según el punto 5 2 8 de la EN 12453 La central no presenta ningún tipo de dispositivo de seccionamiento de la línea eléctrica 230 Vac por lo tanto será responsabilidad del instalador prever un dispositivo de seccionamiento en la instalación Es necesario instalar un interruptor omnipolar con categoría III de so...

Страница 21: ...odellen Es ist möglich unterschiedliche Funksteuerungsmodelle zu programmieren Durch das Speichern eines einzigen Codes 1 Taste wird eine zyklische schrittweise Steuerung AUFWÄRTS STOP ABWÄRTS durch das Speichern von zwei unterschiedlichen Codes 2 Tasten werden dagegen getrennte Steuerungen die erste zum ÖFFNEN und die zweite zum SCHLIESSEN und durch das Speichern von drei unterschiedlichen Codes ...

Страница 22: ...ngsvorgang abzuschließen muss die entsprechende Steuerungstaste konstant gedrückt werden Sobald die Taste losgelassen wird hält die Bewegung sofort an Wiederholen Sie diese Schritte wenn die ursprüngliche Konfiguration wiederhergestellt werden soll 2 CODE Code der Funksteuerung Die Steuereinheit ermöglicht das Speichern von bis zu 75 Funksteuerungsbefehlen mit voneinander abweichenden Codes fixe C...

Страница 23: ...gliche Status wiederhergestellt werden mittels der Aktivierung des Automatischen Motor Timers muss die blinkende LED T MOT ausgewählt werden und dann zweimal hintereinander in einem Abstand von 2 Sekunden die Taste SET betätigt werden Die LED erlischt und der Vorgang ist abgeschlossen Während der Programmierung kann anstelle der Taste SET der Steuereinheit auch die Taste der Funksteuerung betätigt...

Страница 24: ... Sie sich dass Sie das erweiterte Menü aktiviert haben angezeigt durch abwechselndes Blinken der LED T PAUSA und der LED SEL INPUT 1 2 Drücken Sie nun die Taste SEL bis die LED LAMP CORT blinkt und drücken Sie dann die Taste SET Die LED LAMP CORT schaltet dabei auf Dauerlicht und die Programmierung ist abgeschlossen Wiederholen Sie diese Schritte wenn die ursprüngliche Konfiguration wiederhergeste...

Страница 25: ...eschaffen werden kann Die Sicherheit der endgültigen Installation und die Einhaltung sämtlicher Vorgaben der Richtlinien obliegt demjenigen der die einzelnen Bestandteile zur Erstellung einer kompletten Schließvorrichtung zusammenbaut Außerdem sollten folgende Warnhinweise berücksichtigt werden Vor der Automatisierung des Rolltores muss dessen ordnungsgemäßer Zustand gemäß den Maschinenrichtlinien...

Страница 26: ...6 2016 26 Die Firma SEAV s r l erklärt dass die Produkte Elektronische Steuereinheit LG 2205 LRS 2205 LRS 2205 SET LRH 2205 den Bestimmungen der Richtlinien RED 2014 53 EU EMC 2014 30 EU LVD 2014 35 EU entsprechen ...

Страница 27: ...fecho se der um impulso antes de chegar ao dispositivo de final de percurso a central realiza uma paragem de movimento quer na fase de abertura quer na de fechamento Um ulterior comando determina o reinício do movimento na direcção contrária Funcionamento com vários modelos de comandos de rádio É possível programar vários modelos de comandos de rádio memorizando um código 1 tecla obtém se o funcio...

Страница 28: ...erá necessário manter constantemente activado o comando desejado para obter o movimento da esquadria Se o comando for solto o movimento irá parar imediatamente Repita a operação se desejar restabelecer a configuração precedente 2 CODE Código do comando rádio A central possibilita guardar na memória até 75 comandos rádio com códigos diferentes uns dos outros de tipo fixo ou código rolante Programaç...

Страница 29: ...ida pelo fabricante sem fechamento automático Se desejar activar o fechamento automático realize as seguintes operações coloque se com a tecla SEL sobre a intermitência do LED T PAUSA carregue um instante na tecla SET e em seguida aguarde um tempo igual ao que desejar para a pausa e carregue novamente um instante na tecla SET deste modo define se a memorização do tempo de fechamento automático e o...

Страница 30: ... outros tipos de dispositivos de segurança proceda da seguinte maneira assegure se que activou o menu extenso evidenciado pelo piscar alternado dos Led T PAUSA e Led SEL INPUT 1 2 coloque se com a tecla SEL sobre a intermitência do LED T MOT e em seguida carregue na tecla SET no mesmo instante o LED T MOT acende se permanentemente e a programação será concluída Repita a operação se desejar restabe...

Страница 31: ...N 12453 A fixação dos cabos de alimentação e de ligação deve ser garantida mediante a montagem de prendedores de cabos fornecidos O motorredutor empregado para mover a esquadria deve ser em conformidade ao estabelecido pelo ponto 5 2 7 da EN 12453 Se for montado um painel de comandos para o comando manual o mesmo deve ser posicionado de maneira que o utilizador não se encontre em posição perigosa ...

Страница 32: ...Rev 3 0 13 06 2016 32 ...

Страница 33: ...rvat Werking met verschillende modellen afstandsbedieningen Er kunnen verschillende modellen afstandsbedieningen worden geprogrammeerd door een code op te slaan 1 toets bereikt u een cyclische Stap voor Stap werking Openen Stop Sluiten door twee verschillende codes op te slaan 2 toetsen bereikt u verschillende opdrachten De eerste voor het Openen en de tweede voor het Sluiten Door drie verschillen...

Страница 34: ...ewenste bedieningsknop constant geactiveerd moeten houden om het luik te doen bewegen als u de knop loslaat stopt de beweging onmiddellijk Herhaal de handeling als u de vorige configuratie wilt herstellen 2 CODE Code van de afstandsbediening De centrale biedt de mogelijkheid om tot aan 75 afstandsbedieningen op te slaan die onderling een verschillende code van het type vast of rolling code hebben ...

Страница 35: ... toets die zich op de centrale bevindt de toets van de afstandsbediening gebruiken alleen indien van tevoren opgeslagen 6 T PAUZE Programmeren automatische sluitingstijd 4 min max De centrale wordt door de fabriek geleverd zonder automatische sluiting Als u de automatische sluiting wilt activeren gaat u als volgt te werk ga met de SEL toets naar het knipperlicht van de LED T PAUZE druk kort op de ...

Страница 36: ...s u de ingangen IN3 en IN4 DS2 en DS3 wilt instellen ofwel met de werkingswijze voor de normale aansluiting van fotocellen of andere veiligheidsmechanismen dient u als volgt te werk te gaan controleer of u het uitgebreide menu heeft ingeschakeld aangegeven door het afwisselend knipperen van de Leds T PAUZE en SEL INPUT 1 2 Ga met de SEL toets naar het knipperlicht van de LED T MOT en druk vervolge...

Страница 37: ...n richtlijn EN 12453 hieraan zijn toegevoegd De bevestiging van de voedingskabels en de verbindingskabels moet verzekerd worden door montage van de bijgeleverde kabelklemmen De bewegingsvertrager die wordt gebruikt voor het bewegen van het luik moet conform zijn aan de voorschriften van punt 5 2 7 van richtlijn EN 12453 Het eventueel aanbrengen van een schakelpaneel voor handmatige bediening moet ...

Страница 38: ...Rev 3 0 13 06 2016 38 ...

Страница 39: ...r att rörelsen återupptas i omvänd riktning Användning av olika fjärrkontrollmodeller Det går att programmera olika fjärrkontrollmodeller Om en kod 1 knapp lagras erhålls en cyklisk steg för stegfunktion öppning stopp stängning Om två olika koder 2 knappar lagras erhålls två olika kommandon den första för öppning och den andra för stängning Om tre koder 3 knappar serie BeFree lagras erhålls tre ol...

Страница 40: ...r klar Om inte den andra koden skickas inom 10 sekunder genom att välja funktionen med 1 knapp på fjärrkontrollen lämnar styrenheten programmeringsfasen Programmering med fjärrkontroll 3 knappar Serie BeFree Genom att programmera knappen Up lagrar styrenheten hela radiostyrningen BeFree Programmeringen av koderna för radiostyrningen BeFree görs på följande sätt Genom att trycka på knappen SEL börj...

Страница 41: ...pningsfasen UP och IN2 knappanslutningen NÖ för den enda stängningsfasen DOWN Upprepa operationen om du vill återgå till föregående konfiguration UTÖKAD MENY När styrenheten levereras från tillverkaren går det att endast välja funktioner från huvudmenyn Om du vill koppla i de funktioner som beskrivs i den utökade menyn gör så här Tryck på SET knappen kontinuerligt i 5 sekunder När denna tid förflu...

Страница 42: ...växlande koppla till och från intervall om 5 sekunder utgången på 230 Vac 500 W för anslutning av blinkljuset eller belysningen Denna signalering pågår max 1 minut Detta garanterar en övervakning mot fel i överensstämmelse med Kategori 2 i standard EN 954 1 När någon av dessa felfunktioner förekommer krävs att behörig personal ingriper Test av motorns drivkrets Styrenheten har två drivkretsar som ...

Страница 43: ...2 7 i standard EN 12453 En eventuell montering av en manuell kommandoknappsats ska göras så att knappsatsen placeras på så sätt att användaren inte hamnar i ett farligt läge i enlighet med punkt 5 2 8 i standard EN 12453 Styrenheten är inte försedd med någon typ av frånskiljare på ellinjen 230 Vac det åligger alltså installatören att förse systemet med en frånskiljningsanordning Det är nödvändigt ...

Страница 44: ...ριν την επίτευξη του τέλους διαδρομής το κέντρο διενεργεί το σταμάτημα της κίνησης τόσο στη φάση ανοίγματος όσο και σε εκείνη του κλεισίματος Μια περαιτέρω εντολή καθορίζει την επανάληψη της κίνησης με αντίθετη φορά Λειτουργία με διαφορετικά μοντέλα ραδιοχειριστηρίων Είναι δυνατός ο προγραμματισμός διαφορετικών μοντέλων ραδιοχειριστηρίων αποθηκεύοντας ένα κωδικό 1 πλήκτρο επιτυγχάνεται μια κυκλική...

Страница 45: ...ουργία Βήμα Βήμα Χειροκίνητα Το κέντρο παρέχεται από τον κατασκευαστή με τον Χειροκίνητο τρόπο λειτουργίας Παρουσίας Ανθρώπου ανενεργό Αν επιθυμείτε να ενεργοποιήσετε τη λειτουργία προχωρήστε με τον ακόλουθο τρόπο τοποθετηθείτε με το κουμπί SEL στο αναβοσβήσιμο του LED AUT MANUAL μετά πατήστε το κουμπί SET την ίδια στιγμή το LED AUT MANUAL θα ανάψει αδιάλειπτα και ο προγραμματισμός θα ολοκληρωθεί ...

Страница 46: ...παρέχεται από τον κατασκευαστή με τη λειτουργία του Αυτόματου Timer Κινητήρα ενεργή Με τον τρόπο αυτόν το κέντρο διακόπτει τροφοδοσία στον κινητήρα μετά 1 sec από την επίτευξη του εσωτερικού τέλους διαδρομής στον κινητήρα Αν χρειαστεί να έχετε καθορισμένο χρόνο εργασίας κινητήρα και Αυτόματο Timer Κινητήρα ανενεργό ο προγραμματισμός πρέπει να διενεργηθεί με κούφωμα κλειστό με τον ακόλουθο τρόπο το...

Страница 47: ...θείτε με το κουμπί SEL στο αναβοσβήσιμο του LED INB CMD AP κατόπιν πατήστε το κουμπί SET την ίδια στιγμή το LED INB CMD AP θα ανάψει αδιάλειπτα και ο προγραμματισμός θα έχει ολοκληρωθεί Με τον τρόπο αυτόν θα διενεργηθεί το test των φωτοκυττάρων στις εισόδους ασφαλείας αντιστροφή στη φάση κλεισίματος καλούμενες και DS1 και DS2 Επαναλάβετε την εργασία αν επιθυμείτε να αποκαταστήσετε την προηγούμενη ...

Страница 48: ...ένα τελικό προϊόν μηχανή σύμφωνα με την Οδηγία Μηχανών Η ασφάλεια της τελικής εγκατάστασης και η τήρηση των υποδείξεων των κανονισμών αποτελεί φροντίδα αυτού που συναρμολογεί τα διάφορα μέρη για την κατασκευή ενός πλήρους κλεισίματος Προτείνεται ακόμη να τηρείτε τις ακόλουθες προειδοποιήσεις Πριν αυτοματοποιήσετε το κούφωμα είναι απαραίτητο να διαπιστώσετε την καλή κατάσταση και σύμφωνα με την οδη...

Страница 49: ...3 0 13 06 2016 49 Η SEAV s r l l δηλώνει ότι τα προϊόντα Ηλεκτρονικό Κέντρο LG 2205 LRS 2205 LRS 2205 SET LRH 2205 είναι σύμφωνα με τις προδιαγραφές των Οδηγιών RED 2014 53 EU EMC 2014 30 EU LVD 2014 35 EU ...

Отзывы: