Maintenance
50
02.00|1416054_ROTA-M2 + 2 |en-US
interlaces
CAUTION: The wedge bars are numbered; install according to
the numbering on the chuck body!
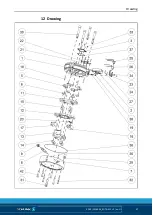
14 Place connecting member (item 6) on the bar of the wedge
bars (item 5)
15 Place the upper drive ring (item 11) on the shaft in the lathe
chuck center, thread the connecting members (item 6) into
the holes. The marking must be visible and point in the
direction of guideway 1
16 Remove the cylindrical pins (item 48) on guideway 1
17 Accurately place the middle drive ring (item 12) on the upper
drive ring (item 11); the marking must be visible and point in
the direction of guideway 1
18 Place the sliding block (item 20) in the groove of the middle
drive ring (item 12); the marking must be visible and point
outwards
19 Place the lower drive ring (item 13) on the middle drive ring
(item 12) and thread the connecting members (item 6) into
the holes. The marking must be visible and point in the
direction of guideway 1
20 Remove the cylindrical pins (item 48) on guideway 4
21 Insert the sleeves (item 14) into the lower drive ring (item 13),
the chamfers must point downwards
22 Insert the locking bolts (item 15) into the holes of the drive
rings
23 Insert the slide (item 17) with pin into the groove of the center
drive ring (item 12) at guideway 3 and align it parallel to the
plane of guideways 2 and 4. The pin must point to the middle
axis
24 Place the seat of bearing (item 29) in the mount (item 7).
25 Place the slide (item 16) in the pocket, the pin must face the
middle axis
26 From the outside through the hole in the mount (item 7),
screw the spindle (item 8) into the slide (item 16) until it is
braced in the end position.
27 Turn the spindle nut (item 9) up to the stop in the mount (item
7) using the assembly tool (item 49).
28 Turn back the spindle nut (item 9) using the assembly tool
(item 49) until the cylindrical pin (item 35) can be inserted into
the hole of the mount (item 7)
Содержание ROTA-M flex 2+2 1000
Страница 20: ...Screw tightening torques 20 02 00 1416054_ROTA M2 2 en US Dimensions 3 2 ...
Страница 21: ...Screw tightening torques 02 00 1416054_ROTA M2 2 en US 21 ...
Страница 57: ...Drawing 02 00 1416054_ROTA M2 2 en US 57 Drawing 12 ...
Страница 58: ...Drawing 58 02 00 1416054_ROTA M2 2 en US ...


