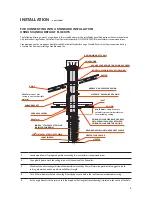
scandia HEAT & COOK SCX 501 Скачать руководство пользователя страница 8

6.

Position the drop box between the angle brackets, keeping a 25mm clearance to combustibles. The located end
of the drop box must protrude no less than 150mm down from the ceiling or any combustible material. Fix the drop 
box to the angle brackets.

7.

Add the remaining casings to the required height. Australian/New Zealand Standards state that “the flue pipe shall 
extend not less than 4.6m above the top of the floor protector”. If the flue pipe is within 3 metres of the ridge, the flue 
pipe must protrude at least 600mm above the ridge of the roof. If the distance from the ridge is more than 3 metres, 
the flue pipe must protrude at least 1000mm above roof penetration. Additional lengths of casing and flue may be 
required to achieve this. The flue pipe must be more than 3 metres from any nearby structure. Other clearances may 
be applicable, it is up to the installer to ensure compliance with all regulations. 

See Figure 1 and 2 on P7.

8.

Install roof flashing (Additional accessory, not supplied in flue kit)

9.

Secure the Ceiling Collar in place using ceramic spacers and screws provided.

10. 

Insert crimped end of the upper decorative flue (without internal stainless steel heat shield) up into the drop box.
Then insert the crimped end of the lower decorative flue (with the internal stainless steel heat shield) up into bottom 
of the upper decorative flue. The lower decorative flue features locating tags on the non crimped end which rest on 
the heater flue collar. The solid heat shield section of the decorative mesh and stainless steel inner heat shield is to face 
the wall.

11.

Feed stainless steel flue through decorative flue and drop box through to the required height. Assemble flue pipes 
tight together as you go ensuring seams are straight. Secure each joint with three stainless steel rivets or screws spaced 
equally. Clean any finger prints or oils off stainless steel flue with methylated spirits.

12.

Trim the inner flue to the same height as the outer casing. Place cover cone and cowl over stainless steel flue 

&

 push 

cover cone over gal casing. Fix cover cone to gal casing with stainless steel pop rivets or screws. 

FOR CONNECTING INTO EXISTING MASONRY CHIMNEY

Any chimney should be fully intact with no holes or missing bricks. We recommend a chimney register be installed above any 
installation into a masonry fireplace minimising heat loss up the chimney. The top of the chimney must be sealed using a chimney 
plate which should be sealed in place with a  mortar mix. 

Active flue should be trimmed in line with the top of the chimney if it meets the minimum height requirements under 
AS/ NZS 2918. If additional lengths are required to fulfill this requirement these lengths must be cased. The flue should always be 
finished with a cowl and cone. 

6.

INSTALLATION 

....continued

Содержание HEAT & COOK SCX 501

Страница 1: ...HEAT COOK OWNERS MANUAL Scandia Heating Aust Pty Ltd Head Office 306 South Gippsland Highway Dandenong South VIC 3175 Australia 61 3 5792 2388 info scandiastoves com au www scandiastoves com au...

Страница 2: ......

Страница 3: ...NCIL REQUIREMENTS Check Local Council Requirements Eg permits When installing operating and maintaining your wood heater follow the guidelines presented in these instructions and make them available t...

Страница 4: ...g a chimney fire If you suspect a chimney fire close down the air controls on the wood heater if the fire persists evacuate people from the building and call the Fire Brigade To prevent the accumulati...

Страница 5: ...toves com au PLEASE NOTE Hot plates can be found in Lower Ash Tray 2 BEFORE INSTALLING YOUR WOOD HEATER You need to consider the following to ensure the safe operation of your wood heater Provision of...

Страница 6: ...stallation regulations This is for your safety The manufacturer is not responsible for the product if it is not installed following these recommendations These clearances may only be reduced by means...

Страница 7: ...JOIST CEILING HEATER HEATER FLUE COLLAR DECORATIVE MESH WITH REAR HEAT SHIELD CERAMIC SPACERS ANGLE BRACKET CEILING COLLAR FIXED WITH SCREW WITH CERAMIC SPACERS BETWEEN CEILING COLLAR AND THE CEILING...

Страница 8: ...steel heat shield up into bottom of the upper decorative flue The lower decorative flue features locating tags on the non crimped end which rest on the heater flue collar The solid heat shield sectio...

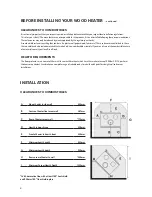
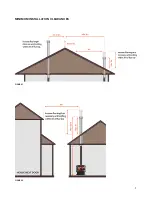
Страница 9: ...MINIMUM INSTALLATION CLEARANCES FIGURE 1 FIGURE 2 7...

Страница 10: ...y Air Inlet Control Provides secondary air intake directly to coal base to further regulate burn rate of fire 4 Oven Temperature Control Provides cool air to oven to further regulate oven temperature...

Страница 11: ...r on the firebox base then a few small dry pieces of sticks or kindling Open the flue damper fully by pushing backwards Open both the air inlet controls Now light the paper close the fire door when th...

Страница 12: ...g port cover located on the top plate to the left hand side Push the cleaning tool down the back of the stove moving it about to loosen any built up creosote or ash These loose particles will fall to...

Страница 13: ...s does crack when the wood heater is lit let the fire die out Do not open the door until the wood heater has fully cooled Replace the glass with the specified replacement part before re using the wood...

Страница 14: ...t easily you may need to adjust or replace the door seal 3 Check to see if the glass moves within the door frame If it does you may need to tighten the glass retainer screws 4 Check the condition of t...

Страница 15: ...ing warranty period after the date of the original purchase such as to make the wood heater unfit for normal home use and you comply with the requirements below regarding making a claim then subject t...

Страница 16: ...ill only be responsible for transport of the wood heater from the original place of purchase to Scandia s premises and back and replacement or repair in accordance with this Warranty Head Office 306 S...

Страница 17: ......

Страница 18: ......

Отзывы: