


11.
WOOD HEATER MAINTENANCE
....continued
ASH REMOVAL
When the stove is out and completely cold you may remove the ash using an ash vacuum or a steel bucket with a lid and shovel.
Place a cover over the bucket so that when removing the bucket the ash does not blow about your house.
HOT WATER GENERATOR (OPTIONAL)
According to Australian law this appliance must be installed by a registered plumber. Be sure to always have water running through
your system, failure to do so will result in damage to hot water generator. When installing the plumber must use radial bends and
always have the hot water line from the hot water generator to the storage unit inclining. Failure to comply with any of the above
will negate warranty.
WARNING: DO NOT CAP OFF HOT WATER OUTLETS!
CARE OF GLASS
At times, especially when the air controls are turned to low settings or when damp wood is used, the wood heater glass will blacken.
This is caused by fuel that is not completely burnt, but the build-up on the inside of the glass will normally burn off when a good
hot fire is established in the wood heater.
There may be times however when you need to clean the glass. To do this, use a soft cloth and a non-abrasive glass cleaner.
Only ever clean the glass when the wood heater is cold. For best results select from Scandia’s range of glass cleaning products.
When loading fuel into the wood heater, always make sure it is not protruding out through the door opening, as this may break
the glass when you close the door. This is especially relevant when loading logs. Always close the door gently.
If the glass does crack when the wood heater is lit, let the fire die out. Do not open the door until the wood heater has fully cooled.
Replace the glass with the specified replacement part before re-using the wood heater.
DOOR ADJUSTMENTS
Door closing tension adjustment - As door seals age the seal beds into the heater body, this will allow air to be drawn in any gaps
created. Remove the grub screw from the door handle shaft on the inside of the door, this will allow the handle to rotate 360
O
.
Rotate the handle 1 full turn anti-clockwise and shut the door. Repeat this step until the door offers a little resistance to close.
Replace the grub screw. Over tightening may cause the door to distort and break the glass. If the door is at maximum adjustment
this generally means the door seal will need replacing.
SURFACE FINISH
To clean your heater wipe lightly with a damp cloth or dust with a duster. Some cleaning products may leave stains on the wood
heater surface. Never use abrasive cloths as these may scratch the surface; take caution when using microfiber cloths as they can
leave swirl marks if used in a circular motion. Painted wood heaters can be re-painted by using a good quality, high temperature
wood heater paint. When re-painting, make sure there is plenty of ventilation and follow the manufacturer’s instructions. Allow
the paint to fully dry before lighting the stove and allow extra ventilation for the first couple of fires as some fumes may emit from
the stove as the paint cures.
Scandia high temp enamel is available at your local Scandia retailer.
Visit www.scandiastoves.com.au for details.
REPLACING PARTS
Always use genuine replacement parts. Only ever make replacements when the wood heater is cold.
All replacement parts can be ordered from
www.scandiastoves.com.au.
Содержание HEAT & COOK SCX 501
Страница 2: ......
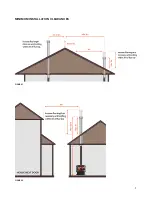
Страница 9: ...MINIMUM INSTALLATION CLEARANCES FIGURE 1 FIGURE 2 7...
Страница 17: ......
Страница 18: ......