


3.
BEFORE INSTALLING YOUR WOOD HEATER
You need to consider the following to ensure the safe operation of your wood heater:
- Provision of adequate air to support efficient combustion of the fuel.
- A well sealed flue/chimney system, hereinafter referred to as the “flue system”.
- The protection of combustible materials in proximity of the wood heater.
- A suitable base on which to place your wood heater.
ADEQUATE PROVISION AIR
It is essential for the safe and efficient use of your wood heater that you provide an adequate air supply to your wood heater.
This may mean the provision of an outside air supply to the room, especially if there are extraction units such as cooker hoods or
clothes dryers in the vicinity. Failure to do so will mean that fuel is burned inefficiently causing smoke and blackening the glass and
may also cause smoke to come back into the room. As a simple check for this open a door or window in the room and check if the
wood heater burns more efficiently.
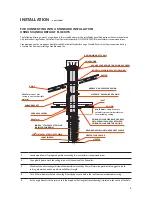
WELL SEALED FLUE SYSTEM
Under no circumstances should you use aluminum or galvanized steel pipes for your wood heater flue. Always fit pipes with the
narrow crimped side down, this allows any creosote to run down the inside of the pipe and not to come out and cause an unsightly
mess and possible fire hazard.
Pipe bends should be kept to a minimum and we do not recommend using more than 2 bends on any installation. Flues must not
pass through ceilings, floors, attics, roofs, or combustible walls without adequate and approved insulation being provided to protect
combustible materials.
The chimney and flue provide a means of taking combusted fuel from the wood heater, as well as a draught to enable the wood
heater to work. It is essential that the flue system is kept in good condition and there are no breaks or cracks allowing contact with
any other combustible materials of the house. It is also essential that the flue system is kept clean and seals are maintained to ensure
the draught is not lost.
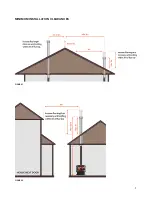
The open end of the flue system must be above the height of the apex of the building and any other obstructions, such as trees,
which are within 3 meters (10ft) of the flue system. Failure to do this will affect the efficiency of the wood heater and may cause
down draughts which will mean dangerous products of combustion are emitted into room.
Under no circumstances should the flue pipe be less than 6” (152mm) internal diameter.
Side and bottom panels are consumable
and may warp over time.
For replacements visit www.scandiastoves.com.au
PLEASE NOTE:
Hot plates
can be found in Lower Ash Tray
2.
BEFORE INSTALLING YOUR WOOD HEATER
You need to consider the following to ensure the safe operation of your wood heater:
- Provision of adequate air to support efficient combustion of the fuel.
- A well sealed flue/chimney system, hereinafter referred to as the “flue system”.
- The protection of combustible materials in proximity of the wood heater.
- A suitable base on which to place your wood heater.
ADEQUATE PROVISION AIR
It is essential for the safe and efficient use of your wood heater that you provide an adequate air supply to your wood heater.
This may mean the provision of an outside air supply to the room, especially if there are extraction units such as cooker hoods or
clothes dryers in the vicinity. Failure to do so will mean that fuel is burned inefficiently causing smoke, blackening the glass and may
also cause smoke to come back into the room. As a simple check for this open a door or window in the room and check if the wood
heater burns more efficiently.
WELL SEALED FLUE SYSTEM
Under no circumstances should you use aluminum or galvanized steel pipes for your wood heater flue. Always fit pipes with the
narrow crimped side down, this allows any creosote to run down the inside of the pipe and not to come out and cause an unsightly
mess and possible fire hazard.
Pipe bends should be kept to a minimum and we do not recommend using more than 2 bends on any installation. Flues must not
pass through ceilings, floors, attics, roofs, or combustible walls without adequate and approved insulation being provided to protect
combustible materials.
The chimney and flue provide a means of taking combusted fuel from the wood heater, as well as a draught to enable the wood
heater to work. It is essential that the flue system is kept in good condition and there are no breaks or cracks allowing contact with
any other combustible materials of the house. It is also essential that the flue system is kept clean and seals are maintained to ensure
the draught is not lost.
The open end of the flue system must be above the height of the apex of the building and any other obstructions, such as trees,
which are within 3 meters (10ft) of the flue system. Failure to do this will affect the efficiency of the wood heater and may cause
down draughts which will mean dangerous products of combustion are emitted into the room.
Under no circumstances should the flue pipe be less than 6” (152mm) internal diameter.
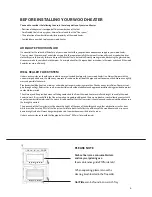
When unpacking, please remove the
cleaning brush located in the flue collar.
Hot Plates
can be found in Lower Ash Tray
Firebox liners are a consumable item
and may warp during use.
(See maintenance guide P.10 for details)
PLEASE NOTE
Содержание HEAT & COOK SCX 501
Страница 2: ......
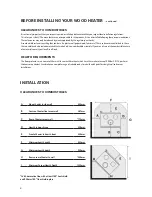
Страница 9: ...MINIMUM INSTALLATION CLEARANCES FIGURE 1 FIGURE 2 7...
Страница 17: ......
Страница 18: ......