16
RT-FS/RT-PHFS OWNER’S MANUAL
15
16
17
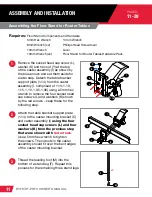
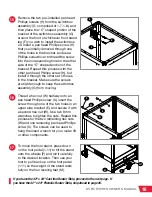
Remove the two pre-installed pan head
Phillips screws (H) from the switchbox
assembly (G, comprised of 1.7-1.8), and
then place the “C” shaped portion of the
bracket of the switchbox assembly (G)
around the front of whichever front stand
leg (F) you wish to install the switchbox
on. Insert a pan head Phillips screw (H)
that you initially removed through one
of the holes in the bracket, and use a
Phillips screwdriver to thread the screw
into the corresponding hole on the other
side of the “C” shaped portion of the
bracket. Repeat this process with the
other pan head Phillips screw (H), but
install it through the other set of holes
in the bracket. Make sure the screws
are tight enough to keep the switchbox
assembly (G) from moving.
Thread a hex nut (W) halfway onto an
pan head Phillips screw (X), insert the
screw through one of the two holes in an
upper side bracket (E), and secure it with
a second hex nut (W). Use two 8 mm
wrenches to tighten the nuts. Repeat this
process for the two remaining hex nuts
(W) and one remaining pan head Phillips
screw (X). The screws can be used to
hang the insert wrench for your router lift
or other components.
To move the floor stand, press down
on the foot pedal (1.11) to tilt the stand
onto the wheels (P) and roll it carefully
to the desired location. Then use your
foot to pull back up on the foot pedal
(1.11) so the weight of the stand rests
fully on the four leveling feet (M).
If you have the 32" x 24" Cast Iron Router Table, proceed to the next page. If
you have the 32" x 24" Phenolic Router Table, skip ahead to page 20.
H
G
F
W
W
P
M
1.11
E
X


