11
RT-FS/RT-PHFS OWNER’S MANUAL
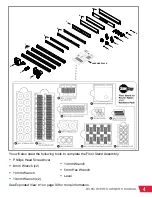
Requires:
Floor Stand Components and Hardware
5mm Hex Wrench
14mm Wrench
8mm Wrench (x2)
Phillips Head Screwdriver
10mm
Wrench Level
13mm Wrench (x2)
Floor Stand for Router Tables Hardware Pack
1
2
3
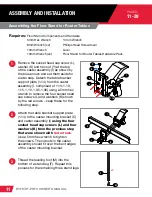
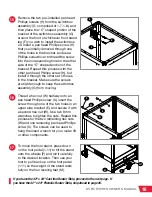
Remove the socket head cap screw (L),
washer (K) and hex nut (Y) at the top
of the caster assembly (I) as shown by
the blue arrows and set them aside for
a later step. Detach the table bracket
support plate (1.14) from the caster
assembly (I, comprised of 1.10-1.13,
1.15-1.19, 1.35-1.36) using a 5mm hex
wrench to remove the four socket head
cap screws (L) and washers (K) shown
by the red arrows – keep these for the
following step.
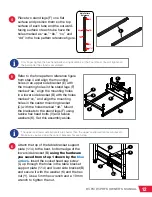
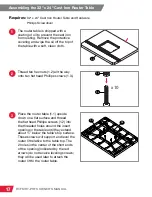
Attach the table bracket support plate
(1.14) to the caster mounting bracket (C)
and caster assembly (I)
using the four
socket head cap screws (L) and four
washers (K) from the previous step
that were shown with
red arrows
.
Use a 5mm hex wrench to tighten
the screws. The cutouts in the caster
assembly should fit over the bent edges
of the caster mounting bracket.
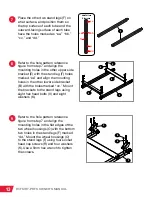
Thread the leveling foot (M) into the
bottom of a stand leg (F). Repeat this
process for the remaining three stand legs.
x4
ASSEMBLY AND INSTALLATION
PAGES:
11-29
Assembling the Floor Stand for Router Tables
L
C
1.14
1.14
L
F
M
K
K
K
I
I
L
Y

