3. After adjusting one or more of the screws, check
the insert again and adjust the other screws, as
needed. Repeat the check and adjust process, as
needed, until the insert is flush with the table top.
How to Change the Blade
Wear gloves when handling the blade.
Always turn off and unplug the saw when
working on or maintaining the saw.
Tools needed:
•
Arbor flange wrench and arbor nut wrench (located
on the top of the accessory storage compartment)
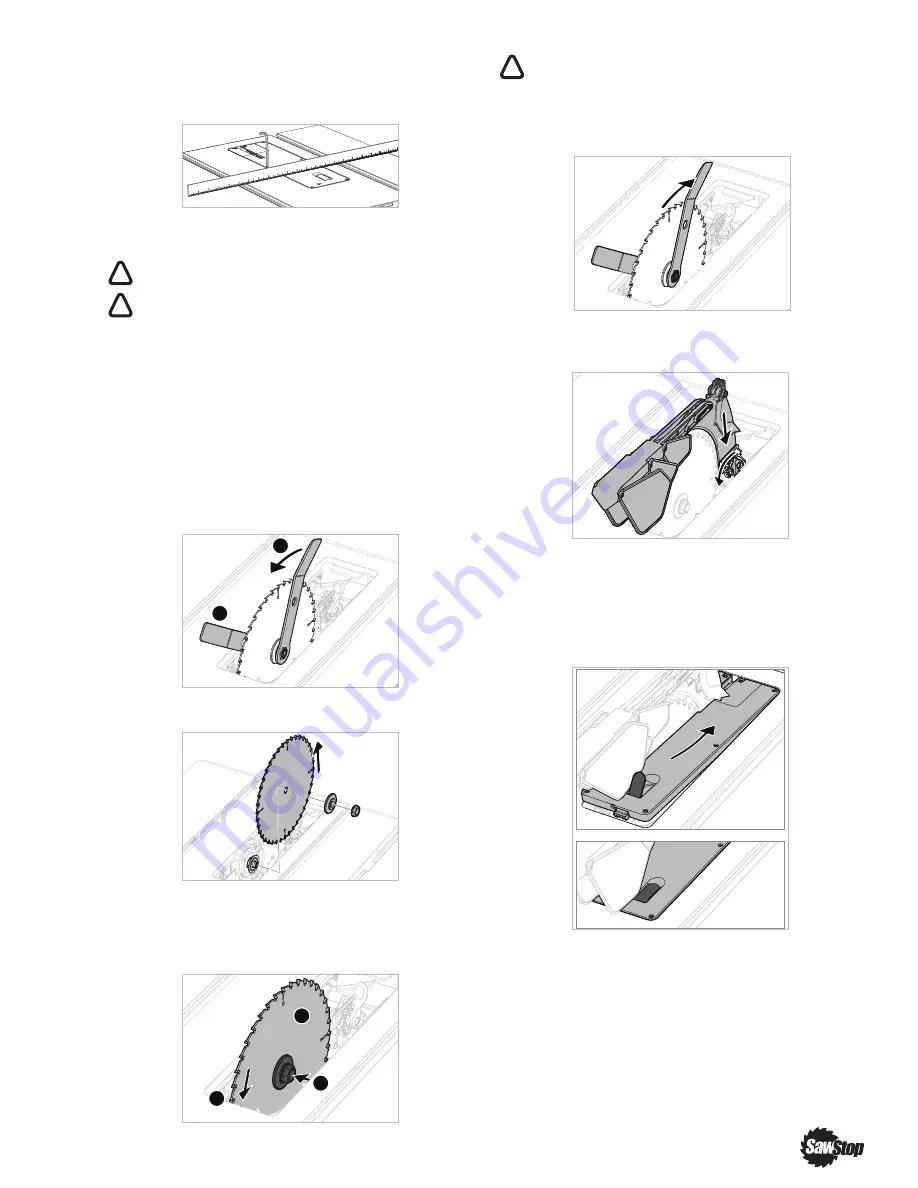
1. Fully raise the blade, and then remove the insert.
2. Open the blade guard clamp, and then remove the
blade guard or riving knife.
3. Use the arbor flange wrench to hold the arbor (A),
and the use the arbor nut wrench to loosen the
arbor nut (B).
4. Remove the nut, arbor washer and blade.
5. Install the new blade (C). Install the arbor washer
and arbor nut (D). Make sure the teeth face in the
correct direction, that is, pointing down at the front
of the throat (E).
Make sure the teeth face in the correct direction
(pointing counterclockwise when looking from
the right side of the saw).
6. Tighten the arbor nut. Only a small amount of
pressure is needed. Do not over-tighten.
7. Install the blade guard or riving knife, and then
close the blade guard clamp.
to learn how to check and adjust the
alignment of the spreader or riving knife.
to learn how to adjust the clamping
force of the blade guard clamp.
8. Install the insert.
to learn how to adjust blade alignment.
Brake Cartridge
Your compact table saw came with a brake cartridge
designed to work with a regular 10" blade (
). The brake cartridge contains no serviceable
parts—never open the housing of the brake cartridge.
Replace the brake cartridge as a unit, as necessary.
!
!
A
B
C
E
D
!
SawStop
®
Compact Table Saw
|
37


