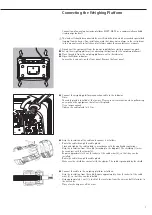


– Screw the wires tightly into the clamps
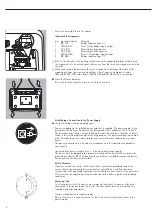
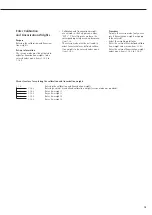
Indicator Pin Assignment:
No.
Signal description
Meaning
1
BR_POS
Bridge supply voltage (+)
2
SENSE_POS
Sense (+) for bridge supply voltage
3
OUT_POS
Measuring voltage positive
4
OUT_NEG
Measuring voltage negative
5
SENSE_NEG
Sense (-) for bridge supply voltage
6
BR_NEG
Bridge supply voltage (–)
!
Refer to the data sheet or operating instructions of the weighing platform for details on
the assignment of wire colors/signals. Ensure any lines that are not assigned are insulated
correctly.
!
When connecting a load receptor that uses 4-conductor technology (the cable of the
weighing platform to be connected only has 4 lines), connect clamp pairs 1 and 2
(BR_ and SENSE_POS), and 5 and 6 (SENSE_NEG and BR_NEG) with a wire jumper.
§
Close the Midrics indicator:
Re-attach the front panel and secure it with the 4 cap nuts
Establishing a Connection to the Power Supply
§
Check the voltage rating and plug design.
$
Power is supplied via the installed power cord that is supplied. The power supply is inte-
grated into the indicator. The device can be operated with a voltage of 100 V to 240 V.
The printed voltage rating (see type label) must match the voltage in the place of instal-
lation. If the stated supply voltage or the plug design of the power cord does not comply
with the standard you use, please inform your nearest Sartorius representative or your
dealer.
The power connection must be made in accordance with the regulations applicable in
your country.
Connecting the device, rated to Class 1, to power supply (mains supply):
The device must be plugged into a properly installed wall outlet which has a protective
grounding conductor (PE). The power plug or a different, suitable disconnecting device
for the power must be easily accessible.
Safety Measures
If you use an electrical outlet that does not have a protective grounding conductor,
ensure that an equivalent protective conductor is installed by a certified electrician
(as specified in the applicable regulations for installation in your country). The protective
effect must not be negated by using an extension cord without a protective grounding
conductor.
Warm-up Time
To return precise results, the device must warm up for at least 30 minutes after initial
connection to the power supply. Only after this time will the device have reached the
required operating temperature.
Using a verified device in legal metrology:
$
Ensure that there is a warm-up time of at least 6 hours after initial connection to the
power supply.
8
Содержание Midrics 1
Страница 1: ...Operating Instructions Sartorius Midrics 1 Midrics 2 Models MIS1 MIS2 Indicators 98648 014 89 ...
Страница 92: ...92 Dimensions Scale Drawings All dimensions given in millimeters 92 ...
Страница 97: ...97 C ...
Страница 98: ...98 ...
Страница 99: ...99 ...
Страница 100: ...100 ...
Страница 101: ...101 ...
Страница 102: ...102 ...
Страница 104: ...104 ...


