background image

Sapido Technology Inc.                                                                    

www.sapido.com.tw


53 


8.1.3


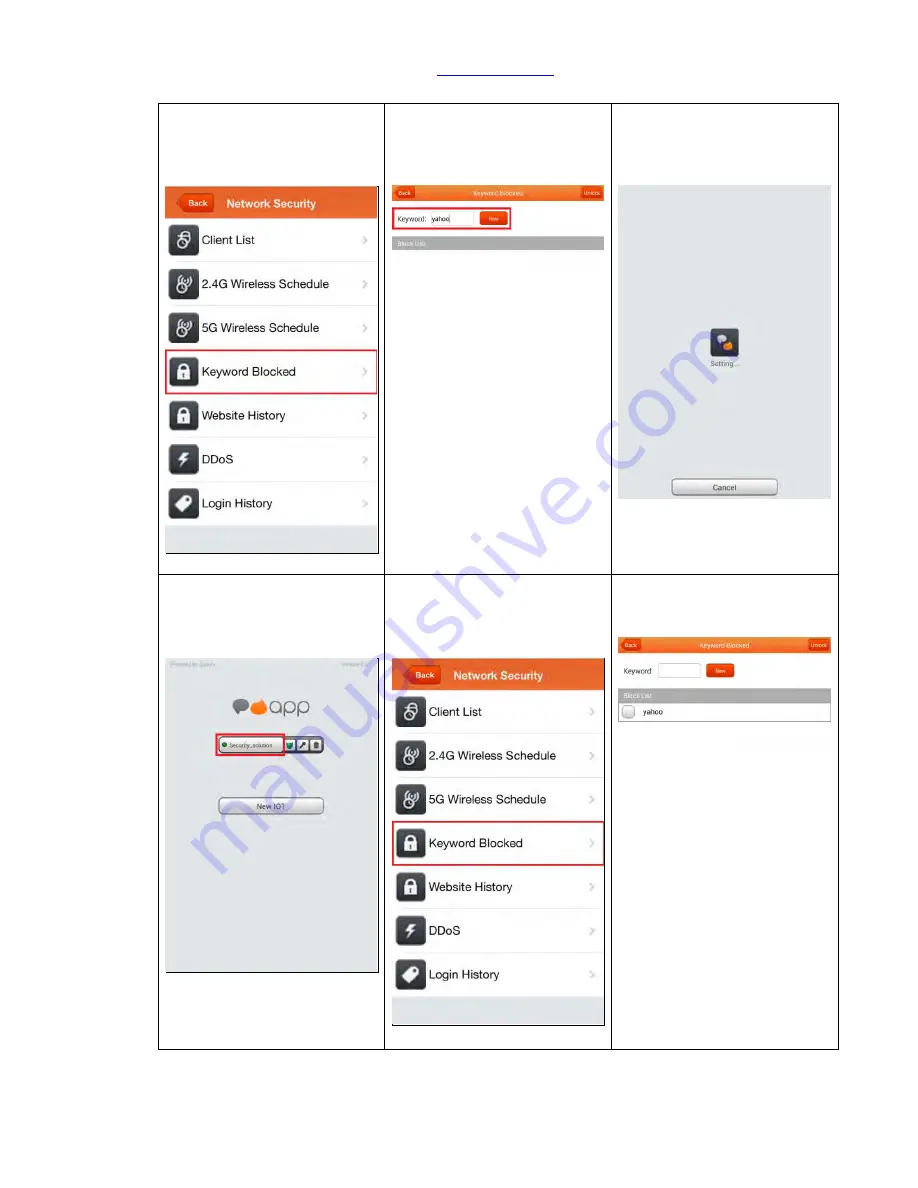
Keyword Blocked 

Step 1. Click <Keyword 
Blocked> 


Step 2. Enter the key word for 
blocking, such as: Yahoo, and 
click <New> 


Step 3. Under connecting, 
please wait... 


Step 4. The system will 
automatically logout and login 
to finish the setting 


Step 5. Click <Network 
Security> -> <Keyword Blocked>


Step 6. You can view the key 
word under the Block List on 
the Keyword Blocked page.


Содержание DDLA0z

Страница 1: ... Kit Product Introduction The Smart Cloud Sensor Kit has an easy installation system via internet connection with Sapido APP downloaded to a smartphone With the immediate notification message from the system during an emergency you will enjoy not only the home safety but also company security all in one ...

Страница 2: ...ce is not around the same place as security kit 40 7 Advanced Settings of Security System 41 7 1 How to mute the alarm and the message notification 41 7 1 1 ZigBee Cloud Motion Sensor MDKA0z 41 7 1 2 ZigBee Door Window Sensor DDLA0z 42 7 2 How to change the security alarm sound 43 7 2 1 ZigBee Cloud Motion Sensor MDKA0z 43 7 2 2 ZigBee Door Window Sensor DDLA0z 45 8 System Management 47 8 1 Networ...

Страница 3: ...ensor device or cloud security instruction 72 9 1 Set up a new Door Window Sensor DDLA0z 72 9 2 Add New IP Camera 74 10 How to connect security system to the existing Sapido devices at your home 77 10 1 Wired network connecting Transfer to wireless network mode 77 10 2 Wireless network connecting Transfer to Wireless network mode 84 11 Q A 90 ...

Страница 4: ...e Power on is being applied on the device After 30 seconds the LED light will be green Green Wireless network is connected properly ZigBee LED Green Steady Security system working properly Flashing Alarm Door Window sensors and motion detector are mapping the connection Wireless Status Green Wi Fi signal normal WPS Status Orange Wi Fi signal extending Green Wi Fi signal extended successfully ...

Страница 5: ... Cloud Motion Sensor MDKA0z Product Guide light Light Color Statue Instruction DDLA0z ZigBee Red Connecting with WDG71n Green Connected with WDG71n successfully Orange Low Battery MDKA0z ZigBee Red Connecting with WDG71n Green Connected with WDG71n successfully Orange Low Battery ...

Страница 6: ...turn on off alarm manually Network Mode Switch Please switch to the R mode while the RJ45 cable is connecting to the xDSL modem and WDG71n Please switch to A mode while RJ45 cable is connecting to Sapido router and WDG71n Please switch to the W mode while connecting to Wi Fi network by Sapido router Please switch to the R mode while connecting to the network by other brand routers Reset Button Pre...

Страница 7: ...otion Sensor MDKA0z and Cloud Door Window Sensor DDLA0z Product Button Statue Instruction DDLA0z Power Button ON Power On OFF Power Off ZigBee LED ZigBee signal connecting MDKA0z Power Button ON Power On OFF Power Off ZigBee LED ZigBee signal connecting ...

Страница 8: ... turn on when ZigBee light and all LED lights turn green after 30 seconds The alarm WDG71n can not only deter the intruders by alert sound but also warn the owner about any unusual circumstances are happening For example the door and window to which are attached Cloud Door Window Sensors were opened by intruders or the Cloud Motion Sensor detected intruders Step 2 Please open the lid of the Cloud ...

Страница 9: ...ease turn on the power When the ZigBee light is blinking which means the DDLA0z is mapping with alarm WDG71n Once the Window is opened the alarm will start to have the alert sound Step 5 Please open the lid of the Cloud Motion Sensor MDKA0z and insert 2 x AAA batteries Before close the lid switch the power to ON Step 6 When the left light ZigBee of MDKA0z is blinking means the MDKA0z is connecting...

Страница 10: ...gy Inc www sapido com tw 10 Step 8 Open the window which has installed with Window Door Sensor DDLA0z to trigger the alarm WDG71n Please press the ZigBee button to turn off the alarm manually on Security Alarm WDG71n ...

Страница 11: ...Store to search and download Sapido APP Step 2 Click and type into key word Sapido for search Step 3 Click Install to download APP Step 4 After completing the installation you can find Sapido APP icon in your smartphone desktop Step 5 Go to Settings Step 6 Switch the Wi Fi signal to ON and search for Security Alarm WDG71n WiFi signal ...

Страница 12: ...twork domain security please click Change Password and enter the new password Then click New IOT to finish the process Now you have to enter your new password to access the domain security IOT name of Security You can give your IOT Name in the blank Device Name The Device name will show up automatically doesn t need to change User name of Domain The account will show up automatically doesn t need ...

Страница 13: ... devices are built up as below WDG71n DDLA0z MDKA0z shows the battery status Step 14 You can rename the name of device in IOT Setting Please select the Security Alarm router WDG71n first then click Rename Step 15 After entering the new name please click Apply then it will show the new name Step 16 The alarm WDG71n had been changed to the new name ...

Страница 14: ...name please click Apply then it will show the new name Step 19 The Cloud Door Window Sensor DDLA0z_xxx had been changed to the new name Step 20 To rename the Cloud Motion Sensor Choose the Cloud Motion Sensor DDLA0z_xxx in IOT Setting first then click Rename Step 21 After entering the new name please click Apply then it will show the new name Step 22 The Cloud Motion Sensor had been changed to the...

Страница 15: ...the security system Security System Arm Once you are sleeping or go out please set the shield as green which represents the security system is working Alarm Triggered When the security system was triggered the shield will turn red Click the shield from red to green to turn off the alert sound and stay security mode Security System Disarm To click the shield to turn gray represents turn off the sec...

Страница 16: ...e Ethernet cable to WDG71n s WAN LAN port and switch to R mode while Ethernet cable is connecting to the xDSL modem and WDG71 modem mode Step 2 Log in APP and click Internet Settings and then your internet network will be automatically detected Step 3 Please enter your ISP account and password and select WPA2 as the encryption mode at lease 8 included digital characters and finally click Apply Ple...

Страница 17: ...DG71n Step 7 Back to the Sapido APP again you will see the new name of domain that you just setup Step 8 The instruction of the symbols from the main page Guide light Light Statue Instruction 1 The lights of device of the domain Green Domain and network is connected Gray Domain and network is disconnected Red Event alert 2 The light symbols of the Cloud Security Green Security System Arm Gray Secu...

Страница 18: ...l the situation by self via Sapido APP Click the push notification to enter the APP main page you will see the shield is red and the event alert will show up in front of the network name Meanwhile you can enter the Message to obtain the detail of event Ex 2nd Floor Window is opened and turn off the alert at the same time When everything settle down turn off the alarm and the security system is sti...

Страница 19: ... already Once it detects abnormal situation the alarm system will be activated Default of Door Window Sensor Step 1 Click Security Step 2 Click Door Window Sensor Step 3 Select your specific Door Window Sensor Step 4 You can see the message and alert are selected already means that WDG71n will send you an alert message and make alert at the same time ...

Страница 20: ...2 You will see the event alert and the shield will turn red To mute the alarm just click the shield to return to green The 2nd method to turn off the alarm The 3rd method to turn off the alarm Step 3 Click Message to understand the situation immediately It will show the event list included the event date and time To understand more about event s detail please select the event Step 1 The event list...

Страница 21: ... com tw 21 Step 3 Click the silence sign to mute the alarm Step 4 After disarming the shield will turn back to green Also the event alert will turn to the green dote which means that the alert is turn off but the security keep working ...

Страница 22: ...ert already Once it detects abnormal situation the alarm system will be activated Default of Cloud Motion Sensor MDKA0z Step 1 Click Security Step 2 Click Motion Sensor Step 3 Select your specific Cloud Motion Sensor Step 4 You can see the message and alert are selected already means that WDG71n will send you an alert message and make alert at the same time ...

Страница 23: ...nd method to turn off the alarm If the alarm is triggered and you are at home you can press the ZigBee button of the alarm WDG71n to mute the alarm Step 1 You will receive the push notification as the photo below Please click the push notification and enter to the security system in APP Step 2 You will see the event alert and the shield will turn red To mute the alarm just click the shield to retu...

Страница 24: ... is sorted by date and time If you enter the event to view the details while the shield is red Please select the event again to view the page with more detail Step 2 The event list is sorted by date and time You can turn off the alert when you reenter the event again to view the page with more detail Step 3 Click the silence sign to mute the alarm Step 4 After disarming the shield will turn back t...

Страница 25: ...ty Alarm WDG71n will send you an alert message to tell you the emergency immediately In addition you can control the situation by self via Sapido APP Click the push notification to enter the APP main page you will see the shield is red and the event alert will show up in front of the network name Meanwhile you can enter the Cloud Message to obtain the detail of event Ex Unusual temperature in kitc...

Страница 26: ...d volume dB level will show on the right of the Sound Sensor page Step 4 Please click Warning Device Step 5 When it detects the abnormal sound in the space you will receive an alert message on your phone Meanwhile the alarm system will activate Please choose Notification Message and Sensor Alarm Step 6 For setting up the condition of the alarm trigger please click Sensor Alarm Device shown below i...

Страница 27: ... a time Step 8 The preinstall alarm setting is continuity alarm means that the alarm will touch off when the intensity reaches the level of indoor maximum limit Sirens will continue beeping until you turn off the alarm manually If you want to change the setting to Define Alarm Sounds then you can adjust alarm sounding time under any abnormal movement such as 1 second 2 seconds 5 minutes etc ...

Страница 28: ...he alarm WDG71n triggers alarm The 1st method to turn off the alarm The 2nd method to turn off the alarm If the alarm is triggered and you are at home you can press the ZigBee button of the alarm WDG71n to mute the alarm Step 1 Open the Sapido APP you can enter Message to view the situation immediately Step 2 The event list is sorted by date and time If you enter the event to view the details whil...

Страница 29: ... method to turn off the alarm Step 3 Click the silence sign to mute the alarm Step 4 After disarming the shield will turn back to green Also the event alert will turn to the green dote which means that the alert turned off but the security keep working ...

Страница 30: ...current in room temperature The preinstall measurement setting is Celsius Step4 Click the Sensor Device Step5 Select the Notification Message and Sensor Alarm options you will receive a push notification on your phone and the alarm will make beeping sound when the temperature is in an abnormal situation Step 6 For setting up the condition of the alarm trigger by the limit of trigger temperature pl...

Страница 31: ... a time Step 8 The preinstall setting of Sensor Alarm is continuity alarm means that the alarm will touch off when the intensity reaches the level of indoor maximum limit Sirens will continue beeping until you turn off the alarm manually If you want to change the setting to Define Alarm Sounds then you can adjust alarm sounding time under any abnormal movement such as 1 second 2 seconds 5 minutes ...

Страница 32: ...arm when the Security Alarm Router WDG71n triggers alarm The 1st method to turn off the alarm The 2nd method to turn off the alarm If the alarm is triggered and you are at home you can press the ZigBee button of the alarm WDG71n to mute the alarm Step 1 Open the Sapido APP you can enter Message to view the situation immediately Step 2 The event list is sorted by date and time You can turn off the ...

Страница 33: ... method to turn off the alarm Step 3 Click the silence sign to mute the alarm Step 4 After disarming the shield will turn back to green Also the event alert will turn to the green dote which means that the alert turned off but the security keep working ...

Страница 34: ...t in room brightness Step4 Click the Siren Device Step5 Select the push notification and Sensor Alarm options you will receive a push notification on your phone and the alarm will make beeping sound when the temperature is in an abnormal situation Step 6 For setting up the condition of the alarm trigger please click Sirens Device shown below in red frame ...

Страница 35: ...p 8 The preinstall setting of Sensor Alarm is continuity sounds means that the alarm will touch off when the intensity reaches the level of indoor maximum limit Sirens will continue beeping until you turn off the alarm manually If you want to change the setting to Define Alarm Sounds then you can adjust alarm sounding time under any abnormal movement such as 1 second 2 seconds 5 minutes etc ...

Страница 36: ...arm when the Security Alarm Router WDG71n triggers alarm The 1st method to turn off the alarm The 2nd method to turn off the alarm If the alarm is triggered and you are at home you can press the ZigBee button of the alarm WDG71n to mute the alarm Step 1 Open the Sapido APP you can press Message to view the situation immediately Step 2 The event list is sorted by date and time You can turn off the ...

Страница 37: ... method to turn off the alarm Step 3 Click the silence sign to mute the alarm Step 4 After disarming the shield will turn back to green Also the event alert will turn to the green dote which means that the alert turned off but the security keep working ...

Страница 38: ...device is around the same place as security kit Step 1 Go to Settings Step 2 Switch on Wi Fi of new device for search Step 3 Select WiFi signal of Security Alarm WDG71n to connect Step 4 Type in the Security Password set by network creator and click Connect Step 5 Click Play Store and search Sapido APP or Sapido Step 6 Click Install ...

Страница 39: ...istrator in column and click New IOT to log in Step 10 Connecting please await Step 11 Once log in is success handheld device could access the security system see below picture The device can control the security system and receive push notification anytime and everywhere once it is connected to internet Step 12 Click Back and return to home page and then you can see the network nickname set by th...

Страница 40: ...PP Open the Sapido APP Step 2 Click New IOT Step 3 Device Name The Device name will show up automatically doesn t need to change User name of Domain The account will show up automatically doesn t need to change Password of Domain Need to enter the default password admin Step 4 The network is under connecting please wait Step 5 Log in successfully you can see the security system is built up Step 6 ...

Страница 41: ...sage Below are the steps of how to cancel those functions 7 1 1 ZigBee Cloud Motion Sensor MDKA0z Step 1 Click Security Step 2 Click Motion Sensor Step 3 Enter the alarm system to the setting page Step 4 Cancel the Notification Message Once detected someone s movement you will not receive the push notification but alarm keeps working Step 5 Cancel the Sensor Alarm Once detected someone s movement ...

Страница 42: ...ge Once detected the door is opened you will not receive the push notification but alarm keesp working Step 5 Cancel the Sensor Alarm Once detected the door is opened alarm will not make the beeping sound but you will receive the push notification Step 6 Cancel both Notification Message Sensor Alarm Once detected the door is opened you will not receive any message notification and the alarm will n...

Страница 43: ...Sensor MDKA0z Step 1 Click Security Step 2 Click Motion Sensor Step 3 Enter the alarm system to the setting page Step 4 Select the Sensor Alarm to the setting page shown below in red frame Step 5 Enter Sensor Alarm to adjust the system Step 6 Choose one of the options as you like to set up the alarm type and time ...

Страница 44: ...Inc www sapido com tw 44 Step 7 There are 5 types of different selectable beep length of Siren When settle down alarm sounds and siren please press Done at the top right of the page to return to the sensing feature page ...

Страница 45: ...k Security Step 2 Click Door Window Sensor Step 3 Enter the alarm system to the setting page Step 4 Select the Sensor Alarm to the setting page shown below in red frame Step 5 Enter the Sensor Alarm to adjust the system Step 6 Choose one the options as you like to set up the alarm type and time ...

Страница 46: ...Inc www sapido com tw 46 Step 7 There are 5 types of different selectable beep length of Sirens When settle down alarm sounds and siren please press Done at the top right of the page to return to the sensing feature page ...

Страница 47: ... you can remote log in and check the situation from network attack 8 1 1 Client List Step 1 Click Network Security Step 2 Click Client List Step 3 The is for block or adjust the time of surfing the internet To do so the time you set up cannot surf the internet Step 4 Select the limit time from Start to the End in 24 hour time system Then select dates and Apply Step 5 Under connecting please wait S...

Страница 48: ...st Step 9 The is turning grey and ON sign appeared represents that the block system is on Step 10 If you don t want to block the network in specific device please switch to OFF Step 11 Select Sure after setting the system will set up the schedule for blocking Step 12 Under connecting please wait ...

Страница 49: ... finish the setting Step 14 Click Network Security Step 15 Click Client List Step 16 The is turning grey and ON sign appeared represents that the block system on Step 17 To cancel the block system please switch to OFF Step 18 Select Apply after setting the system will cancel the schedule for blocking ...

Страница 50: ...Under connecting please wait Step 20 The system will automatically logout and login to finish the setting Step 21 Click Network Security Step 22 Click Client List Step 23 The is turning grey and OFF sign appeared represents that the block system is OFF ...

Страница 51: ...ick New on the right top and enter the Internet Time Setting page Step 3 Select the limit time from Start to the End in 24 hour time system Then select dates and Save Step 4 Under connecting please wait Step 5 The system will automatically logout and login to finish the setting Step 6 Click Network Security ...

Страница 52: ...Sapido Technology Inc www sapido com tw 52 Step 7 Click Wireless Schedule Step 8 You can view the wireless status on the page of Internet Time Setting and do the Edit or Delete ...

Страница 53: ...2 Enter the key word for blocking such as Yahoo and click New Step 3 Under connecting please wait Step 4 The system will automatically logout and login to finish the setting Step 5 Click Network Security Keyword Blocked Step 6 You can view the key word under the Block List on the Keyword Blocked page ...

Страница 54: ...rd under the list and click Unlock Step 8 Under connecting please wait Step 9 The system will automatically logout and login to finish the setting Step 10 Click Network Security Step 11 Click Keyword Blocked Step 12 You can view the key word under the Block List on the Keyword Blocked page is disappeared ...

Страница 55: ...ter Website History page and select the device you want to viewing Step 3 Before viewing the website history under the list select one of the websites and click Preview Step 4 Do the website filter before viewing To finish the viewing click Back Step 5 Select one of the websites and click Block to block the website that you choose Step 6 Under connecting please wait ...

Страница 56: ...n to finish the setting Step 8 Click Network Security Step 9 Click Website History Step 10 You can view the website under the Block List on the Website History page Step 11 To cancel the website blocked please select the website under the list and click Unlock Step 12 Under connecting please wait ...

Страница 57: ...w 57 Step 13 The system will automatically logout and login to finish the setting Step 14 Click Network Security Step 15 Click Website History Step 16 You can view the website under the Block List on the Website History page is disappeared ...

Страница 58: ...3 You can view the attact type situation and time when your network is attracted If there is no information shown under the list means that your network is safe so far 8 1 6 Login History Step 1 Click Network Security Step 2 Click Login History Step 3 You can view the APP device s IP location date and time that you used to log in before ...

Страница 59: ...1 Click Download List will lead you to the Download List page Step 2 The file downloaded by Sapido APP will sort by file format JPG MP3 AVI EXE automatically categories and save the Videos Music Pictures and Document EX JPG file format will save to Pictures file automatically There is nothing in the file if you didn t download anything from Sapido APP before Step 3 Camera Roll My Files and Camera ...

Страница 60: ...el and Power Point that cannot be browsing without downloaded relating Office APP or PDF from Play Store EX Polaris Office Step 1 Click Camera Roll Step 2 Select the photo for browsing Step 3 Photo browsing Click Back to go back to the front page Step 4 You can portrait orientation for browsing photo in different direction and click Back to go back to the front page Step 5 Return to Download List ...

Страница 61: ...watch Step 8 During video play click Exit to stop and return to the previous page Step 9 Rotate the smartphone or tablet to enlarge the screen click Back to stop and return to the previous page If functional key is hidden after rotating it will be again appeared after rotate it back Step 10 Return to Download List page and click Music ...

Страница 62: ... functional bar Click Exit to stop and return to the previous page Step 12 Please again select the file your want to browse Step 13 Before document open your smartphone will ask which APP you want to apply for browse Please select APP and click Only Once If you want to always browse via this APP please click Always Step 14 Document browsing ...

Страница 63: ...lick Edit on top right corner Step 2 You will find the rename key and edit functional key appeared on the right and bottom side of page Step 3 Click the function key in the right hand side to rename the file Step 4 Enter new name and click Apply to confirm Step 5 Rename succeeded new name has been shown in checklist ...

Страница 64: ... 2 Function keys of Rename and Edit will appear in the right hand side and in the bottom cut copy paste folder and delete Step 3 You can do the file and data edit here please select the files you want to sort and click Cut Step 1 Step 4 Click Folder Step 5 Enter the name of new folder and click Apply to confirm Step 6 Select the new added folder ...

Страница 65: ...lick Done to end the edit or click Back to continue other file edit Step 9 Return to the previous page and continue other edit Please select the file you want to copy and click below Copy Step 10 Copy the selected file to any folder of Download List or click Folder to add new folder Step 11 Enter the new folder and click Paste to paste your photos you have selected Step 12 Click Back to the front ...

Страница 66: ...e other file edit Select the files you want to delete and click Delete in below function key Step 14 Again confirm whether to delete the file or not click Apply to confirm the delete Step 15 File delete succeeded To end the edit click Done on the top right corner Step 16 End up your editing ...

Страница 67: ...cted the light indicator will become gray Please select the network Step 2 Connecting please await Step 3 Please click Offline Browse Step 4 After access the download list you can browse the video and music etc or click Edit on the top right corner to edit files Step 5 Edit function key cut copy paste folder and delete will appear in bottom side of page Refer to 8 2 3 File Edit for detail operatin...

Страница 68: ...new name for your security system Please operate in the IOT Settings page The IOT Settings page offers several functions like rename and the symbols of Graphic User Interface GUI security sensor update and PC management You can view the detail of all the wireless devices and ZigBee s CS101x number name and battery ...

Страница 69: ...it and complete the updating Step 2 Click Sure before double check Step 3 Under connecting Do not turn off or log out Step 4 You will see Sensor Alarm Router WDG71n lights on green after updating Step 5 Then press the ZigBee button on both Motion Sensor MDKA0z and Door Window Sensor DDLA0z separately once about 1 sec to make them connect to the Sensor Alarm Router WDG71n ...

Страница 70: ...Sapido Technology Inc www sapido com tw 70 Step 6 Enter Sapido APP then log in your security network Step 7 Click IoT Settings Step 8 Congratulations The latest firmware version is successfully upgraded ...

Страница 71: ... viewing firmware version today s date time time of power on and network status Also it can setup VPN SSID and so on Step 1 Select one of the sensors then click GUI on the top right corner Step 2 Enter the page of GUI You will see the page as same as when you viewing from computer Step 3 You can arrange the screen for easier watching ...

Страница 72: ... your place more secure Below are the steps of make connection of all of your sensors at home Step 1 Please open the lid of the Door Window Sensor DDLA0z and insert 2 x AAA batteries Before close the lid switch the power to ON Step 2 Get started to connect WDG71n and ZigBee Press the ZigBee button on both Sensor Alarm Router WDG71n and Door Window Sensor DDLA0z separately once about 1 sec When the...

Страница 73: ...hen click IOT Settings Step 4 You will see the new DDLA0z under the page of IOT Settings Step 5 Please select the new DDLA0z then click Rename Step 6 Enter the new name and click Apply for easier manage events in the future Step 7 Under connecting Please wait Step 8 Complete DDLA0z setting with new name ...

Страница 74: ...efore you will have a new camera and updating security system Step 1 Please switch to the W mode that located at the back side of IPJC2n while connecting to Wi Fi network by Sapido router Wait for about 30 seconds for starting up Step 2 Get started to make the WPS wireless Wi Fi connection of Sensor Alarm Router WDG71n Please press the WPS button on both Sensor Alarm Router WDG71n and IPJC2n separ...

Страница 75: ...Settings Step 4 You can see the new IPJC2n device is already under the list it means it is added in your network Step 5 Select IPJC2n then click Rename Step 6 Enter the new name and click Apply then complete rename the new IPJC2n device Step 7 Under connecting Please wait Step 8 Complete IPJC2n setting with new name ...

Страница 76: ...e and click Camera for real time monitoring from your phone Step 10 Camera ten functions available below Step 11 Please go back to the home page and click Security and Sensor you will find the camera To understand more about Sapido IPJC2n please reference IPJC2n user manual ...

Страница 77: ...ireless to connect Sensor Alarm Router WDG71n to other Sapido devices at your home 10 1 Wired network connecting Transfer to wireless network mode Step 1 Use the Ethernet Cable to hook up Sapido router and Sensor Router WDG71n and switch to the A mode Plug in To install Sensor Alarm Router WDG71n and Door Window Sensor DDLA0z please reference 1 2 Hardware Installation instruction ...

Страница 78: ...l turn on Step 3 Then press the ZigBee button on both Motion Sensor MDKA0z and Door Window Sensor DDLA0z separately once about 1 sec to make them connect to the Sensor Alarm Router WDG71n Step 4 Open the Settings page on your phone Step 5 Turn on Wi Fi and search the signal of your sensor Step 6 Get on Wi Fi from either Sensor Alarm Router WDG71n or other Sapido routers ...

Страница 79: ...please click Change Password and enter the new password Then click New IOT to finish the process Now you have to enter your new password to access the domain security IOT name of Domain You can give your IOT Name in the blank Device Name The Device name will show up automatically doesn t need to change User name of Domain The account will show up automatically doesn t need to change Password of Do...

Страница 80: ... will see all the Sapido routers and devices under connecting after enter the page of IOT Settings You can rename them Later on you will see all the devices with new name and battery status Step 13 Rename the router Select the router and click Rename Step 14 Enter the new name and click Apply then complete rename the router Step 15 The routers complete setting with new name ...

Страница 81: ...d click Apply then complete rename the controller Step 18 Complete the Sensor Alarm Router WDG71n setting with new name Step 19 Rename the Door Window Sensor Select the Door Window Sensor and click Rename Step 20 Enter the new name and click Apply then complete rename the Door Window Sensor Step 21 Complete the Door Window Sensor DDLA0z setting with new name ...

Страница 82: ... setting with new name Security System finish set up already Step 25 After rename all devices please set up Wi Fi password to protect your network for Sensor Alarm Router WDG71n Select the sensor and click GUI on the top right Step 26 You will see IOT Network of the router Please select the type of encryption to WPA2 and enter the new password at least 8 characters numbers click Apply You can arra...

Страница 83: ...stem Arm Once you are sleeping or go out please set the shield as green which represents the security system is working Alarm Triggered When the security system was triggered the shield will turn red Click the shield from red to green to turn off the alert sound and stay security mode Security System Disarm To click the shield to turn gray represents turn off the security system ...

Страница 84: ... W mode Wi Fi mode and plug in WAN LAN light will turn red to green while starting up After 30 seconds both ZigBee lights and Wireless lights will turn on Step 2 Then press the ZigBee button on both Motion Sensor MDKA0z and Door Window Sensor DDLA0z separately once about 1 sec to make them connect to the Sensor Alarm Router WDG71n ...

Страница 85: ...parately When both of the lights stop blinking it means the connection and encryption are completed To understand more about Motion Sensor MDKA0z and Door Window Sensor DDLA0z follow the 1 2 section of Hardware Installation instruction Step 4 Open the Settings page on your phone Step 5 Turn on Wi Fi and search the signal of your sensor Step 6 Get on Wifi from either Sensor Alarm Router WDG71n or o...

Страница 86: ...lease click Change Password and enter the new password Then click New IOT to finish the process Now you have to enter your new password to access the domain security IOT name of Domain You can give your IOT Name in the blank Device Name The Device name will show up automatically doesn t need to change User name of Domain The account will show up automatically doesn t need to change Password of Dom...

Страница 87: ...will see all the Sapido routers and devices under connecting after enter the page of IOT Settings You can rename them Later on you will see all the devices with new name and battery status Step 12 Rename the router Select the router and click Rename Step 13 Enter the new name and click Apply then complete rename the router Step 14 Complete the routers setting with new name ...

Страница 88: ...d click Apply then complete rename the controller Step 17 The Sensor Alarm Router WDG71n complete setting with new name Step 18 Rename the Door Window Sensor Select the Door Window Sensor and click Rename Step 19 Enter the new name and click Apply then complete rename the Door Window Sensor Step 20 Complete the Door Window Sensor DDLA0z setting with new name ...

Страница 89: ...cted after this step Step 24 After setting back to the network main page to get started your security system Security System Arm Once you are sleeping or go out please set the shield as green which represents the security system is working Alarm Triggered When the security system was triggered the shield will turn red Click the shield from red to green to turn off the alert sound and stay security...

Страница 90: ...the security system still working while powering cut A3 The Sensor Alarm Router WDG71n has inserted lithium battery and both Motion Sensor MDKA0z and Door Window Sensor DDLA0z have inserted AAA batteries in order to remain the security system working So that when it detects the door is opened the alarm system will still on function However you cannot receive the alert message since there is no pow...

Отзывы: