background image

Connections and Setup

13

Select

OK

OK

Back

Step 3: Software Update

1.   If  the  TV  set  has  connected  to  the  network 

successfully,  it  will  search  for  upgrade  files 
automatically.

2.   Follow  the  guides  on  the  screen  and  press  the 

corresponding  buttons  on  the  remote  control  to 
proceed.

Initial Setup

Initial setup involves selecting all the settings required
to be able to search for and store all the analogue & digital
channels you can receive.
Make sure that the television is switched on and follow
all the steps in turn specified hereafter.  

Note:If  the  channel  search  retrieved  only  the analogue 
channels it could be caused by poor broadcasting  and 
therefore  is  not  coverd  by  manufacturer  w a r r a n t y.  
M a n u f a c t u r e r s   c a n n o t   b e   h e l d  responsible  for 
lack  of  or  poor  broadcasting  in some areas. 

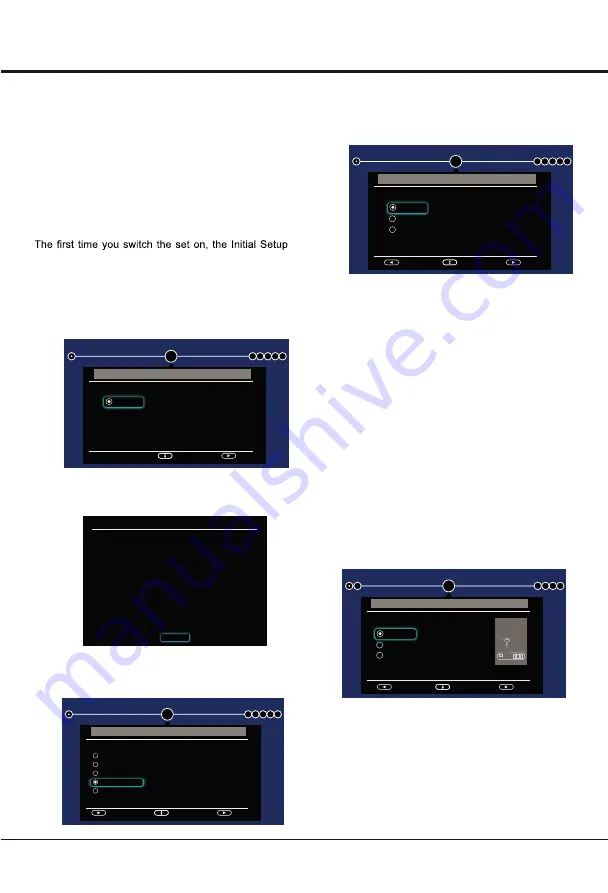
wizard  opens,  which  guides  you  through  the  initial 
setup process. 

Step 1: 

Enviroment

1.   

Press ▲/▼ to select your language, then press 

OK

to enter the next step.


Step 2: Network setup

1.   Press 

▲/▼

  to  select  your  network  connection 

type(Wired or wireless), then press 

OK 

to enter the 

next step.

2.   Follow  the  guides  on  the  screen and  press  the

corresponding  buttons  on  the  remote  control  to
proceed.   


Note: You  can  also  skip  this  step  and  step
3  by selecting "I do not have a network connection",
and  connect  to  the  internet  later.  For  details
please refer to section Network Connection.    


1

Initial Setup

2 3 4 5 6

Please select your language:

Select

Next

English

Environment

Back

Select

Next

Network Setup

Please select your 

network 

connection type:

Wireless

Wired

I do not have a network connection

2

Initial Setup

1

3 4 5 6

1

Initial Setup

2 3 4 5 6

Environment

Back

Select

Next

Please select your location:

Home

Shop

Shop with demo

1

Initial Setup

2 3 4 5 6

Environment

Back

Select

Next

Please select your location:

Home

Shop

Shop with demo

2.   Press 

OK

 to confirm Tems and conditions, then enter 

the next step.


Terms and Conditions

The contents and services 

(

collectively the


“Licensed Application”

)


made available to you through this TV set (this “Device”) are licensed, not

sold,  to you for use only under these terms and conditions. The providers
of the Lisensed Application (each an “Application Provider”) reserve all
rights not expressly granted to you.
  1.Scope of License
   The license granted to you for a Licensed Application by the relevant
Application Provider is limited to a non-transferable license to use the 
Licensed Application on the Device that you own or control.You may not
distribute or make the Licensed Application available over a network 
where it could be used by multiple devices at the same time.You may not
rent, lease, lend, sell, redistribute or sublicense the Licensed Application.
  You acknowledge and agree that all Licensed Application and all
to Application Provider and are accessible through this Device belong
property laws. You may not modify, copy, decompile, reverse engineer,
disassemble, republish, upload, post, transmit, translate, attempt to devive
the sourse code of, create derivative works of, or othervise exploit any

OK

3.   

Press ▲/▼ to select your 

country/region, then press

to enter the next step.

3.   

Press ▲/▼ to select your 

country/region, then press 

OK

to enter the next step.

1

Initial Setup

2 3 4 5 6

Please select your country/region:

Select

Next

Environment

Polynesia
Georgia
Ghana
India
Indonesia

Next

4.   

Press ▲/▼ to select your 

location, then press OK

to enter the next step.

Note:Picture menu settings will not be accessible
when you select Shop Mode. 

Home Mode:

You Would be able to view the standard

settings for Picture and sound modes.

Shop Mode:

You can enjoy enhanced setting for Picture

and Sound modes.

Shop with demo:

Vendor mode, which is used to 

display eSticker.

Содержание XT-32A081H

Страница 1: ... 内页80g书写纸 封面105g铜版纸 1 封面的LOGO尺寸描述及线条 请不要印刷在成品上 2 说明书的功能描述 按客户要求 为准 说明书请以客户确认业务签 名为准 3 32 43型号合订版说明书 4 封面第二页和封底需留空白页 5 在72 D129NT E72Z2基础上修改 APP页 其它不变 SANYO 32D1291 3NT725A2T2D 是 IDX142002B E7 32D129GV IN2 2A INDIA 2019 05 05 邓智玲 32D1291 说明书内容见下页 ...

Страница 2: ...nic Copy of this Manual or much further contents go to product page at our website www sanyoappliance in Thank you for purchasing this Sanyo product Please read these instructions carefully before operating this Product and retain them for future reference The images shown in this manual are for illustrative purposes only 50 mm 16 171 mm XT 43A081F YEA R S ...

Страница 3: ......

Страница 4: ...mote Control Functions 10 Base Installation Buttons on the TV Smart TV Network System 20 Support Chapter 2 Connections and Setup 11 11 Switching off 13 Initial Setup 12 Network Connection Switching on Accessing channels Watching connected devices Volume Using System Settings Power connection and aerial Picture Channel Sound Troubleshooting Safety Precautions 24 25 Specifications Table of Contents ...

Страница 5: ...duct according to the method recommended by the manufacturer This is a safety feature When mounting the product on a wall or ceiling be sure to install the product according to the method recommended by the manufacturer This is a safety feature 3 Introduction 110 240 V 50 60 Hz Sanyo service center Sanyo service center ...

Страница 6: ...ure that you put down a soft cushion or cloth so that your TV is not scratched 2 Fasten and tighten the screws Carefully put in screws and fasten them securely Hanging the TV Set on the Wall Warning This operation requires two people To ensure a safe installation observe the following safety notes Check that the wall can support the weight of the TV set and wall mount assembly Follow the mounting ...

Страница 7: ...00 mm Standard accessories Optional accessories Sanyo service center Sanyo 43 class 200 mm 100 mm Screw specs 32 M4 8 43 M6 12 32 6 mm 43 14 mm Product page HD FHD XT 32A081H LED TV E mail helpline sanyoappliance in Need help Please Call at Toll Free No 1800 419 5088 To obtain a more detailed Electronic Copy of this Manual or much further contents go to product page at our website www sanyoapplian...

Страница 8: ...aler may be able to assist you in obtaining the correct aerial system for your particular area and the accessories required Any matters regarding aerial installation upgrading of existing systems or accessories required and the costs incurred are the responsibility of you the Customer 1 LAN 4 HDMI 2 Sound Out SPDIF ANTENNA HDMI 1 USB 2 0 USB 2 0 R L VIDEO AV IN AUDIO AUDIO OUT 3 2 6 5 7 1 LAN 2 AU...

Страница 9: ...le or USB devices HDMI equipment AV devices VIDEO L AUDIO R AV cable AV IN AUDIO VIDEO Never remove the USB device or turn off the TV while using the USB device The First inserted USB will be regarded as Device C as default and Second inserted USB would be reflected as Device D Note If your device has an HDMI connection we recommend you use that to get the best quality possible If the external dev...

Страница 10: ...8 Introduction Rear of the TV External Equipment SPDIF cable Amplifier with speaker system AUDIO OUT Audio cable ...

Страница 11: ...p down left and right direction buttons Highlights different items in the menu system and adjusts the menu controls OK Confirms your selection Goes to the APP Store homepage APPS Goes to the smart TV homepage HOME Brings up the option menu OPTION Exit the menu and return to the previous menu RETURN In corresponding mode press it to enter the right function as hint Red R button VOL Increases or dec...

Страница 12: ...n Scans up down through the channel list In the menu system they act like the up down direction buttons on the remote and adjust menu controls button 3 Note The location and names of the function buttons and power button on the TV may vary according to TV model Turns the TV on The TV is on press it to display Source Select In some menus press to return to the previous menu long press it for 3 seco...

Страница 13: ...red on the TV will be turned on directly or be in standby Note For some models switch the TV on by pressing the power button If the power indicator lights up the TV set is in standby mode Press the button on the remote control or on the TV set to turn on the TV 2 Connect the power cable FIRST to the television THEN to a mains socket Note If the power cable is connected to the television please onl...

Страница 14: ...or Connecting to a wired network To connect to a wired network 1 Ensure you have An ethernet cable long enough to reach your TV A router or modem with an available Ethernet port A high speed internet connection An Ethernet LAN port on the back of the TV 2 Connect your ethernet cable to the router and to the Ethernet port on the back of the TV 3 Use the Network Settings Connecting to a wireless net...

Страница 15: ...vironment Back Select Next Please select your location Home Shop Shop with demo 2 Press OK to confirm Tems and conditions then enter the next step Terms and Conditions The contents and services collectively the Licensed Application made available to you through this TV set this Device are licensed not sold to you for use only under these terms and conditions The providers of the Lisensed Applicati...

Страница 16: ...uides on the screen and press the corresponding buttons on the remote control to proceed Note To prevent the channel installation process from being interrupted wait for the message indicating that the installation is complete You can also skip this step by selecting I don t want to scan In this case to search and store your channels you may do an automatic channel search by follwing the instructi...

Страница 17: ...f the picture Saturation Adjusts the richness of color Tint Adjusts the balance between the red and green levels Sharpness Adjusts the crispness of the edges in the picture Color temperature Adjusts the color temperature of the picture Use to scroll through the color settings Cool Normal Warm and Custom Auto format Enables disables the aspect ratio selection automatically Screen mode Use to select...

Страница 18: ... Auto can be selected If the current program does not output sound in Auto format only PCM can be selected Otherwise no sound will be output Note The options you may choose depend on the program you are watching If you select PCM and the sound output is ahead of the picture you can select SPDIF delay from the Sound menu and press to adjust the delay time to synchronize the sound with the picture S...

Страница 19: ...put a frequency and then press OK to start search During the process you can press OK to abort halfway and press OK to restart or press to return Channel list Press OK to display channel list EPG Press OK enter Program Guide menu For those functions you might operate them following the directions on screen on digital TV channels Channel organiser You can skip channels sort channels edit channels o...

Страница 20: ...y DNS and Secondary DNS values Use the numeric buttons to enter numbers and the buttons to move Once IP setting is completed press to select OK and press OK to confirm The set will try to connect to the network and inform you about the result Press to return to the Network menu Wireless settings Select MENU Network then select Wireless settings to connect to a wireless network You can set the wire...

Страница 21: ...anual you should set date and time at Date and Time item Highlight Date or Time then use 0 9 buttons to change the date or time Note Time option will not be memorized when turning on the TV next time and the TV s time will start from the default Power on timer Use to select Once Daily or Off If you select Once or Daily you should set a time period after which the TV automatically switches to on at...

Страница 22: ...e update press OK to enter You can update software by USB by network or by channel By USB Enables you to install the latest version of the software from your USB ports if available Select By USB and press OK to enter Follow the on screen instructions to continue your installation By network Enables you to download and install the latest software version from the Internet Make sure to set up a wire...

Страница 23: ...onnection for better accessing of websites watching Videos more Some web pages websites may not be compatible with browser For Ex Login to popular web sites credit card payments etc Wireless Display Mirror your android device onto your Smart TV screen in high definition along with audio Steps 1 Go to your cast function option 2 Search for TV_ 3 Enjoy the seamless experience Note Wireless display c...

Страница 24: ... large size hard disk MP4 etc Suggests using it with power to avoid electric power shortage The parameters of file such as the pixel of picture code rate of audio and video file sampling rate of audio file exceed the limit of the system Multimedia You can also select Media input by selecting input AV button In USB state if no USB device connected the USB interface will be displayed Picture 1 Selec...

Страница 25: ...H 264 1080P 30fps 62 5Mbps Main Profile High Profile Level4 2 MP4 mp4 mov AVI avi MKV mkv VC1 1080P 30fps 40Mbps Advanced Profile Level3 Simple Profile Main Profile MPEG program stream MPG MPEG AVI avi MKV mkv Audio Audio codec Sample rate Channel Bit Rate Container MPEG1 2 Layer1 16KHz 48KHz Up to 2 32Kbps 448Kbps Music MP3 mp3 MPEG1 2 Layer2 16KHz 48KHz Up to 2 8Kbps 384Kbps Music MP3 mp3 MPEG1 2 Lay...

Страница 26: ...r system If the antenna is located in the fringe area of a television signal where the signal is weak the picture may be marred by dots When the signal is extremely weak it may be necessary to install a special antenna to improve the reception Snowy dots and interference resources 1 Lead Pb not over 0 1 by weight 2 Cadmium Cd not over 0 01 by weight 3 Mercury Hg not over 0 1 by weight 4 Hexavalent...

Страница 27: ...O OUT L R RCA PIN Type x 2 HDMI connector x 2 RJ45 x 1 Aerial connector x 1 USB 2 0 TYPE A Connector x 2 DC 5 V MAX 500 mA LAN USB ANTENNA 20W 10 W 10 W VIDEO RCA PIN Type x 1 RCA PIN Type x 2 AUDIO L R PAL B G D K I NTSC AV DVB T T2 HDMI connector x 2 RJ45 x 1 Aerial connector x 1 USB 2 0 TYPE A Connector x 2 DC 5 V MAX 500 mA XT 32A081H XT 43A081F 108 cm 0 5 W 0 5 W 1 049 088 1 366 W x768 H 2 07...

Страница 28: ......

Отзывы: