12
Installation
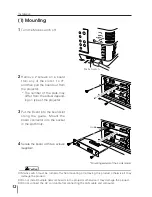
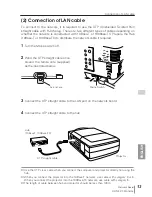
[1] Mounting
1
Turn the Mains switch off.
2
Remove 2 screws on a board
from any of the slots 1 to 4*,
and then pull the board out from
the projector.
* The number of the slots may
differ from the actual depend-
ing on type of the projector.
3
Put the Board into the board slot
along the guide. Mount the
board connector into the socket
in the slot firmly.
4
Secure the board with two screws
(supplied).
✐
Mains switch must be turned off when mounting or removing this product otherwise it may
damage the product.
✐
Do not install multiple network boards into a projector otherwise it may damage the product.
✐
Do not connect the AC cord until after connecting the LAN cable and computer.
Caution
!
WARNING
TEMP.
READ
Y
LAMP
REPLA
CE
LAMP
Guide
Mains Switch
* Mounting example of the 4 slots model.
Содержание Network Board MD13NET
Страница 9: ...Installation 1 9 Network Board OWNER S MANUAL ENGLISH ...
Страница 25: ...Basic Setting and Operation 25 Network Board OWNER S MANUAL ENGLISH 2 ...
Страница 35: ...35 Network Board OWNER S MANUAL ENGLISH Controlling the Projector 3 ...
Страница 55: ...Controlling the Multi Projectors 55 Network Board OWNER S MANUAL ENGLISH 4 ...
Страница 61: ...Use of Serial Port 61 Network Board OWNER S MANUAL ENGLISH 5 ...
Страница 69: ...69 Network Board OWNER S MANUAL ENGLISH Appendix A 6 Connection examples Web browser setting Technical data ...
Страница 83: ...83 Network Board OWNER S MANUAL ENGLISH Appendix B FAQ ...
Страница 91: ...91 Network Board OWNER S MANUAL Appendix ENGLISH ...
Страница 92: ...Network Board Owner s Manual IDFV ...

