background image

plug

l

Make sure that you have fully extended the FM antenna wire.

l

Be  sure  to  connect  the  external AM  loop  antenna  to  the AM ANT  Jack  on  the  back 

panel  if  you  are  planning  to  listen  to  AM  radio  stations  (refer  to  page  15  for 
connection information) .  

l

Make sure you have removed the mylar insulation tab from the remote control.

l

Make sure that the system is connected to an AC outlet that is always “live”.

l

Do not connect the system to an AC outlet controlled by a wall switch.

Auxiliary Input Jack

This system includes an AUX IN Jack to allow you to connect external audio equipment 
and listen to the sound from the external equipment through the speakers of this system.

To listen to the external audio source:


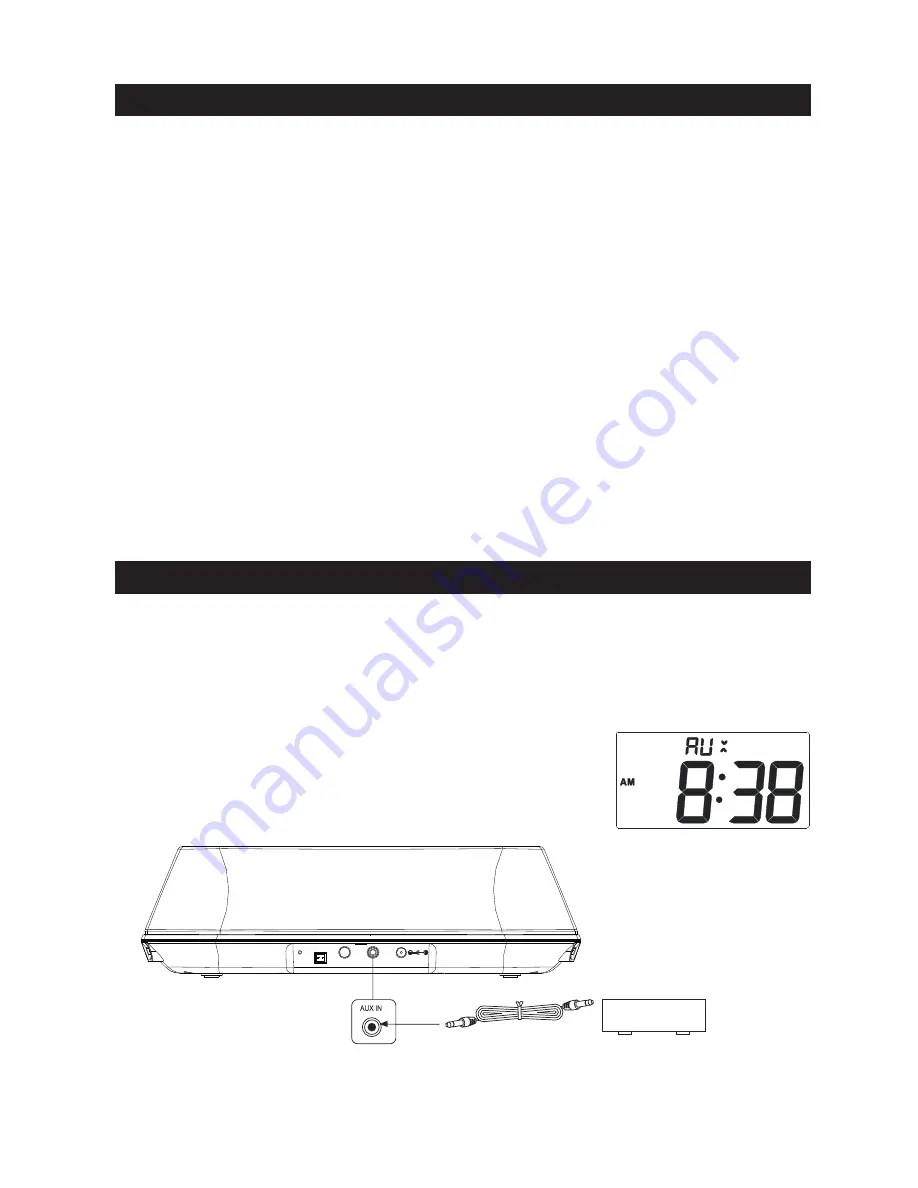
•   Connect the external audio equipment to AUX IN jack on the rear panel of the system 
as  shown below. The connection cable is not included.
Select the 

AUX

 mode by repeatedly pressing the 

MODE

 button

on the top panel or by repeatedly pressing the 

MODE


button on the remote control until the “AUX” indicator appears 
above the time display.

Signal cord(not included)

External audio source

General


Controls

Most of the main functions of this system can be operated by the controls on the top panel of the 
main unit, or by the buttons on the remote control. If a specific function can only be operated by 
the remote control, or by the top panel controls, this will be clearly indicated in the instructions.

When operating this system with the remote control, make sure that the IR (Infrared) transmitter 
on the front of the remote control is pointed at the remote sensor on the front panel of the main 
unit.

The effective operating range of the remote control is approximately 20 feet. Please note that 
bright sunlight or room lighting may interfere with the remote control operation. If the remote 
control is not operating properly, try reducing the brightness of the room or moving closer to the 
main unit. If this does not solve the problem, it may be time to change the remote control battery.

OPERATING INSTRUCTIONS

CONNECTING EXTERNAL DEVICES

10

AUX IN

DC IN 10V

FM ANT

AM ANT

Содержание DMP-P690

Страница 1: ...ne iPod shown are not included Made for iPod and Made for iPhone mean that an electronic accessory has been designed to connect specifically to iPod or iPhone respectively and has been certified by the developer to meet Apple performance standards Apple is not responsible for the operation of this device or its compliance with safety and regulatory standards ...

Страница 2: ...emote control TABLE OF CONTENTS INTRODUCTION 1 INTRODUCTION 1 IMPORTANT SAFETY INSTRUCTIONS 2 PREPARATION FOR USE 4 MAINTENANCE 4 BATTERY BACK UP SYSTEM 5 LOCATION OF CONTROLS INDICATORS 7 REMOTE CONTROL 9 OPERATING INSTRUCTIONS 10 CONNECTING EXTERNAL DEVICES 10 SETTING BASIC OPERATIONS 11 RADIO OPERATION 14 PRESETTING STATIONS IN THE TUNER MEMORY 16 SLEEP TIMER 18 ALARM SETTING 19 iPod iPhone OPE...

Страница 3: ...ventilation should not be impeded by covering the ventilation openings with items such as newspapers table cloths curtains etc Give minimum 100 mm distances around the apparatus for sufficient ventilation To prevent fire or shock hazard do not expose this unit to rain or moisture Do not subject the product to harsh impacts Do not drop the appliance This may result in damage to the product and loss...

Страница 4: ...such as power supply cord of plug is damaged Liquid has been spilled of objects have fallen into the unit the unit has been exposed to rain or moisture or has been dropped does not operate normally Batteries shall not be exposed to excessive heat such as sunshine fire or the like Attention should be drawn to the environmental aspects or battery disposal This product is not intended for commercial ...

Страница 5: ...front panels of the unit but do not remove any labels or stickers from the back or bottom panels To prevent fire or shock hazard disconnect your unit from the main power source when cleaning If the cabinet becomes dusty wipe it with a soft dry cloth Do not use any wax or polish sprays on the cabinet If the cabinet becomes dirty or smudged with fingerprints it may be cleaned with a soft cloth sligh...

Страница 6: ...g the front cabinet surface 2 Open the battery compartment cover as shown in the illustration 3 Insert two fresh AAA UM 4 batteries into the battery compartment We recommend that you use a well known brand of alkaline batteries for longest life and best performance Be sure to follow the polarity markings inside the battery compartment If the batteries are inserted incorrectly the battery back up s...

Страница 7: ...or injury from possible battery leakage 5 Do not try to recharge a battery not intended to be recharged it can overheat and rupture Follow battery manufacturer s directions 6 Battery shall not be exposed to excessive heat such as sunshine fire or the like Using The AC Adaptor Connect the small female plug of the AC adaptor to the DC IN Jack on the back panel Connect the housing of the AC adaptor t...

Страница 8: ... ALM 2 PRESET Control 13 TIME SET MEMORY Control 14 SLEEP Control 15 Remote Sensor 16 PLAY PAUSE Control 17 TUNE SKIP Control 18 Backup Battery Compartment On Bottom Cabinet 19 FM ANTENNA Wire 20 AM ANTENNA Socket 21 AUX IN Jack 22 DC IN Jack 23 iPod Holders 6 inserts 7 23 AUX IN DC IN 10V FM ANT AM ANT 1 2 3 4 5 6 7 8 9 10 11 12 13 14 15 16 17 18 19 20 21 22 STANDBY ON MODE SLEEP SNOOZE DIMMER VO...

Страница 9: ... Indicator TIME AM PM Indicator STEREO Indicator SLEEP SNOOZE Indicator Daylight Savings Time Wake To Indicator iPod Radio Buzzer Alarm 1 2 On Indicator FM AM Indicator AUX Radio Frequency Volume EQ DBBS Indicator LCD DISPLAY Left iPod Indicator Right iPod Indicator ...

Страница 10: ...e controller point the remote control transmitter on the remote control toward the remote control receiver on the front panel of the main unit and press the desired button The effective range of the remote controller is approximately 20 feet Please note that bright sunlight or artificial light may interfere with the proper operation of the remote control Battery Replacement When the remote operati...

Страница 11: ...atedly pressing the MODE button on the remote control until the AUX indicator appears above the time display Signal cord not included External audio source General Controls Most of the main functions of this system can be operated by the controls on the top panel of the main unit or by the buttons on the remote control If a specific function can only be operated by the remote control or by the top...

Страница 12: ...y one hour After a few seconds the number 1 indicator disappears but the DST indicator remains in the display to confirm that the clock is showing Daylight Saving Time 2 At the end of Daylight Saving Time touch and hold the MODE button on the top panel or press and hold the MODE button on the remote control Until the number 0 will briefly appear above the time display The display will back up by o...

Страница 13: ... the correct minute 4 When the correct time appears on the display touch the TIME SET button on the top panel or press the TIME SET button on the remote control once more The display stops flashing and the clock begins to run Setting The Clock When the system is connected to the AC 240V 50Hz Outlet for the first time AM 12 00 will flash on the display Important Do not press the STANDBY ON button t...

Страница 14: ...ound characteristic for the most popular types music Press the EQ button on the remote control to cycle through the following equalization modes The appropriate EQ indicator briefly appears in the display to confirm your selection The system remembers the EQ setting when the power is switched Off and returns to the same setting when the power is switched On again DBBS Dynamic Bass Boost Control On...

Страница 15: ... or up the band for the next strong signal and stop on that station Manual Tuning Repeatedly press the buttons on the remote control or touch the TUNE SKIP buttons on the top panel until the display shows the frequency of the desired station Note Use the Manual Tuning method to tune to stations with weaker signals that may be bypassed during Automatic Tuning 4 If you tuned to a FM stereo station t...

Страница 16: ...y also have to vary the direction of this antenna until you find the position that provides the best reception AM Insert the small black plug at the end of the AM loop antenna wire into the AM ANT jack on the back panel as shown in the illustration FM ANT 15 AUX IN DC IN 10V FM ANT AM ANT To connect the AM loop antenna AM ANT AM ANT ...

Страница 17: ...r selected station has now been entered in Preset Memory 1 2 Tune to the next station that you want to memorize and when that station appears in the display press the TIME SET MEMORY once The P 01 indicator begins flashing Press the PRESET MENU or button on the remote control or touch the ALM1 PRESET or ALM2 PRESET control on the top panel to select a different preset memory number and then press ...

Страница 18: ...ol on the top panel to select the memory number you wish to change When that memory number is flashing in the display press the TIME SET MEMORY button once The new station is entered in the memory and the previously memorized station is erased Important The back up batteries will maintain the preset tuner memories in the event of a power interruption However if the back up batteries are not instal...

Страница 19: ...ill show SLEEP 120 indicating that the sleep timer will shut the power off after 120 minutes Repeatedly press the SLEEP button to decrease the amount of sleep timer operation 4 After a few seconds the Sleep Time display disappears and the normal TUNER display returns but the small SLEEP indicator remains in the display When the Sleep Timer counts down to 00 the unit returns to the Standby Power Of...

Страница 20: ...n the remote control or touch the TUNE SKIP or control on the top panel repeatedly to set the display to the desired wake up minutes 5 Press the ALM 1 button once more to select the wake up Alarm Mode iPod Radio or Buzzer One of the 3 Alarm Mode indicators will be flashing in the display Press the or buttons on the remote control or touch the TUNE SKIP or control on the top panel repeatedly to sel...

Страница 21: ...n This action can be repeated continuously but if you don t press SNOOZE DIMMER button again after one hour the alarm will not turn On again The SNOOZE indicator appears in the display during Snooze Timer operation To switch SNOOZE function off you can press STANDBY ON button During normal operation touch the SNOOZE DIMMER button on the top panel or press the SNOOZE DIMMER button on the remote con...

Страница 22: ...conds before the system recognizes the device and the main menu is displayed This is because the system and the docked device must go through an Authentication Process before the docked device can accept any commands THIS IS NORMAL AND NOT AN INDICATION OF ANY PROBLEM WITH YOUR SYSTEM IMPORTANT NOTES The system is supplied with 6 different iPod adaptor inserts intended to insure that older iPod mo...

Страница 23: ...by mode then turn off While the iPod iPhone is docked in the system it will recharge until fully charged Please note that older 3rd generation iPod cannot be charged by this unit NOTE In order to avoid interfering with the reception the iPod iPhone will not be charged in the TUNER mode FM AM from your iPod iPhone To place a dock adaptor 1 Refer to the compatibility table below and select the corre...

Страница 24: ...he DOCK SELECT TIME SNYC control on the top panel The time on the Clock Radio will be updated to the time set on your iPod or iPhone device NOTE An iPod iPhone cannot sync to exact seconds so it s possible to have up to 59 seconds difference between the Main Unit and synced iPod iPhone iPhone 3G iPhone 3GS iPhone iPod touch 1st 2nd generation iPod Classic iPod nano 1st 2nd 3rd 4th 5th generation 5...

Страница 25: ...e A B C D E F 16GB 16GB 32GB iPhone 8GB 4GB 16GB 8GB 16GB 160GB 120GB 4G 5G nano DOCK ADAPTOR COMPATIBILITY 8GB 3G iPod iPod mini 4G iPod iPod photo iPod nano iPod classic 1G 2G iPod touch 5G iPod 24 A B C D E F 16GB 32GB ...

Страница 26: ... the STANDBY ON button on the top panel or ON button on the remote control to turn the system On 2 If necessary touch the MODE control on the top panel or press the MODE button on the remote control to select the iPod mode The word iPod begins flashing above the time display and the R right iPod indicator appears 3 Make sure that you have inserted the correct adaptor into the right dock DOCK R and...

Страница 27: ...e time you can switch between the two devices by touching the DOCK SELECT control on the top panel or press the DOCK SEL button on the remote control 7 To pause iPod playback touch the control on the top panel or press the button on the remote control Press again to release pause and resume iPod playback 8 To stop iPod playback touch and hold the control on the top panel or depress the button on t...

Страница 28: ...pond no power iPod does not dock properly iPod does not respond to the unit iPod did not charge up AM or FM no sound Function is not set to Tuner Volume at minimum Make sure the dock insert is the proper fit for the iPod Remove the iPod from the dock and check for obstruction on the connections in the dock and on the iPod Then reseat it in the dock Remove the iPod from the dock and check for obstr...

Страница 29: ...nce 5 AUX IN Input Max voltage Impedance AC Adaptor Input AC 100 240V 50 60Hz Output DC 10V 2 4A 2 AAA UM 4 batteries Purchase separately 21W 295mm L x 186mm W x 85mm H Approx 1 5 Kg not including batteries 5W x 2 THD 10 522 KHz to 1620 KHz 9kHz step 87 50 MHz to 108 00 MHz 50 kHz step 8 Ω 2 0 Speaker x2 3 5mm 1 V 47 KΩ Φ TECHNICAL SPECIFICATION 28 Specifications subject to change without notice ...

Страница 30: ...6GB only iPod with video 5th generation 30GB 60GB 80GB only iPod nano 1st generation 1GB 2GB 4GB only iPod nano 2nd generation aluminum 2GB 4GB 8GB only iPod nano 4th 5th generation 8GB 16GB only iPod classic 80GB 160GB only iPod classic 2nd generation 120GB only iPod nano 3rd generation video 4GB 8GB only iPhone 4GB 8GB 16GB only 3G iPhone 8GB 16GB only 3GS iPhone 16GB 32GB only 29 iPod touch 1st...

Страница 31: ...Printed in China CODE NO 116421166 ...

Отзывы: