background image

51

Browsing Your Music

ENG

1

Select a title in the Playlists, and press and hold the SEL button.

Move to Play Options screen.

2

In the Play Options, use the SCROLL UP/SCROLL DOWN buttons to select the
desired play option, and press the SEL button.

Add To Mobile Playlist:

The selected title will be moved to Mobile Playlist.

Cancel:

Go back to the previous screen.

I

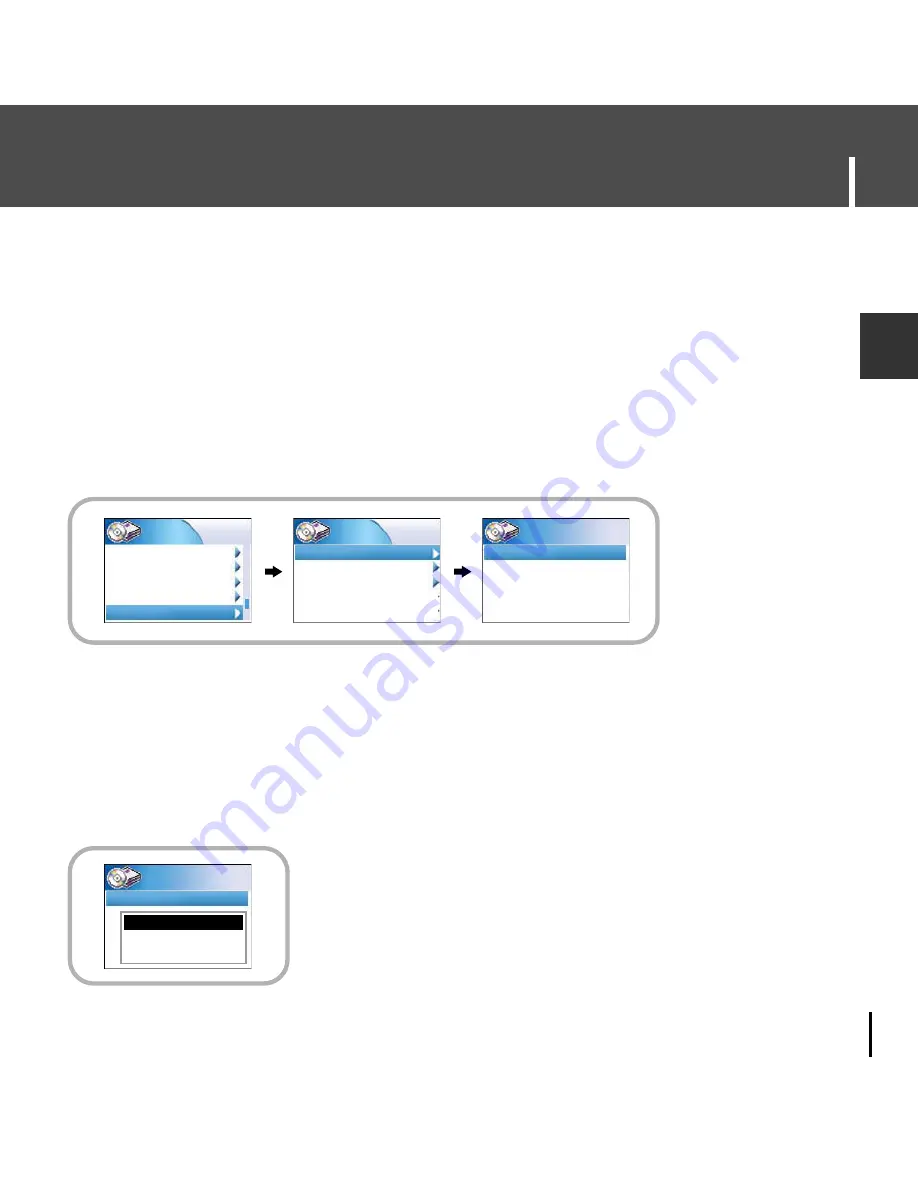
Play Options (Playlists)

1

In the Library, use the SCROLL UP/SCROLL DOWN buttons to select Playlists
and then press the SELECT button.

2

Select the playlist that you want to play, and then press the SEL button.

Saved files will appear in the selected playlist. 

I

Selecting a Playlist

3

Press the SEL button on the desired file.

The selected file will be played.

Artists

Library

Albums
Tracks
Genres

Playlists

Mobile Playlist

Playlists

Line-in Recordings
FM Radio Recordings

Clear tracks

Mobile Playlist

Jack Jhonson-Inaudible

Enya-Braveheart Theme

Enya-Braveheart Theme

Mobile Playlist

Add To Mobile Playlist

Cancel

Содержание YH-925

Страница 1: ...Support MP3 WMA Playback USB Host Function Support Image file viewer Direct MP3 Recording USB 2 0 High Speed Data Transfer SRS WOW Surround Sound 1 8 inch Color TFT LCD Upgradable Built in Rechargeable Li ion Battery YH 925 ...

Страница 2: ...c 24 Importing Your Existing Music 27 Transferring Music to your Player 29 Deleting Music on Your Player 32 Getting Help with Napster 33 Installing Multimedia Studio 34 Using Multimedia Studio 36 To View Help on Multimedia Studio 43 Contents 2 I Using Your Player Playing music 44 Hold Feature Loop Repeating 45 Searching Within Music Files 46 Safety Instructions 4 Battery Charger Safety 6 Charging ...

Страница 3: ...ng Voice 53 Recording MP3s 54 Viewing Image Files 55 Viewing Slide Show 56 Using USB Host 57 I Additional Features I Using Your Player I Customer Support Troubleshooting 69 Specifications 71 Safety Information 72 Warranty 74 Shuffle and Repeat Playback 60 Equalizer Settings 61 SRS Settings 62 Recording Settings 63 Backlight Setting 64 Contrast Setting 64 LCD Off Time Settings 65 Fader Effect 66 Po...

Страница 4: ...ry to disassemble and repair the device yourself Do not expose to chemicals such as benzene and thinners Do not expose to direct sunlight or heat sources Do not store in dusty areas Do not let any foreign matter spill into the device Do not place heavy objects on top of the device Please be aware that we disclaim all responsibility for damages from loss of saved or recorded data due to breakdown r...

Страница 5: ...ot turn up the volume too high Doctors warn against prolonged exposure to high volume Stop using the device or turn the volume down if you have ringing in your ears Follow local guidelines for waste disposal when discarding packages batteries and old electronic appliances Your player is packaged with cardboard polyethylene etc and do not use any unnecessary materials Ambient temperature 5 C 35 C 4...

Страница 6: ...he case of the charger Read this User Manual to prevent any problems that may occur while using the charger W Wa ar rn ni in ng g Use the charger away from water sources to avoid fire or electric shock C Ca au ut ti io on n To avoid electric shock use the charger only with a 120V power outlet Make sure that the charger s plug is inserted all the way into the outlet ...

Страница 7: ...irst time or after several months of non use fully charge it first Overcharging will reduce the battery life The rechargeable battery is a consumable item and its capacity will decrease gradually To prolong the life of your battery use the fully charged battery until it is completely discharged and then fully charge it again before use If you charge the battery that is not completely drained the b...

Страница 8: ...ports playback of both MP3 and WMA USB Host Function Support Connect a digital camera directly to the unit for easy transfer of music images and other data files without the need for a PC Image File Viewer You can view JPEG images Image files edited with Multimedia Studio can be viewed as slide shows Direct MP3 Recording You can convert music from CDs cassettes and radio into MP3 files without a P...

Страница 9: ...sound 1 8 inch Color TFT LCD You can enjoy high quality images Upgradable You can upgrade the built in programs when available Please check the home page www samsung com for upgrades Built in Rechargeable Li ion Battery The built in rechargeable lithium battery provides up to 10 hours of play time Time may vary depending on usage pattern ENG Features ...

Страница 10: ...odel Built in memory YH 925 GS 20GB Mode indicator Artist display Track display Elapsed track time Album display Remaining Time Battery remaining indicator Song number display Next Track Track Name Indicator Display Player Earphones AH30 00070D Line In Cable AH39 00488A User Manual AH68 01655L Charger AH44 00061A USB Cable AH39 00655A SEL MENU Belt Clip AH61 01929A USB Adapter AH39 00658A USB Host...

Страница 11: ...EC MIC HOLD switch LINE IN jack Skip Search button Skip Search button Record button USB Cable Connection Port Power On Off Play Pause button VOLUME UP SCROLL UP button Earphone jack VOLUME DOWN SCROLL DOWN button SELECT button MENU button RESET Hole Display ...

Страница 12: ...r 6 0 or higher Pentium 200MHz or greater 50MB of available hard disk space CD ROM drive double speed or greater USB port 2 0 supported DirectX 8 0 or above N N No ot te e Log into your PC as an administrator Main User and install the supplied software Driver Utilities Napster Client Multimedia Studio Otherwise the software may not install properly I Installing software 1Insert the Installation CD...

Страница 13: ...13 Connecting the player to your PC ENG Continued 2Follow the instructions in the window to complete the installation N ...

Страница 14: ...g during USB driver installation your PC may not function correctly 6Upon installation of the USB driver Samsung YH 925 USB Device will appear in the System Properties Device Manager 5The USB driver is installed with a message saying that it is searching for a new device You may not see the display screen during installation Go to the device manager to check that installation has been successfully...

Страница 15: ...d properly installed Windows XP 1 Start Settings Control Panel System Hardware Device Manager Disk Drives Samsung YH 925 USB Device 2 Start Settings Control Panel System Hardware Device Manager Universal Serial Bus Controller YH 925 Mass Storage Device 7When USB driver is not installed automatically refer to next page ...

Страница 16: ...ted with an exclamation point or a question mark displayed as unknown device or USB device 3Double click on the device listed with an exclamation point or a question mark I When an error occurs during installation of the USB driver N No ot ti ic ce e The installation method may vary depending on the type of PC or operating system Contact your PC dealer or service center for installation informatio...

Страница 17: ...17 Manual Installation of the USB Driver ENG 4After selecting the driver and click Reinstall driver 5Select Install the software automatically and click Next to finish N ...

Страница 18: ...ion you must disconnect the cable in the following way Please close Multimedia Studio 1Double click on the green arrow in the taskbar on the bottom right of the window 2When the Stop a Hardware device message appears press the OK button and disconnect the USB cable N ...

Страница 19: ...2Press the Format Device button When the format screen appears select the file system as FAT32 and then press the Start button N No ot te e By formatting all previously preset menus will be reset and any pre existing song or data files will be erased Care must be taken as formatted files can not be recovered N ...

Страница 20: ... The device database needs repairs Please connect to PC and rebuild database with recovery utility Device will be turned off If the message Loading appears and the device does not operate when you turn on the power If file search does not work properly in the Menu Library 1Connect the player to PC 2Select Start Programs Samsung YH 925 in the desktop and then press Recovery Utility For more details...

Страница 21: ...choose Explore to Open Windows Explorer on PC Removable Disk is displayed in Windows Explorer 3Select the file to save and drag and drop it into the Removable Disk The Removable Disk can be used as Mass Storage Video audio and image files can be downloaded but cannot be played back I Downloading files ...

Страница 22: ... above please go to http www microsoft com downloads and download it You will first need to install the Napster application 1Insert the installation CD that came with your player and follow the instructions to install Napster 2Follow the on screen instructions as the InstallShield Wizard guides you through the installation When the installation has completed click Finish ...

Страница 23: ...ee to search browse and play music clips If you want to become a member of the Napster subscription service enter your credit card information and click on the SUBMIT button Note that you do not have to enter a credit card to register 3Sign in to Napster You can use Napster to copy your CDs to your PC and your player You can search browse and play music clips in the Napster catalog You can buy son...

Страница 24: ...cks you want are checked in the tracklist then click the Rip button or select Rip Checked Tracks from the right click menu N N No ot te e Tracks are saved in the directory you specified for your Napster music An optional MP3 encoder is available for download You can access this encoder from the Update Napster page of the My Account menu If the MP3 encoder is installed the first time you rip a CD y...

Страница 25: ...lessly transferred to your player You can keep copies of purchased tracks on up to three computers To copy your purchased tracks to another computer use the Sync Restore feature on Napster available from the My Account menu N No ot te e If you try to transfer to your player tracks that have not yet been purchased you will automatically be prompted to purchase the tracks ...

Страница 26: ...ere is a specific track you are looking for simply type the artist album or track name in the search field in the upper right corner select the search type from the drop down menu and click go If you do not know specifically what you are looking for you can go to the Browse tab to browse for music by genre 5 A confirmation page with your selected tracks is displayed Click Next 6 If it is your firs...

Страница 27: ...e the correct license for those tracks to import them into Napster If you purchase the tracks you can burn them and transfer them to your player If you sign up for the Napster subscription service the imported tracks are treated as regular Napster downloads To import WMAs or MP3s into your Napster Library 1 Select Import Track s to My Library from the File drop down menu on the Napster application...

Страница 28: ...progress bar displays while the tracks are importing When the tracks successfully imported they will be stored and accessible from your Napster Library You will also be prompted to edit the track data for any non Napster tracks see next section ...

Страница 29: ...ort the Napster application will automatically recognize it and display it as YH 925 under the menu tree of your Napster Library If your player is not connected or detected it will display a Portable Device icon If your layer is not listed check your connection and verify that the player is detected by your computer If you try to transfer tracks to your player that you have not purchased yet you w...

Страница 30: ...om other areas of Napster by right clicking and selecting Transfer Track s to Portable Device N No ot te e If the tracks are Napster tracks that you have not already purchased you will be prompted to purchase them 2 Click and hold the mouse on the track s then drag the tracks to the listed Samsung YH 925 icon in the left window of your Napster Library refer to the following figure ...

Страница 31: ...tus 4 When the tracks have finished transferring the status is listed as Complete Important Note Do not disconnect the device while the transfer is in progress Windows XP Click the Safely Remove Hardware icon on your Windows taskbar and follow the instructions in the message box that appears 5 Never unplug the device without first safely disconnecting To safely disconnect or eject your player do t...

Страница 32: ... computer and displayed in your Napster Library as Samsung YH 925 2 Navigate to and locate the track s within the player menu tree by clicking on the sign next to the YH925 icon 3 Select the track s and click the remove button or press the Delete key on your keyboard I Deleting Music on Your Player ...

Страница 33: ...ble User Guide Comprehensive online instructions for using all the Napster features and functions FAQs Answers to frequently asked questions about Napster Customer Support If you require additional assistance using the Napster Software or Napster Services please contact Customer Support from the Help drop down menu or send your inquiries to support napster com U S I Getting Help with Napster ...

Страница 34: ...34 1 Insert the installation CD into the CD ROM drive Select Install Multimedia Studio 2 Select language Multimedia Studio is a program that supports image editing video playback and format conversion and multimedia album creation ...

Страница 35: ...35 Installing Multimedia Studio ENG 3 Follow the instructions in the window to complete the installation N N N ...

Страница 36: ...le list window on the right 2 Select the image to edit The selected image will be displayed in the Preview image window 3 Press the Edit Img button From the Picture editor window you can perform functions like editing wallpaper images editing layers inserting clip arts making frames and other various editing functions N No ot te e Refer to Help for more information Run Multimedia Studio from on th...

Страница 37: ...ayer 3 Select File Export images to device at the top of the Multimedia Studio menu 4 Select the device connected to PC from the Select device screen and then press the OK button 1 Connect the player to PC Files downloaded without using Multimedia Studio cannot be viewed on the screen N ...

Страница 38: ...otoAlbum Albums on the player The optimal image size for viewing on the unit is 160 x 128 Please adjust the image size if the image does not display correctly on the player N No ot te e Path refers to the location or folder where the converted image s will be saved to on your PC Image files saved in the player can be deleted by selecting File Delete images from device Refer to Help for more inform...

Страница 39: ...d each image will be displayed for 5 seconds 5 Press the Add Music button to add background music Add BG Music Images change every 5 seconds while the selected music is played 1 Connect the player to PC Albums created from Making Album for the use of PPL can be viewed as slide shows on the player N No ot te e To add a copyright protected audio file which can be played on the player select Add Musi...

Страница 40: ...m will be saved in the selected directory 8 Select Album Export Export to Device at the top of the PPL Album window to send the saved ppl file to the device 9 Enter the album name at the Select device screen and then press the OK button The ppl file will be sent to the selected device The sent ppl file can be viewed from PhotoAlbum Slide Show on the player 6 Press the Save button at the top of the...

Страница 41: ...timedia Studio menu The Media Player screen will be displayed 2 Click Menu Open on your PC and select the video to play The selected video will be played The Multimedia Studio software allows you to capture a still frame from a video file and save it as a picture then transfer it to the YH 925 N N ...

Страница 42: ...y selected image Save All captured images saves all captured images 5 Select the directory to save to from the Save As window and press the Save button The selected image will be saved N No ot te e Video playback and conversion codecs are not provided It is recommended that you use codecs of latest versions Refer to Help for more detailed information The device will only play back still images It ...

Страница 43: ...43 To View Help on Multimedia Studio ENG Run Multimedia Studio and press the Help button at the top of the screen Help will be displayed ...

Страница 44: ...sing Music Turning Power On and Off Power On Press and hold the button to turn on the power Power Off Press and hold the button to turn off the power Select Now Playing in the menu Playback starts automatically Press the button to pause playback While in Pause mode briefly press again to resume playback Make sure the player is fully charged and the earphones are connected PLAY Now playing Press th...

Страница 45: ...m being accidentally turned off or on when jogging or to ensure uninterrupted playback HOLD I Starting Point While playing a music file press the SEL button at the beginning of the loop you want to set A appears in the display Press the SEL button again to set the end of the loop A B appears in the display The loop is played repeatedly I Ending Point N No ot te e Press the SEL button to cancel the...

Страница 46: ...old the buttons to forward or reverse search the cur rently playing file I Searching for Specific Parts in PLAY Mode During playback briefly press the button to play the next track in the playlist Press the button within 5 seconds after playback starts to move to and play the previous track Press the button after 5 seconds to play the current track from the beginning I Searching for Music Files in...

Страница 47: ...n N No ot te e In Menu mode press the Menu button to exit from the submenu you are in Now Playing Display the song currently playing Library Search and select music to play Photo Album View saved image files or slide shows USB Host Transfer files saved in the unit to external devices or transfer files saved in external devices to the unit Settings Change the settings Photo Album ...

Страница 48: ...mation stored in the music file Press the button on the desired album name All song titles corresponding to the album name will be played If you select an album name song titles corresponding to that album will be displayed You can use the SCROLL UP DOWN buttons to choose a song and then press the SEL button to play the selected song I Searching for and Selecting Music Files Artists Library Albums...

Страница 49: ...selected song Tracks Shows the song title from the ID3 tag information stored in the music file You can use the SCROLL UP DOWN buttons to move and then press the SEL button to play the selected song Artists Library Albums Tracks Genres Playlists 009 5tion Sorry Tracks 027 Cami You can it 073 U groove 015 everything me Artists Library Albums Tracks Genres Playlists Blues Genres Other Pop Rock Takin...

Страница 50: ... press and hold the SEL button Move to Play Options screen 2 In the Play Options use the SCROLL UP SCROLL DOWN buttons to select the desired play option and press the SEL button I Play Options Artist Album Tracks Genres N No ot te e Mobile Playlist is a play list always present in the unit Songs stored in the unit can be easily added to or deleted from Mobile Playlist Enya Braveheart Theme Tracks ...

Страница 51: ... In the Library use the SCROLL UP SCROLL DOWN buttons to select Playlists and then press the SELECT button 2 Select the playlist that you want to play and then press the SEL button Saved files will appear in the selected playlist I Selecting a Playlist 3 Press the SEL button on the desired file The selected file will be played Artists Library Albums Tracks Genres Playlists Mobile Playlist Playlist...

Страница 52: ...e deleted Cancel Go back to the previous screen I Play Options Voice Recordings 1 In the Library use the SCROLL UP SCROLL DOWN buttons to select Voice Recordings and then press the SEL button Recorded voice file will appear 2 Press the button or SEL button on the desired file The selected file will be played I Searching for and Selecting Voice Files Albums Library Tracks Genres Playlists Voice Rec...

Страница 53: ...2 kbps 1 Slide the REC switch up to start voice recording 2 Slide the REC switch in the opposite direction that you had pushed for recording Recording stops and the file is created Files are recorded and renamed Voice0001 mp3 Voice0002 mp3 and so on MP3 files are automatically added to your Library Voice recordings 0001 mp3 ...

Страница 54: ...e level is too high the sound quality may be poor LINE IN MIC HOLD 2 Slide the REC switch to start recording The music currently played on the external device will be saved as an MP3 file 3 Slide the REC switch in the opposite direction to stop recording Recording stops and the file is created Files are recorded and renamed Line in0001 mp3 Line in0002 mp3 and so on MP3 files are automatically adde...

Страница 55: ...he SEL button 2 Use the SCROLL UP SCROLL DOWN buttons to select Albums 3 Use the SCROLL UP SCROLL DOWN buttons to move to the desired image file and press the SEL button The selected image file will be displayed While viewing the image file press the MENU button to move to the previous screen Albums Albums Albums Photo Album Photo Album Slide Show Upload Album º Ï sky jpg Albums sea jpg land jpg ...

Страница 56: ...e SCROLL UP SCROLL DOWN buttons to adjust the background music volume While viewing the slide show press the MENU button to move to the previous screen N No ot te e Slide show files can be created and edited in Multimedia Studio For details see Using Multimedia Studio Music is played only if music was attached at the time of album editing Select Menu Photo Album Upload Album to view image files tr...

Страница 57: ...OLL UP SCROLL DOWN buttons to move to the Please connect a slave device YES and then press the SEL button The External Device screen will be displayed Make sure the External Device s Power is turned on before connecting it to your YH925 I Connecting an External Device Player External USB Device USB Cable External Device USB Host Adapter USB Cable Player Charger Please connect a slave device YES NO...

Страница 58: ...it from the external device during file transfer To view the transferred file press the button to move to the Host screen and see the UPLOAD folder Uploaded image files can be viewed at Menu Photo Album Upload Album If you want to delete the selected file move to Delete and press the SEL button I Transferring Files from an External Device to the Player Do not disconnect Device Device Host DCIM MIS...

Страница 59: ...up window Move to Copy and press the SEL button The selected file will be transferred to the external device Do not disconnect the unit from the external device during file transfer If you want to delete the selected file move to Delete and press the SEL button I Transferring Files from the Player to an External Device Do not disconnect Device My Music BrownEyes mp3 GOD1 mp3 GOD2 mp3 Device 1TYM_O...

Страница 60: ... All or Shuffle Select the desired mode and then press the MENU button to go to the main menu Off Select this to listen to songs in the current playlist one at a time in the given order One Select this to repeatedly play just one track All Select this to repeatedly play all tracks in the current playlist Shuffle Select this to play all stored tracks in random order Settings EQ Off SRS Settings Rec...

Страница 61: ...ass boost WOW SRS TruBass N N No ot te e is a trademark of SRS Labs Inc WOW technology is incorporated under license from SRS labs Inc Please adjust the volume to a suitable level as the volume may increase in the SRS setting This unit supports sampling frequencies of 32KHz 44 1KHz or 48KHz WOW This feature allows you to enjoy the SRS and Trubass features simultaneously SRS You will hear 3D Stereo...

Страница 62: ...and then press the MENU button to go to the main menu SRS TruBass Focus Level The level for SRS TruBas and Focus can each be set within the range of 0 to 10 Focus You can enjoy clearer tone during playback Optimum It optimizes the SRS function according to the device connected Use the SEL button to move to the connected device Earphone Headphone Speaker Carpack N N No ot te e SRS settings are avai...

Страница 63: ...cording setting Complete the desired setting and then press the MENU button to go to the main menu SamplingRate Each time the Select button is pressed the selection toggles between 32KHz and 44KHz Bit Rate Each time the Select button is pressed the selection changes as follows 96 128 160Kbps Selecting a higher bit rate results in better quality sound but uses more memory space N N No ot te e Voice...

Страница 64: ... the contrast of the screen is 0 to 6 1 In the Menu use the SCROLL UP SCROLL DOWN buttons to select Settings and then press the SEL button 2 Use the SCROLL UP SCROLL DOWN buttons to select Backlight 3 Press the SEL button until the desired Backlight On Time appears Off 3 5 10 15 30seconds and Always are available for Backlight On Time Contrast Settings Settings Record Settings Repeat Off EQ Off SR...

Страница 65: ...D power off time appears 30sec 1min 5min 10min 15min Always If the selected time elapses while playing music the screen switches to power save mode In power save mode the music continues to play but the music information is not displayed on the screen This helps to avoid battery drain Press the button in power save mode to return to the normal playback screen Settings Contrast 3 SRS Settings Recor...

Страница 66: ...de In Volume gradually increases only when playback starts Fade Out Volume gradually decreases at the end only Fade In Out Volume gradually increases when playback starts and gradually decreases at the end Curve Type Each time the SELECT button is pressed the selection changes as follows Linear The speed at which the volume of music increases or decreases is fixed Slow The speed at which the volum...

Страница 67: ...se the SCROLL UP SCROLL DOWN buttons to select Auto Power off 3 Press the SEL button until the desired power off time appears Select the desired power off time and then press the MENU button to go to the main menu OFF 30sec 1min 5min 10min 15min Settings Fader Effect Backlight 5sec Contrast 3 LCD OFF Time 30sec Auto Power Off 5min ...

Страница 68: ...ect Settings and then press the SEL button 2 Use the SCROLL UP SCROLL DOWN buttons to select Reset and then press the SEL button If you select YES all selected settings will be restored to the default setting Volume 20 Repeat Off EQ Off Backlight 5sec Contrast 3 Default Settings Restoring Default Settings Player Information Reset all default Settings NO YES Settings Auto Power Off 5min Contrast 3 ...

Страница 69: ...ayer Connect the charger Make sure the Hold switch is in the off position There is no sound even if I press the Play button in Music mode Check if there are MP3 or WMA files on the player Non playable file formats e g MPEG1 LAYER 1 file cannot be played Files that have been downloaded without using the Napster cannot be played I cannot download files Check the battery s power level Check if the dr...

Страница 70: ...ast in the Menu Please check if the player is in power save mode During playback some unknown characters are displayed on the display panel Unsupported languages will be indicated by an asterisk A Noartist Noalbum file path appears on the playback screen in place of the selected music file s song title There is no ID3 tag information for the music file Edit the song title artist and album informat...

Страница 71: ...atents 5 991 715 5 740 317 4 972 484 5 214 678 5 323 396 5 539 829 5 606 618 5 530 655 5 777 992 6 289 308 5 610 985 5 481 643 5 544 247 5 960 037 6 023 490 5 878 080 and under US Published Patent Application No 2001 44713 A1 This license is limited to private non commercial use by end user consumers for licensed contents No rights are granted for commercial use The license does not cover any prod...

Страница 72: ... harmful interference and 2 this device must accept any interference received including interference that may cause undesired operation Caution Any changes or modifications in construction of this device which are not expressly approved by the party responsible for compliance could void the user s authority to operate the equipment Note This equipment has been tested and found to comply with the l...

Страница 73: ...that the product Trade Name Samsung Electronics Co Ltd Model Number YH 925 has been tested according to the FCC CISPR22 95 requirements for Class B devices and found compliant with the following standards EMI EMC AnSI C63 4 1992 FCC Part 15 Subpart B This device complies with part 15 of the FCC Rules Operation is subject to the following two conditions 1 This device may not cause harmful interfere...

Страница 74: ...rranty is only valid when the warranty card is properly completed and upon presentation of the proof of purchase consisting of original invoice or sales slip confirmation indicating the date of purchase dealer s name model serial No and product number Samsung reserves the right to refuse warranty service if this information has been removed or changed after the original purchase of the product fro...

Страница 75: ...nsistent with technical or safety standardsin current force or failure to comply with productmanual instructions Accidents Acts of God or any cause beyond the control of Samsung caused by lightning water fire public disturbances and improper ventilation Unauthorized modifications carried out for the product to comply with local or national technical standards in countries for which the Samsung pro...

Страница 76: ...Y KIND AGAINST SAMSUNG BE GREATER IN AMOUNT THAN THE PURCHASE PRICE OF THE PRODUCT SOLD BY SAMSUNG AND CAUSING THE ALLEGED DAMAGE WITHOUT LIMITING THE FOREGOING PURCHASER ASSUMES ALL RISK AND LIABILITY FOR LOSS DAMAGE OR INJURY TO PURCHASER AND PURCHASER S PROPERTY AND TO OTHERS AND THEIR PROPERTY ARISING OUT OF THE USE MISUSE OR INABILITY TO USE THIS PRODUCT SOLD BY SAMSUNG NOT CAUSED DIRECTLY BY...

Страница 77: ...7 Warranty ENG To obtain warranty service please contact SAMSUNG at Samsung Electronics America Inc 400 Valley Road Suite 201 Mount Arlington NJ 07856 1 800 SAMSUNG 1 800 726 7864 www samsung com 081299 ...

Страница 78: ...AH68 01655L Rev 0 0 Samsung Electronics America Inc 400 Valley Road Suite 201 Mount Arlington NJ 07856 1 800 SAMSUNG 1 800 726 7864 www samsung com ...

Страница 79: ......

Страница 80: ......

Страница 81: ......

Страница 82: ......

Страница 83: ......

Страница 84: ......

Страница 85: ......

Страница 86: ......

Страница 87: ......

Страница 88: ......

Страница 89: ......

Страница 90: ......

Страница 91: ......

Страница 92: ......

Страница 93: ......

Отзывы: