background image

- 2 -

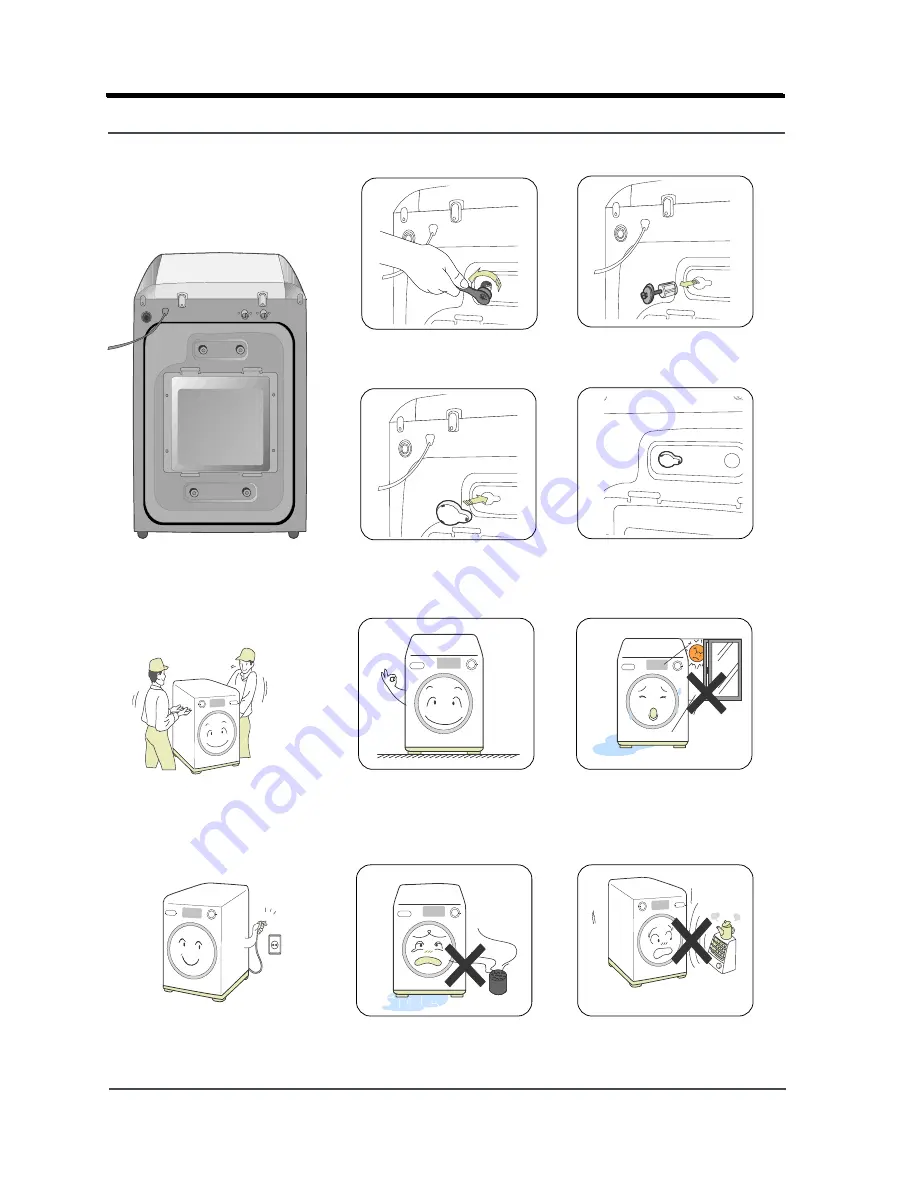
How to disassemble

the safety apparatus

1. Remove the screw of the safety

apparatus using a spanner.

2. Remove the safety apparatus from

the back of the main body.

3. Insert the stopper into

the groove for fixing the
safety appratus.

4. Insert 4 stoppers into each

groove for fixing the safety
appratus.

Install the product on a
solid and flat surface.

Avoid places with direct sunlight
and humidity for the installation. A
well-ventilated place is a good
position for installing the product.

Do not install the product at the
place where gas is emitted,
which will freeze the product in
winter season.

Avoid locations close to heat
sources such as a stove.

Safety Notes before
Installing

At least two people are needed
to unpack or move the product,
due to its weight.

Install the washig machine
where the power cord or
plug can be easily pulled out.

1-2.Precautions upon Installation

Содержание WM1255AGS/XEN

Страница 1: ...tself http itself sec samsung co kr for the more information BASIC MODEL WM1245A WM1255AGS XEN 1 Silver Nano Sterilization Anti bacteria 2 Premium Design 3 Wide Graphic Display 4 Direct Drive Motor 5...

Страница 2: ...SEMBLY AND DISASSEMBLY 5 1 TOOLS FOR DISASSEMBLY AND ASSEMBLY 5 2 ASSEMBLY AND DISASSEMBLY 6 TROUBLE DIAGNOSIS 6 1 RELATED PARTS TO ERRORS FOR CHECKING 7 EXPLODED VIEWS AND PARTS LIST 7 1 EXPLODED VIE...

Страница 3: ...RAM 11 PCB CIRCUIT DIAGRAM 11 1 PCB CIRCUIT DIAGRAM Main 11 2 CIRCUIT DIAGRAMS OF MAIN PARTS 11 3 MOTOR DRIVING PART 11 4 DISPLAY PART 12 REFERENCE INFORMATION 12 1 MODEL NAME 12 2 TERMINOLOGY 12 3 FA...

Страница 4: ...n of the parts after finishing the A S Maintain the same conditions as before the A S 11 When you pull out the power cord be sure to hold the plug part when pulling the cord out If the cord is damaged...

Страница 5: ...at surface Avoid places with direct sunlight and humidity for the installation A well ventilated place is a good position for installing the product Do not install the product at the place where gas i...

Страница 6: ...e over the Wash Basin or Laundry Tub or plug the end of the drain hose into the Standpipe The end of the drain hose must be passed through the Hose Guide or secured as shown in the picture to prevent...

Страница 7: ...3 Adjust the height using the adjustable feet The machine is in a balanced state when all four adjustable feet are firnly on the ground and there is no movement If uneven Adjust the lowest of the 4 a...

Страница 8: ...5 Cold Water supply hose Drain Hose Door Debris filter Door release Emergency drain tube Base cover Adjustable feet Control panel Detergent Drawer 2 THE FEATURE OF PRODUCT 2 1 Part Names...

Страница 9: ...m X H1015mm WATER PRESSURE 50 kPa 780 kPa WEIGHT NET 92 kg GROSS 99 kg WASH SPIN CAPACITY 10 0 kg DRY LAUNDRY DRY CAPACITY 6 0 kg POWER CONSUMPTION WASHING 220V 170W 240V 170W WASHING and HEATING 220V...

Страница 10: ...odel Name WM1255A WM1245A Capacity Washing 10 0kg 10 0kg Drying 6 0kg 6 0kg Drum Capacity 78 78 Washing Motor DD INVERTER DD INVERTER Heater 220V 1900W 1900W Supply Drain Cold water Drain pump Cold wa...

Страница 11: ...anel Control SNOW WHITE SNOW WHITE Panel Drawer SNOW WHITE SNOW WHITE Cover Door IMPERIAL SILVER IMPERIAL SILVER Deco Top IMPERIAL SILVER IMPERIAL SILVER Deco Front IMPERIAL SILVER IMPERIAL SILVER But...

Страница 12: ...ich pushes the clothing out towards the wall of the drum through the high speed rotation of the drum Max 1200 RPM 3 Drying Condensing System This heats the internal and evaporates the moisture contain...

Страница 13: ...teria from infiltrating into the laundry by means of silver nano coating Prevents any harmful substances from growing in the tub mold various bacteria bad smell etc 2 Driving System Ag ionized water g...

Страница 14: ...mploying a Water Turbine 10 Convenient handles intalled for wasy moving 11 Automatic power cut function If a user doesn t press the START button within 10min of the power being switched on power is au...

Страница 15: ...high speed it does a max of 5 times If Unbalance is over the set value thereafter the water is supplied during the dehydration cycle to perform the cloth untwisting cycle a max of 3 times However in...

Страница 16: ...he previous drum type washing machines used to control Unbalances on the principle of weight so that the weight of the product was quite heavy whereas this product decreases the weight by employing a...

Страница 17: ...able for the Wash Cycle It is impossible to set the wash temperature during a wash If the wash temperature button is pressed during washing the selected temperature is displayed for 3 seconds If a tem...

Страница 18: ...IN Button is selected after the selection of Wash Only or SPIN Only 6 Drying Selector Button The drying process is performed according to the steps below when the Drying button is pressed Standard Ste...

Страница 19: ...is below 70 and the water is below 55 the add laundry LED turns on to inform you that the add laundry key can be selected b When the add laundry key is selected and the machine stops the drum rotating...

Страница 20: ...mation can be changed during a wash If one of the courses is selected that LED will stay ON But if the course is operating its LED repeatedly displays On Off every 0 7 second The Wool and Delicate cou...

Страница 21: ...Spin Rinse Final Spin End If the Start Pause button is pressed during the operation of a cycle it stops that cycle One more press of the button will re start that cycle In this manner Stop Start Stop...

Страница 22: ...g cycle is done with dryness sensing the washer turns off the heater and only runs the fan motor lowering the temperature inside the drum All cycles are completed when the temperature of the internal...

Страница 23: ...he door lock is switched off However the door stays locked while the tube is running When opening the door while rotating all motor and display functions stop operating and turn off While the Soft Kee...

Страница 24: ...r by restriction of motor driving Start button 3E2 If an excessive current is detected at IPM it will be retried 6 times But if it is detected more than 7 times this error will occur caused by short c...

Страница 25: ...l communication for longer than 1sec it is automatically released Excessive water level water leakage 0F If less than 20 48kHz of frequency of water level sensor is continuously kept longer than 10sec...

Страница 26: ...ostat Power Off HE2 If the fan housing temperature remains less than 35 C for preheat dehydration low temp drying or less than 50 C for drying of the others and if it doesn t rise to 5 C higher than t...

Страница 27: ...nano model when it uses the cold water valve B E error occurs for an unconnected silver kit and high electrical current only applicable to test mode The silver nano kit LED turns on Check the silver n...

Страница 28: ...test mode B Use the SW2 door lock before the fan motor can drive properly 150 mins during the fan motor operation Time Dry Set Time Custom Dry LED turns on SW6 Heater Sequential Operation Dry1 Wash Dr...

Страница 29: ...Pump connector 220V 5 Door Open S W Silver Wash button Closed Wash button Open function The voltage between the two terminals of the Door S W steering part Solenoid 220V Resistance between the two ter...

Страница 30: ...13 19 Replaced by box driver Leg 3 Vice pliers A Tool for protecting empty turning of bolt or abrasion from using box driver For disassembly of Spindrum 4 T 10mm BOX over 250mm For disassembly of Hea...

Страница 31: ...e Please take care of your hands when removing the motor particularly with the Stator Edge part Separate the wire connected to the Motor Press down on the belly of the Housing and pull forward to sepa...

Страница 32: ...t L R for fixing the lower part 4 Remove the Deco Front L R Caution Knock the Deco Front L R in an upward direction to disassemble it 5 Remove the Detergent Drawer You can pull out the detergent drawe...

Страница 33: ...d draw out the Drain Pump 3 Separate the connection wire Caution Be sure to check that the power plug is unplugged at the time of repair There may be a danger of electric shock 4 Separate the Hose Fil...

Страница 34: ...ang the groove part of the Diaphragm onto the Frame Front for temporary fixation and then bring the Diaphragm into the groove by pulling gently in a clockwise direction 4 Remove the screws used to fix...

Страница 35: ...Do not remove the nut completely simply unscrew it to the final thread You can then pull the Heater forward Don t use any tools such as a nipper at this time Draw it out by shaking it a little with yo...

Страница 36: ...ix the Bracket PCB from the Frame Raise the Bracket PCB upwards to release the fixing hook Separate the PCB from the Frame Separate the screws used to fix the Main PCB Bracket PCB Exchange the Main PC...

Страница 37: ...in Test mode Water Level Sensor Disassembly Instructions 1 Separate the Deco top and the Cover top 2 Separate the screws used to fix the Water Level Sensor Separate the connecton wire from the Water L...

Страница 38: ...screws fixing the silver kit and the housing drawer and disconnect the wire harness connector Loosen the two screws fixing the bracket guide and the guide water detach the guide water Loosen the two...

Страница 39: ...Check if the belt is broken or cracked 2 Check the pulley and the cooling fan for any damage Dry Motor Replacement 1 Loosen the fixing nuts for the pulley uses a 10mm Box Loosen the screws 2 Remove th...

Страница 40: ...duct surface Needs to divide the white black connectors Check Point 1 Measure the resistance between the two thermostats Auto Type Always 0 Manual Type When pressing the press system you will hear a t...

Страница 41: ...b Point A 2 Loosen the three screws for fixing the heater Check Point 1 Measure the heater resistance The resistance between the common terminals 47 2 Check the connecter for any problem Note Remove t...

Страница 42: ...m o st at D ry in g F a n B el t S u b P C B T U B W I R E H A R N E S S 1 5E Drain abnormal Drain not worked O O O O O 2 dE Door open O O O O O 3 dE1 Door switch abnormal Door switch not worked O O...

Страница 43: ...er C o n d e n si n g T h er m is te r F e e d b a c k T h er m o st at N o n F e e d b a c k T h er m o st at D ry in g F a n B el t S u b P C B T U B W I R E H A R N E S S 17 13E Communication abno...

Страница 44: ...41 7 Exploded Views and Parts List 7 1 Exploded View of Whole Parts...

Страница 45: ...42 7 2 Exploded View of Detergent Tray SUB PCB R0014 C0103 C0044 C0056 C0081 Y0162 C0082 C0043 C0105 C0029 Y0066 C0002 A0128 A0329 C0055 Y0066 C0029...

Страница 46: ...C1235A ABS 6 SA C0056 DC64 00856A DECORATION BUTTON P WC1235A ABS 1 SA A0329 DC64 00859A INLAY ENCODER WC1235A PC 1 SA Y0162 MFS WM1255A S0 ASSY PCB PARTS S MFS WM1255A S0 COMBI 1 SA C0043 DC64 00853A...

Страница 47: ...ews of TUB Damper Main Motor PCB U0095 U0221 U0198 U0071 R0158 U0064 U0163 U0201 U0358 R0001 U0029 U0038 F0224 S0058 I0043 U0013 U0202 U0137 W0004 U0061 U0061 U0061 J0013 I0043 I0071 Y0161 R0125 U0359...

Страница 48: ...SA U0038 DC97 04981A ASSY CLAMP DIAPHGRAM TS85 PJT TUB 1 SA U0013 DC97 08149C ASSY TUB BACK K3 COMBI SGEC 1 SA I0043 DC67 00058A HOSE DRAIN TS85 PJT EPDM BLK 1 SA U0201 DC62 00155A NOZZLE CONDENSER I...

Страница 49: ...46 7 6 Exploded View of Frame front Assy Door F0064 C0058 R0065 R0030 D0107 D0061 D0045 D0004 D0010 A0355...

Страница 50: ...ER DOOR SEW HR125Q SILVER METAL 1 SA A0355 DC66 00360A LEVER SEW HW125 LDPE XZ700 L292 1 SA C0058 DC64 00519A DOOR LOCK S W DW100 NYLON WHT VD 1 SA R0065 DC63 00370B COVER FRONT PANEL SEW HW126 ABS 1...

Страница 51: ...ed View of Frame R0073 R0070 F0125 A0351 A0351 W0032 Q0006 A0282 A0086 F0062 B0070 A0358 W0036 R0019 R0159 R0160 P0053 I0040 I0022 Y0162 R0021 R0020 I0003 R0158 I0068 R0105 R0104 A0352 A0086 R0105 R01...

Страница 52: ...SA R0020 DC97 06539D ASSY WATER SILVER WM1255A H1255A EURO K1 1 SA R0021 DC97 06485B ASSY GUIDE WATER SEW 4HR126A ONE SIDE HO 1 SA Y0162 MES AG3MOD S1 ASSY PCB PARTS S MES AG3MOD S1 1 SA I0068 DC69 00...

Страница 53: ...70029C SPRING CLIP SEW HW125 HSWR67 CD1 2 ID8 5 1 SA U0083 DC96 00421B ASSY THERMOSTAT SEW HW125 220V 15A 150C 1 SA U0365 DC97 02412E ASSY BOLT SWF P12 WEIHGT U M8 L123 2 SA U0063 DC97 05674G ASSY DU...

Страница 54: ...006 SCREW TAPPING TH 2S M4 L12 STS410 2 SA Z0017 6002 001327 SCREW TAPPING PWH 1 M4 L12 NI PLT 4 SA Z0019 6006 001170 SCREW TAPPING TH WT TC M4 L10 ZPC YEL 1 SA Z0021 6009 001343 SCREW SPECIAL PH TORX...

Страница 55: ...DE BAR TS85 PJT POM L19 NTR 4 SC Z0006 6002 000213 SCREW TAPPING TH 1 M4 L12 ZPC YEL S 1 SC D0081 DC61 00821A HOLDER GLASS TS85 PJT FRPP GLASS 20 1 SC Z0006 6002 000213 SCREW TAPPING TH 1 M4 L12 ZPC Y...

Страница 56: ...8 BLOCK DIAGRAM...

Страница 57: ...Driving IC switches the current before supplying it to the motor 6 Display Port Sub PCB Power Communication Sub Main MICOM 7 Hall Sensor Port Hall Sensor Power Data 8 Sensor System Thermistor Water Le...

Страница 58: ...hing Temp Setup Silver Wash Course Wash Selection Number of Rinse Setup Spin Speed Setup Drying Selector Course Selection Dial COURSE SELECTION DIAL COTTON Cotton 95 COLOUREDS QUICK WOOL DELICATES BED...

Страница 59: ...10 SCHEMATIC DIAGRAM...

Страница 60: ...11 PCB CIRCUIT DIAGRAM This Document can not be used without Samsung s authorization 11 1 PCB CIRCUIT DIAGRAM Main...

Страница 61: ...nd makes Micom start to drive At this moment sequential sigals generated from Micom function to operate Power Relay continuously One more press of Power S W switches NC to NO and permits Micom to acce...

Страница 62: ...Part A voltage of DC 300V is sent from MIG10j503 to Motor through Power Line and Hall Sensor checks the rotation through feedback of the signal into Main Micom TMP88PS43F when Motor is being rotated...

Страница 63: ...60 Water Temperature Level Sensors Water Level Sensing Water Temp Sensing TMP88CS42N 11 4 Display Part TMP88CS42N...

Страница 64: ...Model Name in the Market BOM Model Code Drum machine classification according to type WM Washer Dryer H Washer Only RPM Notation 1000rpm 10 1200rpm 12 1600rpm 16 INTRO YR 2005 Alphanumeric notaton ba...

Страница 65: ...ts water draining and displays OVER FLOW ERROR E3 on the LED 4 THERMISTOR Keeps sensoring and controlling the temperature inside the tube to keep it below your settings 5 ASSY THERMAL FUSE Anti Over H...

Страница 66: ...This is particularly effective for cleaning badly stained laundry 10 WEIGHT SENSOR The tube automatically rotates when no water is supplied to detect the laundry weight so that the proper wash time ca...

Страница 67: ...in mind Operate the appliance only from the type of power source indicated on the marking label If you are not sure of the type of power supplied to your home consult your appliance dealer or local p...

Страница 68: ...this all right The heat inside the tube while boiling or drying can cause physical damage To avoid this we use reinforced glass for the internal door and reinforced plastic for the outside door Intern...

Страница 69: ...y You can remove the laundry For avoiding wrinkles in the laundry the machine performs drying at intervals for 30 more minutes Q14 The machine shakes badly when it detects the weight of the laundry fo...

Страница 70: ...late You can use it for more than 10 years based on 4 times a week and 4 times a course Q21 Is the silver ionized water harmful It is not harmful at all Silver ionized water is currently popular for t...

Страница 71: ...ion 5 DRUM WASHER display part Display part being not lit up not being cleared AS rerecomm ended It is a symptom occurred when it is installed in the humid place or the water is entered its inside Dry...

Страница 72: ...ng It can be appeared at the drum washing machine of which the drain hose is located at the bottom For the m up and fix it all water su 21 DRUM WASHER smell smoke Burning smell General consulting For...

Страница 73: ...are used Use the prop is cooled do And if it doe 34 DRUM WASHER HE front loading washing machine error E6 WATER HEATER ERR AS rerecomm ended It may appear when it dose not reach to the set temperatur...

Страница 74: ...DRUM WASHER water supply related Water being not supplied in winter It may appear when the tap and the water supply hose are frozen if it is used at the veranda in the winter Make the 50 DRUM WASHER r...

Страница 75: ...neral consulting the drainage hose clogged or foreign material inside After loos whether the 62 DRUM WASHER installation connection Consulting for installation of front loading washing machine General...

Страница 76: ...September 2005 Printed in Korea Code No DC68 02081A ELECTRONICS This Service Manual is a property of Samsung Electronics Co Ltd Any unauthorized use of Manual can be punished under applicable Interna...

Отзывы: