background image

Customization and Navigation       7

• Tab  Options

Launches the 

Today 

Plus Option

 screen 

showing the options 
currently assigned to 
the selected options 
list. 

5.

Select new options 

as desired.

Removing Today Plus Options

You can remove options from the 

Favorites

 and 

Contacts

 options 

lists by doing the following:

1.

Activate the 

Today Plus

 menu. For more information, refer 

to 

“Today Plus Option Lists” 

 on page 36.

2.

In the Today screen, select the Today Plus 

Favorites

 tab or 

Contacts

 tab.

3.

Position the cursor over the option you want to remove.

4.

Press and hold 

. Select the 

Remove Item

 / 

Contact from 

Today

 option. The selected Item/Contact is removed from 

the displayed option list.

Showing/Hiding the Today Plus Options Lists

The Today Plus options lists display in the Today screen. To hide 
or display the options lists, do the following:

1.

Activate the 

Today Plus

 menu. For more information, refer 

to 

“Today Plus Option Lists” 

 on page 36.

2.

From the 

Today

 screen, press the 

Start

 key (

) to 

activate the 

Start

 menu.

3.

Select 

Settings


(

➔ 

Personal

 tab 

➔ 

Today


(

➔ 

Items

 tab.

4.

Select the box adjacent to the 

Today Plus

 option. A check 

mark appears in the selected box (show Today Plus) or 

disappears from it (hide Today Plus).

5.

Press 

 or select 

 to save your new setting.

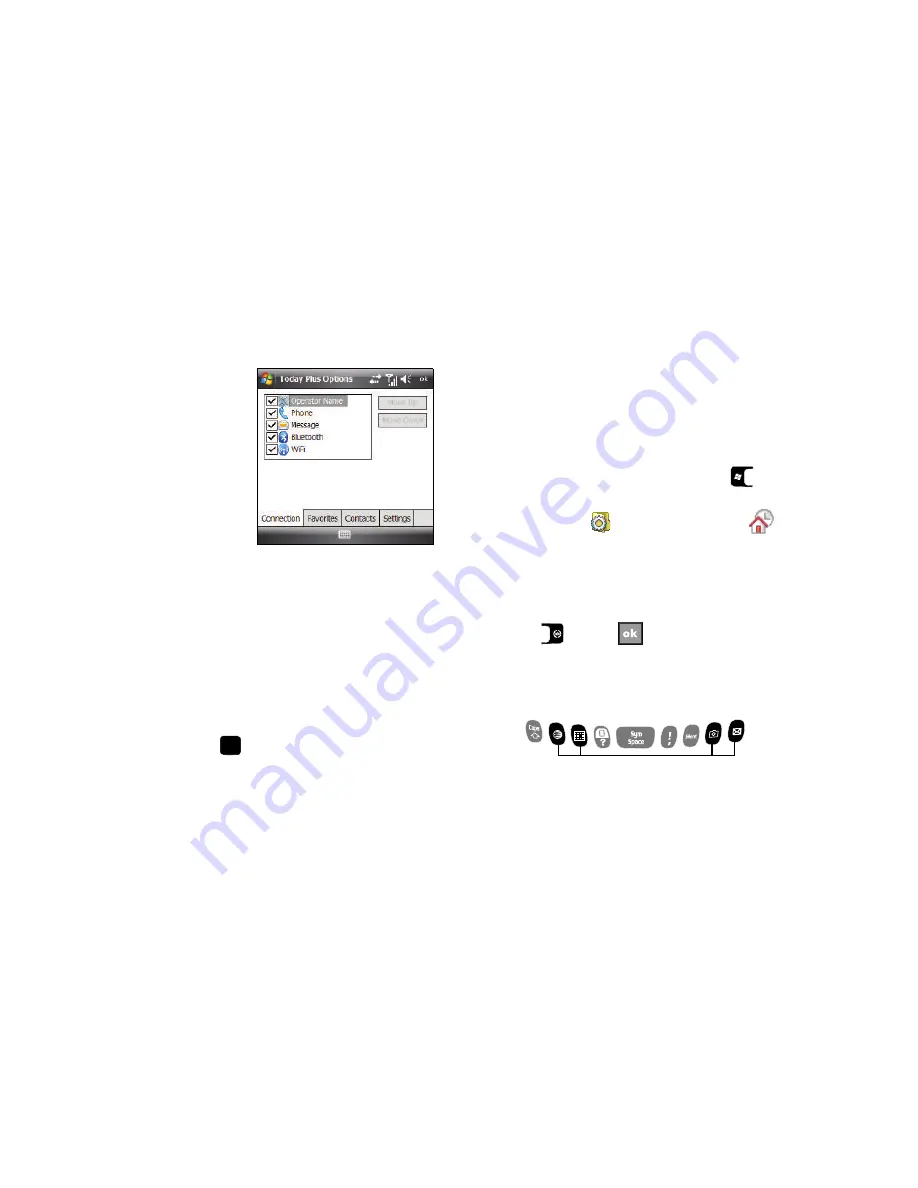
Customizing the Special Function Keys

The bottom row of keys on your phone contains four Special 
Function keys. 

Special Function keys

Содержание SGH-i907 Series

Страница 1: ...SGH i907 Series S M A R T P H O N E User Manual Please read this manual before operating your phone and keep it for future reference ...

Страница 2: ...ou agree that you will not and will not attempt to modify prepare derivative works of reverse engineer decompile disassemble or otherwise attempt to create source code from the software No title to or ownership in the Intellectual Property is transferred to you All applicable rights of the Intellectual Property shall remain with SAMSUNG and its suppliers Samsung Telecommunications America STA LLC ...

Страница 3: ...ARRANTY CONTAINED ON THE WARRANTY PAGE ENCLOSED WITH THE PRODUCT THE PURCHASER TAKES THE PRODUCT AS IS AND SAMSUNG MAKES NO EXPRESS OR IMPLIED WARRANTY OF ANY KIND WHATSOEVER WITH RESPECT TO THE PRODUCT INCLUDING BUT NOT LIMITED TO THE MERCHANTABILITY OF THE PRODUCT OR ITS FITNESS FOR ANY PARTICULAR PURPOSE OR USE THE DESIGN CONDITION OR QUALITY OF THE PRODUCT THE PERFORMANCE OF THE PRODUCT THE WO...

Страница 4: ... Using a microSD Storage Card 27 Programs Installation and Removal 28 Managing Certificates 29 Rebooting your Phone after Lockup 30 Resetting your Phone to Factory Defaults 30 Performing a Manual Hard Reset 31 Section 4 Call Functions 32 Turning the Phone Feature On and Off 32 Making a Call 33 Answering a Call 35 Using the Speakerphone 35 Displaying Your Phone Number 35 Call History 36 Roaming Net...

Страница 5: ...t 100 Help 101 Section 11 Personal Organizer 103 Today Screen 103 Calendar 106 Tasks List 109 Notes 112 Calculator 114 Section 12 Synchronization 115 Active Sync 115 Changing the Synchronization Schedule 121 Windows Mobile Device Center 6 1 for Windows Vista 123 Section 13 Network Services 125 Call Barring 125 Caller ID 126 Call Forwarding 126 Call Waiting 127 Voicemail and Text Messages 128 Secti...

Страница 6: ...ening 154 Operating Environment 156 Using Your Phone Near Other Electronic Devices 156 FCC Hearing Aid Compatibility HAC Regulations for Wireless Devices 157 Potentially Explosive Environments 159 Emergency Calls 159 FCC Notice and Cautions 160 Other Important Safety Information 160 Product Performance 161 Availability of Various Features Ring Tones 161 Battery Standby and Talk Time 162 Battery Pr...

Страница 7: ...appear in place of repeatedly used procedural steps Preparing Your Phone Before you can activate your new phone you need to install your SIM card and the phone battery Installing Your SIM Card Important The plug in SIM card and its contacts can be easily damaged by scratches or bending Use caution when inserting or removing the card and keep all SIM cards out of reach of children 1 If in place rem...

Страница 8: ...own Installing the Battery The SGH i907 comes with a standard rechargeable battery and a power accessory Note This phone comes packaged with a partially charged rechargeable standard Li Ion battery and travel charger You must fully charge the battery before using your phone for the first time A fully discharged battery requires up to 4 hours of charge time 1 Place the battery so that the plastic t...

Страница 9: ...he phone bottom end first 4 Lift the battery up and away from the phone Charging the Battery Note The SGH i907 comes with a rechargeable battery Fully charge this battery before using your phone Your phone is powered by a rechargeable standard Li ion battery Only use Samsung approved charging devices and batteries Samsung accessories are designed to maximize battery life Using other accessories ma...

Страница 10: ...tate on page 7 Battery Capacity When the battery becomes low a warning window displays and the backlight turns off Note Long backlight settings simultaneous use of Wi Fi and Bluetooth searching for service vibrate mode and browser use affect the battery s talk and standby times There is also an internal backup battery that saves all phone settings if the regular battery is discharged The internal ...

Страница 11: ...xternal power parameters for your device 1 From the Today screen press the Start key to activate the Start menu 2 Select Settings System tab Power Advanced tab The Power screen displays with the Advanced tab active 3 To stop the phone from turning itself off when on battery power within the On battery power section select the Turn off device if not used for box The check mark disappears from the b...

Страница 12: ...LCD Off Tab allows you to set this power save mode function to suit yourself 1 From the Today screen press the Start key to activate the Start menu 2 Select Settings System tab Power LCD Off tab The Power screen displays with the LCD Off tab active 3 To disable this function select the Turn off LCD after call has been connected for option The check mark disappears from the associated check box and...

Страница 13: ...en you access the My Account Overview page select Activate a new phone to display instructions needed to activate your phone online 3 After gathering the required materials follow the instructions to complete the activation process Powering On the Phone 1 Press and hold the Power On Off key located on the left side of the phone near the top 2 The phone receives a signal from your home network then...

Страница 14: ...erefore you ll want to set up your voicemail and personal greeting as soon as you activate your SGH i907 1 Press and hold to dial the voicemail system Note Use of the key is reserved for speed dialing voicemail To dial voicemail without using speed dial simply dial your own phone number and when the system answers enter your password and press 2 When the system answers enter your password and then...

Страница 15: ... to all the applications and settings information similar to that of a Windows based PC system To access the Start menu simply press the Start key A drop down menu list is then displayed and from there all other applications and settings can be accessed Customizing Your Start Menu List 1 From the Today screen press the Start key to activate the Start menu 2 Select Settings Personal tab Menus 3 Ena...

Страница 16: ...gs Personal tab Today Items tab 3 Select the box adjacent to those items that will appear on the Today screen A check mark appears in the selected box Remove these items by selecting their boxes again thus removing the check mark from each item 4 Position each item from top to bottom on the list by selecting the item not its box The item becomes highlighted 5 Select the Move Up Move Down button to...

Страница 17: ...his options menu and display the applications or settings icons you want To choose which options display do the following 1 Activate the Today Plus menu For more information refer to Today Plus Option Lists on page 36 2 In the Today screen select the Today Plus tab Connection Favorites Contacts or Settings whose options list you want to change 3 Position the cursor in the blank space below the sho...

Страница 18: ... from Today option The selected Item Contact is removed from the displayed option list Showing Hiding the Today Plus Options Lists The Today Plus options lists display in the Today screen To hide or display the options lists do the following 1 Activate the Today Plus menu For more information refer to Today Plus Option Lists on page 36 2 From the Today screen press the Start key to activate the St...

Страница 19: ... key This procedure reassigns the Messaging key as a second Left soft key 1 From the Today screen press the Start key to activate the Start menu 2 Select Settings Personal tab Buttons 3 Scroll and select a Special Function key from the Select a button list 4 Select the Assign a program drop down list then select Left Softkey 5 Press to save your setting and return to the Today screen ...

Страница 20: ...ized at all times The features listed below are just a sample of what your SGH i907 has to offer You should read this guide to understand the many features that this phone supports and keep it handy for reference Key Features of the SGH i907 Large 320 x 320 pixel 65k color TFT screen Wireless Internet Capability Windows Mobile 6 1 Professional Text Messaging SMS Multimedia Messaging MMS E mail Mes...

Страница 21: ... in profile mode or the voice volume during a call To mute the ringer during an incoming call press the Volume key up or down To reject an incoming call press the Ignore soft key or press and hold the Volume key up or down This will send the call to your voicemail 4 Navigation touch pad OK key Lightly touch to move the cursor arrow head and to highlight choices Short press to accept choices when n...

Страница 22: ... as or or other symbols 11 Uppercase Lowercase Shift key Press repeatedly to select abc Abc or ABC text capitalization modes 12 MEdia Net key Short press to launch the MEdia Net Home page Press and hold to launch Microsoft Voice Command voice recognition 13 Calendar key Short press to launch your calendar 14 Silent mode Press and hold to place your device in silent mode 15 Microphone The Microphon...

Страница 23: ...e current menu 21 microSD Storage Card socket Insert an optional microSD Storage Card to expand file storage space 22 Headset Power adapter jack USB or data cable Allows you to plug in the travel adapter power PC connection cable data transfer and optional headset for safe convenient hands free conversations 23 Earpiece Used to listen to audio from your phone 24 Indicator LED Indicates status of v...

Страница 24: ...rrent time and allows you to close screens Click on the status icons to access abbreviated Connectivity Phone Volume and Battery settings menus 3 Date Day Time Displays the Date Day Time Short click or select on this bar to display abbreviated Clock Alarms settings 4 Xpress Mail Select to access your personal or business e mail 5 Instant Messaging Select to access your IM account 6 Messages Select...

Страница 25: ...you to access and scroll through menus and lists confirm changes that you ve entered and interact with menus that appear in the display 2 Hot keys Used to launch Voice Command enable or disable Silent Mode activate the camera camcorder and more 3 QWERTY keypad Provides an alphanumeric character keypad layout for entering text numbers and symbols 4 Numeric keypad Enter phone numbers Navigation Keys...

Страница 26: ... 1 From the Today screen press the Start key to activate the Start menu 2 Select Settings Personal tab Lock 3 Select the check box next to Prompt if device unused for 4 From the Minutes drop down menu select the amount of unused time required before you are prompted for a password if the phone becomes idle 5 Select the Password type box then select one of the following options Simple PIN This pass...

Страница 27: ...e box This hint may be visible by others Note The password hint you set will only appear after five consecutive incorrect password entries 4 Press or select to save your hint and return to the previous screen Unlocking the Phone After a Time out To unlock your phone after the timer has expired 1 Press to activate the password screen 2 Enter your password 3 Press the Unlock soft key to unlock the h...

Страница 28: ...ice Display Icons Various icons appear in your phone s display or Title Bar during operation The following table lists these icons as well as their descriptions Indicates signal strength More bars mean better signal Indicates GPS is on for location Indicates GPS for 911 is active Indicates your device is in Flight mode and your cellularradioisturnedoff i e thephoneisturnedOff but the PDA is On Ind...

Страница 29: ...inder of an upcoming calendar event Indicates you received a new text message If you select this icon awindowdisplays thatallowsyou to access the Inbox Indicatesyoureceivedanewmultimediamessage If you select this icon a window displays that allows you to access the Inbox Indicates you received a new voicemail message If youselectthisiconawindowdisplaysthatallowsyou to listen to new voicemail messa...

Страница 30: ...y slot on the right side of the phone and flip up the microSD plastic cover 2 Orient the microSD card so the label side is facing upwards and the gold contact pins are not visible see illustration 3 Carefully insert the compatible microSD card into the opening and firmly push it in until you hear a click that indicates the card is securely installed The card is secure when it is not protruding fro...

Страница 31: ...ile Adding Programs by using Microsoft ActiveSync You can install programs downloaded from the Internet or included on the Getting Started CD found with your Samsung SGH i907 by performing a synchronization between your phone and your computer First you ll need to determine what your phone and processor type are so that you can know which version of a particular software is required for installati...

Страница 32: ...can add and delete public key certificates You can store the following two types of certificates on your phone 1 From the Today screen press the Start key to activate the Start menu 2 Select Settings System tab Certificates 3 Select the appropriate type of certificate tab Personal Used to identify yourself to others Intermediate Used to identify intermediate certification authorities Root Used to ...

Страница 33: ...er Your phone s temporary memory is cleared but information in permanent storage remains unchanged Resetting your Phone to Factory Defaults Note To completely remove any personal information stored on your device see Precautions for Transfer and Disposal on page 146 You can reset your phone s settings and clear all data applications from phone s internal memory and or external memory optional micr...

Страница 34: ...erly calibrate your device Please use the Stylus for calibration of the SGH i907 7 Using your Stylus select within the crosshairs that appear in the align screen 8 Follow the on screen tutorials and complete the setup process Performing a Manual Hard Reset Important Caution when performing a manual Hard Reset the storage and settings initialize Remove your SIM card prior to performing a Manual Har...

Страница 35: ...ature On and Off Before using the SGH i907 s phone features verify your phone features are active 1 From the Today menu select the Start menu 2 Verify that the No Service icon on the Status Bar as shown 3 Select Settings Connection tab Wireless Manager 4 From the Wireless Manager menu select Phone Off The Wireless Manager screen displays 5 Click on Phone to toggle it On and Off Tip The Wireless Ma...

Страница 36: ...u must first do the following Enter Contact information For more information refer to Contacts on page 43 Add stored Contacts to your Contacts shortcut list For more information refer to Customizing Your Today Plus Options on page 6 Using the Contacts shortcut list lets you make a call while using just one hand To make a call 1 From the Today screen select the Contacts tab 2 Select a contact butto...

Страница 37: ...e numbers highlight the desired number 4 Press to display the number in the phone screen and dial the number Method 4 Using the Stylus 1 From the Today screen tap Start to activate the Start menu 2 Tap Phone A combined list of recently call numbers and your Contacts list displays 3 Tab the phone number of the person you wish to calling A list of recent actions involving the selected person display...

Страница 38: ...umber you wish to dial 3 Press Answering a Call Make sure the phone is turned on When you receive an incoming call the Phone Incoming screen displays 䊳 Press the Answer soft key or press to answer the call 䊳 Press the Ignore soft key or press to send the call to voicemail Note When you receive a call you can silence the ringer by pressing the volume key on the side of your phone Using the Speakerp...

Страница 39: ...ncoming calls that were answered Selecting a call entry displays the time date and duration of the call To display the calls logs 1 Activate the Today Plus menu For more information refer to Today Plus Option Lists on page 36 2 From the Today Plus menu select Connection tab Phone The Phone screen displays the All Calls log 3 To show only selected types of calls press the Menu soft key then select ...

Страница 40: ...select the Phone soft key or From the Today Plus menu select Connection tab Phone The Phone screen displays the All Calls log Note If desired display a particular calls log by pressing the Menu soft key and then selecting Filter All Calls Missed Outgoing or Incoming This option is available only from the Today Plus menu To activate the Today Plus menu see Today on page 68 2 Highlight a call log en...

Страница 41: ...r current list will be displayed This option allows you to set to the initialization of the list saved to the call history For example if your currently selected filter is only displaying your Missed Calls deleting all calls in this instance would only delete these listed calls while leaving all remaining Incoming and Outgoing Call entries untouched Note To delete all call log entries you will nee...

Страница 42: ... filled in 4 Use the keypad to enter the message text For more information refer to Entering Text on page 38 Note Each text message can contain a maximum of 160 characters Any characters text over that limit will be moved onto consecutive text messages to the same recipient 5 When you re finished entering your message press the Send soft key to send the message For more information refer to Messag...

Страница 43: ...tection On Off A checkmark in the box indicates Password Protected is on An unmarked box means indicates Password Protected is off 5 Select the menu applications you want to access with a Voice Command Choose from the following Calendar Contacts Media Messaging Phone Start Menu Status A checkmark in the boxes adjacent to an application indicates the Voice Command is enabled for that particular fea...

Страница 44: ...ou with one step access to some or all of the following applications depending on their voice enabled settings Calendar Contacts Media Messaging Phone Start Menu Status Video Share The Video Share features allows you to place a call and share live or recorded video while on the call You can initiate or receive video by using the following procedures Enabling Disabling Video Share To enable or disa...

Страница 45: ...nts to share video with you Accept the connection displays In case of unknown number Number wants to share video with you Accept the connection displays 8 Press the Yes soft key to accept the connection or the No soft key to decline it 9 When the recipient accepts the video share Establishing a Video Connection displays to both the sender and the recipient A Recording Started pop up displays showi...

Страница 46: ... shape 1 From the Today screen press the Start key to activate the Start menu 2 Select Settings System tab Finger Mouse to open the Finger Mouse screen The following navigation Action methods are available 4 way Navigation When selected you navigate screens and menus by touching the Navigation Pad Up Down Left and Right Lets you select highlighted options by pressing the center of the Navigation P...

Страница 47: ...lect highlighted options by pressing the center of the Navigation Pad 3 To exit the menu without changing the settings press the key or select Accessing a Menu Function in the Mouse Mode 1 Navigate screens and menus by moving a finger lightly across the surface of the Navigation Pad 2 Select highlighted options by pressing the center of the Navigation Pad 3 To exit the menu without changing the se...

Страница 48: ...gs The associated Today Plus options list appears 2 Select the desired option The associated option screen appears Navigating Using the Title Bar Icons The status icons that display in the title bar are also shortcuts to related features and functions of your handset To use the status icons as shortcuts From the Today screen select an available icon The associated menu or screen displays Some avai...

Страница 49: ...re are four different character input methods available Block Recognizer Keyboard built in QWERTY keypad or touch screen keypad Letter Recognizer Transcriber Each of these methods allow you to input alphanumeric characters and symbols into the device In addition to these input methods there are other options such as Word Completion associated with the input selected To access the Input Method sett...

Страница 50: ...rd icon Block Recognizer This input method uses the traditional writing area box split in the middle This method allows you to enter characters using single strokes The left side is used to write letters and the right side is for number entry Symbols and common functions are located in other smaller boxes located to the right of the writing box area There are no options associated with this type o...

Страница 51: ...access the following options associated with this method Quick stroke Right to left crossbar Allowaccented characters Transcriber The transcriber option is similar to the letter recognizer except instead of entering characters into a designated area you can enter entire words and sentences using the stylus and your own handwriting cursive print or mixed formats Transcriber supports both printing a...

Страница 52: ...um number of letters a word must contain before a word is suggested 5 Select the Suggest word s drop down list and choose the numbers of words the device will suggest once the word completion parameters are met 6 To enter an empty space after each recognized word select Add a space after word 7 To enable the auto correction feature which dynamically corrects for spelling errors and other mistakes ...

Страница 53: ...evel for writing Default zoom level for typing Capitalize first letter of sentence Scroll upon reaching the last line 3 Select each option s associated box or field and make your desired changes Note Selecting the box adjacent to each item can either enable check or disable uncheck the items 4 Press or select to save your settings ...

Страница 54: ...o record or write a note associated with the contact All of this information can be synchronized with a PC or Laptop using the Microsoft ActiveSync application For more information refer to Synchronization on page 93 Name Company Telephone Picture Work2 Home2 Telephone Company Radio Telephone Department IM2 IM3 Job Title E mail2 E mail3 File as Assistant Work Telephone Fax Address Assistant Teleph...

Страница 55: ...ers of the contact entry and then display the results on the screen To find a contact 1 From the Today screen press the Contacts soft key The Contacts screen displays 2 Select the Enter a name field and use the keypad to enter the first few characters of the contact entry With each consecutive character the list of matching contacts becomes more refined 3 If needed scroll through this list of matc...

Страница 56: ...d devices 1 Find the desired contact For more information refer to Find a Contact on page 44 2 Press the Menu soft key and select Send Contact Beam Your device begins to search for a compatible Bluetooth device is its communication range 3 Select the device s you wish to transmit to When the contact has been successfully transferred the selected device displays Done 4 Press or select to exit and r...

Страница 57: ...t to display its information 3 Press the Menu soft key and select Edit Notes tab 4 Enter the note using the desired entry method For more information refer to Entering Text on page 38 5 After the note has been successfully entered select to save your note and return to the previous screen Deleting a Note 1 Find the desired contact For more information refer to Find a Contact on page 44 2 Select th...

Страница 58: ...page 44 2 Select the contact to display its information 3 Press the Menu soft key and select Add to Speed Dial The Speed Dial screen displays with the next available Speed Dial location in the Location field 4 If desired select the Location field s up or down arrows to assign this contact to another available speed dial location 2 99 5 Press or select to save the Speed Dial assignment and return t...

Страница 59: ...nformation refer to Find a Contact on page 44 6 Select the contact The Speed Dial screen appears in the display 7 Select the Location field s up or down arrows to assign this contact to an available speed dial location 2 99 8 Press or select to save the Speed Dial assignment and return to the previous screen ...

Страница 60: ...new text picture or video message the message ringer sounds unless turned off and the message displays in a preview pane Note The Text Message Notification icon displays on the top of the screen 1 To remove the preview pane from the Today screen press 2 To re open and display the message in the preview pane press the Notification soft key 3 To reply to the displayed message press the Reply soft ke...

Страница 61: ...ge as unread Unread messages are boldfaced on the message list Save to Contacts Save sender s number to your Contact list Save as Bookmark Save a URL included in this message as a bookmark Save as Multimedia Msg Temp Save this message as a pre composed Multimedia message template for later reuse Attached Files View and or save attached picture file and or sound file or video file Multimedia Msg Op...

Страница 62: ...crosoft Outlook user manual 4 To display the contents of a folder select it in the drop down menu Received Text Message Options Several message features are available for received text messages 1 From the Messages Inbox folder screen highlight a text message and press the Menu soft key The following options are available New Lets you create a new Text or Multimedia message Reply Sends a reply to t...

Страница 63: ...ighlight a Multimedia message and press the Menu soft key The following options are available New Lets you create a new Text or Multimedia message Reply Sends a reply to the sender and or all other recipients or forwards this message to other people Delete Moves this message to the Deleted Items folder Move Lets you move this message to other folders Delete All Deletes all Multimedia messages unre...

Страница 64: ...sages folder 3 Press the Menu soft key then select Tools Options The following tabs appear in the display Accounts Lets you review change settings and signatures for your Messaging accounts or for a new account You can also enable disable the account picker screen Message Lets you change message options Selectthebox of the options you would like to turn on or off Address Applies to E mail only Sto...

Страница 65: ...older 3 Press the Menu soft key then select Multimedia Msg Options The following tabs appear in the display Sending Lets you set delivery options and delivery reporting options for Multimedia messages Receiving Lets you specify how your phone reacts to incoming Multimedia messages Profile Letsyouselect create andedit communicationprofilesfor exchanging Multimedia messages with your carrier s messa...

Страница 66: ...g and Sending Text Messages 1 From the Today screen press the Start key to activate the Start menu 2 Select Messaging Messages The Messages screen displays showing the contents of a Messages folder in this case the Inbox folder 3 Press the Menu soft key then select New Text Message The Messages composition screen displays 4 Enter multiple phone number or E mail addresses of recipient s in the To f...

Страница 67: ...essage to a Multimedia message My Text Add pre composed text to this message Save to Drafts Saves the message to the draft folder Spell Check Spell check your message Cancel Message Cancels the new message Message Options Inactive 7 Press the Send soft key to transmit your message to the selected recipients Spell Checking a Text Message 1 While creating a Text message see Creating and Sending Text...

Страница 68: ...y to activate the Start menu 2 Select Messaging Messages The Messages screen displays showing the contents of a Messages folder 3 Press the Menu soft key then select New Multimedia Message The Multimedia Message composition screen displays 4 Enter the phone number or E mail addresses of up to ten recipient s in the To field Use the keypad to place a semicolon between numbers if there is more than ...

Страница 69: ...on or change the duration of pages in a multi page message Save to Allows you to save the current Multimedia message as a Draft or a Template Cancel Message Allows you to save the current message as a draft and exit the message composer Multimedia Msg Options For more information refer to Configuring Multimedia Message Parameters on page 54 Toolbar Enable or disable the message composer toolbar 9 ...

Страница 70: ...y 4 Use the keypad or use the stylus and the virtual keyboard to edit the text For more information refer to Entering Text on page 38 5 Select to save your changes and return to the message Accessing E mail E mail Account Setup You can configure the SGH i907 to send and receive E mail using Microsoft Outlook ActiveSync and a PC or using an ISP account Setting Up an Outlook E mail Account Install A...

Страница 71: ...ation nearly always required and usually the same as your account ID and password Whether the server requires SSL Secure Sockets Layer Type of connection used to access the server Contact the server operators or your ISP for this information 5 You are notified when setup is complete For ISP servers you are prompted to select an automatic contact interval Using Microsoft Outlook for E mail Using Mi...

Страница 72: ...o create and send E mail press the Menu soft key and select New The E mail composition screen displays 5 Enter the E mail address in the To field 6 Select the Subject field and enter a subject 7 Select the message text field and enter the content of your E mail message 8 When you re finished press the Send soft key Outlook E mail Folders There are five message folders Outlook E mail directory see ...

Страница 73: ...u soft key then select Tools Options The following tabs appear in the display Accounts Lets you review change settings and signatures for your Messaging accounts or for a new account You can also enable disable the account picker screen Message Lets you change message options Selectthebox of the options you wouldliketoturnonor off Address Lets you check E mail address information using the address...

Страница 74: ...some settings are grouped with topics that include them If you don t see a setting that you are looking for discussed here check the Index that begins on page 147 for a complete listing of all settings for your phone Personal Settings Button Assignments For more information refer to Customizing the Special Function Keys on page 7 Function Key Settings You can assign particular letter keys to launc...

Страница 75: ...ou specify settings for the Phone functions of your SGH i907 1 From the Today screen press the Start key to activate the Start menu 2 Select Settings Personal tab Phone Phone options are divided into the following tabs Phone Select the desired sounds associated with the phone Services Enable disable and select parameter values for phone related network services Network Find select and register you...

Страница 76: ...key a short tone is played Long tones When press a keypad key a long tone is played Off No tones are played when keypad key is pressed 5 Press or select to save your new settings and return to the previous screen Services Tab The Services tab lets you configure the phone related network services Note Before configuring any or all of these services you should verify that you are subscribed to these...

Страница 77: ... 3 Highlight the service you want to review or change then select the Get Settings button 4 Select new value s for the selected service as needed Note For more information refer to Network Services on page 103 5 Press or select to save your new settings and return to the previous screen Network Tab 1 From the Settings Phone screen select the Network tab The Phone screen changes to show the Current...

Страница 78: ... Settings Phone screen select the More tab The Phone screen changes to show a list of phone service related settings 2 Change or set the following options FixedDialing LetsyouEnable DisableFDN FixedDialingNumber service Also shows Contact entries stored as FDNs Change PIN2 Lets you change the PIN2 Second Personal ID Number Also shows the number of allowed change attempts remaining SIMLock LetsyouE...

Страница 79: ...tings and return to the previous screen Today The Today screens let you set an appearance Theme for the Today screen and let you determine the Items to be displayed on the Today screen System Settings About 1 From the Today screen press the Start key to activate the Start menu 2 Select Settings System tab About Select the following tabs to display the desired information Version tab Displays impor...

Страница 80: ...3 Press or select to save your changes and return to the previous screen For more information refer to Managing Certificates on page 21 Clock Alarms 1 From the Today screen press the Start key to activate the Start menu 2 Select Settings System tab Clocks Alarms to access the following time settings Tip You can also access the Clocks Alarms screen by Time and Date display in the Today screen Time ...

Страница 81: ... or select to save your changes and return to the previous screen Note Enabling this option may incur data usage charges External GPS 1 From the Today screen press the Start key to activate the Start menu 2 Select Settings System tab External GPS to open the GPS Settings screen The following tabs are available Programs Letsselect the GPSprogram port that programson you phone will use to obtain GPS...

Страница 82: ...ottom of the Memory screen The Search screen displays Enter a Windows style file name pattern and press the Search soft key Review the files returned to the screen for later deletion 5 Press or select to return to the previous screen Power 1 From the Today screen press the Start key to activate the Start menu 2 Select Settings System tab Power For more information refer to Checking Battery Charge ...

Страница 83: ...y screen press the Start key to activate the Start menu 2 Select Settings System tab Screen to open the Screen Settings screen where you can alter the following settings Alignment tab Allows you to assign the display orientation of the screen information and use the Align Screen feature to calibrate the touch screen Clear Type tab Allows you to choose whether the text on screen displays with smoot...

Страница 84: ... the services supported by individual devices Profiles reduce the chance that different devices will not work together For more information refer to Bluetooth Service Profiles on page 107 Toggling Bluetooth On Off When the Bluetooth radio is turned on you can use the Bluetooth features available When the Bluetooth radio is turned off you cannot send or receive information via Bluetooth To save bat...

Страница 85: ...ss the Start key to activate the Start menu 2 Select Settings Connections tab Bluetooth 3 Prepare your external Bluetooth device for communication and detection 4 Select the Devices tab and select Add new device from the on screen list Your phone displays a list of discovered Bluetooth devices that were detected within its communication range 5 Select the device you wish to pair with and press the...

Страница 86: ...files directly onto your phone Modem Enables a PC to communicate through your phone acting as a wireless modem 3 Press or select to save your new setting and return to the previous screen USB to PC USB to PC allows you to change the type of USB connection your devices uses when having problems connecting to ActiveSync 1 From the Today screen press the Start key to activate the Start menu 2 Select ...

Страница 87: ...ectionisforanad hocnetwork select theThisdeviceis a device to device ad hoc connection box 6 Press the Next soft key to continue onto the Authentication and Data Encryption information Use the information provided by your Network administrator to complete this section and press the Next soft key to continue 7 Complete the process by selecting the appropriate security protocol parameters from the E...

Страница 88: ...slider using the stylus Sounds and Notifications The Sounds and Notifications settings allows you to select the actions for which you hear sounds and how to notify you when different events occur To view the sounds and notifications screen follow these steps 1 From the Today screen press the Start key to activate the Start menu 2 Select Settings Personal tab Sounds Notifications Sounds tab 3 Activ...

Страница 89: ...al tab Sounds Notifications Notifications tab 3 Select the event other than Phone Incoming Call from the Event drop down menu For more information refer to Setting Your Phone s Incoming Ringtone on page 78 4 Select Play sound and or Vibrate Note You can also use Sounds Notifications to set the ring type and ring tone settings of your phone 5 Select the check box next to Play sound to then designat...

Страница 90: ...s Personal tab Phone 3 Select the drop down arrow next to Ring type and select one of the Vibrate options or select None 4 Select to exit Screen Tap Vibration In addition to event notifications and incoming call ringtones you can also set the vibration length for screen taps The phone defaults to On with a short vibration mode enabled however you can turn this feature off or modify the vibration l...

Страница 91: ... specified in this setting a password must be entered when you turn the device back on To set the password 1 From the Today screen press the Start key to activate the Start menu 2 Select Settings Personal tab Lock 3 Select the check box next to Prompt if device unused for 4 Select the Minutes drop down menu and select the amount of unused time required before you are prompted for a password if the...

Страница 92: ...r to view web pages in two different ways By downloading pages and then performing an ActiveSync operation By connecting to the Internet Directly via your wireless data connection While browsing you can also download new files and programs Launch Internet Explorer 1 From the Today screen press the Start key to activate the Start menu 2 Select Internet Explorer Note Microsoft Pocket IE does not sup...

Страница 93: ...day screen press the Start key to activate the Start menu 2 Select Office Mobile Excel Mobile If there are no workbooks on this device a new workbook automatically displays Ifthereareexistingworkbooksonthisdevice thefileaccessscreen displays To create a new workbook press the New soft key 3 Construct your spreadsheet s For more information refer to Entering Text on page 38 and to the Excel User Gu...

Страница 94: ...ays If there are no notes on this device a new note automatically displays If there are existing notes on this device the file access screen displays To create a new note press the New soft key 3 Construct your note s For more information refer to Entering Text on page 38 and to the OneNote User Guide 4 Press Menu to select formating options 5 When you are finished press or select to save your not...

Страница 95: ...n 6 Select the Yes button to confirm the deletion Word Mobile Word Mobile works with Microsoft Word on your computer to give you easy access to copies of your documents You can create new documents or copy documents from your computer to your handset Synchronize the documents between your computer and your handset to ensure you have the most up to date content in both locations Use Word Mobile to ...

Страница 96: ...3 Press the Menu soft key and select Options The following options are available Note While viewing a document access the Options menu by pressing the Menu soft key then selecting Tools Options Default template Allows you to select Meeting Notes Memo Phone Memo To Do Word 97 2003 document and Word Document as the default document Save to Allows you to select Main memory as the default document sto...

Страница 97: ... video files that are stored on your device or downloaded from the internet You can play files in either Windows Media or MP3 format including files with extensions wma wmv and mp3 Launch Media Player 1 From the Today screen press the Start key to activate the Start menu 2 Select Programs AT T Music 1 Windows Media Load Media Player files Media player files must be copied to the handset using the ...

Страница 98: ...ress of the selected file The volume controls and adjust the sound level during playback Select Mute to toggle between mute on and off Playlist Windows Media player allows you to configure personal playlists with your favorite music or video files Playlists group media content and store the location of media content whether the location is your computer a network or the Internet Playlists typicall...

Страница 99: ...ct Black and White Sepia Green Aqua Negative Video Share Makes a voice call and launches Video Share For more information refer to Video Share on page 33 Settings 1 2 Camera timeout 1 min 2 min or 3 min Automatic save Turn Auto Save Off or On Quality Super fine Fine Normal Economy Multi shot number 3 shots 6 shots or 9 shots Default storage My device or Storage card microSD optional Settings 2 2 S...

Страница 100: ...a is now active 2 Select to activate the camcorder Mode IndicatesCameramode Selecttoswitch between Camera mode and Camcorder mode Shooting Mode Indicates Single Shot mode Select to switch between Single shot Multi shot Mosaic shot Night shot Panorama Shot Size Indicates1600x1200resolution Selectto switch between 1600x1200 1280x960 1024x768 640x480 and 320x240 Timer Indicates Timer is off Select to...

Страница 101: ... hear when you press or or select to take a photo Select shutter one shutter two crystal dingdong great or ok Brightness sound The sound you hear when you increase or decrease video brightness Select bright one or Off Zoom sound zoom one or Off Recording sound The sound you hear when you press or or select to start stop video recording Select musical one musical two or woman one Version Displays S...

Страница 102: ...the gallery Crop Lets you crop the selected image Edit Image Allows you to Cut Copy Paste Select Deselect Select All Select None Rename or place the image or video in a newfolder You can Flip Rotate andResizethe image and change Brightness Contrast and Effect Print via Bluetooth Allows you to print the selected image on a Bluetooth enabled printer Properties Provides the Name File Type Dimensions ...

Страница 103: ... Transition Effects and change the Show Direction Application Management Your SGH i907 is powered by Windows MobileTM 6 1 Software for SGH i907 Phone Edition which allows installation and removal of any SGH i907 compatible application on your device SGH i907 applications can be downloaded from the web or purchased at retail outlets Install New Applications When a new application is downloaded from...

Страница 104: ...creen displays 3 To end a task highlight the task and press the End Task soft key 4 Press the Menu soft key to access the following options Switch To switches to and displays the selected application End All Tasks ends all the tasks that are running View Allows you to view Applications or Processes Sort By Allows you to sort how applications are viewed by Memory CPU or Name Refresh Refreshes the s...

Страница 105: ... the Table of Contents to launch the associated Help content or 5 Touch Search and select the Search for drop down menu to select a subject in which to search Select the Type dropdown and select a type of information in which to search 6 Touch Search The result of the search displays in the Results field ...

Страница 106: ...erview information When the handset is initially turned on the Today screen displays the following 1 Start Menu 2 Title Bar 3 Digital Clock 4 Day and Date 5 Get Xpress Mail shortcut 6 Instant Messaging shortcut 7 Messaging icon Messaging shortcut 8 Appointments shortcut 9 Device locked unlocked If the device is unlocked selecting this option locks it If the device is locked selecting the Left soft...

Страница 107: ...w to set the current date 6 Press or select to save the information and exit Note The time on the SGH i907 handset does not automatically change when you travel to another time zone To ensure that you don t miss appointments change your clock setting to Visiting and then select the appropriate time zone Scheduling an Alarm Your phone has three alarm clocks that can be configured to ring daily at a...

Страница 108: ...ng From the Today screen select Start Settings Connections tab Wireless Manager or Activate the Today Plus screen then select the Wireless Manager section of the display to turn features on individually or all at once The Wireless Manager screen displays Wi Fi Status The Wireless Manager Wi Fi Status indicators let you know if Wi Fi is turned On or Off For more information about the Wi Fi connecti...

Страница 109: ... an appointment or reminder When you schedule an entry a description displays on the time line and the duration is set to 15 minutes by default You can easily change the start time and duration for any event You can schedule the following types of events in the calendar Timed appointments such as birthdays and meetings which have a specific date start and end time Untimed reminders such as holiday...

Страница 110: ... to select the frequency of this events occurrence 10 Select the Reminder box and select either None or Remind Me If the Remind Me option was selected enter the amount of time before your event which the phone should begin reminding you 11 Select Categories and select either Business Holiday Personal or Seasonal You can also add a new category by selecting the New soft key Use the keyboard to ente...

Страница 111: ...exit and return to the previous screen Calendar Options Calendar options allow you to select what day of the week your calendar starts upon whether you view a 5 day 6 day or 7 day week options for reminders and more 1 From the Today screen press the Start key to activate the Start menu 2 Select Calendar 3 Press the Menu soft key then select Tools Options to open the Calendar Options screen 4 Selec...

Страница 112: ...ption is the default method for sending meeting requests Outlook E mail 13 Press or select to save your settings and return to the calendar Tasks List A task is something that needs to be done in a certain amount of time and requires a reminder once the deadline has been reached Once a task is complete it can be checked off and another task can be started A task list can be set up to keep track of...

Страница 113: ...fidential 13 Press or select to save the task When the task is saved it is added to the task list The task list allows you to sort the tasks based on priority level subject start date due date or status Mark a Task Complete When a task is completed a checkmark is used to indicate the item has been completed 1 From the Today screen press the Start key to activate the Start menu 2 Select Programs Or...

Страница 114: ...the Start key to activate the Start menu 2 Select Programs Organizer Tasks 3 Press the Menu soft key then select Options Show Tasks entry bar box 4 Press or select to save your change Editing a Task 1 From the Today screen press the Start key to activate the Start menu 2 Select Programs Organizer Tasks 3 Select the desired task from the task list to open it 4 Select the Edit soft key to launch the...

Страница 115: ... hold the desired task from the list and select Beam Task or Press the Menu soft key and select Beam Task 4 From the list of detected devices select the preferred device to begin the beaming upload process 5 When the task is successfully transferred Done displays on the screen 6 When finished press or select to exit Notes Quickly capture thoughts reminders ideas drawings and phone numbers with Not...

Страница 116: ...n recording 5 When finished press Stop to stop recording 6 End the call Note The call needs to be disconnected to listen to the recording If the call is still connected there is no audio 7 To listen to the recording select the entry from the notes list Write a Note 1 From the Today screen press the Start key to activate the Start menu 2 Select Programs Organizer Notes 3 Press the New soft key 4 Co...

Страница 117: ...lt note storage location Record button action Allows you to choose what action is taken by pressing the record icon Switch to Notes or Stay in current program 4 Press or select to save your changes and return to the previous screen Calculator The calculator allows you to perform general mathematical functions such as addition subtraction multiplication and division You can use the calculator to pe...

Страница 118: ... occurs by selecting a synchronization mode Select data types to be synchronized and control the amount of synchronized data ActiveSync System Requirements To use ActiveSync 4 5 your computer must meet the following hardware and software requirements Vista Microsoft Windows XP Windows 2000 Windows Millennium Edition or Windows NT Workstation 4 0 with SP6 or later Microsoft Internet Explorer 6 0 or...

Страница 119: ...r to set up a partnership Note When installation completes the ActiveSync icon displays on the taskbar Note Synchronization automatically begins the first time your device is connected to your computer All the selected synchronization items are copied from your computer to your device and Windows Explorer creates a shortcut to the Mobile drive Setting Up and Configuring ActiveSync 1 After you ve i...

Страница 120: ...Synchronization 95 3 Enter a unique name for your device and click Next 4 Select or deselect the desired applications that you wish to synchronize then click Next ...

Страница 121: ...96 5 Click the square to allow wireless data connections on your device while connected to your computer If selected a checkmark will display in the box 6 Click Finish ...

Страница 122: ...tings To establish a connection between your computer and the phone you must enable the connections you want to use in the ActiveSync program By default all connections are enabled 1 From the ActiveSync window on your computer select File Connection Settings 2 Change the connection settings Note If your phone is not connected to the computer click this button to establish a connection 3 Click on O...

Страница 123: ...d easily from the phone to the computer or from the computer to the phone Note To synchronize Bluetooth devices with a compatible computer the computer must have the Bluetooth stack for Windows XP Service Pack 2 Customizing Synchronization Settings You can set various setting options for synchronization with a computer and a server and set the synchronization schedule First you must terminate the ...

Страница 124: ... access select This server requires an encrypted SSL connection 5 Press the Next soft key The User Information screen displays 6 Enter your Microsoft Exchange User name Password and Domain 7 To save the password for subsequent accesses select Save password 8 Press the Next soft key 9 Select data types to synchronize 10 When you are done press the Finish soft key Changing the Synchronization Schedu...

Страница 125: ...finished You are returned to the Schedule screen 8 Select to return to the ActiveSync screen Connecting Your Phone to a Computer To connect the phone to your computer you can choose one of the following ways Using a USB data cable Using a Bluetooth connection Using a USB data cable Connect one end of the USB data cable to the jack on the bottom of the phone and the other end to the USB port on you...

Страница 126: ...indows Mobile Device Center 6 1 for Windows Vista The Microsoft Windows Mobile Device Center enables you to set up new partnerships synchronize content and manage music pictures and video with Windows Mobile powered devices Windows Mobile 2003 or later The Windows Mobile Device Center is only supported on Windows Vista Windows Mobile Device Center helps you to quickly set up new partnerships synch...

Страница 127: ...aging and collaboration clients Microsoft Office 2003 Microsoft Outlook XP Microsoft Outlook 2003 and Microsoft Outlook 2007 messaging and collaboration clients are required for synchronization of e mail contacts tasks and notes to a Personal Computer Installing Windows Mobile Device Center If your PC is running Windows Vista your synchronization settings will be managed through the Windows Mobile...

Страница 128: ...reen press the Start key to activate the Start menu 2 Select Settings Personal tab Phone Services tab A list of available network services displays Call Barring If your Wireless Carrier supports this service it lets you permit or block incoming or outgoing calls Note For more information contact your Wireless Carrier 1 In the network services menu highlight Call Barring then select the Get Setting...

Страница 129: ...nly to contacts 3 Press or select to save your new settings and return to the previous screen Call Forwarding This network service lets you choose whether and under what conditions to forward your incoming calls to another phone number or to Voicemail 1 In the network services menu highlight Call Forwarding then select the Get Settings button 2 To forward your incoming calls unconditionally Select...

Страница 130: ...on select a Forward after time 5 30 seconds 4 Press or select to save your new settings and return to the previous screen Call Waiting This service lets you choose whether or not to be alerted during a call when you receive another waiting incoming call 1 In the network services menu highlight CallWaiting then select the Get Settings button 2 To change your Call Waiting setting select one of the f...

Страница 131: ...you receive your phone You will probably not need to change them unless otherwise instructed by your carrier 1 In the network services menu highlight Voicemail and Text Messages then select the Get Settings button 2 To change the access numbers select one of the following options Text messages service center Voicemail 3 Press or select to save your new settings and return to the previous screen ...

Страница 132: ...beam files appointments tasks and contact cards between common devices or you can use Bluetooth wireless technology enabled peripherals to integrate with your device Bluetooth Service Profiles Actually the Bluetooth specification is a protocol that describes how the short range wireless technology works whereas individual profiles describe the services supported by individual devices Profiles redu...

Страница 133: ...art key to activate the Start menu 2 Select Settings Connections tab Bluetooth to review the various settings tabs Devices Select Add new device to search for nearby Bluetooth devices Select on a device to modify it s settings Mode To activate the Bluetooth functionality select the Turn on Bluetooth box a check mark displays in the box To make your device visible to other Bluetooth devices select ...

Страница 134: ...aveling you can turn off Bluetooth wireless technology in your device Turning Bluetooth On Off 1 From the Today screen press the Start key to activate the Start menu 2 Select Settings Connections tab Bluetooth Mode tab 3 Select or clear the Turn on Bluetooth check box The Bluetooth radio is turned on or off depending on your selection 4 Press or select to save your changes and return to the previo...

Страница 135: ...vice visible to other devices check box Pairing Pairing is a relationship that you create between your SGH i907 and another Bluetooth wireless technology enabled devices to exchange information in a secure manner Pairing involves entering the same Passkey on the two devices sharing a bond Once a bond is created between devices the devices do not have to be discoverable to exchange information howe...

Страница 136: ...r device with another wireless handset or with a personal computer you must enter the same Passkey on both devices 6 Press the Done soft key to complete the process Accepting a Bond 1 Make sure that Bluetooth is turned on and the device is discoverable 2 When prompted to bond with the another device press the Yes soft key 3 Enter the numeric passcode passkey and press the Next soft key You are the...

Страница 137: ...mation about the features available with your Hands free device refer to the user manual Bluetooth Virtual Serial Port There are many Bluetooth wireless technology devices that support the Bluetooth serial profile such as GPS You can use the SGH i907 Bluetooth virtual serial port to make Bluetooth serial connection with such devices Setting Bluetooth Virtual Serial Port 1 Create a Bluetooth bond b...

Страница 138: ...work cabling and it is faster and has a greater range than Bluetooth wireless technology Wi Fi can achieve connection speeds of up to 54 Mbps depending on conditions at any given location which easily allows you to share large files or quickly surf the internet with your SGH i907 Note Wireless Fidelity Wi Fi is a WLAN based on the 802 11 protocol which transmits and receives in the 2 4 GHz frequen...

Страница 139: ... for the network you want 2 Select The Internet if the network connects to the Internet does not use proxy settings or Work uses proxy settings 3 If you are prompted for a Network or Security key enter it and select Connect Manually Entering Network Settings A wireless network can be added when a network is detected the Wi Fi icon displays in the Title Bar or you can add the network manually by en...

Страница 140: ...hat is does not broadcast it s SSID select the This is a hidden network check box If this is an ad hoc connection device to device select the Thisis a device to device ad hoc connection check box 6 Select the Next soft key to continue onto the Authentication and Data Encryption information Use the information provided by your Network administrator to complete this section 7 To connect to an availa...

Страница 141: ...e Today screen press the Start key to activate the Start menu 2 Select Settings Connections tab Wi Fi to open the Configure Wireless Networks screen 3 Select the Network Adapters tab 4 The current connection property displays in the My network card connects to and displays as either The Internet or Work Select The Internet if the network connects to the Internet does not use proxy settings or Work...

Страница 142: ...a to the microSD card from a PC 1 Insert the microSD card label side up into the slot on the right side of the handset The label side should be facing upward that is facing toward you 2 Connect the handset into the PC using an optional USB Data Cable and synchronize the device with your PC via ActiveSync 3 Open Windows Explorer then highlight the application or folder that you wish to transfer to ...

Страница 143: ...SGH i907 These games are listed in the Games folder under Programs You can download other games and add these to your Java folder Note Games can be downloaded from the Internet and stored on your phone Instructions from the game download site should inform you of the location folder in which to store the application on your phone Brain Challenge Vol 2 Demo 1 From the Today screen press the Start k...

Страница 144: ...mmencement of a new game 5 Press Menu soft key and then select Options to display the options screen for the current game Choose from Play Sounds Confirm End Game Display Bursts Guest Mode Game Style and Breaker Set 6 Update your selected options then press or select to return to the game 7 Press or select to exit the current game and return to the previous screen Ms Pac Man 1 From the Today scree...

Страница 145: ...TONS for additional game options HELP GET PAC MAN DEMO MORE NAMCO GAMES and QUIT 7 Update your selected options then select NEW GAME START to start play 8 Press or select to exit the current game and return to the previous screen Sims 2 1 From the Today screen press the Start key to activate the Start menu 2 Select Programs Games Sims 2 3 You are prompted to allow the game to use the network to va...

Страница 146: ...t key and select New Game to commence a new game Play is ready to begin 4 Press the Menu soft key and then select Options to display the options screen for the current game Choose from Draw Scoring Time game Display status and Keep cumulative score 5 Update your selected options then press or select to return to the game 6 Press or select to exit the current game and return to the previous screen ...

Страница 147: ...elect Don t allow for this session then press the OK soft key 4 You are prompted to activate sound for this game To activate game sounds select Yes 5 A list of options displays Choose from CAREER VERSUS SETTINGS MORE GAMES HELP NEW PLAYER ABOUT and EXIT 6 Update your selected options then select VERSUS to start play 7 Press or select to exit the current game and return to the previous screen ...

Страница 148: ...nown as the Specific Absorption Rate SAR The SAR is a measure of the rate of absorption of RF energy by the human body expressed in units of watts per kilogram W kg The FCC requires wireless phones to comply with a safety limit of 1 6 watts per kilogram 1 6 W kg The FCC exposure limit incorporates a substantial margin of safety to give additional protection to the public and to account for any var...

Страница 149: ... be viewed online at http www fcc gov oet ea To find information that pertains to a particular model phone this site uses the phone FCC ID number which is usually printed somewhere on the case of the phone Sometimes it may be necessary to remove the battery pack to find the number Once you have the FCC ID number for a particular phone follow the instructions on the website and it should provide va...

Страница 150: ...l Communications Commission safety guidelines that were developed with the advice of FDA and other federal health and safety agencies When the phone is located at greater distances from the user the exposure to RF is drastically lower because a person s RF exposure decreases rapidly with increasing distance from the source The so called cordless phones which have a base unit connected to the telep...

Страница 151: ...mation on possible effects of wireless phone use on human health FDA belongs to an interagency working group of the federal agencies that have responsibility for different aspects of RF safety to ensure coordinated efforts at the federal level The following agencies belong to this working group National Institute for Occupational Safety and Health Environmental Protection Agency Federal Communicat...

Страница 152: ...ncer glioma meningioma or acoustic neuroma tumors of the brain or salivary gland leukemia or other cancers None of the studies demonstrated the existence of any harmful health effects from wireless phones RF exposures However none of the studies can answer questions about long term exposures since the average period of phone use in these studies was around three years What research is needed to de...

Страница 153: ... The initial research will include both laboratory studies and studies of wireless phone users The CRADA will also include a broad assessment of additional research needs in the context of the latest research developments around the world What steps can I take to reduce my exposure to radio frequency energy from my wireless phone If there is a risk from these products and at this point we do not k...

Страница 154: ... Hands free kits can be used with wireless phones for convenience and comfort These systems reduce the absorption of RF energy in the head because the phone which is the source of the RF emissions will not be placed against the head On the other hand if the phone is mounted against the waist or other part of the body during use then that part of the body will absorb more RF energy Wireless phones ...

Страница 155: ... This standard specifies test methods and performance requirements for hearing aids and wireless phones so that no interference occurs when a person uses a compatible phone and a compatible hearing aid at the same time This standard was approved by the IEEE in 2000 FDA continues to monitor the use of wireless phones for possible interactions with other medical devices Should harmful interference b...

Страница 156: ...ou get an incoming call at an inconvenient time let your voice mail answer it for you 4 Let the person you are speaking with know you are driving if necessary suspend the call in heavy traffic or hazardous weather conditions Rain sleet snow ice and even heavy traffic can be hazardous 5 Do not take notes or look up phone numbers while driving Jotting down a to do list or flipping through your addre...

Страница 157: ... person is exposed to loud sounds over time The risk of hearing loss increases as sound is played louder and for longer durations Prolonged exposure to loud sounds including music is the most common cause of preventable hearing loss Some scientific research suggests that using portable audio devices such as portable music players and cellular telephones at high volume settings for long durations m...

Страница 158: ...ring could be affected Avoid using headphones after exposure to extremely loud noises such as rock concerts that might cause temporary hearing loss Temporary hearing loss might cause unsafe volumes to sound normal Do not listen at any volume that causes you discomfort If you experience ringing in your ears hear muffled speech or experience any temporary hearing difficulty after listening to your p...

Страница 159: ...facturer to discuss alternatives Implantable Medical Devices A minimum separation of six 6 inches should be maintained between a handheld wireless phone and an implantable medical device such as a pacemaker or implantable cardioverter defibrillator to avoid potential interference with the device Persons who have such devices Should ALWAYS keep the phone more than six 6 inches from their implantabl...

Страница 160: ...Not all phones have been rated Phones that are rated have the rating on their box or a label located on the box The ratings are not guarantees Results will vary depending on the user s hearing device and hearing loss If your hearing device happens to be vulnerable to interference you may not be able to use a rated phone successfully Trying out the phone with your hearing device is the best way to ...

Страница 161: ...here may be some newer wireless technologies used in this phone that have not been tested yet for use with hearing aids It is important to try the different features of this phone thoroughly and in different locations using your hearing aid or cochlear implant to determine if you hear any interfering noise Consult your service provider about its return and exchange policies and for information on ...

Страница 162: ... off your vehicle engine Emergency Calls This phone like any wireless phone operates using radio signals wireless and landline networks as well as user programmed functions which cannot guarantee connection in all conditions Therefore you should never rely solely on any wireless phone for essential communications medical emergencies for example Remember to make or receive any calls the phone must ...

Страница 163: ... and void the phone warranty if said accessories cause damage or a defect to the phone Although your phone is quite sturdy it is a complex piece of equipment and can be broken Avoid dropping hitting bending or sitting on it Other Important Safety Information Only qualified personnel should service the phone or install the phone in a vehicle Faulty installation or service may be dangerous and may i...

Страница 164: ... 0 2 watts in digital mode Maintaining Your Phone s Peak Performance For the best care of your phone only authorized personnel should service your phone and accessories Faulty service may void the warranty There are several simple guidelines to operating your phone properly and maintaining safe satisfactory service To ensure that the Hearing Aid Compatibility rating for your phone is maintained se...

Страница 165: ...strength on the cellular network and the parameters set by the network operator Follow battery usage storage and charging guidelines found in the user s guide Battery charging time depends on the remaining battery charge and the type of battery and charger used The battery can be charged and discharged hundreds of times but it will gradually wear out When the operation time talk time and standby t...

Страница 166: ...n a pocket or bag Short circuiting the terminals may damage the battery or the object causing the short circuiting Do not permit a battery out of the phone to come in contact with metal objects such as coins keys or jewelry Do not crush puncture or put a high degree of pressure on the battery as this can cause an internal short circuit resulting in overheating Dispose of used batteries in accordan...

Страница 167: ... Do not paint the phone Paint can clog the device s moving parts and prevent proper operation Do not put the phone in or on heating devices such as a microwave oven a stove or a radiator The phone may explode when overheated If your phone is equipped with an external antenna use only the supplied or an approved replacement antenna Unauthorized antennas or modified accessories may damage the phone ...

Страница 168: ...use of Product in conjunction with accessories products or ancillary peripheral equipment not furnished or approved by SAMSUNG e defects or damage from improper testing operation maintenance installation or adjustment f installation maintenance and service of Product or g Product used or purchased outside the United States or Canada This Limited Warranty covers batteries only if battery capacity f...

Страница 169: ...T AS SET FORTH IN THE EXPRESS WARRANTY CONTAINED HEREIN PURCHASER TAKES THE PRODUCT AS IS AND SAMSUNG MAKES NO WARRANTY OR REPRESENTATION AND THERE ARE NO CONDITIONS EXPRESS OR IMPLIED STATUTORY OR OTHERWISE OF ANY KIND WHATSOEVER WITH RESPECT TO THE PRODUCT INCLUDING BUT NOT LIMITED TO THE MERCHANTABILITY OF THE PRODUCT OR ITS FITNESS FOR ANY PARTICULAR PURPOSE OR USE WARRANTIES OF TITLE OR NON I...

Страница 170: ... AS LIMITED AS THE LAW PERMITS THE PARTIES UNDERSTAND THAT THE PURCHASER MAY USE THIRD PARTY SOFTWARE OR EQUIPMENT IN CONJUNCTION WITH THE PRODUCT SAMSUNG MAKES NO WARRANTIES OR REPRESENTATIONS AND THERE ARE NO CONDITIONS EXPRESS OR IMPLIED STATUTORY OR OTHERWISE AS TO THE QUALITY CAPABILITIES OPERATIONS PERFORMANCE OR SUITABILITY OF ANY THIRDPARTY SOFTWARE OR EQUIPMENT WHETHER SUCH THIRD PARTY SO...

Страница 171: ...ng Customer Care Center for details Important Please provide warranty information proof of purchase to Samsung s Customer Care Center in order to provide this service at no charge If the warranty has expired on the device charges may apply Customer Care Center 1000 Klein Rd Plano TX 75074 Toll Free Tel 1 888 987 HELP 4357 Samsung Telecommunications America LLC 1301 East Lookout Drive Richardson Te...

Страница 172: ...th and Wi Fi 129 Bluetooth Bonds Accepting Bonds 133 Renaming Bonds 133 C Calendar Appointments and Events 106 changing views 108 Scheduling an Appointment 106 Call Functions 32 Answering a Call 35 Call History 36 Making a Call 33 Roaming 39 Your Phone Number 35 Call History creating contact 37 deleting contact 38 placing a call 37 sending messages 39 Certificate Configuring 77 Deleting 29 Managin...

Страница 173: ...lders Text Message Accessing 58 G Games Brain Challenge 140 Bubble Breaker 141 Ms Pac Man 141 Sims 2 142 Solitaire 143 WSOP Pro Challenge Poker 143 Getting Started 4 Activating Your Phone 10 Voicemail 11 H HAC 157 Health and Safety Information 145 I Icon Battery 27 Charging 26 Data Session 26 Flight Mode 25 GPS 25 Missed Call 26 New MultiMedia Message 26 New Text Message 26 New Voicemail 26 Progra...

Страница 174: ...8 microSD 27 28 Installation 27 Removal 28 M Ratings 157 My Text Messages Editing 67 Inserting 67 Using 66 N Network Services 125 New Document 92 Notes deleting 113 options 114 recording 112 recording a call 113 writing 113 O Office Mobile Excel Mobile 90 PowerPoint Mobile 91 92 Word Mobile 92 93 P Performing a Manual Hard Reset 31 Personal Organizer Alarm 104 Calculator 114 Calendar 106 Task List...

Страница 175: ...indows Mobile Device Center 6 123 T Tasks Beaming via Bluetooth 112 creating 109 deleting 112 editing 111 entry bar 111 marking complete 110 options 110 Text Conventions 4 Text Entry Input Method 46 Options 49 Word Completion 48 Today Screen 103 Customization 13 date and time 104 Functions 21 Item List 13 owner information 106 Setting Alarms 104 Theme 13 T Ratings 157 U UL Certification 146 Unders...

Страница 176: ...165 Wi Fi 83 Windows Mobile Internet Explorer 89 Media Player 94 Task Manager 101 Wireless Manager 84 105 Bluetooth Status 105 Wi Fi Status 105 Word Completion 48 Word Mobile Beam Documents 94 Delete Documents 93 new document 92 ...

Отзывы: