background image

v

Important Precautions and Safety Information

When using this machine, these basic safety precautions should always be 
followed to reduce risk of fire, electric shock and injury to people:

1. Read and understand all instructions.

2. Use common sense whenever operating electrical appliances.

3. Follow all warnings and instructions marked on the machine and in the 

literature accompanying the machine.

4. If an operating instruction appears to conflict with safety information, 

heed the safety information. You may have misunderstood the operating 
instruction. If you cannot resolve the conflict, contact your sales or 

service representative for assistance.

5. Unplug the machine from the AC wall socket and/or telephone jack 

before cleaning. Do not use liquid or aerosol cleaners. Use only a damp 
cloth for cleaning.

6. Do not place the machine on an unstable cart, stand or table. It may fall, 

causing serious damage.

7. Your machine should never be placed on, near or over a radiator, heater, 

air conditioner or ventilation duct.

8. Do not allow anything to rest on the power. Do not locate your machine 

where the cords will be abused by persons walking on them.

9. Do not overload wall outlets and extension cords. This can diminish 

performance, and may result in the risk of fire or electric shock.

10. Do not allow pets to chew on the AC power, telephone or PC interface 

cords.

11. Never push objects of any kind into the machine through case or cabinet 

openings. They may touch dangerous voltage points, creating a risk of 
fire or shock. Never spill liquid of any kind onto or into the machine.

12. Your machine may have a heavy cover for optimal pressure on the 

document for the best scanning and/or faxing (usually the flatbed-type 

machine). In this case, replace the cover after placing document on the 
scan glass, by holding and moving it down slowly until it seats on its 
location.

13. To reduce the risk of electric shock, do not disassemble the machine. 

Take it to a qualified service technician when repair work is required. 
Opening or removing covers may expose you to dangerous voltages or 
other risks. Incorrect reassembly could cause electric shock when the 

unit is subsequently used. 

14. Unplug the machine from the telephone jack, PC and AC wall outlet and 

refer servicing to qualified service personnel under the following 
conditions:

•When any part of the power cord, plug or connecting cable is damaged 

or frayed.

•If liquid has been spilled into the machine. 
•If the machine has been exposed to rain or water.
•If the machine does not operate properly after instructions have been 

followed.

•If the machine has been dropped, or the cabinet appears damaged.
•If the machine exhibits a sudden and distinct change in performance.

15. Adjust only those controls covered by the operating instructions. 

Improper adjustment of other controls may result in damage, and may 
require extensive work by a qualified service technician to restore the 
machine to normal operation.

16. Avoid using this machine during a lightning storm. There may be a 

remote risk of electric shock from lightning. If possible, unplug the AC 

power and telephone cord for the duration of the lightning storm.

17. SAVE THESE INSTRUCTIONS.

18. Use only No.26 AWG or larger telephone line cord.

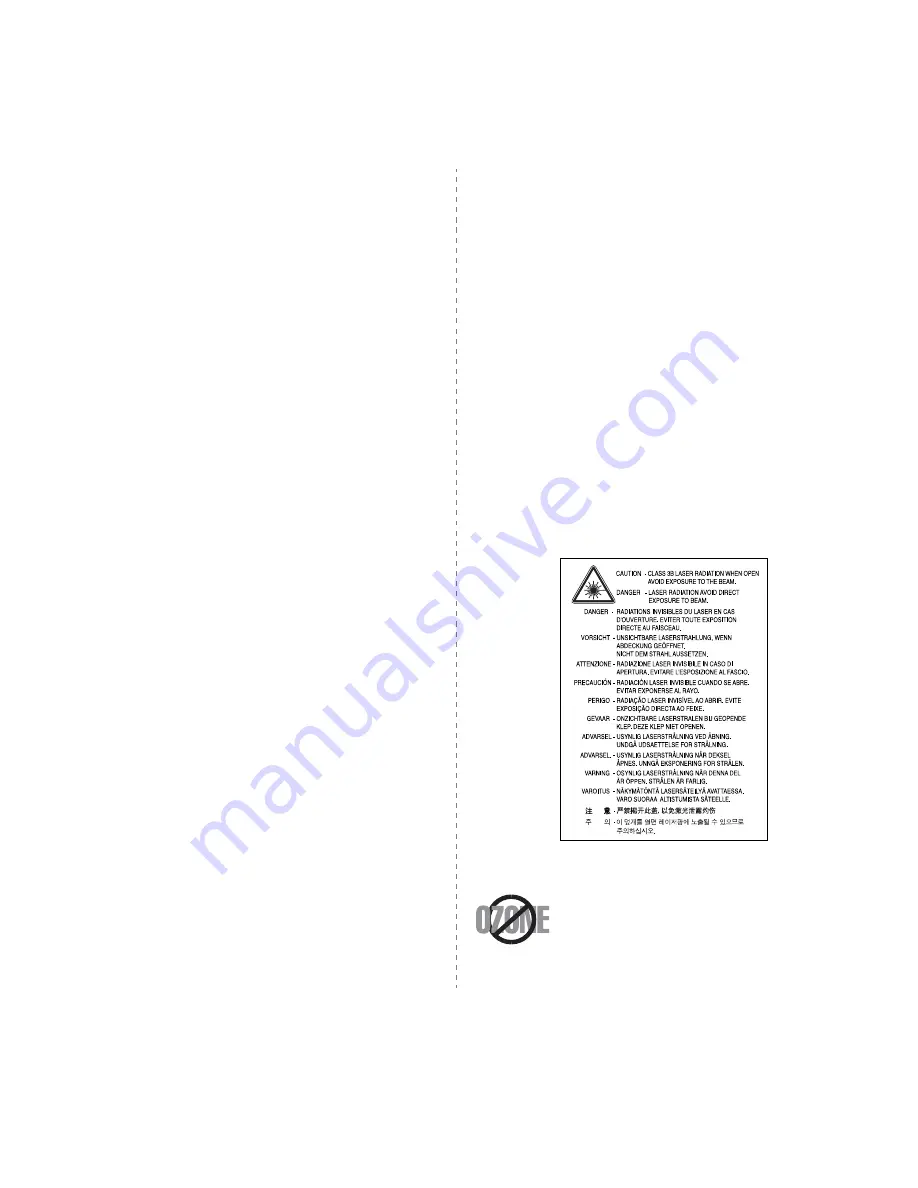
Laser Safety Statement

The printer is certified in the U.S. to conform to the requirements of DHHS 

21 CFR, chapter 1 Subchapter J for Class I(1) laser products, and elsewhere 
is certified as a Class I laser product conforming to the requirements of IEC 
825.
Class I laser products are not considered to be hazardous. The laser system 
and printer are designed so there is never any human access to laser 
radiation above a Class I level during normal operation, user maintenance or 

prescribed service condition.
WARNING 
Never operate or service the printer with the protective cover removed from 

Laser/Scanner assembly. The reflected beam, although invisible, can 
damage your eyes.

Ozone Safety

During normal operation, this machine produces ozone. 
The ozone produced does not present a hazard to the 

operator. However, it is advisable that the machine be 
operated in a well ventilated area.
If you need additional information about ozone, please 

request your nearest Samsung dealer.

Содержание SCX4521F - B/W Laser - All-in-One

Страница 1: ......

Страница 2: ...arks of Apple Computer Inc Microsoft Windows Windows 98 Windows Me Windows 2000 Windows NT 4 0 and Windows XP are registered trademarks of Microsoft Corporation All other brand or product names are tr...

Страница 3: ...g com it JAMAICA 1 800 234 7267 www samsung com latin JAPAN 0120 327 527 www samsung com jp LATVIA 800 7267 www samsung com lv index htm LITHUANIA 8 800 77777 www samsung com lt LUXEMBURG 0035 0 2 261...

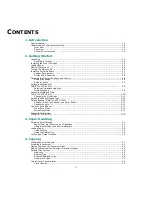
Страница 4: ...ng the Clock Mode 2 10 Setting the Paper Size and Type 2 10 Setting Sounds Only for SCX 4521F 2 11 Speaker Ringer Key Sound and Alarm Sound 2 11 Speaker Volume 2 11 Using the Save Modes 2 11 Toner Sav...

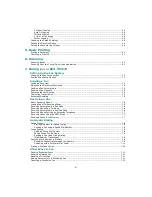
Страница 5: ...a Fax About Receiving Modes 7 6 Loading Paper for Receiving Faxes 7 6 Receiving Automatically in Fax Mode 7 6 Receiving Manually in Tel Mode 7 6 Receiving Automatically in Ans Fax Mode 7 6 Receiving M...

Страница 6: ...earing Document Jams 9 1 Input Misfeed 9 1 Exit Misfeed 9 2 Clearing Paper Jams 9 2 In the Tray 9 2 In the Manual Tray 9 2 In the Fuser Area or Around the Toner Cartridge 9 3 In the Paper Exit Area 9...

Страница 7: ...uired Opening or removing covers may expose you to dangerous voltages or other risks Incorrect reassembly could cause electric shock when the unit is subsequently used 14 Unplug the machine from the t...

Страница 8: ...guarantee that interference will not occur in a particular installation If this equipment does cause harmful interference to radio or television reception which can be determined by turning the equipm...

Страница 9: ...tions on how to actually test the emergency number This machine may not be used on coin service or party lines This machine provides magnetic coupling to hearing aids You may safely connect this equip...

Страница 10: ...rown Live If the wires in the mains lead do not match the colors marked in your plug do the following You must connect the green and yellow wire to the pin marked by the letter E or by the safety Eart...

Страница 11: ...can English British English American English Re dialling Re dialing Colour Color Emphasise Emphasize Recognise Recognize Organise Organize Authorise Authorize Cancelling Canceling Customise Customize...

Страница 12: ...tray supports convenient access Create professional documents Print Watermarks You can customize your documents with words such as Confidential For details see Software User s Guide Print Posters The...

Страница 13: ...1 see page 1 3 Front Door Output Tray Face Down Paper Input Tray Paper Output Extension Document Output Tray Toner Cartridge Manual Tray The figure above shows an SCX 4521F Rear View Line Jack Only fo...

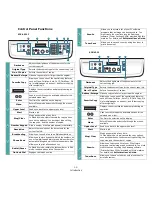
Страница 14: ...se into a fax number On Hook Dial Engages the telephone line 1 2 3 4 5 SCX 4321 Scan to Allows you to access a list of your PC software programs that an image can be scanned to You must create the sca...

Страница 15: ...e power cord and the telephone line cord may differ depending on your country s specifications CD ROM The CD ROM contains the Samsung printer drivers Scan drivers Printer Settings Utility SmarThru sof...

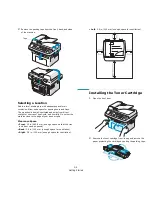
Страница 16: ...s of heat cold and humidity Do not set the machine close to the edge of your desk or table Clearance Space Front 19 in 482 6 mm enough space so that the tray and door can be opened Back 3 9 in 100 mm...

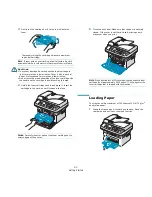
Страница 17: ...tridge to avoid touching this area 4 Unfold the toner cartridge handle and grasp it Insert the cartridge in the machine until it snaps into place NOTE Carefully insert or pull out the toner cartridge...

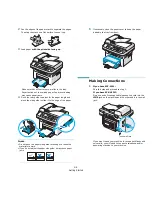
Страница 18: ...OTES Do not push the paper side guide far enough to cause the materials to warp If you do not adjust the paper side guide it may cause paper jams 5 If necessary close the paper cover to keep the paper...

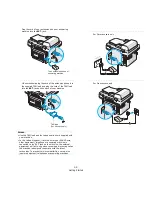
Страница 19: ...ied with your machine In the United Kingdom if a three wire type SHUNT wire older equipment telephone or answering machine is connected to the EXT jack on the machine the external equipment will fail...

Страница 20: ...000 XP Macintosh 10 3 or Linux To the USB port on your computer To the parallel port on your computer Turning the Machine On 1 Plug one end of the supplied three pronged electrical cord into the AC so...

Страница 21: ...d image in many ways using a powerful image editor and to send the image by e mail You can also open another image editor program installed in your Windows like Adobe PhotoShop from SmarThru For detai...

Страница 22: ...guage that displays on the control panel follow these steps 1 Press Menu until Machine Setup appears on the top line of the display 2 Press the scroll button or until Language appears on the bottom li...

Страница 23: ...le when you set up your machine you enter your name or your company s name and telephone number When you store one or two digit speed dial or group dial numbers you may also enter the corresponding na...

Страница 24: ...n the time and date on the display is correct 6 To return to Standby mode press Stop Clear Changing the Clock Mode You can set your machine to display the current time using either a 12 hour or 24 hou...

Страница 25: ...ntil you hear the volume you want The display shows the current volume level 3 Press On Hook Dial to save the change and return to Standby mode NOTE You can adjust the speaker volume only when the tel...

Страница 26: ...ress Menu until Machine Setup appears on the top line of the display 2 Press the scroll button or until you see Dial Mode on the bottom line and press Enter 3 Press the scroll button or to select the...

Страница 27: ...Weight 16 24 lb 60 to 90 g m2 bond for the tray with multi pages feeding and 16 43 lb 60 to 165 g m2 bond for the manual tray and tray with single page feeding Brightness Some papers are whiter than...

Страница 28: ...for long periods of time Dust and dirt may accumulate on them resulting in spotty printing To avoid smudging caused by fingerprints handle them carefully To avoid fading do not expose printed transpa...

Страница 29: ...erial 3 Select Manual Feed for Source from the software application and then select the correct paper size and type For details see Software User s Guide 4 Operate printing 5 The display shows Add Pap...

Страница 30: ...u can use the document glass or the Automatic Document Feeder ADF to load an original document for copying scanning and sending a fax Using the ADF you can load up to 30 documents 20 lb 75 g m2 bond f...

Страница 31: ...darkness and original type by using the control panel buttons See Setting Copy Options on page 4 3 To clear the settings use the Stop Clear button 5 If necessary you can use special copy features such...

Страница 32: ...You can choose from the following image modes Text Use for documents containing mostly text Text Photo Use for documents with mixed text and photographs Photo Use when the originals are photographs NO...

Страница 33: ...e does not work 1 Place the document to be copied on the document glass and close the cover 2 Press Menu until Copy Feature appears on the top line of the display 3 Press the scroll button or until Cl...

Страница 34: ...you press the Stop Clear button or if no buttons are pressed for approximately 30 seconds the machine cancels the copy job and returns to Standby mode 8 Press Start again 2 Up or 4 Up Copying This co...

Страница 35: ...ot start copying after changing them on the control panel 1 Press Menu on the control panel until Copy Setup appears on the top line of the display 2 Press the scroll button or to display Timeout on t...

Страница 36: ...in a print queue or print spooler such as the Printer group in Windows delete the job as follows 1 Click the Windows Start button 2 For Windows 98 NT4 0 2000 Me select Settings and then Printers For...

Страница 37: ...driver for scanning images For details see Software User s Guide From the Samsung SmarThru software Launch Samsung SmarThru and open Scan To to begin scanning For details see Software User s Guide NOT...

Страница 38: ...up appears on the top line of the display The first available menu item Default Change displays on the bottom line 2 Press the scroll button or until you see the desired menu item on the bottom line a...

Страница 39: ...ide the margin and the Auto Reduction feature is turned on the machine reduces the document to fit it onto the appropriately sized paper and discard does not occur If the Auto Reduction feature is tur...

Страница 40: ...DF You can insert up to 30 sheets at a time Make sure that the bottom of the document stack matches the paper size marked on the document tray 2 Adjust the document guide on the ADF to match the width...

Страница 41: ...rts the Super Fine resolution See the notes below Photo Documents containing shades of gray or photographs Color Documents with colors Sending a color fax is enabled only if the machine with which you...

Страница 42: ...t Feeder see To fax a document using the Automatic Document Feeder ADF on page 7 3 the machine automatically begins to send For a document placed on the document glass the display asks if you want to...

Страница 43: ...faxes can only be printed on Letter A4 Legal Folio Executive or B5 sized paper For details about loading paper and setting the paper size in the tray see Loading Paper on page 2 3 and Setting the Pap...

Страница 44: ...istinctive Ring Pattern Detection option Distinctive Ring service must be installed on your telephone line by the telephone company To set up Distinctive Ring Pattern Detection you will need another t...

Страница 45: ...on on page 7 4 If you need to change the darkness see Darkness on page 7 2 3 Enter the speed dial number For a one digit speed dial number press and hold the appropriate digit button For a two digit s...

Страница 46: ...u want to edit another group press Enter and repeat from step 5 Or To return to Standby mode press Stop Clear Sending a Fax Using Group Dialing Multi address Transmission You can use group dialing for...

Страница 47: ...out loading a document see Loading a Document on page 7 3 2 Adjust the document resolution to suit your fax needs see Adjusting the Document Resolution on page 7 4 If you need to change the darkness s...

Страница 48: ...If you set a time earlier than the current time the document will be sent at that time on the following day 12Press Enter when the starting time displays correctly 13The document is scanned into memor...

Страница 49: ...the display 4 Press the scroll button or to display Add Page on the bottom line and press Enter The display shows the last job reserved in memory 5 Press the scroll button or until you see the fax job...

Страница 50: ...m line and press Enter 4 Enter the four digit password and press Enter The mode is deactivated and the machine prints all faxes stored in memory 5 To return to Standby mode press Stop Clear Printing R...

Страница 51: ...V Forward You can set your machine to forward incoming faxes to another fax number during a specified time period When a fax arrives at your machine it is stored in memory Then the machine dials the f...

Страница 52: ...Clears all of the data stored in the memory Paper Setting Restores all of the Paper Setting options to the factory default Machine Setup Resets all of your settings to the factory default Copy Setup...

Страница 53: ...e cabinet While cleaning the inside of the machine be careful not to touch the transfer roller located underneath the toner cartridge Oil from your fingers can cause print quality problems Cleaning th...

Страница 54: ...e To get the most from the toner cartridge keep the following guidelines in mind Do not remove the toner cartridge from its package until ready for use Do not refill the toner cartridge The machine wa...

Страница 55: ...es needs to be replaced NOTE You can set the machine to ignore the Toner Empty message and to continue printing incoming faxes See Ignoring the Toner Empty Message Only for SCX 4521F on page 8 5 Remov...

Страница 56: ...1 Press Menu until Machine Setup appears on the display 2 Press the scroll button or until Ignore Toner appears on the bottom line and press Enter 3 Press the Scroll button or to select On or Off Sel...

Страница 57: ...ad You can purchase an ADF rubber pad from your Samsung dealer or the retailer where you bought your machine 1 Open the ADF cover 2 Remove the ADF rubber pad from the ADF as shown 3 Insert a new ADF r...

Страница 58: ...Common Macintosh Problems Clearing Document Jams When a document jams while passing through the ADF Automatic Document Feeder Document Jam appears on the display Input Misfeed 1 Remove any remaining p...

Страница 59: ...al tray page 9 2 Paper Jam 1 Open Close Door In the fuser area or around the toner cartridge page 9 3 Paper Jam 2 Check Inside In the paper exit area page 9 3 In the Tray 1 Remove the jammed paper in...

Страница 60: ...ry pull the manual tray out 4 Remove the jammed paper by gently pulling it straight out 5 If necessary push the manual tray back into the machine 6 Reinstall the toner cartridge and close the front do...

Страница 61: ...commended print materials See Paper Specifications on page 10 3 Ensure that the recommended print side of print materials is facing up in the tray Clearing LCD Error Messages Display Meaning Suggested...

Страница 62: ...ry Full only for SCX 4521F The memory is full Delete unnecessary documents and retransmit after more memory becomes available Alternatively split the transmission into more than one operation No Answe...

Страница 63: ...s not too much paper in the tray The tray can hold up to 150 sheets of paper depending on the thickness of your paper Make sure that you are using the correct type of paper See Paper Specifications on...

Страница 64: ...m the wrong paper source The paper source selection in the printer properties may be incorrect For many software applications the paper source selection is found under the Paper tab within the printer...

Страница 65: ...he paper may not meet paper specifications for example the paper is too moist or too rough See Paper Specifications on page 10 3 If the entire page is light the print resolution setting is too low or...

Страница 66: ...ality paper see Cleaning the Drum on page 8 5 Condition Suggested solutions AaBbCc AaBbCc AaBbCc AaBbCc AaBbCc AaBbCc AaBbCc AaBbCc AaBbCc AaBbCc AaBbCc AaBbCc AaBbCc AaBbCc AaBbCc Background scatter...

Страница 67: ...f the printed paper is curled or paper does not feed into the machine Turn over the stack of paper in the tray Also try rotating the paper 180 in the tray Condition Suggested solutions A A AaBbCc AaBb...

Страница 68: ...mbers are stored in memory correctly Print a Phonebook list referring to Phonebook List on page 7 13 The document does not feed into the machine Make sure that the document is not wrinkled and you are...

Страница 69: ...k if the MFP port is not busy Since functional components of MFP printer and scanner share the same I O interface MFP port the situation of simultaneous access of different consumer application to the...

Страница 70: ...p for application I encounter error Cannot open MFP port device file when printing a document Please avoid changing print job parameters via SLPR utility for example while a print job is in progress K...

Страница 71: ...sheets Paper type Plain paper Transparencies Labels Card stock Envelopes Consumables 1 piece toner cartridge system Power requirements 110 127 VAC 50 60 Hz 4 5 A 220 240 VAC 50 60 Hz 2 5 A Power cons...

Страница 72: ...Zoom rate Platen 25 400 ADF 25 100 Multiple copies 1 99 pages Gray scale 256 levels Printer Specifications Item Description Printing method Laser Beam Printing Printing speed Print speed will be affe...

Страница 73: ...as cut sheet paper including up to 100 recycled fiber content paper envelopes labels transparencies and custom size paper Properties such as weight composition grain and moisture content are important...

Страница 74: ...y may differ depending on media weight thickness and environmental conditions Guidelines for Using Paper For the best result use conventional 20 lb 75 g m2 bond paper Ensure that the paper is of good...

Страница 75: ...moothness 100 400 Sheffield Output Location Capacity Face down output tray 50 sheets of 20 lb 75 g m2 bond paper The paper storage environment should be properly maintained to ensure optimum performan...

Страница 76: ...an envelope creating an air bubble then the envelope may wrinkle during printing Correct Incorrect Type of Address Minimum Maximum Return address 0 6 in 15 mm 2 in 51 mm Delivery address 2 in 51 mm 3...

Страница 77: ...fault setting change 4 6 from ADF 4 2 from document glass 4 2 number of pages 4 3 original type 4 3 special features 4 4 time out set 4 6 D date and time set 2 10 delayed fax 7 11 display language cha...

Страница 78: ...e 7 6 in Secure Receiving mode 7 13 in Tel mode 7 6 in the memory 7 7 redialing automatically 7 5 manually 7 5 reduced enlarged copying 4 3 replacing ADF rubber pad 8 6 toner cartridge 8 4 reports pri...

Страница 79: ...Samsung Printer Software User s Guide...

Страница 80: ...11 Printer Tab 11 Using a Favorite Setting 12 Using Help 12 Chapter 3 ADVANCED PRINTING Printing Multiple Pages on One Sheet of Paper N Up Printing 13 Printing Posters 14 Printing a Reduced or Enlarge...

Страница 81: ...rThru 22 Uninstalling Samsung SmarThru 23 Using Samsung SmarThru 23 Using Onscreen Help File 24 Scanning Process with TWAIN enabled Software 25 Scanning Using the WIA Driver 25 Chapter 7 USING YOUR PR...

Страница 82: ...apter 8 USING YOUR PRINTER WITH A MACINTOSH Installing Software for Macintosh 34 Setting Up the Printer 35 For a Network connected Macintosh 35 For a USB connected Macintosh 35 Printing 36 Printing a...

Страница 83: ...ur CD ROM drive The CD ROM should automatically run and an installation window appears If the installation window does not appear click Start and then Run Type X Setup exe replacing X with the letter...

Страница 84: ...omatically install Adobe Acrobat Reader for you 3 After the installation is finished a window asking you to print a test page appears If you choose to print a test page select the checkbox and click N...

Страница 85: ...in this User s Guide may differ depending on the printer and interface in use 4 Select the components you want to reinstall and click Next If you select Printer the window asking you to print a test...

Страница 86: ...various Windows applications The exact steps for printing a document may vary depending on the application program you are using Refer to the User s Guide of your software application for the exact p...

Страница 87: ...am To make your changes permanent make them in the Printers folder The following procedure is for Windows XP For other Windows OS refer to the corresponding Windows User s Guide or online help 1 Click...

Страница 88: ...e Make sure that Source is set to the corresponding paper tray Use the Manual Feed source when printing to special material You need to load one sheet at a time into the manual tray If the paper sourc...

Страница 89: ...setting is for bolder line widths or darker gray scale images Dark This setting is for finer line width higher definition in graphics and lighter gray scale images 1 2 3 4 1 2 3 Advanced Options You...

Страница 90: ...bered pages of the document Print Even Pages Your printer prints only the even numbered pages of the document 1 2 3 1 2 3 About Tab Use the About tab to display the copyright notice and the version nu...

Страница 91: ...em from the Favorites drop down list The printer is now set to print according to the Favorites setting you selected To delete a Favorites item select it from the list and click Delete You can also re...

Страница 92: ...es on One Sheet of Paper N Up Printing You can select the number of pages to print on a single sheet of paper To print more than one page per sheet the pages will be reduced in size and arranged in th...

Страница 93: ...y an overlap in millimeters or inches to make it easier to pasting the sheets together 0 15 inches 0 15 inches 4 Click the Paper tab select the paper source size and type 5 Click OK and print the docu...

Страница 94: ...the document A Using Watermarks The Watermark option allows you to print text over an existing document For example you may want to have large gray letters reading DRAFT or CONFIDENTIAL printed diago...

Страница 95: ...ting click OK and start printing To stop printing the watermark select No Watermark from the Watermark drop down list Editing a Watermark 1 To change the print settings from your software application...

Страница 96: ...r logo or image 1 Create or open a document containing text or an image for use in a new page overlay Position the items exactly as you wish them to appear when printed as an overlay 2 To save the doc...

Страница 97: ...printing Select the overlay from the Overlay List box 6 If necessary click Confirm Page Overlay When Printing If this box is checked a message window appears each time you submit a document for print...

Страница 98: ...ed CD ROM Setting Up a Host Computer 1 Start Windows 2 From the Start menu select Printers and Faxes 3 Double click your printer driver icon 4 From the Printer menu select Sharing 5 Check the Share th...

Страница 99: ...Scan Settings Phonebook only for the fax available model and Firmware Update To exit click the Exit button at the bottom of each tab Use the help feature by refering the window which appears when you...

Страница 100: ...s Group dial Allows you to set up group dial numbers 1 2 3 4 5 6 7 1 2 3 4 5 6 7 When you click Group dial the following window opens Name Enter a name for the group Shows the numbers included in the...

Страница 101: ...2 Click Install SmarThru 3 Click Next 4 Follow the on screen instructions and click Next 5 Select the installation type and click Next The software installation supports two types of setup Typical Th...

Страница 102: ...confirm click OK 4 Click Finish You may be prompted to restart your computer In this case you must shut the computer down and then restart it before the changes will be saved Using Samsung SmarThru F...

Страница 103: ...and send it to the OCR program for text recognition Recommended Scan Option for OCR Resolution 200 or 300 dpi Image Type Grayscale or Black White Web Scanning an image previewing it and publishing it...

Страница 104: ...machine also supports the Windows Image Acquisition WIA driver for scanning images WIA is one of the standard components provided by Microsoft Windows XP and works with digital cameras and scanners Un...

Страница 105: ...sent by e mail uploaded to an FTP site or transferred to an external OCR system The MFP driver package is supplied with a smart and flexible installation program You don t need to search for addition...

Страница 106: ...the icon at the bottom of the desktop When the Terminal screen appears type in root localhost root cd mnt cdrom Linux root localhost root install sh NOTE The installation program runs automatically i...

Страница 107: ...rator MFP Configurator is a tool primarily intended for configuring MFP devices Since an MFP device combines the printer and scanner the MFP Configurator provides options logically grouped for printer...

Страница 108: ...s For details see page 30 Shows all of the installed printer Switches to Printer configuration Shows the status model name and URI of your printer Classes Tab The Classes tab shows a list of available...

Страница 109: ...nners I O ports are being chosen by scanner drivers automatically so proper settings are applied by default Switches to MPF ports configuration Shows the port type device connected to the port and sta...

Страница 110: ...s such as color options image size or image position Device allows you to set the print resolution paper source and destination 5 Click OK to apply the changes and close the scx6x20 Properties window...

Страница 111: ...own on the document glass 6 Click Preview in the Scanner Properties window Click your scanner The document is scanned and the image preview appears in the Preview Pane 7 Change the scan options in the...

Страница 112: ...you want to delete from the Job Type drop down list 2 Click Delete The setting is deleted from the list Using the Image Editor The Image Editor window provides you with menu commands and tools to edit...

Страница 113: ...Operating System Mac OS 10 3 x RAM 128 MB Free Disk Space 200 MB Install the Printer driver 1 Make sure that you connect your printer to the computer Turn on your computer and printer 2 Insert the CD...

Страница 114: ...ter the network cable or the USB cable For a Network connected Macintosh NOTE Some printers do not support a network interface Before connecting your printer make sure that your printer supports a net...

Страница 115: ...OK 4 Open the File menu and click Print 5 Choose the number of copies you want and indicate which pages you want to print 6 Click Print when you finish setting the options Mac OS 10 3 Make sure that y...

Страница 116: ...e clarity of printed characters and graphics The higher setting also may increase the time it takes to print a document Mac OS 10 3 1 1 2 2 Printing Multiple Pages on One Sheet of Paper You can print...

Страница 117: ...select it as your TWAIN source in the application you use The basic scanning process involves a number of steps Place your photograph or page on the document glass or ADF Open an application such as...

Страница 118: ...1 overlay create 17 delete 18 print 18 P Paper properties set 9 paper size set 9 print 31 paper source set 31 Windows 9 paper type set Macintosh 37 print 31 Windows 9 poster print 14 print document 7...

Страница 119: ...ows 4 reinstall Windows 6 system requirements Macintosh 34 uninstall Macintosh 34 Windows 6 system requirements Linux 26 Macintosh 34 T toner save set 10 TWAIN scan 25 U uninstall software Macintosh 3...

Страница 120: ...www samsungprinter com Rev 4 00...

Отзывы: