background image

73

Sidebar / Gadget

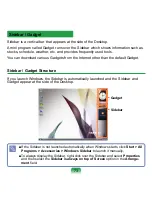
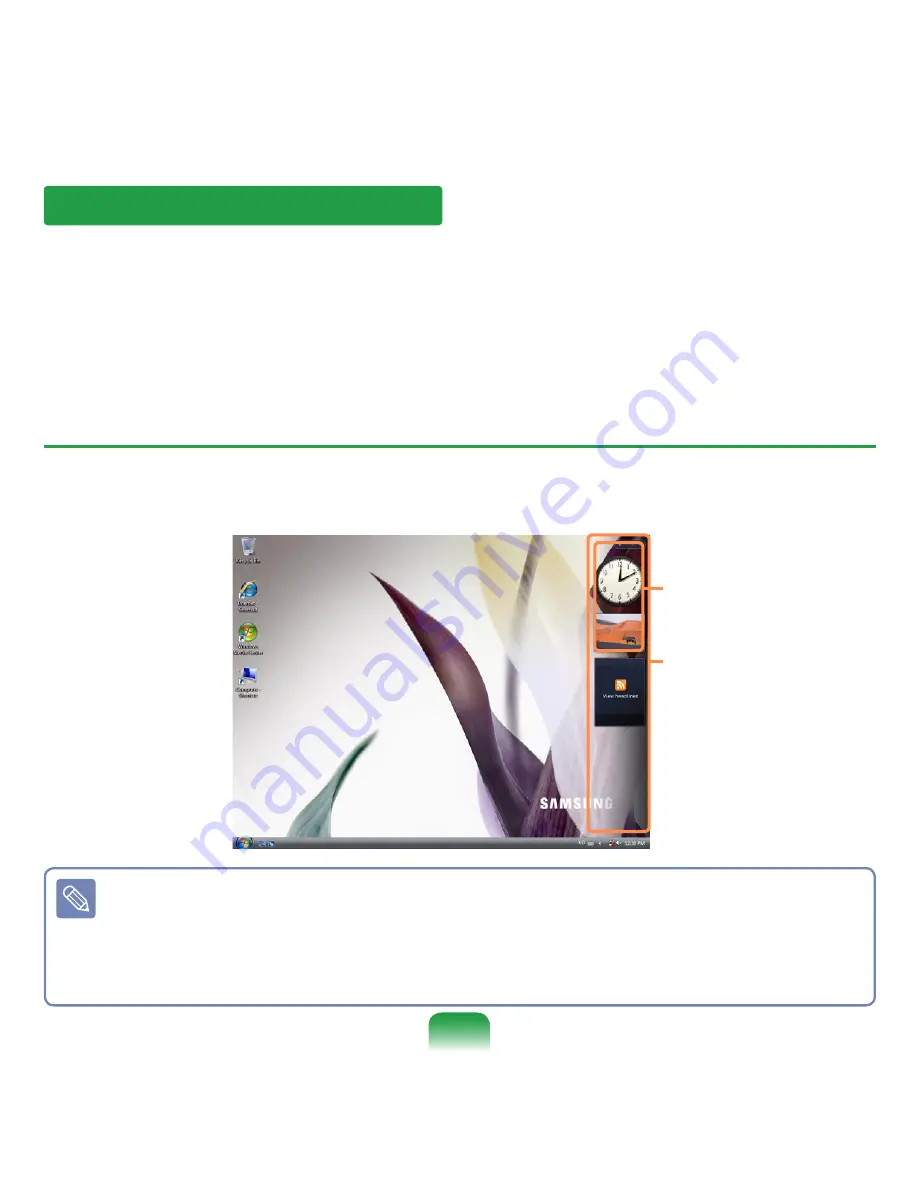
Sidebar is a vertical bar that appears at the side of the Desktop.
A mini program called Gadget runs over the Sidebar which shows information such as 

stocks, schedule, weather, etc. and provides frequently used tools.
You can download various Gadgets from the Internet other than the default Gadget.

Sidebar / Gadget Structure

If you launch Windows, the Sidebar is automatically launched and the Sidebar and 

Gadget appear at the side of the Desktop.

■ If the Sidebar is not launched automatically when Windows starts, click 

Start > All 

Programs > Accessories > Windows Sidebar

 to launch it manually.

■ To always display the Sidebar, right-click over the Sidebar and select 

Properties


and then select the 

Sidebar is always on top of Screen

 option in the 

Arrange-

ment

 field.

Sidebar

Gadget

Содержание NP-Q1 User Manual (Vista)

Страница 1: ...Start 4 Contents 7 Safety Precautions 8 Proper Posture During Computer Use 18 Important Safety Information 20 Replacement Parts and Accessories 22 Regulatory Compliance Statements 24 WEEE SYMBOL INFOR...

Страница 2: ...Basic Resolution of 800x480 Pixels Maximum Resolution of 2048x1536 Pixels when an external display is connected Auto Scaler Automatic Resolution Adjustment Function to Support High Resolution Output E...

Страница 3: ...ication Function Compact Light Weight Design for Portability Polished Design A mere 779g Without the Bluetooth modules High Gloss Front Panel Optional Accessories for Additional Convenience USB Data C...

Страница 4: ...o use the functions and how to use the program Utilizating the User Guide Be sure to read the Safety Precautions before using the computer For basic usage of the computer refer to the additionally sup...

Страница 5: ...ns marked with this symbol may cause slight injury to yourself or dam age your property Text Notations Icon Notation Description Before You Start Content included in this section includes informa tion...

Страница 6: ...Windows Vista as well as any unauthorized copy of Win dows Vista Example When trying to install Windows Vista Home Premium when Windows Vista Home Basic is already installed Other operating systems Wi...

Страница 7: ...r 4 Using the Network Wired Network 92 Wireless Network 95 Using the Easy Network Manager 98 Bluetooth 102 Chapter 5 Using Applications Introducing Programs 109 CyberLink PowerDVD 112 Samsung Update P...

Страница 8: ...is a danger of suffoca tion Keep a distance of 15cm or more between the computer and the wall and do not place any ob jects between them This may increase the in ternal temperature of the computer an...

Страница 9: ...ly into the power out let and AC adapter Failing to do so may cause re hazard Do not unplug the power cord out by pulling the cable only If the cord is damaged it may cause electric shock Do not bend...

Страница 10: ...nect the power cord and contact the service center Damage to the device within the computer may cause electric shock or re hazard Usage Related Disconnect all cables connected to the com puter before...

Страница 11: ...place any con tainer lled with water or chemicals over or near the computer If water or chemicals en ter the computer this may cause re or electric shock If the computer is broken or dropped disconnec...

Страница 12: ...sconnect all cables before disas sembling the computer If there is a modem disconnect the phone line If you are using a notebook computer make sure to remove the battery Failing to do so may cause ele...

Страница 13: ...Dispose of worn out bat teries properly There is a danger of re or explosion The battery disposal method may differ de pending on your country and region Dispose of the used battery in an appropriate...

Страница 14: ...ck and re Close the LCD panel only after checking if the note book computer is turned off The temperature may rise and it may cause overheat ing and deformation of the product Do not press the Eject B...

Страница 15: ...in mothion Make sure to use the emergency disk eject method only when the Optical Disk Drive is stopped There is a danger of injury Do not place your face close to the Optical Disk Drive tray when it...

Страница 16: ...ff and separate all con nected cables rst The product might be damaged or users may trip over the cables For long periods of not using the notebook computer discharge the battery and preserve as it is...

Страница 17: ...y be lost when the computer is turned off or reset by a power failure while the hard disk drive is operat ing The data may be lost and irrecoverable due to a computer virus infection The data may be l...

Страница 18: ...r s needs Since this is commonly applied to Samsung Computers some gures may differ from actual ones Proper Posture Do not use the computer on your lap or close to your skin for a long time There is a...

Страница 19: ...tart the volume at a low level and increase it slowly while listening to the sound It is not recommended using headphones for long periods of time Use Time Break Time Take a break for 10 minutes or mo...

Страница 20: ...on the rating label Ensure that the electrical outlet you are using to power your equipment is easily accessible in case of re or short circuit If your computer has a voltage selector switch make sur...

Страница 21: ...ersonnel if The power cord or plug is damaged Liquid has been spilled into the system The system does not operate properly when the operating instructions are fol lowed The system was dropped or the c...

Страница 22: ...Standard Should the unit ever need servicing contact an authorized service location Laser Safety Note Use of controls or adjustments or performance of procedures other than those speci ed in this man...

Страница 23: ...your authorized dealer reseller or service provider Power Cord Requirements General Requirements The requirements listed below are ap plicable to all countries The length of the power cord set must be...

Страница 24: ...y be embedded in your notebook are well below all international RF exposure limits as known at this time Because the wireless devices which may be embedded into your notebook emit less energy than is...

Страница 25: ...able authority for authorization prior to use or turning on the wireless device Every country has different restrictions on the use of wireless devices Since your system is equipped with a wireless de...

Страница 26: ...ar unshielded blasting caps or in an explosive environment unless the de vice has been modi ed to be quali ed for such use United States of America Use On Aircraft Caution Regulations of the FCC and F...

Страница 27: ...terference This is available at FCC local regional of ces Our company is not responsible for any radio or television interference caused by unauthorized modi cations of this equipment or the substitu...

Страница 28: ...On the back of this equipment is a label that contains among other information the FCC registration number and ringer equivalence number REN for this equipment If requested this information must be p...

Страница 29: ...clearly contains in a margin at the top or bottom of each transmitted page or on the rst page of the transmission the date and time it is sent and an identi cation of the business or other entity or...

Страница 30: ...outdoors is subject to licensing Wireless devices are not user service able Do not modify them in any way Modi cation to a wireless device will void the authorization to use it Contact manufacturer f...

Страница 31: ...dio and Telecom Terminal Equipment Di rective 199 5 EC as per CTR21 if tted with a modem device European Union Users should make sure for their own protec tion that the electrical ground connections o...

Страница 32: ...l is on the system label The power output of the wireless device or devices that may be embedded in you notebook is well below the RF exposure limits as set by the European Commission through the R TT...

Страница 33: ...or regions and are not allowed to be operated in countries or regions other than those of desig nated use As a user of these products you are responsible for ensuring that the prod ucts are used only...

Страница 34: ...marking is indicative that this equipment meets or exceeds the following technical standards CTR 21 Attachment requirements for pan Eu ropean approval for connection to the analogue Public Switched T...

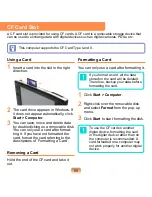
Страница 35: ...sibly to promote the sustainable reuse of material resources Household users should contact either the retailer where they purchased this product or their local government of ce for details of where a...

Страница 36: ...screen resolution changes to 800x480 Default Resolution 800x600 1024x600 se quentially p 58 2 Speaker Used to generate sound 9 Quick Launch Button You can register a frequently used program to launch...

Страница 37: ...n when the wireless LAN is operating p 95 3 Charge Status This shows the power source and the battery charge status Green When the battery is fully charged or the battery is not installed Amber When t...

Страница 38: ...n Now p 130 6 Stylus Pen Stylus Slot The Stylus is used to enter information through the touch screen p 45 You can keep the Stylus Pen in the Stylus Slot 2 Windows Security Button Pressing this button...

Страница 39: ...to connect a monitor TV or projector supporting a 15 pin D SUB interface p 60 2 USB Port A port used to connect a USB device such as a USB keyboard mouse etc 3 DC in Jack A port used to connect the AC...

Страница 40: ...ck A jack used to connect the headphones 4 Volume Control Button A button used to control the volume p 64 5 HOLD Switch When sliding the HOLD switch into the HOLD position upwards no buttons will work...

Страница 41: ...comfortably enter text 1 80 Stand You can position the computer at an 80 degree angle so that you can comfortably view the screen 3 Battery Latch The latch used to remove or install the battery p 144...

Страница 42: ...e it The computer is turned on If you slide the power switch in the right direction brie y when the computer is on the computer enters Sleep Mode When running the computer on battery power the LCD bri...

Страница 43: ...ing Start Power Button will cause the computer to enter Sleep mode To shut down the computer by clicking this icon refer to the descriptions for Setting up Start menu power button of the Control Panel...

Страница 44: ...Chapter 2 Using the computer Stylus Pen 45 Entering Text 48 Using the Buttons 53 CF Card Slot 59 Connecting a Monitor 60 Adjusting the Volume 64...

Страница 45: ...er for a long time Taking the Stylus Pen Out Pull the Stylus Pen upwards When nishing using the pen return it to the Stylus Slot Learning Tablet PC Operations Click Start All Programs Tablet PC to lea...

Страница 46: ...over a point of the screen a circle is drawn around the pointer If you remove the pen when the circle is completely drawn the pop up menu appears Method 2 In addition if you press on the screen with t...

Страница 47: ...and click Calibrate 3 Press the Crosshair displayed on the screen with the Stylus Pen when ever it appears on the screen To re calibrate a previously correct ed point or cancel the calibration press...

Страница 48: ...en a keyboard is not available You can enter letters using the Tablet PC Input Panel in 3 ways 1 Tap Start All Programs Accessories Notepad Notepad is launched 2 If you tap over the Notepad with the S...

Страница 49: ...ering text using the Character Pad You can write a letter in each cell of the Character Pad with the Stylus Pen 1 In the Tablet PC Input Panel tap the Character Pad icon 2 Write a letter in the cell o...

Страница 50: ...Keyboard displays a standard keyboard on the screen so that you can enter a letter by pressing the corresponding key on the screen 1 In the Tablet PC Input Panel tap the On Screen Keyboard icon 2 Tap...

Страница 51: ...puters You can enter letters using the DialKeys by pressing a key on the screen with your thumbs while holding both of the lower corners of the computer with your hands To launch the DialKeys for the...

Страница 52: ...en shown in the gure on the left the screen turns blue and you can enter a number After you enter a number it returns to text input mode If you tap the 123 twice it turns red and you can enter multipl...

Страница 53: ...bed below Press the Menu button to launch the Menu Program The Menu Program provides shortcuts to frequently used functions on the computer You can easily change the settings Press the Menu button aga...

Страница 54: ...y overheat due to the slow fan speed LCD CRT Whenever you press the LCD CRT the mode changes to LCD Clone Dual View mode in sequence The Menu button does not support function to display com puter scre...

Страница 55: ...s Button Function Description u1 MouseScrollUP Scrolls up in a window as a mouse scroll u2 WWW Forward Moves forward in Internet or Windows Explorer to dis play the next page u3 MouseScrollDown Scroll...

Страница 56: ...ame eld of the Tablet PC Input Panel For example enter Test For information on how to use the Tablet PC Input Pan el refer to the descriptions for Entering Text p 48 4 After selecting the U1 button se...

Страница 57: ...et in the selected group To use the default or another group s button functions Right click Easy Button Manager icon of taskbar and select Group List group Otherwise double click the Easy Button Manag...

Страница 58: ...uto Scaler button the Auto Scaler menu appears Whenever this button is pressed the screen resolution changes to 800 x 480 Default Resolution 800 x 600 1024 x 600 sequentially The Auto Scaler Button Ex...

Страница 59: ...you format a card all the data stored on the card will be deleted Therefore backup your data before formatting the card 1 Click Start Computer 2 Right click over the removable disk and select Format f...

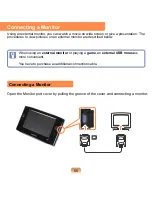
Страница 60: ...edures to view pictures on an external monitor are described below When using an external monitor or playing a game an external USB mouse is more convenient You have to purchase an additional connecti...

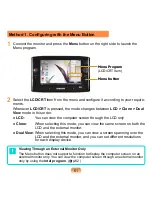
Страница 61: ...ntel program p 62 Menu button Menu Program LCD CRT Item 2 Select the LCD CRT item from the menu and con gure it according to your require ments Whenever LCD CRT is pressed the mode changes between LCD...

Страница 62: ...phics Options and Output To from the pop up menu 3 Select a display mode from among the available Display Modes 1 4 in the Graph ics Options menu The terms and the screen gures in the manual may diffe...

Страница 63: ...tation Clone Mode Select the Intel R Dual Display Clone When selecting this mode you can view the same screen on both the LCD and the external monitor 4 When giving a presentation Extended Mode Dual V...

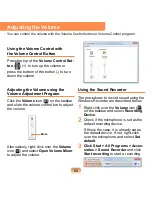
Страница 64: ...er to adjust the volume Using the Sound Recorder The procedures to record sound using the Windows Recorder are described below 1 Right click over the Volume icon on the taskbar and select Recording De...

Страница 65: ...n shots used in this chapter may differ from actual screens depending on the Windows Vista version and model Using Microsoft Windows Vista About Microsoft Windows Vista 66 Windows Vista Screen Layout...

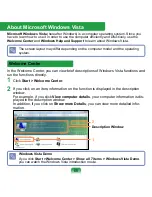
Страница 66: ...ils you can view more detailed infor mation 1 Description Window 2 Windows Vista Demo If you click Start Welcome Center Show all 7 items Windows Vista Demo you can watch the Windows Vista introduction...

Страница 67: ...the Windows operation system You can learn tasks and tools necessary to use the computer Security and Main tenance You can view help on computer protection and security Windows Online Help If your com...

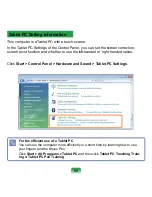
Страница 68: ...handed or right handed option Click Start Control Panel Hardware and Sound Tablet PC Settings Tablet PC Setting Information For the ef cient use of a Tablet PC You can use the computer more ef cientl...

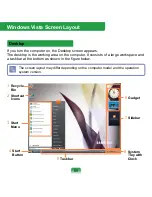
Страница 69: ...area on the computer It consists of a large workspace and a taskbar at the bottom as shown in the gure below The screen layout may differ depending on the computer model and the operation system versi...

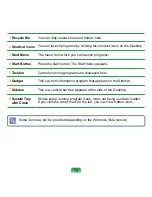
Страница 70: ...Start menu appears 5 Taskbar Currently running programs are displayed here 6 Gadget This is a mini information program that appears on the Sidebar 7 Sidebar This is a vertical bar that appears at the...

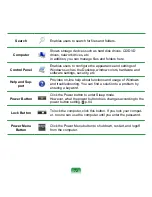
Страница 71: ...programs Click Start The Start menu appears Fixed Programs The program or search result is displayed All Programs You can search for les folders etc Username Search Computer Control Panel Help and Su...

Страница 72: ...curity etc Help and Sup port Provides on line help about functions and usage of Windows and troubleshooting You can nd a solution to a problem by entering a keyword Power Button Click the Power button...

Страница 73: ...an the default Gadget Sidebar Gadget Structure If you launch Windows the Sidebar is automatically launched and the Sidebar and Gadget appear at the side of the Desktop If the Sidebar is not launched a...

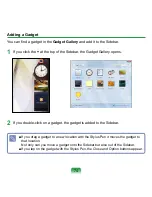
Страница 74: ...get Gallery opens 2 If you double click on a gadget the gadget is added to the Sidebar If you drag a gadget to a new location with the Stylus Pen it moves the gadget to that location Not only can you...

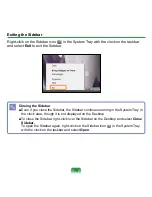
Страница 75: ...bar Even if you close the Sidebar the Sidebar continues running in the System Tray in the clock area though it is not displayed on the Desktop To close the Sidebar right click over the Sidebar on the...

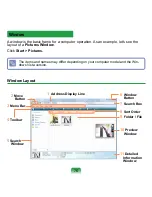
Страница 76: ...ndow Click Start Pictures The items and names may differ depending on your computer model and the Win dows Vista version Window Layout 1 Address Display Line 2 Move Button 3 Menu Bar 4 Toolbar 5 Searc...

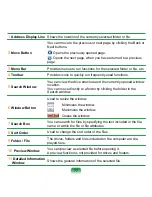
Страница 77: ...urrently opened window location You can move directly to a folder by clicking the folder in the Search window 6 Window Button Used to resize the window Minimizes the window Maximizes the window Closes...

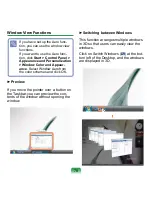
Страница 78: ...e windows in 3D so that users can easily view the windows Click on Switch Windows at the bot tom left of the Desktop and the windows are displayed in 3D If you have set up the Aero func tion you can u...

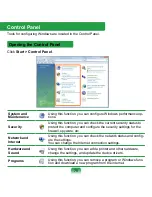
Страница 79: ...to protect the computer and con gure the security settings for the rewall spyware etc Network and Internet Using this function you can check the network status and con g ure the settings You can chang...

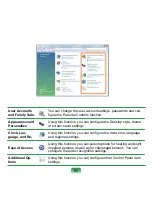
Страница 80: ...heme or screen saver settings Clock Lan guage and Re Using this function you can con gure the date time language and regional settings Ease of Access Using this function you can select options for hea...

Страница 81: ...a user account and to switch users are described below Adding User Accounts 1 Click Start Control Panel User Accounts and Family Safety 2 Click User Accounts Manage another account 3 Click Create a ne...

Страница 82: ...ktop before deleting the account If you click Delete les the account and all les belonging to the account are deleted If you click Keep les only the ac count is deleted and the les be longing to the u...

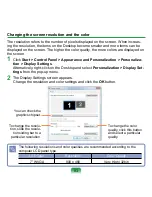
Страница 83: ...ettings Alternatively right click on the Desktop and select Personalization Display Set tings from the pop up menu 2 The Display Settings screen appears Change the resolution and color settings and cl...

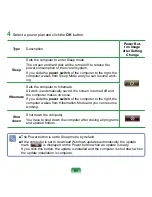
Страница 84: ...ing on the settings 1 Click Start Control Panel Hard ware and Sound Power Options and then Change power saving Set tings 2 Click on Change Plan Settings in the currently selected power setting 3 Click...

Страница 85: ...omatically saved the screen is turned off and the computer makes no noise If you slide the power switch of the computer to the right the computer wakes from Hibernation Mode and you can resume working...

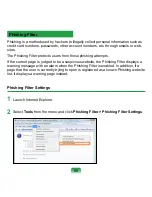
Страница 86: ...ard numbers passwords other account numbers etc through emails or web sites The Phishing Filter protects users from these phishing attempts If the current page is judged to be a suspicious website the...

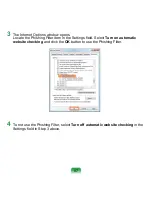
Страница 87: ...e Phishing Filter item in the Settings eld Select Turn on automatic website checking and click the OK button to use the Phishing Filter 4 To not use the Phishing Filter select Turn off automatic websi...

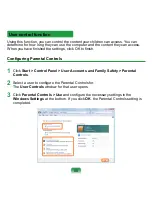
Страница 88: ...d the settings click OK to nish Con guring Parental Controls 1 Click Start Control Panel User Accounts and Family Safety Parental Controls 2 Select a user to con gure the Parental Controls for The Use...

Страница 89: ...e User Controls window re ferring to the descriptions of Parental Controls 2 Set Activity Reporting to On 3 To view the Activity Report click on View Activity Report on the right of the User Controls...

Страница 90: ...Mobility Center Alternatively click Start Control Panel Mobile PC Windows Mobility Center Volume Control Easy Network Manager Window Display Connection Settings Battery Status Settings 2 Con gure the...

Страница 91: ...Using the Network Wired Network 92 Wireless Network 95 Using the Easy Network Manager 98 Bluetooth 102 Chapter 4...

Страница 92: ...er 3 Click Manage Network Connections from the left pane 4 Right click over the Local Area Con nection and select Properties Wired Network A wired network is a network environment used for a company n...

Страница 93: ...he following IP address and set the IP address manually 7 When you have completed the set tings click the OK button The network settings have been com pleted The LAN device driver may differ depending...

Страница 94: ...Start Control Panel Network and Internet Network and Sharing Center and click Manage Network Connections in the left pane 2 Right click over the Local Area Con nection and select Properties 3 Select I...

Страница 95: ...N you have to turn the wireless LAN on rst To turn it on click the Menu button and set the Wireless LAN item to On If the wireless LAN is turned on the Wireless LAN LED is lit Wireless LAN Connections...

Страница 96: ...he taskbar and click Connect to the Network 2 Select an AP to connect to and click Connect If there is a con gured network key for the AP to connect to the Enter Network Key window appears Enter the n...

Страница 97: ...97 Checking the network connection status If you move the pointer over the Network Connections icon of the Taskbar you can view the connection status...

Страница 98: ...es each time regardless of your location You can diagnose the network status p 101 Network Settings This section describes the procedures to connect to the Internet by setting up a net work The settin...

Страница 99: ...option automatic IP setting 7 Click Add Printer and set up a printer according to the wizard When the printer has been added click the Refresh button select the newly added printer and then click the...

Страница 100: ...onding location from the Saved Locations window and then click Move 3 If the Internet connection is a wired LAN you can immediately load the settings for the new location and the corresponding network...

Страница 101: ...1 Launch Easy Network Manager 2 Select Management and Diagnose Status from the menu 3 The Network Connections window appears Click Start to start the network diag nosis 4 When the diagnosis is comple...

Страница 102: ...ne PDA an other notebook computer etc Bluetooth Function Bluetooth Bluetooth is wireless communications technology that allows access to nearby devices such as another computer a cell phone printer ke...

Страница 103: ...slightly different depending on the device 1 To connect to another device via Bluetooth double click the Bluetooth icon on the Taskbar For more information about using the Bluetooth function refer to...

Страница 104: ...the Add Bluetooth Device Wizard screen appears select the My device is set up and ready to be found and click the Next button 4 When the search is complete all available Bluetooth devices are listed...

Страница 105: ...r ing Mode refer to the Headset Manual 5 Enter the PIN in the device PIN eld and click the Next button For pairing a PIN is required Since a PIN is provided by the headset manufacturer refer to the co...

Страница 106: ...evice to send the le to and click the Next button in the Select Bluetooth Device window 3 Select a Bluetooth device to send the le from and click the OK button 4 Enter a PIN in the Bluetooth PIN Code...

Страница 107: ...eception sound related functions and serial port functions Using the network connection or le transmission function multiple Blue tooth devices can be connected How ever since connecting to multiple d...

Страница 108: ...Chapter 5 Using Applications Introducing Programs 109 CyberLink PowerDVD 112 Samsung Update Plus 114 Play AVStation 116 AVStation Now 130 Using Origami Experience 132...

Страница 109: ...e after learning about the basic use of the software For detailed infor mation refer to the help section of the corresponding software Every software program may not be provided or the version may dif...

Страница 110: ...easier and more conve nient use p 132 It is optional and is not supplied with some models Management Functions Samsung Update Plus Samsung Update Plus is a software function that examines and updates...

Страница 111: ...t appears when pressing the Menu button and clicking Brightness Up Troubleshooting Functions SAMSUNG Magic Doctor SAMSUNG Magic Doctor is trou bleshooting software provided by Samsung Computer for sys...

Страница 112: ...DVD Suite Power DVD CyberLink PowerDVD 4 Then click the Play icon in the control panel of CyberLink PowerDVD to play the DVD title Play Undock Player Panel The CyberLink PowerDVD program is only suppl...

Страница 113: ...inserts a DVD title into the drive for the rst time Whenever a DVD title is inserted with a region code different from that of the DVD drive the region code of the DVD drive is automatically changed...

Страница 114: ...g Update Plus Samsung Update Plus is software that examines and updates the Samsung software and drivers installed on your Samsung computer to the latest version To update the software and drivers 1 C...

Страница 115: ...ect Install for an update item that must be installed sepa rately a message appears inform ing you of this Follow the instruc tion message to correctly install it Automatic update items display By def...

Страница 116: ...n describes the basic usage of Play AVStation Launching and Screen Layouts The screens used in this manual may differ from actual screens according to the program version For detailed usage refer to t...

Страница 117: ...age and also view the photographs in a Slide Show Launch Play AVStation and click on Movie on the Station Bar Mini Mode View Movie List and Thumbnail Win dow Play Control Buttons Volume Control Play H...

Страница 118: ...le the EDI function click the EDI button at the bottom of the TV or Movie Station Some TV tuner and graphics cards are not supported by EDI What is EDS Enhanced Digital Sound EDS Enhanced Digital Soun...

Страница 119: ...and click Open The selected le is automatically registered to the Library and played Playing a Video File in Full Screen 1 Double click on the current playback screen 2 The movie is played in full scr...

Страница 120: ...described below You can add les or folders As an ex ample the procedures to add folders are described below 1 Select Menu File Add to Library Folder 2 Select a target folder and select Video Files op...

Страница 121: ...from any of the chapters 1 Select a movie and click Make High light Chapter at the bottom of the window 2 Select the movie type Sports News Other A Highlight Chapter is created 3 To watch a highlight...

Страница 122: ...Launch Play AVStation and click Music on the Station Bar Music Station Playlist Window Music Search Volume Control Music Library Music Type Repeat Setting Random Play Setting EQ EDS Play Control Butt...

Страница 123: ...ect an external type ODD 1 Insert an audio CD into the CD drive 2 If the AutoPlay window appears select Play audio CD using Samsung PLAY AVStation 3 The CD is played If a CD is already inserted in the...

Страница 124: ...k is registered to the Library and played Playing a Music File If a music le is registered to the Music Library you can easily play the music le For the procedures to register tracks to the Library re...

Страница 125: ...elow You can add les folders As an example the procedures to add a folder are described below 1 Select Menu File Add to Library Folder 2 Select a target folder and select the Audio File option in the...

Страница 126: ...126 Launch Play AVStation and click on Photo on the Station Bar Photo Station Photo Library Photo List and Thumbnail Window Batch Edit Button SlideShow Button View and Edit Button...

Страница 127: ...splayed in the Preview screen Press the left and right arrow keys to navigate through the images Left and Right Arrows Zoom Control Edit Image Slide Show 3 Click on To The list Screen to return to the...

Страница 128: ...and Edit button at the bottom right to switch to the Preview screen 4 If the Preview screen appears click the Edit button at the bottom left If the image editor screen appears edit the image using the...

Страница 129: ...The proce dures to add image les saved on the computer to the Library are described below You can add les add folders As an example the procedures to add folders are described below 1 Select Menu Fil...

Страница 130: ...to a multimedia program so that you can use the corresponding function Click on a menu to run the corresponding program For more detailed usage of each pro gram refer to the online help of each progra...

Страница 131: ...launched and you can play a music le or audio CD Movie Play AVStation is launched and you can play a movie or DVD title Photo Play AVStation is launched and you can view photographs or image les indi...

Страница 132: ...Origami Experience click Start All Programs Microsoft Origami Expe rience Pack Origami Experience Category Home Switch Windows Minimize Window Close Window Battery Charge Status Wireless LAN Status P...

Страница 133: ...133 For example the procedures to launch the Calculator are described below Launch Origami Experience Click Programs More Programs Calculator z x c...

Страница 134: ...Chapter 6 Settings BIOS Setup 135 Setting a Boot Password 140 Changing the Boot Priority 143 Battery 144...

Страница 135: ...The BIOS Setup enables you to con gure your computer hardware according to your needs Use the BIOS setup to de ne a boot password change the booting priority or add a new device Since incorrect settin...

Страница 136: ...136 3 After a moment the BIOS setup screen appears The items in the BIOS setup may differ depending on the product Setup Menu Setup Items Help Help for the se lected item ap pears automati cally...

Страница 137: ...onment settings Advanced Used to con gure advanced functions on your computer around devices and chipsets Security Used to con gure security functions including passwords Boot Used to set the boot pri...

Страница 138: ...Function Auto Scaler Button F1 When pressing the Auto Scaler button Help appears When pressing the button again Help disappears Up Down Keys Move the Joystick up or down to move the cursor up and dow...

Страница 139: ...tup Default from the setup menu F10 To save the changes press the F10 key on the external key board If an external keyboard is not connected select Exit Exit Saving Changes from the setup menu Exiting...

Страница 140: ...press Enter Setting a Boot Password When setting a password you have to enter a password to use the computer or enter the BIOS Setup By con guring a password you can restrict system access to authori...

Страница 141: ...on is used as Cancel Esc enter the pass word using the Joystick Left 4 Right 2 Next 3 Up 1 Enter a password press Enter re enter the password for con rmation and press Enter again 4 When a message con...

Страница 142: ...ng Password Before activating the booting password a supervisor password must have been con gured Set the Password on boot option to En abled From now on system booting will not proceed without the pa...

Страница 143: ...anges menu using the Joystick and press Enter to save the settings and exit the setup Changing the Boot Priority The default boot priority of your computer is the CD ROM rst then a removable device an...

Страница 144: ...precautions printed on the battery before using the bat tery Precautions Use only chargers speci ed in the User Guide Never heat the battery pack put it near or in a re or use at a temperature higher...

Страница 145: ...pleting the following procedures Viewing through the Menu button Press the Menu button and press on Battery 3 To install the battery again slide the battery into the system The battery latches move in...

Страница 146: ...y charged battery When the remaining battery charge is under 3 the computer automatically saves the current work and turns off Battery Usage Time Information A battery is an expendable supply so when...

Страница 147: ...button to decrease the LCD brightness Using Easy Battery Manager Easy Battery Manager is a power management program that enables using the battery power ef ciently You can select an optimized power mo...

Страница 148: ...performance Therefore the battery usage time may be reduced in this mode 148 Using the Easy Battery Manager power options To use the Easy Battery Manager power options after reinstalling Windows you...

Страница 149: ...ion and then recharging it again 1 Disconnect the AC power adapter after turning off the computer 2 Restart your computer and press the Menu button when the SAMSUNG logo appears to start System Setup...

Страница 150: ...e Contents and the Program Guide 151 Connecting and Setting Up Media Center 152 Using Media Center 156 Windows Media Center is provided for some versions of Windows Vista only Therefore this chapter i...

Страница 151: ...ices you can more easily use the vari ous Media Center features About the Program Guide An electronic TV program guide the Electronic Program Guide EPG is provided by the EPG provider and the contents...

Страница 152: ...tance External Type Remote Control Sensor To use Media Center using a remote con trol you have to install the remote control sensor on the computer When purchasing a remote control pur chase an extern...

Страница 153: ...o the USB port of the computer Connecting to the Internet To view the TV Guide or to move to Me dia Center sites in Media Center you have to connect to the Internet Connect the network LAN cable to th...

Страница 154: ...installation option Express Setup enables you to use the basic functions of Media Center when clicking OK However you can not use TV and Internet related func tions using Express Setup Custom Setup a...

Страница 155: ...net you cannot setup and use the TV Guide Channel Information 5 When the Media Center setup is com plete click Finish Now you can use the Media Center Changing the Media Center set tings You can chang...

Страница 156: ...ize Move to the Next Menu Item Play Control Buttons Using Media Center The descriptions of the Media Center start screen and basic functions will be given below If you selected Run Setup Later in the...

Страница 157: ...the Media Center library In addition you can also view les not registered to the library by registering them as well as viewing les on a re movable disk Registering to the Library The procedures to r...

Страница 158: ...Library Viewing Pictures and Images The procedures to view pictures and images registered to the library are de scribed below Picture and image les are saved in the Computer Local Disk C Users User A...

Страница 159: ...registered folder are displayed in a random order Viewing Videos The procedures to view videos registered to the library are described below Video les are saved in the Com puter Local Disk C Users Us...

Страница 160: ...a removable media with picture image or video les Removable media refers to a CD DVD USB ash memory memory card etc To view pictures saved on a digital camera connect the digital cam era and the compu...

Страница 161: ...rive to open the CD tray and insert an audio CD The tracks on the CD are played automatically Ripping an Audio CD 1 Launch Media Center 2 Insert an audio CD into the CD ROM drive and play the CD 3 Sel...

Страница 162: ...a Player The ripped tracks are copied to Start Music of the Desktop as album les To change the folder to save the ripped tracks to launch Windows Media Player and right click over the top taskbar and...

Страница 163: ...ng the album artist genre or song at the top If you select Playlist All Music all registered music les are listed 3 Select the music les to be added to the playlist and click Add to Queue in the left...

Страница 164: ...Media Center Music Library Playlist select a playlist and click Play If a music le appears in the Media Center even after the le has been deleted If you deleted a music le you must also manually dele...

Страница 165: ...view the TV program guide You can watch or record live TV programs and reserve a recording Play DVD The DVD title appears Search You can search for a program by the title keyword or genre What is a TV...

Страница 166: ...arting Media Center the Auto Play selection window appears Select Play DVD Video using Me dia Center and click OK 3 After a moment the DVD menu is displayed It the DVD menu is not automatically displa...

Страница 167: ...You can enjoy all kinds of multimedia content such as movies news sports etc over the Internet To use Online Media your com puter must be connected to the Internet For problems encountered while using...

Страница 168: ...ic Doctor 169 Using McAfee SecurityCenter 170 Reinstalling Software 171 Reinstalling Windows Vista 173 Q A 177 Intel Media Sharing Software Information 194 Product Speci cations 195 Glossary 199 Index...

Страница 169: ...function to check system connections and diagnose problems affecting to system operation and solve it 1 Click Start All Programs Samsung Samsung Magic Doctor Samsung Magic Doctor 2 Click on Diagnose t...

Страница 170: ...Curing Viruses 1 Click Start All Programs McAfee McAfee SecurityCenter 2 Click Scan from the left pane of the program 3 If a virus is found remove the virus according to the instructions on the scree...

Страница 171: ...w click Allow If you are not logged in with an administrator account you have to enter an administrator password in the User Account Control window 3 The System Software Media will launch Select an in...

Страница 172: ...ct this option you can select the programs to be installed You can conveniently use this option when you need to install an individual driver or program that is causing a problem Installing Software A...

Страница 173: ...r to p 175 The manual describes procedures on the basis of Windows Vista Home Premium Reinstalling Windows may delete data les and programs saved on the hard disk drive Make sure to backup all importa...

Страница 174: ...informing you that the les and folders will be moved to the Windows old folder Click the OK button 6 The Windows installation continues The computer will restart 3 times during the installation If th...

Страница 175: ...with the System Recovery Media and from there you can reinstall Windows Connect the external type ODD and USB keyboard before turning the computer on If you connect a USB keyboard during the installa...

Страница 176: ...stall the operat ing system to select the partition of the disk drive and then tap the Next button If you click Drive Options Ad vanced you can delete format create or expand a partition Click on a fu...

Страница 177: ...aying A Unselect Library More Options Player Allow screen saver during play back in the Media Player QIn the following cases the screen blinks or displays noise for a short time Click the Graphics Rel...

Страница 178: ...the Magic Keyboard and Samsung Dis play Manager programs are installed QWhen I connect an external monitor and select the monitor no screen image is displayed Clone Mode A This may happen when the cu...

Страница 179: ...x600 pixels or press the Auto Scaler button to change the resolution QThe whole screen image is not displayed on the screen A This may happen when a program or game is designed for at least 800x600 pi...

Страница 180: ...nning Mode A If you restart the computer in Panning Mode Panning Mode continues even after the computer has been restarted To switch to the default resolution in Panning Mode press the Auto Scaler but...

Страница 181: ...to bring the computer out of standby then click OK Restart the system If the system is activated from Sleep mode when there is no received signal use the system after disabling the Wake On LAN functi...

Страница 182: ...work takes about 3 seconds When the network is restored it operates at 100Mbps 1Gbps QCon gure the options below to use the network at its maximum speed A Click Start Control Panel System and Maintena...

Страница 183: ...ation mark on the network icon by clicking Start Control Panel System and Maintenance Device Manager Network Adapter QThe signal strength is excellent but I cannot connect to the network Even if the s...

Страница 184: ...d on A2 Verify whether the same network key encryption key has been entered for both the AP and the computer The network key is an encryption key for encrypting the data transmitted between the AP and...

Страница 185: ...d environment and thus may differ according to the speci c wireless network environ ment When several APs are present simultaneously check the channel settings for each AP When different APs are using...

Страница 186: ...n gured to an address within the subnet IP range This will take about 2 3 min utes If the IP address is con gured to a static IP in the TCP IP properties select Use the following IP address in the TCP...

Страница 187: ...1 Channel interference may occur when a wireless video transceiver or a microwave oven is being used If you experience channel interference from other equipment we recommended changing the channel for...

Страница 188: ...functions are not working A Change the graphics settings of the game to 2D or Software Renderer then run the program again QI want to use the Wireless LAN power saving function to extend the system b...

Страница 189: ...ile running the program QRunning speed of a game is too slow or fast A Change the setting of Power Schemes to Always On QSome part of a game image is not displayed or is displayed in black A This may...

Страница 190: ...ure on the screen In this case lower the game resolution or the screen settings QIf I run a program an error message appears or the program does not launch A This may happen when the program does not...

Страница 191: ...and try again A2 To use the switch you have to slide and hold the switch for more than 0 1 seconds Slide and hold the switch for more than 0 1 seconds before releasing it A3 If the computer is running...

Страница 192: ...install the following devices for UMPC See the Installing Programs section of the Getting Started Guide External USB ODD dedicated to UMPC or Compatible External USB ODD External USB HDD USB Data Cab...

Страница 193: ...o the actual movement e g If you move the joystick upwards of its default direction the pointer moves upward in a rotated screen The default direction means the direction of the joystick before the sc...

Страница 194: ...ntel Viiv system For detailed information about the Intel Viiv system visit the Intel website http www intel com This function is only supported for some models Running Intel Media Sharing Software If...

Страница 195: ...set Intel 915GMS 400 MHz FSB Support Intel ICH6 M Hard Disk Drive 1 8 HDD 20 60GB Graphics Intel 915GMA 900 Graphics Sound Chipset AD1986 2CH Network Wired LAN Marvell Yukon 88E8036 PCI E Fast Etherne...

Страница 196: ...eci cations Sleep Mode 726mW Receive Mode 1 353W Transmission Mode 2 046W Power 3 3V Network Speci cations Compatibility IEEE 802 11b IEEE 802 11g Operating System Microsoft Windows XP Vista Media Acc...

Страница 197: ...Device Transceiver Standard Output Power MAX 10 mW Modulation Scheme 11b mode DSSS CCK 11g mode OFDM Data Rate Mbps 11b mode 11 5 5 2 1 11g mode 54 48 36 24 18 12 9 6 Antenna Type Built in Antenna The...

Страница 198: ...wners Use of this copyright protection technology must be authorized by Macrovision Corporation and is intended for home and other limited viewing uses only unless otherwise authorized by Macrovision...

Страница 199: ...ou can add or remove hardware or update a device driver using the Device Manager Direct X An application interface developed to en able Windows application programs to access hardware devices at a ver...

Страница 200: ...is required To exchange data between computers a protocol is required besides the hardware equipment Windows Vista uses TCP IP as the default protocol LCD Liquid Crystal Display There are Passive Matr...

Страница 201: ...ed When a computer is in Sleep Mode the data on the computer memory is not saved to the hard disk If the power is tuned off the data in memory will be lost System File System Files refer to les that a...

Страница 202: ...112 D Desktop Change 69 E Entering Text 48 H Help 67 M Multi Media 110 N Network 91 Network Status Diagnosis 101 P Password 140 Playing Music 122 Play AVStation 116 Product Speci cations 195 Program...

Страница 203: ...sung com hk MALAYSIA 1800 88 9999 www samsung com my SINGAPORE 1800 SAMSUNG 7267864 www samsung com sg FRANCE Comment contacter Samsung dans le monde Si vous avez des suggestions ou des questions conc...

Страница 204: ...ti o richieste sui prodotti Samsung contatta il nostro Servizio Clienti Customer Care Center TEL Web Site ITALY 199 153 153 www samsung com it RUSSIA UKRAINE SAMSUNG Samsung Samsung Customer Care Cent...

Отзывы: