background image

GB

7

The main lead must be plugged into an appropriate socket.

Before plugging your system into a main socket, you must check
the voltage.

Plug the main lead (marked AC Cord on the rear of the system) into
an appropriate socket.

Press the On/Standby button to switch your mini-compact system on.

To take full advantage of your new mini-compact system, follow
these installation instructions before connecting the unit.

Install the system on a flat, stable surface.

Never place this unit on carpeting.

Never place this unit in an outdoor area.

Maintain an open space of approximately 6 inches (15 cm) on the
sides and rear of the system, for ventilation purposes.

Make sure that you have enough room to open the compact disc
compartment easily.

Place the loudspeakers at a reasonable distance on either side of
the system to ensure good stereo sound.

Direct the loudspeakers towards the listening area.

For optimum performance, make sure that both speakers are placed
at an equal distance above the floor.

Where to Install Your 
Mini-Compact System

Connecting your System to the
Power Supply

Phones

S.Bass

VOL.–

VOL.+

Mode

Function

Color/Demo

Open/Close

Push Eject

1

2

Insert or replace remote control batteries when you:

Purchase the mini-compact system

Find that the remote control is no longer operating correctly

When replacing the batteries, use a new set of batteries and
never mix alkaline and manganese batteries.

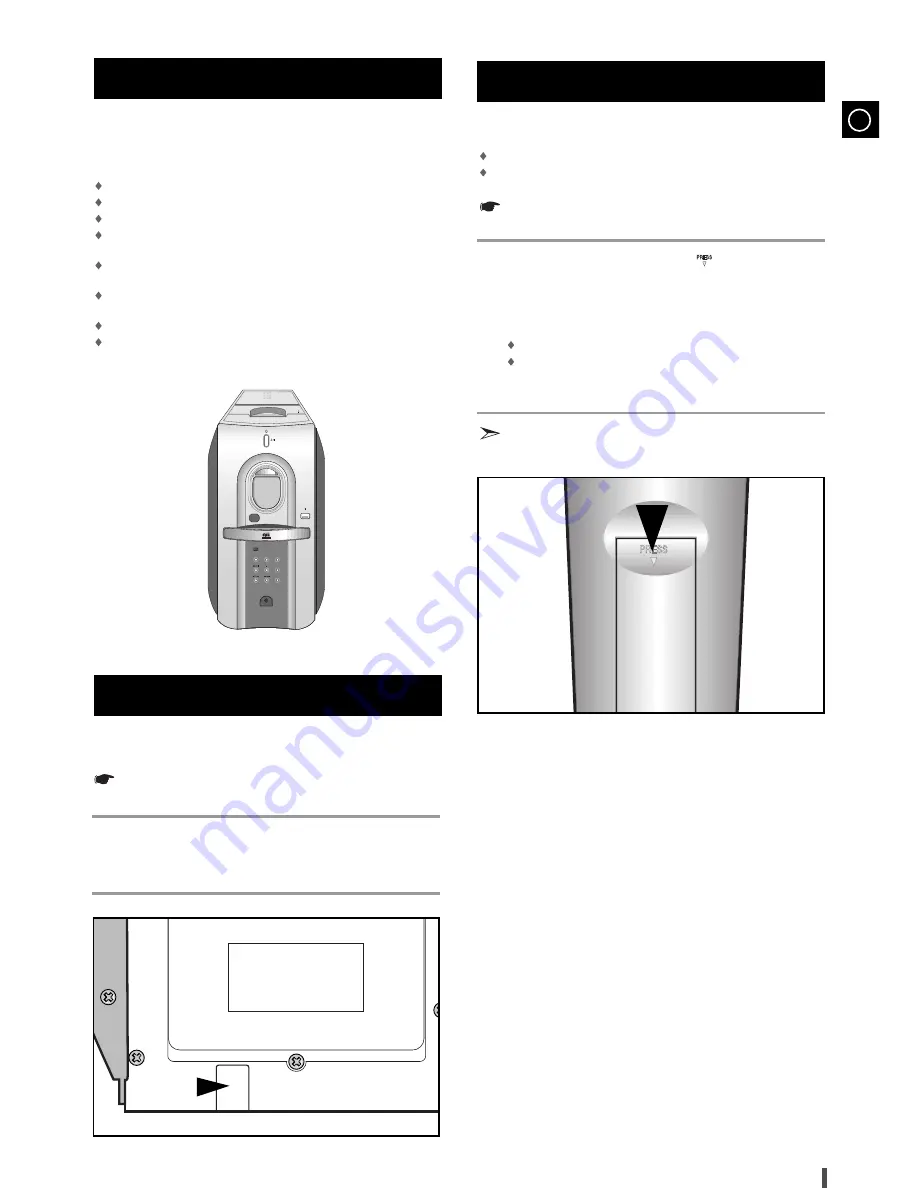
Place your thumb on the position marked       on the battery 
compartment cover (rear of the remote control) and push the cover in
the direction of the arrow.

Insert two AAA, LR03 or equivalent batteries, taking care to respect
the polarities:

+ on the battery a in the battery compartment

– 

on the battery against – in the battery compartment

Replace the cover by sliding it back until it clicks into position.

If you will not be using the remote control for a long time,
remove the batteries to prevent corrosion.

Inserting Remote Control Batteries

1

2

3

Содержание MM-Z100

Страница 1: ...Instruction Manual DIGITAL MICRO COMPONENT SYSTEM MP3 CD CD R RW PLAYBACK MM Z100 ...

Страница 2: ...enough to reach a power point you should obtain a suitable safety approved extension lead or consult your dealer for assistance However if there is no alternative to cutting off the plug remove the fuse and then safely dispose of the plug Do not connect the plug to a main socket as there is a risk of shock hazard from the bared flexible cord Never attempt to insert bare wires directly into a main ...

Страница 3: ...rogrammed Tracks 15 TUNER Searching for and Storing the Radio Stations 15 Selecting a Stored Station 16 Improving Radio Reception 16 About RDS broadcasting 17 About RDS DISPLAY function 17 PTY Program Type indication and PTY SEARCH function 18 TAPE DECK Listening to a Cassette 19 CD Synchro Record Feature 19 Recording a Compact Disc 19 Recording a Radio Program 20 Copying a Cassette Dubbing 20 Sel...

Страница 4: ...tion Selection buttons 4 Play Pause 5 Search Function buttons 6 Headphone Jack Connector 7 S Bass 8 Volume 9 Mode Stop 10 CD Door Open Close 11 On Standby Front Panel View Phones S Bass VOL VOL Mode Function Color Demo Open Close Push Eject 1 2 3 4 5 6 7 8 9 10 11 ...

Страница 5: ...CD Mode 12 Mono ST 13 Mute 14 Volume 15 Band 16 CD Play 17 10 18 Display RDS 19 PTY RDS 20 Deck Stop 21 Deck Play 22 Sleep 23 AUX 24 Timer On Off 25 Timer Clock Timer On Off EQ S Bass REV Mode CD SYNC CD Repeat Program Set Mono ST Mute VOL Band 10 Sleep TAPE Aux Timer Clock VOL Tune CD Mode Display PTY RDS 1 2 3 4 5 6 7 8 9 10 11 12 25 24 23 22 21 20 19 18 17 16 15 14 13 ...

Страница 6: ...GB 6 Rear Panel View 1 MAIN Speaker 2 AM Aerial Connector Terminal 3 FM Aerial Connector Terminal 4 SUBWOOFER Speaker 5 AUX Input 6 CD Digital out Jack R L _ R R L L _ AUX IN AM 1 2 3 4 5 6 ...

Страница 7: ...e listening area For optimum performance make sure that both speakers are placed at an equal distance above the floor Where to Install Your Mini Compact System Connecting your System to the Power Supply Phones S Bass VOL VOL Mode Function Color Demo Open Close Push Eject 1 2 Insert or replace remote control batteries when you Purchase the mini compact system Find that the remote control is no long...

Страница 8: ...Subwoofer Speaker jacks Main Speaker Connection Connect the Main Speaker cords red black to the Main Speaker jacks of the System Subwoofer Speaker Connection Connect the Subwoofer Speaker cords blue black to the Subwoofer Speaker jacks of the System Be careful that the Main Speaker jacks and the Subwoofer Speaker jacks are not interchanged when connecting to the speakers Speaker Connection R L R L...

Страница 9: ... to connect a COAXIAL TYPE aerial Connect a 75Ω antenna to the FM antenna terminal Plug the connector on the FM aerial supplied into the coaxial socket 75Ω marked FM on the rear of the system Follow the instructions given on Page 15 to tune into a radio station and determine the best position for the aerial If reception is poor you may need to install an outdoor aerial To do so connect an outdoor ...

Страница 10: ...Clock once The System allows you to choose your favorite color to produce your own personal atmosphere Press the Color Demo button and select the color you want Result Whenever the button is pressed the color is repeated in the sequence of Cyan Green Red Blue Violet Y Green White Off Auto If you select Auto mode 7 colors are displayed for 3 seconds alternatively Setting the Clock 2 1 1 2 3 4 5 6 7...

Страница 11: ...d tracks In case of Window Explorer display The arrows indicates playback sequence of albums and tracks Tracks with jpg wav or doc only are not audio files and therefore will be skipped MP3 means MPEG1 Layer 3 the global standard for audio signal compression technology It uses digital compression technology to compress original sound data by up to 12 times without sound quality degradation File Co...

Страница 12: ...he track press the button Moves the track within the album Press the Tune CD Mode button then select Album or Track and press the button If Album is selected in the display the title moves If Track is selected in the display the track moves If the button is pressed more than the number of tracks within the title it moves to the next title To select the MP3 CD album and track EQ S Bass REV Mode CD ...

Страница 13: ...the 10 button three times and then press the button three times For MP3 disks the 10 button functions only when there are 10 or more songs in the album directory 15 20 30 40 41 42 43 Last Memory Function This function is only available during playback of an MP3 CD When CD playback is selected again after your CD player has been stopped or turned off this function allows playback from the start of ...

Страница 14: ...ayer by pressing Load the selected CDs Press Program Set Result The following indications are displayed 01 Program no Track no on the disc Select the required track by pressing to move back through the tracks to move forward through the tracks Press Program Set to confirm your selection Result The selection is stored and is displayed To select other tracks repeat Steps 5 to 6 Press CD to listen to...

Страница 15: ...ually One or more times until MANUAL is displayed Automatically One or more times until AUTO is displayed PRESET function is explained in detail in the section Listening to the Preset Stations on Page 16 Select the station to be stored by Pressing or on the front panel or Pressing or on the remote control To scroll through the frequencies faster when searching manually hold down the or buttons The...

Страница 16: ...o station found revert to Step 4 and search for another station Otherwise a Press Program Set Result The PRGM is displayed for a few seconds b Press or to assign a programme number between 1 and 15 c Press Program Set to store the radio station Result PRGM is no longer flashed and the station is stored To store any other radio frequencies required repeat Steps 3 to 8 The PROGRAM function can be us...

Страница 17: ...s it shows that the traffic announcement is in progress 6 EON Enhanced Other Networks Information Offers the RDS information on other networks About PS NAME MODE Displays the name of broadcasting station Press the RDS Display button to select the PS NAME PS NAME appears on the display If the PS information is being received the PS name BBC AFO NDR etc is shown on the display If the PS information ...

Страница 18: ...DUCATE DRAMA CULTURE SCIENCE VARIED POP M ROCK M M O R M LIGHT M CLASSIC OTHER M WEATHER FINANCE CHILDREN SOCIAL A RELIGION PHONE IN TRAVEL LEISURE JAZZ COUNTRY NATIONAL M OLDIES FOLK M DOCUMENT TEST Program Type News including an announced opinion and report Several matters including a current incident documentary discussion and analysis Information including weights and measures returns and fore...

Страница 19: ...eck Select the CD function by pressing Function on the front panel Load a compact disc Select the required track and press CD SYNC or press CD SYNC directly to start recording at the beginning of the disc Result REC is displayed and recording starts To stop recording press The direct recording mode enables you to start recording with any track on the compact disc You do not need to adjust the volu...

Страница 20: ...efore starting to record a cassette for which you wish to take note of the counter values at the beginning of each track reset the counter by pressing Counter Reset You can record a radio program of your choice You do not need to adjust the volume as it has no effect on the recording Switch the system on by pressing Insert a blank cassette in Deck Select the TUNER function by pressing Function Sel...

Страница 21: ...ogram Set Result VOL 15 is displayed where 15 corresponds to the volume already set Press and to adjust the volume level and press Program Set Result The source to be selected is displayed Press and to select the source to be played when the system switches on If you select You must also TAPE cassette Insert a recorded cassette in one of the decks before setting the system to standby TUNER radio a...

Страница 22: ... the required option is selected Press the button repeatedly to select PASS POP ROCK CLASSIC SALSA SAMBA S Bass 1 S Bass 2 S Bass 3 You can turn the sound off temporarily on your system Example You wish to answer a telephone call Press Mute To switch the sound back on at the same volume as before press Mute again or the Volume buttons Mute Function S Bass Function Selecting an Equalizer Preset 2 1...

Страница 23: ...u can set the system to switch off automatically Example You wish to go to sleep to music Press Sleep Result The following indications are displayed Press Sleep one or more times to indicate how long the system should continue playing before it switches off At any time you can Check the remaining time by pressing Sleep Change the remaining time by repeating Steps 1 and 2 To cancel SLEEP function p...

Страница 24: ...components which cause electric shock Phones Subwoofer Level VOL VOL Mode Function Color Demo Open Close Phones Subwoofer Level VOL VOL Mode Function Color Demo Open Close To obtain the best possible results from your mini compact system you must clean the following elements regularly The outer casing The compact disc player The cassette players heads rollers and drive capstans Always unplug the s...

Страница 25: ...r does not work In case it does not work even the action is taken as above The compact disc player does not start playing The mp 3 CD player cannot be played The tape does not start playing The volume falls off The cassette is not erased correctly There is excessive wow and flutter Reception is poor or no radio stations are received at all G E N E R A L C D M P 3 C D R A D I O C A S S E T T E S Ch...

Страница 26: ...harmonic distortion 1 0 COMPACT DISC PLAYER Frequency range 20 Hz 20 KHz 1 dB Signal noise ratio 90 dB at 1 KHz with filter Distortion 0 05 at 1 KHz Channel separation 75 dB Disc sizes Diameter 120 or 80 mm Thickness 1 2 mm TAPE DECK Frequency range 125 Hz 10 KHz Signal noise ratio 40 dB Channel separation 35 dB Erasing effect 60 dB AMPLIFIER Output power 6 Ω Front 2 X 20 Watts RMS total harmonic ...

Страница 27: ...ELECTRONICS ELECTRONICS THIS APPLIANCE IS MANUFACTURED BY AH68 00768B ...

Отзывы: