background image

5

System setup

5

EnG

  SYSTEM SETUP

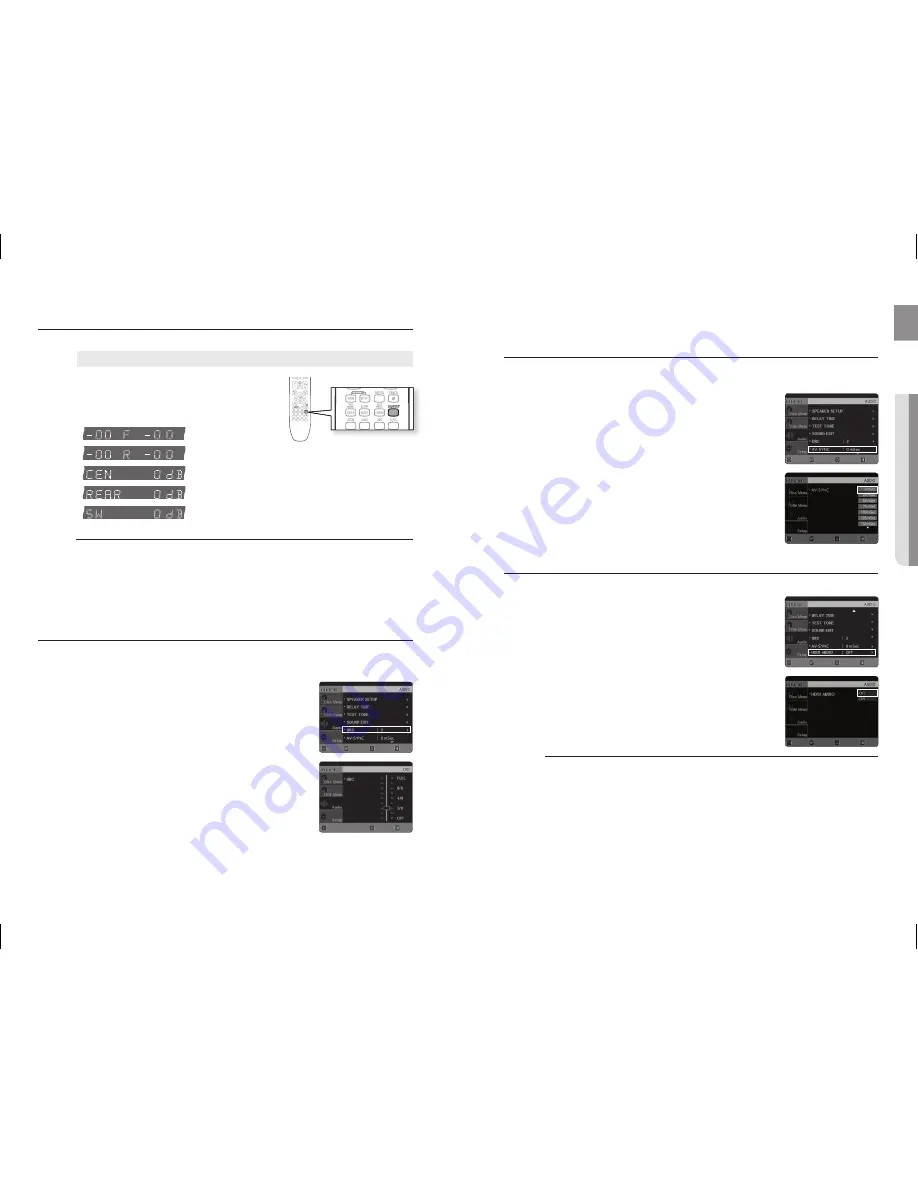
Press the 

SOUnD EDIT

 button and then press the Cursor 

_

+

 button.

Each time you press the 

SOUnD EDIT

 button, you can see 

the balance and level for each speaker.

Adjusting Front/rear Speaker Balance

You can select between 0 dB, -6 dB, and OFF.
The volume decreases as you move closer to – 6 dB.

Adjusting Centre/rear/Subwoofer Speaker Level

The volume level can be adjusted in steps from +6dB to –6dB.
The sound gets louder as you move closer to +6dB and quieter as you get closer to -6dB.

SETTInG THE DrC (DYnAMIC rAnGE COMPrESSIOn)

This feature balances the range between the loudest and quietest sounds. You can use this function to enjoy Dolby 
Digital sound when watching movies at low volume at night.

In Stop mode, press the 

MEnU

 button.

Press the Cursor 

%

 button to move to 

Audio

 and then press the 

EnTEr

 or 

+

 button.

Press the Cursor 

%

 button to move to 

DrC

 and then press the 

EnTEr

 or 

+

 button.

Press the Cursor 

$

%

 to adjust the 

DrC

.

When the Cursor 

$

 button is pressed, the effect is greater, and 

when the Cursor 

%

 button is pressed, the effect is smaller.

Press the 

rETUrn

 button to return to the previous level.

Press the 

EXIT

 button to exit the setup screen.

~

`

`

`

`

1.
.

.

4.

~

Manually Adjusting the Speaker Volume and Balance with the SOUnD EDIT Button.

MOVE

ENTER

EXIT

RETURN

CHANGE

EXIT

RETURN

SETTInG THE AV SYnC

Video may look slower than the audio if it is connected to a digital TV. If this occurs, adjust the audio delay time to to 
match the video.

In Stop mode, press the 

MEnU

 button.

Press the Cursor 

%

 button to move to 

Audio

 and then press the 

EnTEr

 or 

+

 button.

Press the Cursor 

%

 button to move to 

AV-SYnC

 and then press the 

EnTEr

 or 

+

 button.

Press the Cursor 

$

%

 button to select the 

AV-SYnC

 Delay Time  

and then press the 

EnTEr

 button.

You can set the audio delay time between 0 ms and 300 ms. Set 
it to the optimal status.

Press the 

rETUrn

 button to return to the previous level.

Press the 

EXIT

 button to exit the setup screen.

SETTInG THE HDMI AUDIO

The audio signals transmitted over the HDMI Cable can be toggled ON/OFF.

In Stop mode, press the 

MEnU

 button.

Press the Cursor 

%

 button to move to 

Audio

 and then press the 

EnTEr

 or 

+

 button.

Press the Cursor 

%

 button to move to 

HDMI AUDIO

 and then press 

the 

EnTEr

 or 

+

 button.

Press the Cursor 

$

%

 button to select 

On

 or 

OFF

 and then press  

the 

EnTEr

 button.

On

 : Both video and audio signals are transmitted over the HDMI   


connection cable, and audio is output through your TV  


speakers only.

OFF

 : Video is transmitted over the HDMI connection cable only, and  


audio is output 

through the home cinema speakers only.

Press the 

rETUrn

 button to return to the previous level.

Press the 

EXIT

 button to exit the setup screen.

  The default setting of this function is HDMI AUDIO OFF.
HDMI AUDIO is automatically down-mixed to 2ch for TV speakers.

1.
.

.

4.

~

1.
.

.

4.

~

~

M

`
`

MOVE

ENTER

EXIT

RETURN

MOVE

SELECT

EXIT

RETURN

MOVE

ENTER

EXIT

RETURN

MOVE

SELECT

EXIT

RETURN

Содержание HT-X725

Страница 1: ...a System user manual imagine the possibilities Thank you for purchasing this Samsung product To receive a more complete service please register your product at www samsung com register HT X725 HT X725G HT TX725 HT TX725G ...

Страница 2: ...h device to enjoy music with high quality stereo sound all without wires BD Wise BD Wise automatically adjusts BD Wise compliant Samsung products to the optimal settings between them This feature is enabled only if BD Wise compliant Samsung TV s are connected with each other using the HDMI cable What s included Check for the supplied accessories below Video Cable FM Antenna User s Manual Remote Co...

Страница 3: ... only Condensation may occur if your player or disc has been stored in cold temperatures If transporting the player during the winter wait approximately 2 hours until the unit has reached room temperature before using Do not expose the unit to direct sunlight or other heat sources This could lead to overheating and malfunction of the unit The batteries used with this product contain chemicals that...

Страница 4: ...finition DVD This involves a function available with DVD or DVD R DVD RW discs that have been recorded and finalized in Video Mode B CD This involves a function available with a data CD CD R or CD RW A MP3 This involves a function available with CD R RW discs including USB G JPEG This involves a function available with CD R RW discs including USB D DivX This involves a function available with MPEG...

Страница 5: ...er to start playing or may not play at all DVD R RW CD R RW DivX Discs Software updates for incompatible formats are not supported Example QPEL GMC resolution higher than 800 x 600 pixels etc Sections with a high frame rate might not be played while playing a DivX file DivX is a digital video format created by DivX Inc This is an official DivX Certified or DivX Ultra Certified device that plays Di...

Страница 6: ...2CH analogue output of an external device such as a VCR TX CARD CONNECTION WIRELESS The TX card enables communication between the main unit and the optional wireless receiver amplifier EXTERNAL DIGITAL OPTICAL INPUT JACK Use this to connect external equipment capable of digital output FM 75Ω COAXIAL JACK Connect the FM antenna COOLING FAN The fan always revolves when the power is on Ensure a minim...

Страница 7: ... EXIT button 31 DSP EQ button 32 CANCEL button 33 SOUND EDIT button 34 AUDIO UPSCALE P BASS button 35 S VOL button 36 SLEEP button 37 ASC button 38 DIMMER button 2 1 15 14 13 12 11 10 9 8 7 6 5 4 3 22 38 37 36 33 32 31 30 29 28 27 26 25 24 23 16 17 18 19 20 21 34 35 Follow these precautions to avoid leaking or cracking cells Place batteries in the remote control so they match the polarity to and t...

Страница 8: ...el JC Penny JVC KTV KEC KMC LG Goldstar Luxman LXI Sears Magnavox Marantz Matsui MGA Mitsubishi MGA 1 2 3 4 5 6 7 8 9 10 11 12 13 14 15 16 17 18 19 20 21 22 23 24 25 26 27 28 29 30 31 32 33 34 35 36 37 38 39 40 41 42 43 56 57 58 01 15 01 02 03 04 05 06 07 08 09 10 11 12 13 14 01 18 40 48 57 58 81 59 60 18 03 03 18 25 97 03 18 46 15 03 05 61 82 83 84 62 03 59 61 63 03 02 03 04 15 16 17 18 19 20 21 ...

Страница 9: ...f the centre speakers Subwoofer g The position of the subwoofer is not so critical Place it anywhere you like Centre Speaker f It is best to install it at the same height as the front speakers You can also install it directly over or under the TV rear Speakers hj Place these speakers behind your listening position If there isn t enough room place these speakers such that they face each other Place...

Страница 10: ...etic field generated by the speaker If this occurs place the speaker away from your TV set J M COnnECTInG THE SPEAKErS Con HT TX725 HT TX725G Subwoofer Rear Speaker R Centre Speaker Front Speaker R Rear Speaker L Front Speaker L Connect the front centre and Subwoofer speakers to the Home Cinema System Please refer to Pages 17 18 With the Home Cinema System turned off insert the TX card into the TX...

Страница 11: ...ng the card when it is turned on may cause a problem If the TX Card is inserted sound is not output from the Rear Speaker connectors on the main unit The wireless receiving antenna is built into the wireless receiver module Keep the unit away from water and moisture For optimal listening performance make sure that the area around the wireless receiver module location is clear of any obstructions I...

Страница 12: ... use BD Wise 1 Use an HDMI cable to connect the Samsung home cinema to a BD Wise compliant Samsung TV 2 Set each BD Wise menu of the Samsung home cinema and the Samsung TV to On respectively This will optimize the picture quality according to the content In the disc DVD etc that you want to play This will also optimize the picture quality between the home cinema and your BD Wise compliant Samsung ...

Страница 13: ...the TV If you select the Theatre Select Theatre to connect and set the option of each item below View TV If Anynet HDMI CEC is set to on and you select View TV the Home Cinema will automatically switch to DIGITAL mode Theatre Menu You can access and control the Home Cinema menu Theatre Operation The Home Cinema disc playback information will be displayed You can control the Disc operation of the H...

Страница 14: ...e FUnCTIOn button on the main unit The mode switches as follows DVD CD DIGITAL AUX1 AUX2 USB BT AUDIO HDMI In TUnEr 1 M 1 Optical Cable not supplied AUX2 rear Panel OPTICAL rear Panel Audio Cable not supplied If the external analogue component has only one Audio Out connect either left or right External Analogue Component External Digital Component COnnECTInG THE FM AnTEnnA Connect the FM antenna ...

Страница 15: ... of your TV VIDEO Playback DISC PLAYBACK B Load a disc vertically into the Disc Insert slot Place a disc gently into the tray with the disc s label facing up Close the compartment by pressing the PLAY button Playback starts automatically To stop playback press the STOP button during playback If pressed once PrESS PLAY is displayed and the stop position will be stored in memory If the PLAY button o...

Страница 16: ...top mode and select a desired icon from the top part of the menu Music File Icon To play music files only select the Icon Image File Icon To view image files only select the Icon Movie File Icon To view movie files only select the Icon All File Icon To view all files select the Icon 1 4 M To play a file icon in the screen JPEG FILE PLAYBACK Images captured with a digital camera or camcorder or JPE...

Страница 17: ...d for video encoding and MP3 for audio encoding so that the users can watch a movie at near DVD quality video and audio Supported Formats This product only supports the following media formats If both video and audio formats are not supported the user may experience problems such as broken images or no sound Supported Video Formats Format AVI WMV Supported Versions DivX3 11 DivX5 1 XviD V1 V2 V3 V...

Страница 18: ...TLE ELAPSED TITLE rEMAIn CHAPTEr ELAPSED CHAPTEr rEMAIn B TrACK ELAPSED TrACK rEMAIn TOTAL ELAPSED TOTAL rEMAIn A TrACK rEMAIn TrACK ELAPSED M USInG THE PLAYBACK FUnCTIOn Con Fast Playback BAD Press the button Each time the button is pressed during playback the playback speed changes as follows 2X 4X 8X 32X PLAY 2X 4X 8X 32X PLAY During fast playback of a CD or MP3 CD sound is heard only at 2x spe...

Страница 19: ...splay Press the Cursor button to select the desired Repeat Playback mode To select another album and track repeat Steps 2 and 3 above Press the EnTEr button OFF A CHAP TITLE OFF B OFF A TrACK DISC OFF For DivX MP3 and JPEG discs you cannot select Repeat Play from the information display screen 1 4 M USInG THE PLAYBACK FUnCTIOn Con A B repeat Playback You can repeatedly play back a designated secti...

Страница 20: ...may not be available depending on the disc 1 M 1 1 M SELECT ZOOM POSITION USInG THE PLAYBACK FUnCTIOn Con Subtitle Language Selection Function Press the InFO button twice Press the Cursor button to move to SUBTITLE display Press the Cursor button or numeric buttons to select the desired subtitle En 01 03 SP 02 03 Fr 03 03 OFF 03 En 01 03 To operate this function you can also press the SUBTITLE but...

Страница 21: ...e quality is If the distance exceeds the Bluetooth operational range the connection is lost The Home Cinema System only supports Middle Quality SBC data up to 237kbps 48kHz and does not support High Quality SBC data 328kbps 44 1kHz In poor reception sensitivity areas the Bluetooth connection may not work properly The Home Cinema System has an effective reception range of up to 10 meters in all dir...

Страница 22: ...e PLAYInG MEDIA FILES USInG THE USB HOST FEATUrE You can enjoy media files such as pictures movies and music saved on an MP3 player USB memory stick or digital camera in high quality video with 5 1 channel Home Cinema sound by connecting the storage device to the USB port of the Home Cinema Connect the USB device to the USB port on the side of the unit Press the FUnCTIOn button on the Home Cinema ...

Страница 23: ... supported A device using NTFS file system is not supported Only FAT 16 32 File Allocation Table 16 32 file system is supported Does not operate with Janus enabled MTP Media Transfer Protocol devices 1 4 5 For your convenience you can set this Home Cinema System s features for the best use in your home environment Setting the Language OSD On Screen Display language is set to English by default In ...

Страница 24: ...he screen is automatically converted to Wide mode 1 4 M MOVE ENTER EXIT RETURN MOVE SELECT EXIT RETURN Setting Parental Controls Rating Level Use this to restrict playback of adult or violent DVDs you do not want children to view In Stop mode press the MENU button Press the Cursor button to move to Setup and then press the ENTER or button Press the Cursor button to move to PARENTAL and then press ...

Страница 25: ...T EXIT RETURN SETTInG THE SPEAKEr MODE Signal outputs and frequency responses from the speakers will automatically be adjusted according to your speaker configuration and whether certain speakers are used or not In Stop mode press the MEnU button Press the Cursor button to move to Audio and then press the EnTEr or button In the SPEAKEr SETUP press the EnTEr or button again Press the Cursor _ butto...

Страница 26: ...scs M Ideal centre speaker placement Df The distance from front speaker Dc The distance from centre speaker Ds The distance from surround speaker It is desirable to place all speakers within this circle Ideal surround speaker placement Setting up the Speaker Delay Time Setting the Test Tone Use the Test Tone feature to check the speaker connections In Stop mode press the MENU button Press the Curs...

Страница 27: ...r than the audio if it is connected to a digital TV If this occurs adjust the audio delay time to to match the video In Stop mode press the MEnU button Press the Cursor button to move to Audio and then press the EnTEr or button Press the Cursor button to move to AV SYnC and then press the EnTEr or button Press the Cursor button to select the AV SYnC Delay Time and then press the EnTEr button You c...

Страница 28: ...UDIO mode Press the PL II MODE button Each time the button is pressed the mode changes as follows MUSIC CInEMA PrO LOGI MATrIX STErEO MUSIC PrO LOGIC II MUSIC When listening to music you can experience sound effects as if you are listening to the actual performance CInEMA Adds realism to the movie soundtrack PrO LOGI You will experience a realistic multi channel effect as if you re using five spea...

Страница 29: ...nd level values specified for each channel will appear in the display M L FRONT SPEAKER L R FRONT SPEAKER R C CENTRE SPEAKER SW SUBWOOFER SL REAR SPEAKER SL SR REAR SPEAKER SR ASC Microphone ASC Auto Sound Calibration SETUP Plug the ASC microphone into the ASC input jack Place the ASC microphone at the listening position Press ASC button To create the optimal 5 1 channel sound field the selections...

Страница 30: ...Y button 01 flashes in the display Press the button to select preset number You can select between 1 and 15 presets Press the TUnEr MEMOrY button again Press the TUnEr MEMOrY button before number disappears from the display number disappears from the display and the station is stored in memory To preset another station repeat steps 2 to 5 To tune in to a preset station press the button on the remo...

Страница 31: ... the CD press and hold the CD RIPPING button on the remote control The system displays a message of CD RIPPING on the display and starts ripping Press the STOP button to stop ripping When the CD ripping is done a directory named RIPPING will be created in the USB device and the ripped file will be saved in a format of SAM_XXXX mp3 Do not disconnect the USB connection or the power cable during the C...

Страница 32: ...c is recorded with 5 1 channel sound Is the audio language correctly set to DOLBY DIGITAL 5 1 CH in the information display The remote control does not work Is the remote control being operated within its operation range of angle and distance Are the batteries exhausted Have you selected the mode TV DVD functions of the remote control TV or DVD correctly SYMPTOM Check Remedy Disc is rotating but n...

Страница 33: ...40 Tatar 1142 Greek 1298 Greenlandic 1481 Rhaeto Romance 1543 Twi 1144 English 1299 Cambodian 1482 Kirundi 1557 Ukrainian 1145 Esperanto 1300 Canada 1483 Romanian 1564 Urdu 1149 Spanish 1301 Korean 1489 Russian 1572 Uzbek 1150 Estonian 1305 Kashmiri 1491 Kinyarwanda 1581 Vietnamese 1151 Basque 1307 Kurdish 1495 Sanskrit 1587 Volapuk 1157 Persian 1311 Kirghiz 1498 Sindhi 1613 Wolof 1165 Finnish 131...

Страница 34: ...io 70dB Channel separation 60dB Input sensitivity AUX 400mV Specifications Con HT X725 HT X725G Speaker Speaker system 5 1ch speaker system Front Centre Rear Subwoofer Impedance 3 Ω 3 Ω Frequency range 140Hz 20KHz 35Hz 160Hz Output sound pressure level 86dB 86dB Rated input 133W 135W Maximum input 266W 270W Dimensions W x H x D Front 185 x 605 x 185 mm Rear 93 x 271 x 77 mm Centre 358 x 44 x 68 mm...

Страница 35: ...900 SAMSUNG 0900 7267864 0 10 Min www samsung com nl NORWAY 3 SAMSUNG 7267864 www samsung com no POLAND 0 801 1SAMSUNG 172678 022 607 93 33 www samsung com pl PORTUGAL 80820 SAMSUNG 726 7864 www samsung com pt SLOVAKIA 0800 SAMSUNG 726 7864 www samsung com sk SPAIN 902 1 SAMSUNG 902 172 678 www samsung com es SWEDEN 075 SAMSUNG 726 78 64 www samsung com se U K 0845 SAMSUNG 7267864 www samsung com ...

Отзывы: