44
Playback
45
EnG
●
SYSTEM
SETUP
USB Host Specification
USB Host Specification
• Supports USB 1.1 or USB 2.0 compliant devices.
• Supports devices connected using the USB A type cable.
• Supports UMS (USB Mass Storage Device) V1.0 compliant devices.
• Supports the device of which the connected drive is formatted in the FAT(FAT,
FAT16, FAT32) file system.
Non-compliance
• Does not support a device that requires installing a separate driver on the PC (Windows).
• Does not support connection to a USB hub.
• A USB device that is connected using the USB extension cable may not be recognized.
• A USB device requiring a separate power source needs to be connected to the
player with the separate power connection.
Operational Limitations
• If the connected device has multiple drives (or partitions) installed, only one drive
(or partition) can be connected.
• A device supporting USB 1.1 alone may cause a difference in the picture quality,
depending on the device.
Compliant Devices
USB Storage Device
MP3 Player
Digital Camera
Removable HDD
Removable HDDs equipped with less than 160 Gbytes are supported. Removable HDDs
equipped with 160Gbytes or more may not be recognized, depending on the device.
If the connected device does not work due to insufficient power supply, you can use a separate
power cable to supply power so that it can work properly. The connector of the USB cable may
differ, depending on the manufacturer of the USB device.
USB card Reader: One slot USB card reader and Multi slot USB card reader.
The USB card reader may not be supported, depending on the manufacturer.
If you install multiple memory devices into a multi card reader, you may experience problems.
Compliant File Formats
Format
File name
File
extension
Bit rate
Version
Pixel
Sampling
Frequency
Still Picture
JPG
JPG .JPEG
–
–
640x480
–
Music
MP3
.MP3
80~384kbps
–
–
44.1kHz
WMA
.WMA
56~128kbps
V8
–
44.1kHz
Movie
WMV
.WMV
4Mbps
V1,V2,V3,V7
720x480
44.1KHz~48KHz
DivX
.AVI,.ASF
4Mbps
DivX3.11~
DivX5.1, XviD
720x480
44.1KHz~48KHz
CBI (Control/Bulk/Interrupt) is not supported.
Digital Cameras that use PTP protocol or require additional program installation when connected to a
PC are not supported.
A device using NTFS file system is not supported. (Only FAT 16/32 (File Allocation Table 16/32) file
system is supported.)
Does not operate with Janus enabled MTP (Media Transfer Protocol) devices.
1.
.
.
4.
~
~
5.
~
~
~
~
~
~
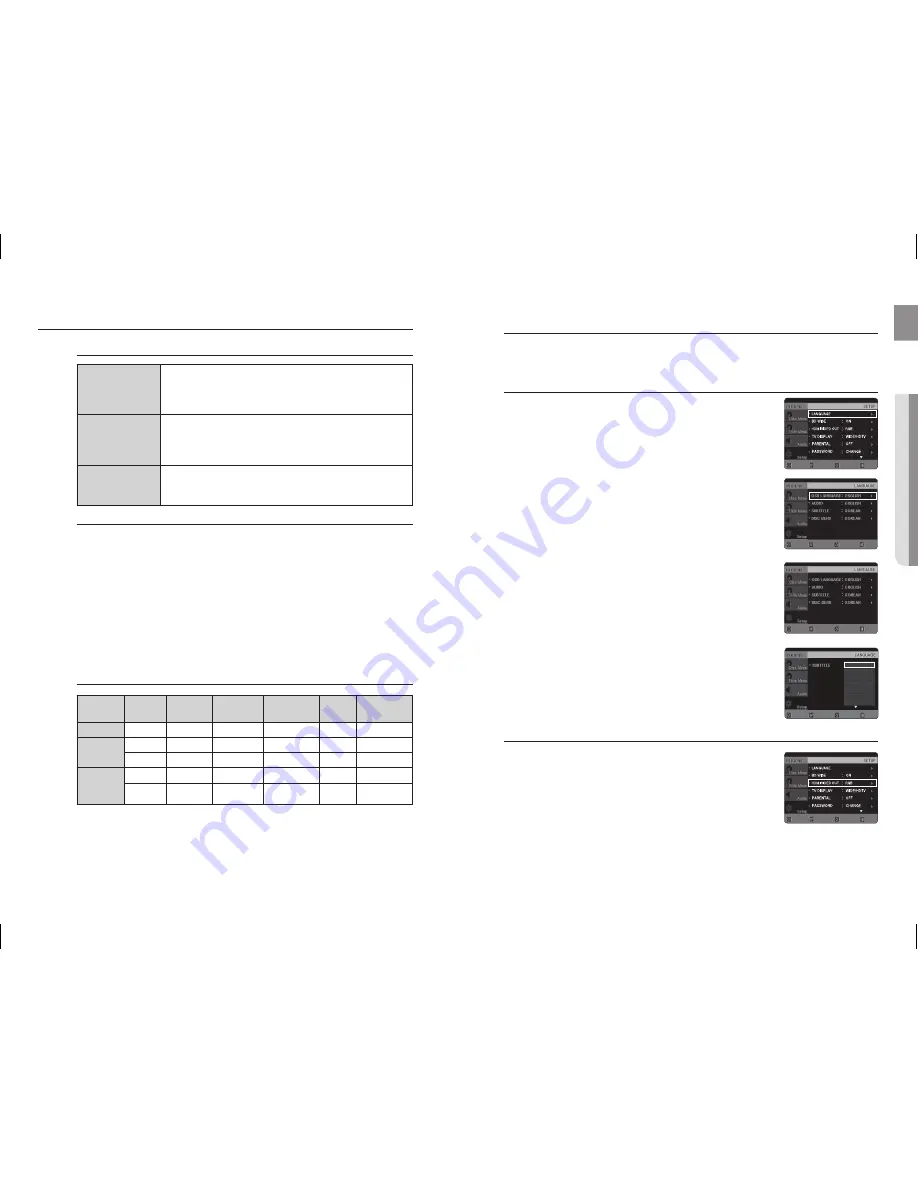
For your convenience, you can set this Home Cinema System's features for the
best use in your home environment.
SETTInG THE LAnGUAGE
OSD(On-Screen Display) language is set to English by default.
In Stop mode, press the
MEnU
button.
Press the Cursor
%
button to move to
Setup
and then press the
EnTEr
or
+
button.
Select
Language
and then press the
EnTEr
or
+
button.
Press the Cursor
$
,
%
button to select
OSD Language
and then
press the
EnTEr
or
+
button.
Press the Cursor
$
,
%
button to select the desired language
and then press the
EnTEr
button.
Once the setup is complete, the OSD will be English if
English has been selected as the language.
d
Press the
rETUrn
button to return to the previous level.
d
Press the
EXIT
button to exit the setup screen.
OSD LAnGUAGE
: Selecting the OSD Language
AUDIO
: Selecting the Audio Language (recorded on the disc)
SUBTITLE
: Selecting the Subtitle Language (recorded on the disc)
DISC MEnU
: Selecting the Disc Menu Language (recorded on the disc)
If the language you selected is not recorded on the disc, menu
language will not change even if you set it to your desired language.
OTHErS
: To select another language, select OTHERS and
enter the language code of your country (see page 64).
AUDIO, SUBTITLE and DISC MENU languages can be
selected.
SETInG THE HDMI VIDEO OUT MODE
Selects the type of output from the HDMI/OUT jack.
YCbCr
: Normally, select this when connecting to an HDMI device.
rGB
: Gives brighter colours and deeper blacks. Select this if colours
are weak.
In Stop mode, press the
MEnU
button.
Press the Cursor
%
button to move to
Setup
and then press the
EnTEr
button.
Press the Cursor
%
button to move to
HDMI VIDEO OUT
and then
press the
EnTEr
button.
Press the Cursor
$
,
%
button to select the desired item and then press the
EnTEr
button.
Once the setup is complete, you will be taken to the previous screen.
d
Press the
rETUrn
button to return to the previous level.
d
Press the
EXIT
button to exit the setup screen.
1.
.
.
4.
5.
~
~
~
~
~
~
~
~
1.
.
.
4.
~
MOVE
ENTER
EXIT
RETURN
MOVE
ENTER
EXIT
RETURN
MOVE
ENTER
EXIT
RETURN
ENGLISH
KOREAN
ARABIC
BULGARIAN
CHINESE
CROATIAN
CZECH
MOVE
SELECT
EXIT
RETURN
MOVE
ENTER
EXIT
RETURN
System setup


