background image

7

.1   

<Troubleshooting>

7

 Troubleshooting

This chapter gives helpful information on what to do if you encounter a 
problem.

This chapter includes:

Machine Setup

Tips for avoiding paper jams

Clearing paper jams

Understanding display messages

Solving other problems

Tips for avoiding paper jams

By selecting the correct media types, most paper jams can be avoided. 
When a paper jam occurs, follow the steps outlined on page 7.1. 

• Follow the procedures on page 4.4. Ensure that the adjustable guides 

are positioned correctly.

• Do not overload the tray. Ensure that the paper level is below the 

paper capacity mark on the inside of the tray.

• Do not remove paper from the tray while your machine is printing.

• Flex, fan, and straighten paper before loading. 

• Do not use creased, damp, or highly curled paper.

• Do not mix paper types in a tray.

• Use only recommended print media. (See "Setting the paper size and 

type" on page 4.7.)

• Ensure that the recommended side of the print media is facing down in 

the tray, or facing down in the multi-purpose tray.

Clearing paper jams

When a paper jam occurs, the warning message appears on the display 
screen. Refer to the table below to locate and clear the paper jam.

Message

Location of jam

Go to

MP Tray 
Paper Jam 0

In the multi purpose tray

Page 7.3

Tray 2 
Paper Jam 0

In the optional tray

Page 7.6

Paper Jam 0
Open/Close Door

In the paper feed area and 
inside the machine

Page 7.1, 
Page 7.4

Paper Jam 1
Open/Close Door

Inside the machine

Page 7.1, 
Page 7.4

Paper Jam 2
Check Inside

Inside the machine and in the 
exit area

Page 7.1, 
Page 7.5

Note

The symbol * denotes an optional feature depending on 
machines.

Caution

To avoid tearing the paper, pull the jammed paper out gently 
and slowly. Follow the instructions in the following sections to 
clear the jam. 

In the paper feed area 

If paper is jammed in the paper feed area, follow the next steps to release 
the jammed paper. 

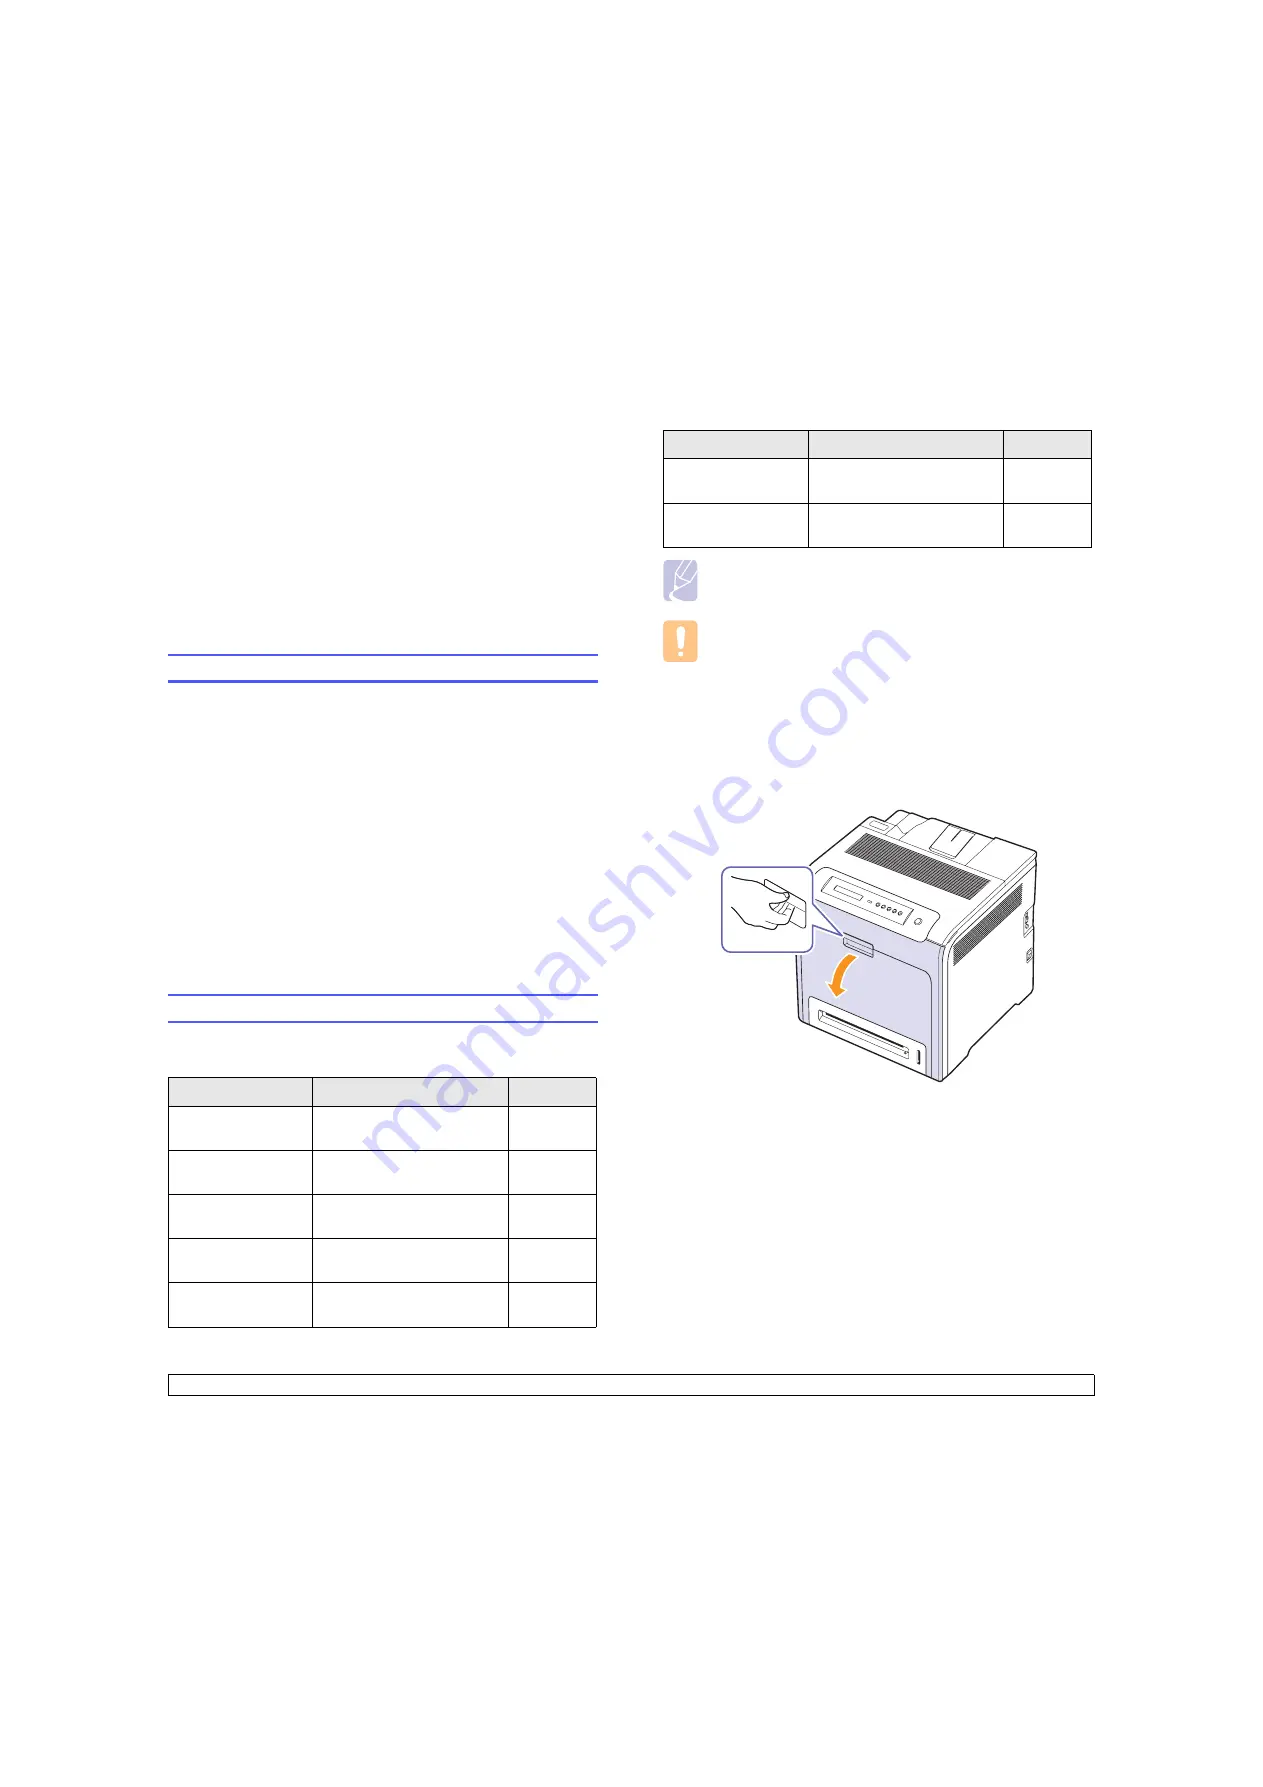
1

Using the handle, completely open the front cover. 

Duplex Jam 0
Check Inside*

Inside the machine

Page 7.1

Duplex Jam 1
Open/Close Door*

In the paper feed area and 
inside the machine

Page 7.1, 
Page 7.4

Message

Location of jam

Go to

Содержание CLP-610 Series

Страница 1: ......

Страница 2: ...mes of Samsung Electronics Co Ltd Samsung and Samsung logo are trademarks of Samsung Electronics Co Ltd PCL and PCL 6 are trademarks of Hewlett Packard company Microsoft Windows Windows NT and Windows Vista are either registered trademarks or trademarks of Microsoft Corporation PostScript 3 is a trademark of Adobe System Inc UFST and MicroType are registered trademarks of Monotype Imaging Inc True...

Страница 3: ...amsung com it JAMAICA 1 800 234 7267 www samsung com latin JAPAN 0120 327 527 www samsung com jp LATVIA 800 7267 www samsung com lv index htm LITHUANIA 8 800 77777 www samsung com lt LUXEMBURG 0032 0 2 201 24 18 www samsung lu MALAYSIA 1800 88 9999 www samsung com my MEXICO 01 800 SAMSUNG 7267864 www samsung com mx NETHERLANDS 0900 20 200 88 0 10 min www samsung com nl NORWAY 815 56 480 www samsun...

Страница 4: ...he hardware 3 1 Setting up the network 3 1 Supported operating systems 3 2 Configuring network protocol via the machine 3 2 Installing the software 3 3 Printer s basic settings 3 4 Altitude Setting after Software Installation 3 4 Changing the display language 3 5 Setting job timeout 3 5 Using power saving feature 3 5 Setting the default paper size and type 3 5 Setting the default tray 3 5 4 Select...

Страница 5: ...eshooting Tips for avoiding paper jams 7 1 Clearing paper jams 7 1 In the paper feed area 7 1 In the multi purpose tray 7 3 In the fuser unit area 7 4 In the paper exit area 7 5 In the optional tray 7 6 Understanding display messages 7 7 Solving other problems 7 11 Paper feeding problems 7 11 Printing problems 7 11 Printing quality problems 7 13 Common Windows problems 7 16 Common PostScript probl...

Страница 6: ...10 Specifications CLP 610 Series 10 1 CLP 660 Series 10 2 11 Glossary Index ...

Страница 7: ...he additional detailed information See page 1 1 for more information Finding more information You can find information for setting up and using your machine from the following resources either as a print out or onscreen Quick Install Guide Provides information on setting up your machine and this requires that you follow the instructions in the guide to prepare the machine Online User s Guide Provi...

Страница 8: ...sequently used 13 Unplug the machine from the PC and AC wall outlet and refer servicing to qualified service personnel under the following conditions When any part of the power cord plug or connecting cable is damaged or frayed If liquid has been spilled into the machine If the machine has been exposed to rain or water If the machine does not operate properly after instructions have been followed ...

Страница 9: ... environmentally safe recycling Business users should contact their supplier and check the terms and conditions of the purchase contract This product should not be mixed with other commercial wastes for disposal Radio Frequency Emissions FCC Regulations This device complies with Part 15 of the FCC Rules Operation is subject to the following two conditions This device may not cause harmful interfer...

Страница 10: ...ained from your Samsung Electronics Co Ltd representative Replacing the Fitted Plug for UK Only Important The mains lead for this machine is fitted with a standard BS 1363 13 amp plug and has a 13 amp fuse When you change or examine the fuse you must re fit the correct 13 amp fuse You then need to replace the fuse cover If you have lost the fuse cover do not use the plug until you have another fus...

Страница 11: ...v ...

Страница 12: ...in various sizes Create professional documents Print Watermarks You can customize your documents with words such as Confidential See Software section Print Posters The text and pictures of each page of your document are magnified and printed across the sheet of paper and can then be taped together to form a poster See Software section You can use preprinted forms and letterhead with plain paper Se...

Страница 13: ... guide may differ from your machine depending on its options or models The surface of the output tray may become hot if you print a large number of pages at once Please make sure that you do not touch the surface and do not allow children near it 1 output tray 7 multi purpose tray 2 output support 8 tray 1 3 control panel 9 optional tray 4 front cover 10 paper level indicator 5 front cover handle ...

Страница 14: ...ailable accessories The symbol denotes an optional device 1 USB port 5 power switch 2 network port 6 power receptacle 3 15 pin Optional tray connection 7 control board cover Memory module see page 9 1 for more information 4 handle Use these handles to move your machine TRAY2 ...

Страница 15: ...rk together with display messages See Status LED with the print cartridge messages on page 1 5 6 OK Confirms the selection on the display 3 Status Shows the status of your machine See Understanding the Status LED on page 1 5 for more information 7 Back Sends you back to the upper menu level 4 Menu Enters Menu mode and scrolls through the available menus See Understanding the Status LED on page 1 5...

Страница 16: ...w Order a new print cartridge see Ordering supplies and accessories on page 8 1 You can temporarily improve print quality by redistributing the toner See Replacing the print cartridge on page 6 4 On A problem has occurred such as a paper jam opened cover or no paper in the tray so that the machine can not continue the job Check the message on the display and refer to Understanding display messages...

Страница 17: ...and 5 6 Press left right arrow until the menu item ex Print you want displays on the bottom line 7 Press OK to process your selection save your input or selection An asterisk appears next to the selection on the display indicating that it is now the default 8 To exit the menu press Back repeatedly or Stop Note If no key is pressed within 1 minute the machine automatically returns to ready mode The...

Страница 18: ...figuration Demo Page You can print the demo page whether your machine is printing properly or not PCL Font List You can print the PCL font list PS Font List You can print the PS font list Menu Description Orientation This menu allows you to select the direction in which information is printed on a page Landscape and Portrait are selectable Simplex Margin Set the margin of print materials for one s...

Страница 19: ...s the paper from the multi purpose tray first than the tray 1 and tray 2 for the last So if any tray is empty then the machine try to search the paper from the next available tray See page 3 5 for more information Tray Chaining When you select any other value except Auto from Paper Source and the selected tray is empty you can set the machine to automatically print from other trays If this menu it...

Страница 20: ...CL emulation PCL1 PCL7 s interval between letters is fixed and PCL8 PCL45 s interval is proportional to the font type and font size You can adjust the font size of PCL1 PCL7 using the Pitch item and PCL8 PCL45 can do using Point Size item PCL46 PCL54 s interval and font size are fixed Symbol This item selects the symbol set to be used in PCL emulation The symbol is the group of numbers marks and s...

Страница 21: ...ors to those on your screen Note If you have moved the machine it is strongly recommended to operate this menu manually Menu Description TCP IP If you are using the TCP IP protocol for networking select this menu DHCP The DHCP server allots an IP address to you automatically BOOTP The BOOTP server allots an IP address to you automatically Static You can enter an IP address subnetmask and gateway m...

Страница 22: ...ments Macintosh Postscript Printer Description PPD filea Use this file to run your machine from a Macintosh computer and print documents Smart Panel This program allows you to monitor the machine s status and alerts you when an error occurs during printing Printer driver features Your printer drivers support the following standard features Paper source selection Paper size orientation and media ty...

Страница 23: ... Explorer 5 0 or higher is the minimum requirement for all Windows operating systems Users who have an administrator right can install the software Linux OS Requirement recommended CPU RAM free HDD space Windows 2000 Pentium II 400 MHz Pentium III 933 MHz 64 MB 128 MB 650 MB Windows XP Pentium III 933 MHz Pentium IV 1 GHz 128 MB 256 MB 1 5 GB Windows 2003 Server Pentium III 933 MHz Pentium IV 1 GH...

Страница 24: ...Operating system Macintosh 10 3 10 4 CLP 610 series Macintosh 10 1 10 4 CLP 660 series CPU Intel processor PowerPC G4 G5 RAM 512 MB for an Intel based Mac 128 MB for a Power PC based Mac free HDD space 1 GB Connection USB interface or Network interface ...

Страница 25: ...surface for not letting it tilt more than 5 mm 0 2 inches Otherwise it may affect the printing quality Allow a flat surface area of 5 mm 0 2 inches to surround all sides 2 Unpack the machine and check all the enclosed items 3 Remove the tape holding the machine tightly 4 Install both the print cartridge 5 Load paper See Loading paper on page 4 4 6 Make sure that all the cables are connected to the...

Страница 26: ...each byte 13 Press the left right arrow until Subnet Mask displays 14 Press OK 15 Enter Subnet Mask a Press the left right arrow to enter a number between 0 and 255 b Press OK c Repeat these steps to complete Subnet Mask 16 Press Back to go to the upper level 17 Press the left right arrow until Gateway displays 18 Press OK 19 Enter Gateway a Press the left right arrow to enter a number between 0 a...

Страница 27: ...p exe If the AutoPlay window appears in Windows Vista click Run Setup exe in Install or run program field and click Continue in the User Account Control window The window above may slightly differ if you are reinstalling the driver View User s Guide Allows you to view the User s Guide If your computer does not have Adobe Acrobat click on this option and it will automatically install Adobe Acrobat ...

Страница 28: ...termined by the height of the machine above sea level The following information will guide you on how to set your machine to the best print quality or best quality of print Before you set the altitude value find the altitude where you are using the machine 1 Ensure that you have installed the printer driver with the provided Printer Software CD 2 Double check the Smart Panel icon on the Windows ta...

Страница 29: ...ave displays 4 Press OK 5 Press the left right arrow to select the amount of time 6 Press OK 7 Press Stop to return to machine ready mode Setting the default paper size and type You can select the paper size you would like to keep for printing job Note For detailed information on the Custom paper size setting and the paper type setting see Setting the paper size and type on page 4 7 1 Press Menu o...

Страница 30: ...erature and humidity levels or other variables over which Samsung has no control Before purchasing large quantities of print media ensure that it meets the requirements specified in this user s guide Guidelines for selecting and storing print media When selecting or loading paper envelopes or other print materials keep these guidelines in mind Always use print media that conform with the specifica...

Страница 31: ...184 x 267 mm 7 25 x 10 5 inches A5 148 x 210 mm 5 82 x 8 26 inches Statement 140 x 216 mm 5 5 x 8 5 inches A6 105 x 148 mm 4 13 x 5 82 inches Post Card 105 x 148 mm 4 13 x 5 82 inches Envelope Envelope Monarch 98 x 191 mm 3 87 x 7 5 inches 75 to 105 g m2 20 to 28 lb bond 10 sheets of 75 g m2 20 lb bond in the multi purpose tray Envelope No 10 105 x 241 mm 4 12 x 9 5 inches Envelope DL 110 x 220 mm...

Страница 32: ...tible with the machine s fusing temperature for 0 1 second Check your machine s specification to view the fusing temperature see page 10 1 The extra flaps and strips might cause wrinkling creasing or jams and may even damage the fuser For the best print quality position margins no closer than 15 mm from the edges of the envelope Avoid printing over the area where the envelope s seams meet Labels T...

Страница 33: ...es Loading paper In the tray Load the print media you use for the majority of your print jobs in the tray 1 The tray 1 can hold a maximum of 250 sheets of 75 g m2 20 lb bond plain paper You can purchase an optional tray and attach it below the standard tray to load an additional 500 sheets of paper See Accessories on page 8 1 Loading paper in the tray 1 or optional tray 1 To load paper pull and op...

Страница 34: ...ide as shown move it toward the stack of paper until it lightly touches the side of the stack Do not press the guide too tightly to the edge of the paper the guide may bend the paper When you use legal sized paper you need to extend the length of the tray 3 Press and hold the green lever on the back of the tray when you are holding the lever extend the tray to the corresponding position 4 Load the...

Страница 35: ...int media Print media should be loaded face down with the top edge going into the multi purpose tray first and be placed in the center of the tray Always load only the specified print media to avoid paper jams and print quality problems See Selecting print media on page 4 1 Flatten any curl on postcards envelopes and labels before loading them into the multi purpose tray To load paper in the multi...

Страница 36: ... top short edge entering the machine first Preprinted paper Design side up with the top edge toward the machine Card stock Print side up and the short edge entering the machine first Previously printed paper Previously printed side down with an uncurled edge toward the machine Setting the paper size and type The settings you change remain in effect only while you are using the current program To m...

Страница 37: ...rint in the Print window For details about printing see Software section Canceling a print job If the print job is waiting in a print queue or print spooler such as the printer group in Windows delete the job as follows 1 Click the Windows Start menu 2 For Windows 2000 select Settings and then Printers For Windows XP 2003 select Printers and Faxes For Windows Vista select Control Panel Hardware an...

Страница 38: ...ntil you see System Setup on the bottom line of the display 2 Press OK 3 Press the left right arrow until Maintenance displays 4 Press OK 5 Press the left right arrow until Supplies Life displays 6 Press OK 7 The display shows two options as you press the left right arrow button Total displays the total number of pages printed Toner Remains displays how much toner remains in the cartridge 8 When y...

Страница 39: ... more than a few minutes the OPC drum can be exposed to light This will cause damage to the OPC drum Cover the OPC drum of the print cartridge with the clean paper could avoid damaging it from the light while you clean the inside 2 Grasp the handles on the print cartridge and pull to remove all the cartridge from the machine 3 With a dry lint free cloth wipe away any dust and spilled toner from th...

Страница 40: ...incorrect colors due to flawed mixing of toner colors when one of the colored print cartridges is low on toner You can temporarily improve print quality by redistributing the toner The toner related message saying that the toner is low may appear on the display The SmartPanel program window appears on the computer telling you which color cartridge is low on toner 1 Using the handle completely open...

Страница 41: ...nt cartridge needs to be replaced Check the type of print cartridge for your machine See Supplies on page 8 1 1 Turn the machine off then wait a few minutes for the machine to cool 2 Using the handle completely open the front cover Caution Do not touch the green surface the OPC drum or the front of each print cartridge with your hands or any other material Use the handle on each cartridge in order...

Страница 42: ...utes Cover it with a piece of paper to protect it if necessary 5 Holding both handles on the print cartridge thoroughly rock it from side to side to evenly distribute the toner 6 Place the print cartridge on a flat surface as shown and remove the paper covering the print cartridge by removing the tape Note If toner gets on your clothing wipe it off with a dry cloth and wash it in cold water Hot wa...

Страница 43: ...he transfer belt related message appears on the display telling it s time for a replacement The SmartPanel program window appears on the computer telling you the paper transfer belt needs to be replaced Note The life span of the paper transfer belt may be affected by operating environment printing interval media type and media size 1 Turn the machine off then wait a few minutes for the machine to ...

Страница 44: ...the surface of the paper transfer belt Be careful not to scratch the surface of the paper transfer belt 6 Holding the handle on the new paper transfer belt align it with the slots on the inside of the front cover 7 Lower the paper transfer belt until it is parallel with the front cover and firmly seated 8 Close the front cover firmly Caution If the front cover is not completely closed the machine ...

Страница 45: ...tly you can manage the machine via Samsung s SyncThru Web Service an embedded web server Use SyncThru Web Service to View the device information and check its current status Change TCP IP parameters and set up other network parameters Change the printer properties Set the machine to send email notifications and update you on the machine s status Get support for using the machine To access SyncThru...

Страница 46: ... facing down in the tray or facing down in the multi purpose tray Clearing paper jams When a paper jam occurs the warning message appears on the display screen Refer to the table below to locate and clear the paper jam Message Location of jam Go to MP Tray Paper Jam 0 In the multi purpose tray Page 7 3 Tray 2 Paper Jam 0 In the optional tray Page 7 6 Paper Jam 0 Open Close Door In the paper feed a...

Страница 47: ... with your hands or any other material Use the handle on each cartridge in order to avoid touching this area Be careful not to scratch the surface of the paper transfer belt If you leave the front cover open for more than a few minutes the OPC drum can be exposed to light This will cause damage to the OPC drum Close the front cover should the installation need to be halted for any reason 3 Close t...

Страница 48: ...ng the Multi purpose Tray and the machine detects that there is either no paper or that the paper has been improperly loaded follow the next steps to release the jammed paper 1 Check if the paper is stuck in the feeding area and if so pull it out gently and slowly If you cannot find the jammed paper or if there is any resistance removing the paper stop pulling and go to step 2 2 Using the handle c...

Страница 49: ...t cover should the installation need to be halted for any reason 4 Close the front cover firmly The machine will resume printing Caution If the front cover is not completely closed the machine will not operate In the fuser unit area If paper is jammed in the fuser unit area follow the next steps to release the jammed paper 1 Open the top cover 2 Open the inner cover using the handle on it and care...

Страница 50: ...y The machine will resume printing If you cannot find the jammed paper or if there is any resistance removing the paper stop pulling and go to step 2 2 Open the top cover 3 Open the inner cover using the handle on it and carefully take the jammed paper out of the machine Caution Do not touch the fuser inside the inner cover It is hot and could cause burns The fuser s operating temperature is 180 C...

Страница 51: ...tional Tray follow the next steps to release the jammed paper 1 Pull the optional Tray open After you pull it all the way out lift up the front part of the tray slightly to release the tray from the machine 2 If you see the jammed paper remove the paper from the machine by gently pulling it straight out as shown below 3 Slide the tray back into the machine and close the two jam covers 4 Open the f...

Страница 52: ...he tray lower the rear edge align it with the slot and slide it into the printer yyy Paper Empty There is no paper in the tray Load paper in the tray Page 4 4 ADC Not Confirm Error There is a problem in the ADC Analog to Digital Converter of your machine Unplug the power cord and plug it back in If the problem persists contact the service representatives ADC Slope Error Cycle Power The temperature...

Страница 53: ...elt Page 8 1 Page 6 6 Message Explanation Solution Install Toner The print cartridge is installed improperly or not installed Reinstall the print cartridge two or three times If the problem persists the print cartridge is not being detected Please contact the service representatives IP Conflict The network IP address you have set is being used by someone else Check the IP address and reset it if n...

Страница 54: ...rror Cycle Power The temperature for the fuser unit is above the normal range Unplug the power cord and plug it back in If the problem persists contact the service representatives Message Explanation Solution Outer Temp Open Cycle Power The outer temperature of the machine is above the normal range Unplug the power cord and plug it back in If the problem persists contact the service representative...

Страница 55: ...ord and plug it back in If the problem persists contact the service representatives Thermistor Open Cycle Power There is a problem in the temperature sensing device for the fuser unit This device detects a value above the normal value range Unplug the power cord and plug it back in If the problem persists contact the service representatives Thermistor Short Cycle Power There is a problem in the te...

Страница 56: ...e tray An incorrect type of paper is being used Use only paper that meets the specifications required by the machine See Specifications on print media on page 4 2 There may be debris inside the machine Open the front cover and remove the debris Printing problems Envelopes skew or fail to feed correctly Ensure that the paper guides are against both sides of the envelopes Condition Possible cause Su...

Отзывы: