background image

S

P E C I A L

F

E AT U R E S

English - 51

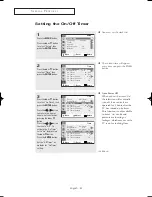
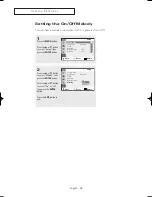
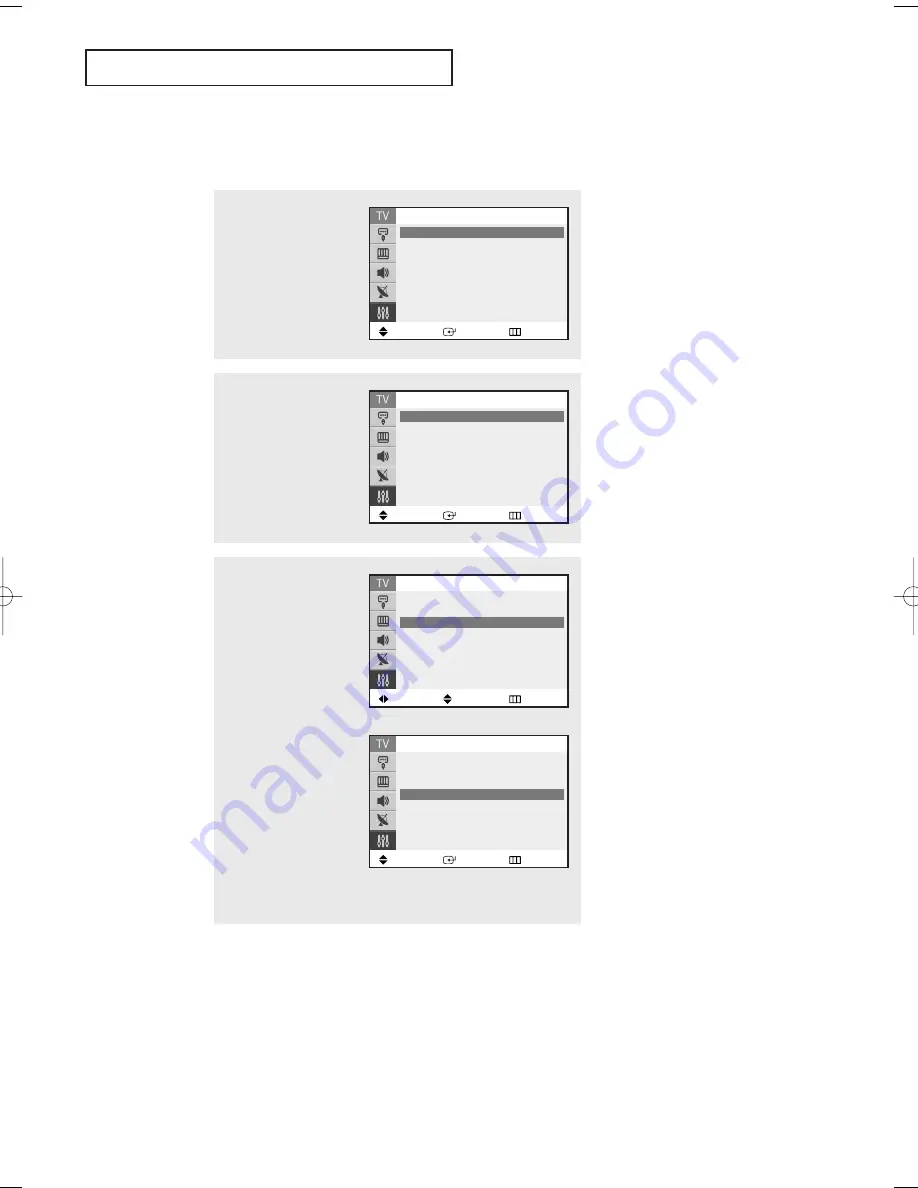
Setting the On/Off Timer

1

Press the 

MENU 

button.

Press the 

or 

button

to select “Setup”, then
press the 

ENTER 

button.

3

Press the 

or 

button

to select “On Timer”, then
press the 

ENTER

button.

Press the 

œ

œ

or 

√  

button

to move to the hour or
minute. Set the clock by
pressing the 

or 

button.
Press the 

œ

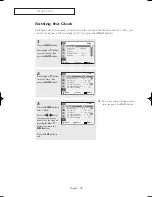
œ

or 

√  

button

to move to “Off”. To
activate the “On Timer”,
set to “On” by pressing
the 

or 

▼ 

button.

Press the 

ENTER

button.

Set the “Off Timer” as
methods for “On Timer”
setting.

2

Press the 

or 

button

to select “Time”, then
press the 

ENTER

button.

Move

Enter

Return

Setup

Plug & Play

Language

: English

Time

Caption 

Blue Screen

: On

Melody

: Off

Move

Enter

Return

Time

Clock

09 : 30 am

Sleep Timer

: Off

On Timer

-- : -- am Off

Off Timer

-- : -- am Off

On Timer Source

:

Air

On Timer Channel

:

3

On Timer Volume

:

10

œ

The current time will appear
every time you press the 

INFO

button.

œ

You must set the clock first.

Move

Adjust

Return

Time

Clock

09 : 30 am

Sleep Timer

: Off

On Timer

12

: 00 am Off

Off Timer

-- : -- am Off

On Timer Source

:

Air

On Timer Channel

:

3

On Timer Volume

:

10

Move

Enter

Return

Time

Clock

09 : 30 am

Sleep Timer

: Off

On Timer

06 : 30 am On

Off Timer

11 : 00 pm On

On Timer Source

:

Air

On Timer Channel

:

3

On Timer Volume

:

10

œ

Auto Power Off

When you set the timer “On”,
the television will eventually
turn off, if no controls are
operated for 3 hours after the
TV was turned on by timer.
This function is only available
in timer “On” mode and
prevents overheating or
leakages, which may occur if a
TV is on for too long time.

continued...

AA68_03783B_02_LEng  9/12/06  5:38 PM  Page 51

Содержание CL-29Z40MQ

Страница 1: ...Owner s Instructions COLOR TELEVISION CL 29Z40MQ Register your product at www samsung com global register ...

Страница 2: ...ch as the dark side bars on non expanded standard format television video and programming should be limited to no more than 15 of the total television viewing per week Additionally viewing other stationary images and text such as stock market reports video game displays station logos web sites or computer graphics and patterns should be limited as described above for all televisions Displaying any...

Страница 3: ...0i and 480 line progressive 480p video 480i programs are essentially a digital version of our current analog TV programs while the 480p format offers improved image detail over 480i Some 480p programs are broadcast in widescreen and are comparable to progressive scan DVD movies in image quality HDTV program formats include 1080 line interlaced 1080i and 720 line progressive 720p Both HDTV formats ...

Страница 4: ...TVs and monitors The advantage of an integrated DTV set is that it can tune both analog and digital TV channels at the same time All you need to do is add an external antenna and you are ready to watch DTV However integrated DTV sets are not as common as DTV ready TVs and monitors If you already own a DTV ready TV with component video inputs you can enjoy DTV broadcasts by simply adding a low cost...

Страница 5: ...riginally encoded for broadcast This is a big advantage for DTV over analog TV there is no noise ghosting static or scratchy audio 3 How can I connect an antenna in my townhouse co operative apartment condominium or apartment The Federal Communications Commission s OTARD Rule part of the Telecommunications Act of 1996 allows residents of condominiums townhouse or members of neighborhood associatio...

Страница 6: ... DVD Player 19 Connecting to Y PB PR 19 Connecting to Regular Audio and Video Jacks 19 Connecting to an Analog Amplifier 20 Installing Batteries in the Remote Control 21 Chapter 3 Operation 22 Turning the TV On and Off 22 Plug Play Feature 22 Viewing the Menus and On Screen Displays 25 Viewing the Menus 25 Viewing the Display 25 Selecting a Menu Language 26 Selecting the Antenna Input 26 Memorizin...

Страница 7: ...on 45 Tilt 46 Using the R Surf Feature 47 Choosing a Multi Channel Sound MTS track 48 Choosing a Multi Channel Sound MTS track 49 Extra Sound Settings Auto Volume Pseudo Stereo or Turbo Plus 50 Setting the On Off Timer 51 Setting the Preferred Option 52 Setting the Sleep Timer 53 Viewing Closed Captions On Screen Text Message 54 Viewing Closed Captions On Screen Text Message 56 Setting the Blue Sc...

Страница 8: ... A built in multi channel sound decoder for stereo and bilingual listening Built in dual channel speakers A special sleep timer Capable of receiving Analog and Digital TV broadcasts Checking Accessories The following parts are sold separately and are available at most electronics stores Once you have unpacked your TV check to make sure that you have all the parts shown here If any piece is missing...

Страница 9: ...ing on the model Œ Remote Control Sensor Aim the remote control towards this spot on the TV Stand By Indicator Lights up when you turn the power off Power Off Red Power On Off ˇ POWER Press to turn the TV on and off MENU Press to see an on screen menu of your TV s features ˆ VOL Press to increase or decrease the volume Also used to select items on the on screen menu Ø CH Press to change channels A...

Страница 10: ... game For information on connecting equipment see page 18 Please be sure to match the color coded input terminals and cable jacks Œ S VIDEO Input Connect an S Video signal from a camcorder or video game VIDEO Input Connect a video signal from a camcorder or video game ˇ AUDIO R L Input Connect audio signals from a camcorder or video game ...

Страница 11: ...ers and similar devices ˇ Audio Input jacks Connect to the audio output jacks of VCRs DVD players and similar devices Component Input jacks Y PB PR AUDIO R L Connect to the Component audio and video outputs of a DVD or DTV set top box 480i video signal input is available ˆ UPGRADE PORT USB For service only Ø ANTENNA terminals Two independent cables or antennas can be connected to these terminals U...

Страница 12: ... your personal customized picture settings Refer to page 33 ADD DEL Press to add or erase channels in the TV s memory Refer to page 30 Ô AUTO PROG Press to display the memorized channels menu Refer to page 29 ANTENNA Press to select Cable or Air Refer to page 26 Ò TV DTV Press to switch between TV Analog and DTV Digital mode Ú SOURCE Press to display all of the available video sources Refer to pag...

Страница 13: ...u have two antennas see Separate VHF and UHF Antennas on page 14 Antennas with 300 ohm Flat Twin Leads If you are using an off air antenna such as a roof antenna or rabbit ears that has 300 ohm twin flat leads follow the directions below 1 Place the wires from the twin leads under the screws on the 300 75 ohm adapter not supplied Use a screwdriver to tighten the screws 2 Plug the adapter into the ...

Страница 14: ...ignals before connecting the antennas to the TV This procedure requires an optional combiner adapter available at most electronics shops 1 Connect both antenna leads to the combiner 2 Plug the combiner into the ANT 1 IN AIR terminal on the rear panel Antennas with 75 ohm Round Leads 1 Plug the antenna lead into the ANT 1 IN AIR terminal on the rear panel ...

Страница 15: ...cable into the ANT 2 IN CABLE terminal on the rear panel Connecting to a Cable Box that Descrambles All Channels 1 Find the cable that is connected to the ANTENNA OUT terminal on your cable box œ This terminal might be labelled ANT OUT VHF OUT or simply OUT 2 Connect the other end of this cable to the ANT 2 IN CABLE terminal on the rear panel Cable Box ...

Страница 16: ...oming Cable Cable Box Splitter 3 Connect a coaxial cable between the ANTENNA OUT terminal on the cable box and the B IN terminal on the RF A B switch 4 Connect another cable between the other OUT terminal on the splitter and the A IN terminal on the RF A B switch 5 Connect the last coaxial cable between the OUT terminal on the RF A B switch and the VHF UHF terminal on the rear panel After you ve m...

Страница 17: ...Panel 1 2 3 1 Connect a coaxial cable between the ANT 1 IN AIR or ANT 2 IN CABLE terminal on the TV and the antenna out terminal on the VCR A coaxial cable is usually included with a VCR If not check your local electronics store 2 Connect a set of audio cables between the AV IN 1 R L jacks on the TV and AUDIO OUT jacks on the VCR If you have a mono VCR connect L mono to VCR audio out using only on...

Страница 18: ...view the Camcorder tapes without using a VCR Please be sure to match the color coded input terminals and cable jacks 1 Locate the A V output jacks on the Camcorder They are usually found on the side or rear of the Camcorder 2 Connect a set of audio cables between the AV IN 2 R L jacks on the TV and the AUDIO OUT jacks on the Camcorder If you have mono Camcorder connect L mono to Camcorder audio ou...

Страница 19: ...he AUDIO OUT jacks on the DVD player 2 Connect a video cable between the AV IN 1 VIDEO jack on the TV and the VIDEO OUT jack on the DVD player Also you can connect to AV IN 2 on the side panel of TV Component video separates the video into Y Luminance brightness Pb Blue and Pr Red for enhanced video quality Be sure to match the component video and audio connections For example if connecting the vi...

Страница 20: ...ifier is connected to the AV OUT R L terminals Decrease the gain volume of the TV and adjust the volume level with the Amplifier s volume control TV Rear Panel Speaker Speaker Audio Cable Amplifier If you want to play movies by connecting DVD player with the COMPONENT IN jacks on the TV connect the AUDIO OUT jacks on DVD player to an Amplifier AV OUT R AUDIO L RF AV S Video Sound Output Component ...

Страница 21: ...ime The remote control can be used up to about 23 feet from the TV Assuming typical TV usage the batteries last for about one year 2 Install two AAA size batteries œ Make sure to match the and ends of the batteries with the diagram inside the compartment Installing Batteries in the Remote Control 1 Lift the cover at the back of the remote control upward as shown in the figure ...

Страница 22: ...l You can also use the POWER button on the front panel Plug Play Feature When the TV is initially powered On basic customer settings proceed automatically and subsequently Setting the language Antenna input check Channel Memorize and Time Setting The Plug Play function operates after plugging in the TV for the first time Plug Play Start Plug Play Enter Exit OK Plug Play Move Enter Skip Language En...

Страница 23: ...Enter Skip DTV Auto Program DTV 17 60 Stop continued Plug Play Move Enter Skip Antenna Air Cable Air Cable Plug Play Move Enter Skip Antenna Air Cable Air Cable Plug Play Move Enter Skip Cable System STD HRC IRC Air Cable Air Cable Antenna Select Channel Memorization Antenna Air Antenna Air Antenna Cable Antenna Cable Analog Channels DTV Channels Analog Channels DTV Channels O O X X X X O X O O O ...

Страница 24: ...ature 1 Press the MENU button 2 Press the or button to select Setup then press the ENTER button Plug Play is selected 3 Press the ENTER button Start Plug Play is displayed Move Enter Return Setup Plug Play Language English Time Caption Blue Screen On Melody Off Plug Play Clock Set am Move Enter Skip œ Refer to Setting the Clock on page 39 Enjoy your watching OK œ Even if the ENTER button is not pr...

Страница 25: ...e or button to move to items in the menu the icon is selected Press the ENTER or button to enter items in the menu Press the œ button to change the selected items Press the MENU or œ button to return to the previous menu 3 Press the EXIT button to exit œ You can also use the MENU VOL and CH buttons on the control panel of the TV to make selections Alternate method Press the INFO button on the remo...

Страница 26: ... English Español or Français then press the ENTER button Press the EXIT button to exit Move Enter Return Setup Plug Play Language English Time Caption Blue Screen On Melody Off Move Enter Return Language English Español Français Selecting the Antenna Input You can connect to two different signal sources by choosing the antenna input Air or Cable Alternate method Press the ANTENNA button repeatedly...

Страница 27: ...ion can begin memorizing the available channels you must specify the type of signal source that is connected to the TV i e an antenna or a cable system 1 Press the MENU button Press the or button to select Channel then press the ENTER button 2 Press the ENTER button to select Antenna Press the or button to select Air or Cable then press the ENTER button Move Enter Return Channel Antenna Air Auto P...

Страница 28: ...Air Cable Auto Program Move Enter Return STD HRC IRC Auto Program Enter Return DTV 17 60 Stop continued Storing Channels in Memory Air Cable Air Cable Antenna Select Channel Memorization Antenna Air Antenna Air Antenna Cable Antenna Cable Analog Channels DTV Channels Analog Channels DTV Channels O O X X X X O X O O O X STD HRC and IRC identify various types of cable TV systems Contact your local c...

Страница 29: ...tenna in order to receive TV signals Even if a particular channel is deleted from the memory you can always tune to that channel directly by using the number buttons on the remote control Alternate method Simply press the AUTO PROG button on the remote control to memorize the channels menu Auto Program Enter Exit 0 Start Auto Program Move Enter Exit Air Cable Air Cable ...

Страница 30: ...ed or Added then press the ENTER button Press the EXIT button to exit Move Enter Return Channel Antenna Air Auto Program Add Delete Fine Tune Name Signal Strength Move Enter Return Add Delete More Air 2 Deleted Air 3 Deleted Air 4 Deleted Air 5 Deleted Air 6 Deleted More Move Enter Return Add Delete More Air 2 Deleted Air 3 Deleted Air 4 Deleted Air 5 Deleted Air 6 Deleted More Deleted Added Alter...

Страница 31: ...hannel Press the number buttons to go directly to a channel For example to select channel 27 press 2 then 7 The TV will change channels when you press the second number Using the PRE CH Button to Select the Previous Channel œ To quickly switch between two channels that are far apart tune to one channel then use the number buttons to select the second channel Then use the PRE CH button to quickly a...

Страница 32: ...ew name then press the ENTER button 3 Press the or button to select a letter a number or a blank Results in this sequence A Z 0 9 blank Press the button to switch to the next field which will be selected Select a second letter or digit by pressing the or button as above Repeat the process to select the last two digits When you have finished press the MENU or ENTER button Press the EXIT button to e...

Страница 33: ...tory settings Choose Movie when viewing a movie Choose Custom if you want to adjust the settings according to personal preference 1 Press the MENU button Press the or button to select Picture then press the ENTER button 2 Press the ENTER button to select Mode Press the ENTER button again Press the or button to select a particular item then press the ENTER button Press the EXIT button to exit Move ...

Страница 34: ...NTER button again Press the or button to select a particular item Dynamic Standard Movie or Custom then press the ENTER button 3 Press the or button to select a particular item Contrast Brightness Sharpness Color or Tint then press the ENTER button Contrast 100 Move Enter Return Picture Mode Dynamic Size Normal Digital NR Off Tilt 0 Move Enter Return Mode Mode Dynamic Contrast 100 Brightness 50 Sh...

Страница 35: ... is set for each mode Dynamic Standard Movie or Custom The previously adjusted settings will be reset to the factory defaults Press the EXIT button to exit Resetting the Picture Settings to the Factory Defaults Move Enter Return Mode Mode Dynamic Contrast 100 Brightness 50 Sharpness 75 Color 50 Tint G 50 R 50 Color Tone Cool1 Reset Cool2 Cool1 Normal Warm1 Warm2 Move Enter Return Mode Mode Dynamic...

Страница 36: ... At any time you can temporarily cut off the sound using the MUTE button 1 Press the MUTE button and the sound cuts off is displayed To turn mute off press the MUTE button again or press either the VOL or VOL button Press the VOL or VOL buttons to increase or decrease the volume ...

Страница 37: ... show that is mostly dialog i e news Choose Custom to recall your personalized settings 2 Press the ENTER button to select Mode Press the or button to select a particular item then press the ENTER button Press the EXIT button to exit 1 Press the MENU button Press the or button to select Sound then press the ENTER button Move Enter Return Sound Mode Custom Equalizer MTS Stereo Auto Volume Off Pseud...

Страница 38: ...he Sound The sound settings can be adjusted to suit your personal preferences Alternatively you can use one of the automatic settings See page 37 Move Enter Return Sound Mode Custom Equalizer MTS Stereo Auto Volume Off Pseudo Stereo Off Turbo Plus Off Move Adjust Return Equalizer R L 100 300 1K 3K 10K If you make any changes to the equalizer settings the sound mode is automatically switched to the...

Страница 39: ...ock by pressing the or button then press the ENTER button Press the EXIT button to exit 2 Press the or button to select Time then press the ENTER button Move Enter Return Setup Plug Play Language English Time Caption Blue Screen On Melody Off Move Enter Return Time Clock am Sleep Timer Off On Timer am Off Off Timer am Off On Timer Source Air On Timer Channel 3 On Timer Volume 10 Move Adjust Return...

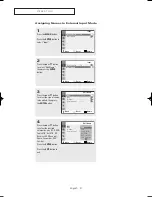
Страница 40: ...ess the ENTER button to select Input 2 Press the ENTER button to select Source List Press the or button to select the desired signal source then press the ENTER button AV 1 Move Enter Return Input Source List TV Edit Name Move Enter Return Source List TV DTV AV1 AV2 S Video Component œ When you connect equipment to the TV you can choose between the following sets of jacks AV1or Component on the TV...

Страница 41: ... external device VCR DVD Cable STB Sat STB AV Receiver DVD Receiver Game Camcorder DVD Combo Press the ENTER button Press the EXIT button to exit 1 Press the MENU button Press the ENTER button to select Input Move Enter Return Input Source List TV Edit Name Move Enter Return Input Source List TV Edit Name Move Enter Return Edit Name AV1 AV2 S Video Component Move Enter Return Edit Name AV1 AV2 S V...

Страница 42: ...emory press the MENU button To reset the fine tuning to 0 select Reset by pressing the or button then press the ENTER button Press the EXIT button to exit 1 Press the MENU button Press the or button to select Channel then press the ENTER button Move Enter Return Channel Antenna Air Auto Program Add Delete Fine Tune Name Signal Strength Reset Fine Tune Move Adjust Return Air 3 0 Reset Fine Tune Mov...

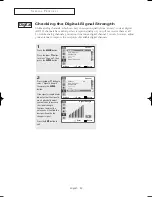
Страница 43: ...or button to select Signal Strength then press the ENTER button If the signal strength meter indicates that the signal is weak physically adjust your antenna to increase the signal strength Continue to adjust the antenna until you find the best position with the strongest signal Press the EXIT button to exit 1 Press the MENU button Press the or button to select Channel then press the ENTER button ...

Страница 44: ...he EXIT button to exit Move Enter Return Picture Mode Dynamic Size Normal Digital NR Off Tilt 0 Move Enter Return Picture Mode Dynamic Size Normal Digital NR Off Tilt 0 Normal Zoom Move Enter Return Picture Mode Dynamic Size Normal Digital NR Off Tilt 0 Normal Wide Changing the Screen Size Alternate method Press the P SIZE button on the remote control repeatedly to select one of the screen formats...

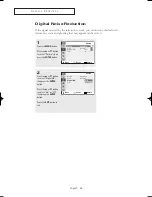
Страница 45: ... the MENU button Press the or button to select Picture then press the ENTER button 2 Press the or button to select Digital NR then press the ENTER button Press the or button to select On or Off then press the ENTER button Press the EXIT button to exit Move Enter Return Picture Mode Dynamic Size Normal Digital NR Off Tilt 0 Move Enter Return Picture Mode Dynamic Size Normal Digital NR Off Tilt 0 Of...

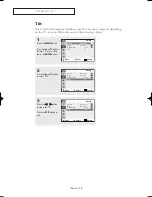
Страница 46: ...ss the or button to select Picture then press the ENTER button 2 Press the or button to select Tilt 3 Press the œ œ or button to adjust the Tilt Press the EXIT button to exit Move Enter Return Picture Mode Dynamic Size Normal Digital NR Off Tilt 0 Move Adjust Return Picture Mode Dynamic Size Normal Digital NR Off Tilt 0 Move Adjust Return Picture Mode Dynamic Size Normal Digital NR Off Tilt 2 ...

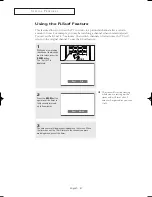
Страница 47: ... use the R Surf feature 1 While you are watching the channel to which you want to return press the R SURF button The Surf Off is displayed 2 Press the R SURF button again to set the timer in thirty second intervals up to five minutes 3 The time you set will begin counting down on the screen When the time runs out the TV will return to the channel you were watching when you set the timer Surf Off S...

Страница 48: ...Enter Return Sound Mode Custom Equalizer MTS Stereo Auto Volume Off Pseudo Stereo Off Turbo Plus Off Move Enter Return Sound Mode Custom Equalizer MTS Stereo Auto Volume Off Pseudo Stereo Off Turbo Plus Off Mono Stereo SAP Choose Mono for channels that are broadcasting in mono or if you are having difficulty receiving a stereo signal Choose Stereo for channels that are broadcasting in stereo Choos...

Страница 49: ...utton Press the or button to select the language you want then press the ENTER button Press the EXIT button to exit 1 Press the MENU button Press the or button to select Sound then press the ENTER button Move Enter Return Sound Mode Custom Equalizer MTS English Auto Volume Off Pseudo Stereo Off Turbo Plus Off Move Enter Return Sound Mode Custom Equalizer MTS Stereo Auto Volume Off Pseudo Stereo Of...

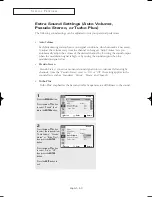
Страница 50: ...l into two identical left and right channels Once the Pseudo Stereo is set to On or Off the setting applies to the sound effects such as Standard Music Movie and Speech Turbo Plus Turbo Plus emphasizes the bass and treble frequencies to add fullness to the sound 2 Press the or button to select the required item Auto Volume Pseudo Stereo or Turbo Plus then press the ENTER button Press the or button...

Страница 51: ... Return Time Clock 09 30 am Sleep Timer Off On Timer am Off Off Timer am Off On Timer Source Air On Timer Channel 3 On Timer Volume 10 œ The current time will appear every time you press the INFO button œ You must set the clock first Move Adjust Return Time Clock 09 30 am Sleep Timer Off On Timer 12 00 am Off Off Timer am Off On Timer Source Air On Timer Channel 3 On Timer Volume 10 Move Enter Ret...

Страница 52: ...vel Press the EXIT button to exit Move Enter Return Time Clock 09 30 am Sleep Timer Off On Timer 06 30 am On Off Timer 11 00 pm On On Timer Source TV On Timer Channel 3 On Timer Volume 10 Move Adjust Return Time Clock 09 30 am Sleep Timer Off On Timer 06 30 am On Off Timer 11 00 pm On On Timer Source Air On Timer Channel 3 On Timer Volume 10 Move Adjust Return Time Clock 09 30 am Sleep Timer Off O...

Страница 53: ...e interval then press the ENTER button Press the EXIT button to exit Move Enter Return Setup Plug Play Language English Time Caption Blue Screen On Melody Off Move Enter Return Time Clock 09 30 am Sleep Timer Off On Timer 06 30 am On Off Timer 11 00 am On On Timer Source TV On Timer Channel 3 On Timer Volume 10 Off 30 60 90 120 150 180 30 Min œ After about 5 seconds the sleep display will disappea...

Страница 54: ...ess the or button to select On then press the ENTER button Move Enter Return Setup Plug Play Language English Time Caption Blue Screen On Melody Off Move Enter Return Caption Caption On Mode Caption Channel 1 Field 1 3 Press the or button to select Mode then press the ENTER button Press the or button to select Caption or Text then press the ENTER button Off On Move Enter Return Caption Caption On ...

Страница 55: ...lar broadcast it might be necessary to make changes to Channel and Field Press the or button to select Channel or Field then press the ENTER button Press the or button to select 1 or 2 then press the ENTER button Press the EXIT button to exit Move Enter Return Caption Caption On Mode Caption Channel 1 Field 1 1 2 Move Enter Return Caption Caption On Mode Caption Channel 1 Field 1 1 2 Alternate met...

Страница 56: ...e Enter Return Setup Plug Play Language English Time Caption Blue Screen On Melody Off Move Enter Return Caption Caption On Mode Default Option 3 Press the or button to select Mode then press the ENTER button Press the or button to select submenu Service1 Service6 CC1 CC4 or Text1 Text4 you want then press the ENTER button Off On Move Enter Return Caption Caption On Mode Default Option Default Ser...

Страница 57: ...ack Red Green Blue Yellow Magenta and Cyan You can change the color of the letter The default is White Back Color This option consists of Default White Black Red Green Blue Yellow Magenta and Cyan You can change the background color of the caption The default is Black Fore Opacity This option consists of Default Solid Flashing Translucent and Transparent You can change the opacity of the letter Ba...

Страница 58: ...n mode to Off 1 Press the MENU button Press the or button to select Setup then press the ENTER button 2 Press the or button to select Blue Screen then press the ENTER button Press the or button to select On or Off then press the ENTER button Press the EXIT button to exit Move Enter Return Setup Plug Play Language English Time Caption Blue Screen On Melody Off Move Enter Return Setup Plug Play Lang...

Страница 59: ...hen press the ENTER button 2 Press the or button to select Melody then press the ENTER button Press the or button to select On or Off then press the ENTER button Press the EXIT button to exit Move Enter Return Setup Plug Play Language English Time Caption Blue Screen On Melody Off Move Enter Return Setup Plug Play Language English Time Caption Blue Screen On Melody On Off On ...

Страница 60: ...our TV in the TV mode Make sure the remote has batteries Check that the and ends of the batteries are inserted correctly Check that the batteries are drained The TV won t turn on Make sure the wall outlet is working Make sure the TV is plugged in Make sure the remote has batteries Digital broadcasting screen Please check the digital signal strength and input problem antenna The visual qualities of...

Страница 61: ...h a clean dry cloth Never use water cleaning fluids wax or chemicals Do not put heavy objects on top of the cabinet Temperature If your TV is suddenly moved from a cold to a warm place unplug the power cord and allow at least two hours for moisture that may have formed inside the unit to dry completely Using Your TV in Another Country If you plan to take your TV with you to a foreign country pleas...

Страница 62: ...This page is intentionally left blank ...

Страница 63: ...This page is intentionally left blank ...

Страница 64: ...enter 0800 333 3733 0800 124 421 800 726 7864 SAMSUNG 0 800 507 7267 1 800 10 7267 800 6225 1 800 299 0013 1 800 234 7267 01 800 SAMSUNG 7267864 800 7267 1 800 682 3180 1 800 751 2676 1 800 7267 864 1 800 100 5303 Web Site www samsung com ar www samsung com br www samsung com cl www samsung com latin www samsung com latin www samsung com latin www samsung com latin www samsung com latin www samsun...

Отзывы: