English - 9
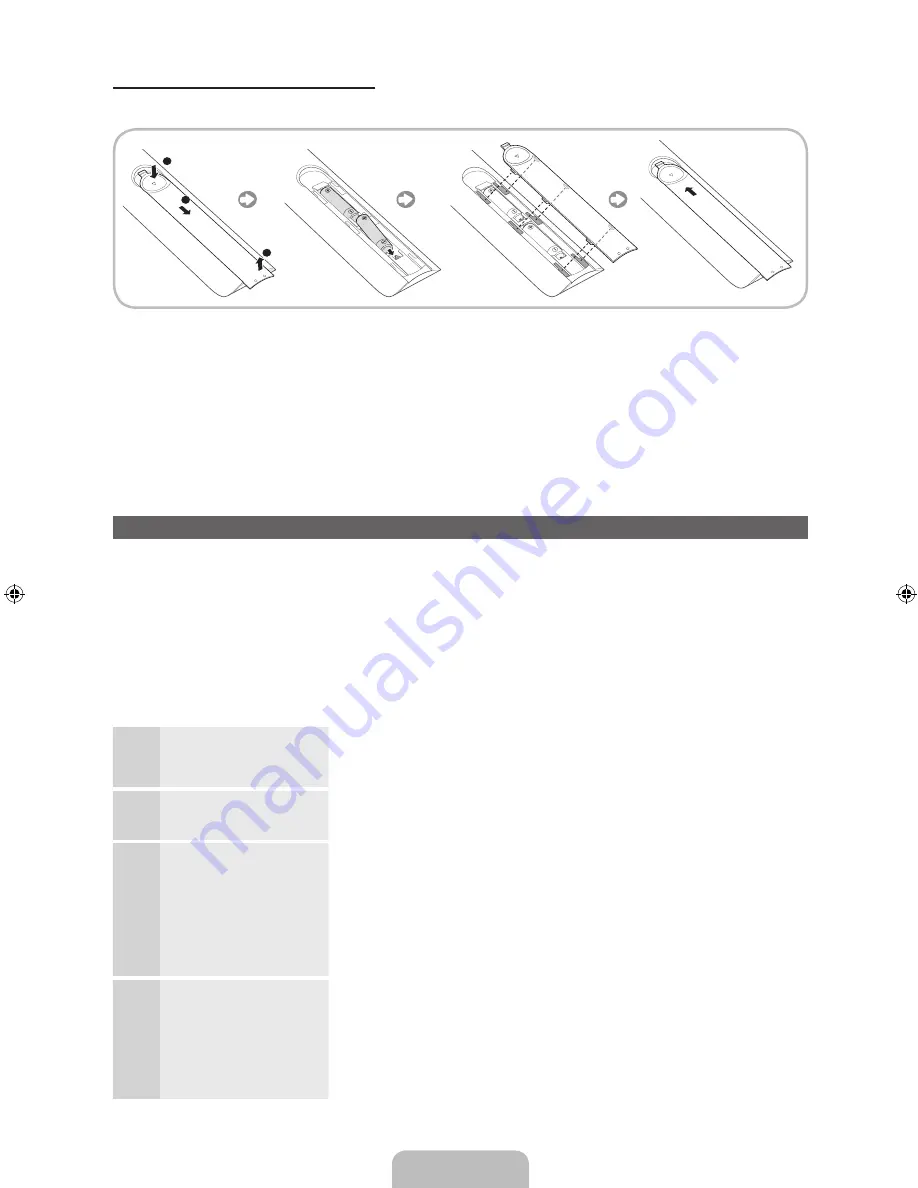
Installing batteries (Battery size: AAA)
Match the polarity of the batteries to the symbols in the battery compartment.
1
3
2
✎
NOTE
•
Install the batteries so that the polarity of the batteries (+/-) matches the illustration in the battery
compartment.
•
Use the remote control within 23 feet / 7M of the TV.
•
Bright light may affect the performance of the remote control. Avoid using when near special
fluorescent lights or neon signs.
•
The colour and shape may vary depending on the model.
Setup (Initial Setup)
When you turn the TV on for the first time, a sequence of prompts and screens will assist you in configuring
basic settings. To begin
Setup
, press the
P
button on your remote.
✎
Setup
is available only when the input source is set to TV. See "Changing the Input Source" (p. 16).
✎
To return to the previous step in the
Setup
sequence, Select
Previous
.
✎
Before you begin, make sure you have connected the TV to an aerial or a cable connection and that
the TV is plugged in. (p. 7).
✎
To start the
Setup
select
Start
.
1
Menu Language
:
Select a Language.
Select a menu language you want using your remote, and then select
Next
. The TV will display a menu using the selected language after
next step.
2
Use Mode
: Select the
Home Use Mode.
Select
Home Use
using your remote, and then select
Next
.
Store Demo
mode is for retail environments.
3
Network Settings
:
Configure network
settings
✎
To connect later,
select
Skip
.
To set up your network connection, select
Next
using your remote.
If you do not know your network set up information or want to set to
it later, select
Skip
. For more detailed information, refer to “Setting
up the Wired or Wireless Network” in the e-Manual for set up
requirements and instructions, and the Network Connection section of
this manual (p. 24). You can set up the network connection later using
the
Network
menu.
4
Software Upgrade
:
Upgrading the
software to latest
version
✎
To update later,
select
Skip
.
Select
Next
to update your TV software. The software on your TV will
automatically update if required. If you want to upgrade later, select the
Skip
. For more information, refer to
Software Upgrade
(Preference
Features
→
Support Menu) in the e-Manual.
✎
This process may take some depending on the seed of your
internet connection.
[UE9000-XU]BN68-04584E-00ENG.indb 9
2012-09-05 �� 3:45:12
Содержание 75" ES9000 Series 9 SMART 3D Full HD Slim LED...
Страница 46: ...This page is intentionally left blank ...


