


16
Replace the fuse by another one with the same size and type
•
only, in order to avoid fire risks.
Do not dismantle the UPS.
•
4.2.
TO kEEP IN MIND.
•
The UPS can be wired and handled by non-trained
staff, less those models with terminals that will be
installed by qualified staff and in accordance with the
applicable safety regulations.
4.3.
UNPACkING AND CONTENT ChECkING.
Unpack and check the content:
1.
One UPS.
•
Documentation relative to the equipment (user’s manual and
•
warranty certificate).
One power cord to connect it to the mains and standardized
•
for 16A, less those hardwired models.
One serial communication cable.
•
One battery cable (Modules with extended autonomy only (B*)).
•
One CD for monitoring software.
•
Inspect the UPS with the purpose of detecting possible dam-
2.
ages due to the transport. Do not start up the unit and notify
immediately to the carrier and to your distributor if there is any
damaged or missing part.
4.4.
CONNECTION Of ThE INPUT, OUTPUT AND
PROTECTIVE EARTh WIRING.
4.4.1. Notes for installing.
The UPS has to be installed in a well-cooled place, far from
1.
water, inflammable gases and corrosive agents.
Make sure that the front and rear cooling wholes of the UPS
2.
are not blocked. Leave 0,2 metres of space around the UPS as
minimum.
Drops of water condensation can appear if the UPS is un-
3.
packed in a low temperature environment. In this case it is
necessary to wait until the total unit is dry before proceeding
to the installation and the starting up. Otherwise electrocution
danger will exist.
The installation and wiring have to be done in accordance with
4.
the local regulations and following the instructions of profes-
sional staff.
For safety, turn off the power supply before doing the instal-
5.
lation.
It is recommended to charge the batteries of the UPS for 1-2
6.
hours before its use. Once the input circuit breaker is turned
«On», the UPS will charge the batteries automatically. The
UPS can be used immediately without charging the batteries
previously, but the expected autonomy will be lower than the
standard value, being possible to be nil or almost nil.
4.4.2. Installation.
Insert the end of the power cord supplied with the equipment
1.
(end with female connector IEC 320), into the connector (C0)
of the UPS, make the suitable pressure to insert it correctly.
The power supply of the equipment has to be done through
2.
the supplied power cord (C1) and it has to be connected to an
outlet (socket) with both earth connection and easy access.
In case of requiring another power cord due to lose, ageing or
damage of the original one, replace it by a standardized one
with the same features.
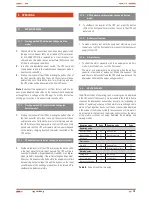
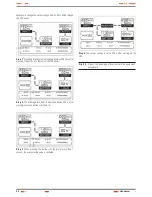
Phase
(L)
Neutral
(N)
(PE)
Output terminal (C4)
fig. 19.
Connect the loads to the outlets (C4).
3.
Some model depending on the power, has output terminals
4.
(C4) to feed the loads. To have access to them it is better to
remove the screws that fix the terminal cover, take it away and
next make the wiring connections by respecting the order of
the phase (L), neutral (N) and protective earth (PE) stated in
the labelling and figure 19. Finally put the terminal cover back
by fixing it with the respective screws.
The cross section of these cables will be taken from the nom-
inal currents stated in the nameplate of the equipment, by re-
specting the Local an/or National Low Voltage Electrotechnical
Regulation.
5.
Under request, the equipment can be supplied with
different outlets (French, IEC, Schuko, Uk, ...), which
are standardized for 10A current (IEC) or 16A (for the
rest). Do not overload the UPS and the outlets. The laser printers,
plotters, scanners or other peripheral devices with high con-
sumption
do not have to be
connected to the equipment.
When the installation is finished, make sure that the wiring is
6.
correct.
Install a circuit breaker at the UPS output if were needed.
7.
USER MANUAL
Содержание SLC TWIN series
Страница 3: ......
Страница 29: ...28 NOTES USER MANUAL...
Страница 30: ...29 SALICRU NOTES...
Страница 31: ...30 NOTES USER MANUAL...
Страница 32: ......
Страница 35: ......
Страница 60: ......