background image

User Manual of DVR6100V-H Series DVR 


120 

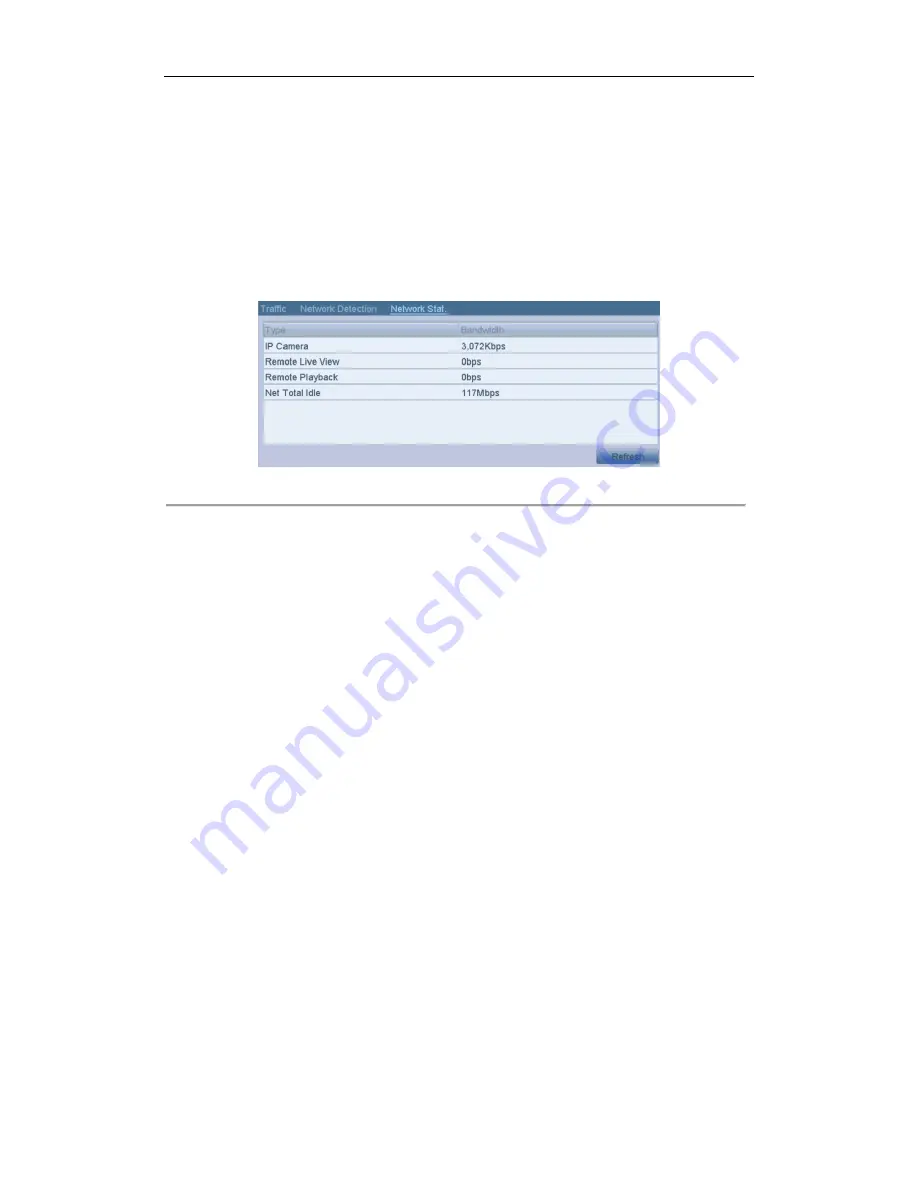
9.4.4 Checking Network Statistics   

Purpose

:   

You can check the network statistics to obtain the real-time information of the device.   

Steps: 

1.


Enter the Network Statistics interface. 

Menu > Maintenance> Net Detect 

2.


Click the 

Network Stat.

 tab to enter the Network Statistics menu. 


Figure 9.38 Network Stat. Interface 


3.


View the bandwidth of Remote Live View, bandwidth of Remote Playback, bandwidth of Net Total Idle 

information.   

4.


Click 

Refresh

 button to get the latest bandwidth statistics. 

Содержание DVR6100V-H Series

Страница 1: ...Digital Video Recorder User Manual UD 7L0202D1437B01...

Страница 2: ...ence received including interference that may cause undesired operation EU Conformity Statement This product and if applicable the supplied accessories too are marked with CE and comply therefore with...

Страница 3: ...manual is applicable to the following models DVR6104V H DVR6108V H DVR6116V H This manual may contain several technically incorrect places or printing errors and the content is subject to change with...

Страница 4: ...properly secured to a rack or shelf Major shocks or jolts to the unit as a result of dropping it may cause damage to the sensitive electronics within the unit Use the device in conjunction with an UP...

Страница 5: ...ed in group and manual switch and automatic cycle view is also provided the interval of automatic cycle can be adjusted Quick setting menu is provided for live view The selected live view channel can...

Страница 6: ...creen monitoring audio alarm notifying surveillance center and sending email Automatic restore when system is abnormal Support alarm push notification in live video or playback on the linked mobile ph...

Страница 7: ...te host Remotely start stop recording Upgrade by remote FTP server Remote PTZ control Two way audio and voice broadcasting Embedded WEB server Development Scalability SDK for Windows and Linux system...

Страница 8: ...3 1 Introduction of Live View 29 3 2 Operations in Live View Mode 30 3 2 1 Using the Mouse in Live View 30 3 2 2 Using an Auxiliary Monitor 31 3 2 3 Main Aux Output Switching 31 3 2 4 Quick Setting T...

Страница 9: ...ions of Playback 79 6 2 1 Playing Back Frame by Frame 79 6 2 2 Smart Search 79 6 2 3 Digital Zoom 81 6 2 4 Reverse Playback of Multi channel 81 C H A P T E R 7 83 Backup 83 7 1 Backing up Record Files...

Страница 10: ...ng HDD Groups 125 10 3 2 Setting HDD Property 126 10 4 Configuring Quota Mode 128 10 5 Checking HDD Status 129 10 6 Checking S M A R T Information 130 10 7 Detecting Bad Sector 131 10 8 Configuring HD...

Страница 11: ...nfiguring General Settings 150 13 2 Configuring RS 232 Serial Port 150 13 3 Configuring DST Settings 151 13 4 Configuring More Settings 152 13 5 Managing User Accounts 153 13 5 1 Adding a User 153 13...

Страница 12: ...User Manual of DVR6100V H Series DVR 11 C H A P T E R 1 Introduction...

Страница 13: ...s green when DVR is powered up 2 STATUS STATUS indicator lights in red when HDD is reading writing 3 Tx Rx Tx Rx indictor blinks green when network connection is functioning properly 4 USB Interface C...

Страница 14: ...to delete the character in front of the cursor On checkbox fields pressing the EDIT button will tick the checkbox In Playback mode it can be used to generate video clips for backup 5 A Button Switchin...

Страница 15: ...F2 Button Cycle through tab pages Troubleshooting Remote Control Note Make sure you have installed batteries properly in the remote control And you have to aim the remote control at the IR receiver on...

Страница 16: ...ect channel and show the quick set menu Menu Select and enter Double Click Live view Switch single screen and multi screen Click and Drag PTZ control pan tilt and zoom Tamper proof privacy mask and mo...

Страница 17: ...utput 5 VGA DB15 connector for VGA output Display local video output and menu 6 AUDIO IN RCA connector for audio input 7 AUDIO OUT RCA connector for audio output 8 LAN Interface RJ45 10M 100M Ethernet...

Страница 18: ...r indicator LED should turn green indicating that the unit begins to start up Shutting down the device Steps 1 Enter the Shutdown menu Menu Shutdown Figure 1 6 Shutdown Menu 2 Click the Shutdown butto...

Страница 19: ...User Manual of DVR6100V H Series DVR 18 C H A P T E R 2 Getting Started...

Страница 20: ...zard Interface 2 Check the checkbox to enable Setup Wizard when device starts Click Next to continue the setup wizard You can also click Cancel to exit the Setup Wizard or use the Setup Wizard next ti...

Страница 21: ...ate and system time Figure 2 4 Date and Time Settings 5 Click Next button which takes you back to the Network Setup Wizard window as shown in Figure 2 5 Set the network parameters including the NIC ty...

Страница 22: ...TSP port UPnP and DDNS settings Figure 2 6 Advanced Network Configuration 8 Click Next button to enter the HDD Management window shown in Figure 2 7 To initialize the HDD click the Init button Initial...

Страница 23: ...ord Settings window as shown in Figure 2 9 1 Select the camera to configure 2 Check the checkbox to enable Start Recording 3 Select the recording mode to Normal or Motion Detection Figure 2 9 Record S...

Страница 24: ...n is valid and correct For detailed checking and configuring of the network please see Chapter 9 1 Configuring General Settings Chapter 9 3 Checking Network Traffic and Chapter 9 4 Network Detection S...

Страница 25: ...y The user name and password are admin and 12345 by default 3 Optionally you can click the button Custom Adding to enter the Custom Adding interface Figure 2 13 Custom Adding of IP Camera Input the re...

Страница 26: ...Import Export tab Figure 2 15 Import IP Camera Configuration File 2 Select the backup device from the drop down list and you can click the Refresh button to get the latest information of the backup d...

Страница 27: ...list You can click the Refresh button to get the latest information of the backup device 3 Click the Export button to export the configuration file of IP cameras to the backup device 4 Click OK on the...

Страница 28: ...on such as the IP address protocol port etc 3 Click the button OK to save the new settings 4 To delete the added camera click the icon Or check the corresponding checkbox and click the button Delete D...

Страница 29: ...User Manual of DVR6100V H Series DVR 28 C H A P T E R 3 Live View...

Страница 30: ...live view mode there are icons at the right top of the screen for each channel showing the status of the record and alarm in the channel so that you can know whether the channel is recorded or whethe...

Страница 31: ...and menu operations When the aux output is enabled you can do some basic operation on the live view mode for the Aux output while no operation is allowed for the main output 3 2 1 Using the Mouse in L...

Страница 32: ...le Aux output mode is enabled 3 2 3Main Aux Output Switching When the HDMI VGA output is configured as the main output you can perform the following operation to switch to CVBS output as the main outp...

Страница 33: ...cription Icons Description Icons Description Enable Manual Record Instant Playback Mute Audio on PTZ Control Digital Zoom Image Settings Close Instant Playback Instant Playback only shows the record i...

Страница 34: ...onfigured When you have configured Period 1 the Period 2 is remained as the Other Time Figure 3 5 Image Settings 2 Adjust the image parameters including the brightness contrast saturation hue sharpnes...

Страница 35: ...o output for the selected video output Notes 1 When the VGA HDMI output interface is used as the main video output and the Audio Output for the VGA HDMI output interface is enabled the VGA HDMI audio...

Страница 36: ...layout 3 Click to select a screen in the right region and double click to select a channel in the left region Thus the selected channel will be displayed in the corresponding screen Note means the ch...

Страница 37: ...kbox after Enable Channel Zero Encoding 4 Configure the Frame Rate Max Bitrate Mode and Max Bitrate After you set the Channel Zero encoding you can get a view in the remote client or Web browser of al...

Страница 38: ...the analog signal to the device for the video quality diagnostics Three exception types can be diagnosed Blurred Image Abnormal Brightness and Color Cast You can enter Menu Configuration Video Qualit...

Страница 39: ...and if you want to do some operation you need to enter user name and password to log in again Steps 1 Enter the Shutdown menu Menu Shutdown Figure 3 10 Shutdown Menu 2 Click Logout Note After you have...

Страница 40: ...User Manual of DVR6100V H Series DVR 39 C H A P T E R 4 PTZ Controls...

Страница 41: ...ote All the parameters should be exactly the same as the PTZ camera parameters Only PTZ Protocol can be set for network cameras Example If the PTZ camera has a Baud rate as 115200 you should input 115...

Страница 42: ...the steps2 4 to save more presets If the number of the presets you want to save is more than 17 you can click and choose the available numbers Figure 4 3 More Presets 4 2 2 Calling Presets Purpose Thi...

Страница 43: ...so access the PTZ Control toolbar by clicking the PTZ button in the PTZ settings interface under Menu Camera PTZ More Settings Figure 4 5 PTZ Toolbar Call Preset 2 Choose Camera in the list on the men...

Страница 44: ...ne key point and speed of patrol The key point is corresponding to the preset The Key Point No determines the order at which the PTZ will follow while cycling through the patrol The Duration refers to...

Страница 45: ...and then click to call the patrol 3 Click to stop it Figure 4 9 Calling Patrol Call patrol in live view mode Steps 1 In the Live View mode you can press the PTZ Control button on the IR remote contro...

Страница 46: ...g to the predefined path Steps 1 Enter the PTZ Control interface Menu Camera PTZ More Settings 2 Choose pattern number in the option box Figure 4 11 PTZ Pattern 3 Click and use your mouse to drag the...

Страница 47: ...4 12 PTZ Calling Pattern Call pattern in live view mode Steps 1 In the Live View mode you can press the PTZ Control button on the IR remote control or choose the PTZ Control icon to enter the PTZ too...

Страница 48: ...TZ settings interface under Menu Camera PTZ More Settings Figure 4 14 PTZ Toolbar Table 4 1 Description of the PTZ toolbar icons Icon Description Icon Description Icon Description Direction button and...

Страница 49: ...User Manual of DVR6100V H Series DVR 48 C H A P T E R 5 Record Settings...

Страница 50: ...DD General Figure 5 1 HDD General 2 Check the storage mode of the HDD 1 Click Advanced to check the storage mode of the HDD 2 If the HDD mode is Quota please set the maximum record capacity For detail...

Страница 51: ...Set the bitrate type to be Variable or Constant Video Quality Set the video quality of recording with 6 levels configurable The Stream Type Resolution Bitrate Type and Video Quality are not configurab...

Страница 52: ...hapter 5 7 Configuring Redundant Record Notes The Redundant Record option is only available when the HDD mode is Group The redundant record is used when you want to save the record files in the redund...

Страница 53: ...e Copy Camera interface Select the camera s and click OK to finish the copy settings 5 2 Configuring Record Schedule Purpose Set the record schedule and then the camera automatically starts stops reco...

Страница 54: ...To arrange other schedule leave the All Day checkbox blank and set the Start End time and Type Note Up to 8 periods can be configured for each day And the time periods cannot be overlapped each other...

Страница 55: ...on refer to Chapter 8 1 and Chapter 8 2 2 Use the mouse to drag and draw time periods Note Up to 8 periods can be configured for each day Figure 5 11 Draw the Schedule 3 You can repeat the above steps...

Страница 56: ...follow the steps to schedule a record which triggered by the detected motion Steps 1 Enter the Motion Detection interface Menu Camera Motion Figure 5 13 Motion Detection 2 Configure Motion Detection...

Страница 57: ...he channels which you want the motion detection event to trigger recording 6 Click Apply to save the settings 7 Click OK to back to the upper level menu 8 Exit the Motion Detection menu 3 Enter Schedu...

Страница 58: ...End time Note Up to 8 periods can be configured for each day And the time periods can t be overlapped each other Repeat the above steps3 6 to schedule motion detection triggered recording for all the...

Страница 59: ...you can enable recording for all cameras by clicking the status bar before Analog to change it to 3 Set recording mode to manual By default the camera is enabled with recording by schedule Click the s...

Страница 60: ...ter the Record setting interface Menu Record 2 Choose Holiday on the left bar Figure 5 22 Holiday Settings 3 Enable Edit Holiday schedule 1 Click to enter the Edit interface Figure 5 23 Edit Holiday S...

Страница 61: ...Type dropdown list 6 If you need all day recording check the All Day checkbox Otherwise leave it blank 7 Set start end time for holiday schedule Note Up to 8 periods can be configured for each day An...

Страница 62: ...ore you set the HDD property to Redundant For detailed information please refer to Chapter 10 4 Managing HDD Group There should be at least another HDD NetHDD which is in R W mode Steps 1 Enter HDD In...

Страница 63: ...tion is only available when the HDD mode is Group 2 The redundant record is used when you want to save the record files in the redundant HDD You must configure the redundant HDD in HDD settings For de...

Страница 64: ...4 Configuring HDD group 1 Choose a group number for the HDD group 2 Click Apply and then in the pop up message box click Yes to save your settings 3 Click OK to back to the upper level menu Repeat th...

Страница 65: ...30 Export 2 Select the channels by checking the checkbox to 3 Configure the record type file type and start end time 4 Click Search to show the results Figure 5 31 Export Search Result 5 Protect the r...

Страница 66: ...nt to protect Figure 5 34 HDD General Editing 3 Set the HDD to Read only 4 Click OK to save settings and back to the upper level menu Note You can t save any files in a Read only HDD If you want to sa...

Страница 67: ...User Manual of DVR6100V H Series DVR 66 C H A P T E R 6 Playback...

Страница 68: ...this channel will be played back Figure 6 1 Instant Playback Interface All day Playback by channel 1 Enter the All day Playback interface Mouse right click a channel in live view mode and select Playb...

Страница 69: ...ck tab and you can cancel the selection for all the channels Dates marked in different colors No record files in this day There is record file s in this day not current day There is only event recordi...

Страница 70: ...me duration Multi channel simultaneous playback and channel switch are supported Steps 1 Enter playback interface Menu Playback 2 Check checkbox of channel s in the channel list 3 Double click to sele...

Страница 71: ...stomized tag Tag management Digital Zoom Smart Search Pause Play Reverse Stop 30s backward 30s forward Speed down Speed up Previous day Next day Scaling up down time bar Process bar Full Screen Exit V...

Страница 72: ...elect to enter the Event Playback interface 3 Select Alarm Input or Motion as the event type and specify the start time and end time for search Figure 6 8 Video Search by Motion Detection Click Search...

Страница 73: ...e as 5 seconds the video plays back till 11 00 05 If there is only one channel is triggered by an alarm input clicking button takes you to Full screen Playback interface of this channel If several cha...

Страница 74: ...h Pause Play Reverse Stop 30s backward 30s forward Speed down Speed up Previous day Next day Scaling up down time bar Process bar Full Screen Exit Video type bar Event playback 6 1 4 Playing Back by T...

Страница 75: ...yback interface Figure 6 15 Video Search by Tag 3 Select the channels from the list and specify the start time and end time for search 4 Optionally you can input the keyword of the tag name in the Key...

Страница 76: ...ustomized tag Tag management Digital Zoom Smart Search Pause Play Reverse Stop 30s backward 30s forward Speed down Speed up Previous day Next day Scaling up down time bar Process bar Full Screen Exit...

Страница 77: ...on the top left side 3 Select a date in the calendar and select a camera in the camera list 4 Click the button to play Figure 6 18 Smart Playback Interface Table 6 5 Detailed Explanation of Playback...

Страница 78: ...Exception Operation and Information 4 Check the checkboxes to select the minor type of the log for search 5 Click Search and the logs matching the search conditions will be displayed on a list Figure...

Страница 79: ...back Before you start Insert the external device s with available record files into the device Steps 1 Enter the Playback interface Menu Playback 2 Click and select to enter the External File Playbac...

Страница 80: ...d one click on the playback screen represents adverse playback of one frame It is also feasible to use button in toolbar 6 2 2 Smart Search Purpose In order to locate motion detection event easily and...

Страница 81: ...rea s for smart search You can click the icon to set the full screen as target searching area Note Multi area and full screen searching modes are supported Figure 6 25 Draw Area of Smart Search 4 Clic...

Страница 82: ...ht corner of the interface And then the image within it will be enlarged up to 16 times 4 Right click to exit the Digital Zoom mode Figure 6 27 Draw Area for Digital Zoom 6 2 4 Reverse Playback of Mul...

Страница 83: ...User Manual of DVR6100V H Series DVR 82 Figure 6 28 4 ch Synchronous Playback Interface 3 Click the icon on the playback control toolbar and the record files will be played back reversely...

Страница 84: ...User Manual of DVR6100V H Series DVR 83 C H A P T E R 7 Backup...

Страница 85: ...ATA HDD Steps 1 Enter Export interface Menu Export Normal Figure 7 1 Normal Video Search for Backup 2 Set search conditions and click Search button to enter the search result interface 3 Select record...

Страница 86: ...Normal Video Search using USB Flash Drive 5 Click Export button and select to export the video and log files or the player to the backup device Click OK to confirm Figure 7 4 Export Selection Stay in...

Страница 87: ...kup are supported Steps 1 Enter Export interface Menu Export Event 2 Select Motion or Alarm Input as the event type Note The following steps have introduced the backup by motion detection triggered re...

Страница 88: ...g start time end time file size etc Note The size of the currently selected files is displayed in the lower left corner of the window 2 Select record file s from the list and click Export button to e...

Страница 89: ...to the backup device Click OK to confirm Figure 7 11 Export Selection Stay in the Exporting interface until all record files are exported with pop up message box Export finished Figure 7 12 Export Fi...

Страница 90: ...SB flash drives USB HDDs USB writer SATA writer Steps 1 Enter Playback interface Please refer to Chapter 6 2 During playback use buttons and in the playback toolbar to start or stop clipping record fi...

Страница 91: ...o and log files or the player to the backup device Click OK to confirm Figure 7 16 Export Selection Stay in the Exporting interface until all record files are exported with pop up message box Export f...

Страница 92: ...User Manual of DVR6100V H Series DVR 91 Figure 7 18 Checkup of Video Clips Export Result Using USB Flash Drive...

Страница 93: ...rd file picture click the icon and then you can play and view the video picture For USB Flash Drives USB HDDs and eSATA HDDs Click the button New Folder and you can create a new folder in the backup d...

Страница 94: ...User Manual of DVR6100V H Series DVR 93...

Страница 95: ...User Manual of DVR6100V H Series DVR 94 C H A P T E R 8 Alarm Settings...

Страница 96: ...the sensitivity bar to set sensitivity Please refer to Chapter 5 3 Configuring Motion Detection Record Note By default the motion detection is enabled and configured in full screen 2 Click the icon of...

Страница 97: ...epeated or overlapped Figure 8 4 Set Arming Schedule of Motion Detection 5 Click the Linkage Action tab to set up alarm response actions of motion alarm please refer to Chapter 8 6 Figure 8 5 Set Alar...

Страница 98: ...Figure 8 7 Video Loss Setup Interface 2 Select a channel you want to detect 3 Check the checkbox of Enable Video Loss Alarm 4 Click the icon of Settings to enter the Settings interface 5 Set the armin...

Страница 99: ...k the checkbox of Enable Video Tampering Note By default the tamper proof detection is configured in full screen 4 Move the sensitivity bar and choose a proper sensitivity level 5 Click the icon of Se...

Страница 100: ...o Signal Exception are not supported by IP cameras of HDVR series Steps 1 Enter Exceptions interface and handle various exceptions Menu Configuration Exceptions 2 Check the checkbox of Enable Event Hi...

Страница 101: ...o Menu Configuration Live View Full Screen Monitoring Dwell Time Auto switch will terminate once the alarm stops and you will be taken back to the Live View interface Note For motion detection alarm y...

Страница 102: ...User Manual of DVR6100V H Series DVR 101 C H A P T E R 9 Network Settings...

Страница 103: ...CP server is available you can click the checkbox of DHCP to automatically obtain an IP address and other network settings from that server Notes When the DHCP is failed the default IP address 192 168...

Страница 104: ...PoE connection Please refer to Chapter 12 1Viewing System Information for PPPoE status 9 2 2 Configuring DDNS Purpose If your device is set to use PPPoE as its default network connection you may set D...

Страница 105: ...ce PeanutHull Enter User Name and Password obtained from the PeanutHull website Figure 9 7 Peanut Hull Settings Interface NO IP Enter the account information in the corresponding fields Refer to the D...

Страница 106: ...name is defined in the DVR it will replace the old one registered on the server Figure 9 9 HiDDNS Settings Interface Register the device on the HiDDNS server 1 Go to the HiDDNS website www hiddns com...

Страница 107: ...ng actions with NTP server The unit is minute NTP Server IP address of NTP server NTP Port Port of NTP server 5 Click the Apply button to save and exit the interface Note The time synchronization inte...

Страница 108: ...iscover the presence of other network devices on the network and establish functional network services for data sharing communications etc If you want to use the UPnP function to enable the fast conne...

Страница 109: ...apping type you can edit the external port on your demand by clicking to activate the External Port Settings dialog box Steps 1 Click to activate the External Port Settings dialog box Configure the ex...

Страница 110: ...interface of Forwarding Steps 1 Enter the Network Settings interface Menu Configuration Network 2 Select the NAT tab to enter the port mapping interface 3 Leave the Enable UPnP checkbox unchecked 4 Cl...

Страница 111: ...router manufactures Please contact the manufacturer of router if you have any problems with setting virtual server 9 2 6 Configuring Remote Alarm Host Purpose With a remote alarm host configured the...

Страница 112: ...e Multicast 4 Click the Apply button to save and exit the interface 9 2 8 Configuring RTSP Purpose The RTSP Real Time Streaming Protocol is a network control protocol designed for use in entertainment...

Страница 113: ...col Secure ensures the data transferred is encrypted using Secure Socket Layer SSL or Transport Layer Security TLS HTTPS provides authentication of the web site and associated web server that one is c...

Страница 114: ...led Certificate Property 4 Check the checkbox to enable the HTTPS function Note The HTTPS Port should be set to the range of 1 65535 9 2 11 Configuring Email Purpose The system can be configured to se...

Страница 115: ...he default TCP IP port used for SMTP is 25 Enable SSL optional Click the checkbox to enable SSL if required by the SMTP server Sender The name of sender Sender s Address The Email address of sender Se...

Страница 116: ...User Manual of DVR6100V H Series DVR 115 message box will pop up...

Страница 117: ...real time information of device such as linking status MTU sending receiving rate etc Steps 1 Enter the Network Traffic interface Menu Maintenance Net Detect Figure 9 30 Network Traffic Interface 2 Y...

Страница 118: ...Test button to start testing network delay and packet loss The testing result pops up on the window If the testing is failed the error message box will pop up as well Figure 9 32 Testing Result of Net...

Страница 119: ...ort Network Packet 4 Click the Export button to start exporting 5 After the exporting is complete click OK to finish the packet export Figure 9 34 Packet Export Attention Note Up to 1M data can be exp...

Страница 120: ...s normal the following message box pops out Figure 9 36 Network Status Checking Result If the message box pops out with other information instead of this one you can click Network button to show the q...

Страница 121: ...the device Steps 1 Enter the Network Statistics interface Menu Maintenance Net Detect 2 Click the Network Stat tab to enter the Network Statistics menu Figure 9 38 Network Stat Interface 3 View the ba...

Страница 122: ...User Manual of DVR6100V H Series DVR 121 C H A P T E R 1 0 HDD Management...

Страница 123: ...n interface Menu HDD General Figure 10 1 HDD Information Interface 2 Select the HDD to be initialized 3 Click the Init button Figure 10 2 Confirm Initialization 4 Select the OK button to start initial...

Страница 124: ...D interface as shown in Figure 10 5 Figure 10 5 Adding NetHDD Interface 3 Add the allocated NetHDD 4 Select the type to NAS or IP SAN 5 Configure the NAS or IP SAN settings Add NAS disk 1 Enter the Ne...

Страница 125: ...list shown below 4 Click the OK button to add the selected IP SAN disk Note Up to 1 IP SAN disk can be added Figure 10 7 Add IP SAN Disk 6 After having successfully added the NAS or IP SAN disk return...

Страница 126: ...enu HDD Advanced 2 Set the Mode to Group as shown below Figure 10 9 Storage Mode Interface Note IP Camera is supported by HDVR series only 3 Click the Apply button and the following Attention box will...

Страница 127: ...or read write R W Before setting the HDD property please set the storage mode to Group refer to step1 4 of Chapter 10 3 1 Setting HDD Groups A HDD can be set to read only to prevent important recorded...

Страница 128: ...ndancy 4 Click the OK button to save the settings and exit the interface 5 In the HDD Information menu the HDD property will be displayed in the list Note At least 2 disks HDD or network disk must be...

Страница 129: ...d Capacity GB Figure 10 15 Configure Record Quota 4 You can copy the quota settings of the current camera to other cameras if required Click the Copy button to enter the Copy Camera menu as shown belo...

Страница 130: ...tatus of each HDD which is displayed on the list Figure 10 17 View HDD Status 1 Note If the status of HDD is Normal or Sleeping it works normally If the status is Uninitialized or Abnormal please init...

Страница 131: ...A R T Settings interface Menu HDD HDD Detect S M A R T Settings 2 Select the HDD to view its S M A R T information list Note If you want to use the HDD even when the S M A R T checking is failed you c...

Страница 132: ...mediate measures to repair it Steps 1 Enter the Bad Sector Detection interface Menu HDD HDD Detect Bad Sector Detection Figure 10 20 Bad Sector Detection 2 Select a HDD and click Detect to start detec...

Страница 133: ...face Menu Configuration Exceptions 2 Select the Exception Type to HDD Error from the dropdown list 3 Click the checkbox s below to select the HDD error alarm type s Note The alarm type can be selected...

Страница 134: ...User Manual of DVR6100V H Series DVR 133 C H A P T E R 11 Camera Settings...

Страница 135: ...preview window to adjust the OSD position 7 Copy Camera Settings 1 If you want to copy the OSD settings of the current camera to other cameras click the Copy button to enter the Copy Camera interface...

Страница 136: ...onfigured privacy mask zones on the window can be cleared by clicking the corresponding Clear Zone1 4 icons on the right side of the window or click Clear All to clear all zones Figure 11 4 Set Privac...

Страница 137: ...elatively clearer and sharper The degree of contrast and saturation is high 5 Adjust the image parameters including the brightness contrast saturation hue sharpness and denoising level by moving the s...

Страница 138: ...parameters 3 Check the checkbox to enable the Video Quality Diagnostics 4 Click the to enter the Settings interface Configure the arming schedule of triggering video quality diagnostics alarm Figure...

Страница 139: ...11 8 Image Settings Interface 7 Click Apply to save the settings You can click Copy to copy the settings to other analog cameras or click Restore to restore the values of the Blurred Image Abnormal Br...

Страница 140: ...User Manual of DVR6100V H Series DVR 139 C H A P T E R 1 2 Device Management and Maintenance...

Страница 141: ...vice Information menu to view the device name model serial No firmware version and encoding version Figure 12 1 Device Information Interface 12 1 2 Viewing Camera Information Steps 1 Enter the System...

Страница 142: ...on menu to view the recording status and encoding parameters of each camera Figure 12 3 Record Information Interface 12 1 4 Viewing Network Information Steps 1 Enter the System Information interface M...

Страница 143: ...1 5 Viewing HDD Information Steps 1 Enter the System Information interface Menu Maintenance System Info 2 Click the HDD tab to enter the HDD Information menu to view the HDD status free space propert...

Страница 144: ...time Steps 1 Enter the Log Search interface Menu Maintenance Log Information Log Search Figure 12 6 Log Search Interface 2 Set the log search conditions to refine your search including the Start Time...

Страница 145: ...view the related video files if available Figure 12 8 Log Details 6 If you want to export the log files click the Export button to enter the Export menu You can also export all the log files stored in...

Страница 146: ...xport Notes 1 Please connect the backup device to device before operating log export 2 The log files exported to the backup device are named by exporting time e g 20110514124841logBack txt 12 3 Import...

Страница 147: ...uration files to the selected local backup device 3 To import a configuration file select the file from the selected backup device and click the Import button After the import process is completed you...

Страница 148: ...ding is complete reboot the device to activate the new firmware 12 4 2 Upgrading by FTP Before you start Ensure the network connection of the PC running FTP server and the device is valid and correct...

Страница 149: ...nterface Menu Maintenance Default Figure 12 14 Restore Factory Default 2 Click the OK button to restore the default settings Note Except the network parameters including IP address subnet mask gateway...

Страница 150: ...User Manual of DVR6100V H Series DVR 149 C H A P T E R 1 3 Others...

Страница 151: ...Standard Select the CVBS output standard to NTSC or PAL which must be the same with the video input standard Resolution Select the VGA HDMI output resolution which must be the same with the resolutio...

Страница 152: ...Enter the General Settings interface Menu Configuration General 2 Choose DST Settings tab Figure 13 2 DST Settings Interface You can check the checkbox before the Auto DST Adjustment item Or you can...

Страница 153: ...rightness Operation Timeout Set timeout time for menu inactivity E g when the timeout time is set to 5 Minutes the system will exit from the current operation menu to live view screen after 5 minutes...

Страница 154: ...Operator or Guest Different user levels have different operating permission Operator The Operator user level has permission of Local Log Search in Local Configuration Remote Log Search and Two way Au...

Страница 155: ...DD property upgrading system firmware clearing I O alarm output Local Shutdown Reboot Shutting down or rebooting the device Remote Configuration Remote Log Search Remotely viewing logs that are saved...

Страница 156: ...ted camera s Remote PTZ Control Remotely controlling PTZ movement of the selected camera s Local Video Export Locally exporting recorded files of the selected camera s Note You should select the camer...

Страница 157: ...password level and MAC address 5 Click the OK button to save the settings and exit the menu 13 5 4 Changing Password of Admin Purpose The password of the admin user account can be changed in the User...

Страница 158: ...anual of DVR6100V H Series DVR 157 Figure 13 12 Change Password 3 Enter the old password check checkbox enter new password and confirm password on the menu 4 Click OK to save the settings and exit the...

Страница 159: ...e ADSL transceiver modem over Ethernet and in plain Metro Ethernet networks DDNS Dynamic DNS is a method protocol or network service that provides the capability for a networked device such as a route...

Страница 160: ...e decoder speed configuration is correct d The dome decoder address bit configuration is correct e That the main board RS 485 interface is not broken Why is there no video recorded after setting the m...

Страница 161: ...User Manual of DVR6100V H Series DVR 160 0300001040319...

Отзывы: