background image

4 32 026 006

Saab 9-5

2

5D -

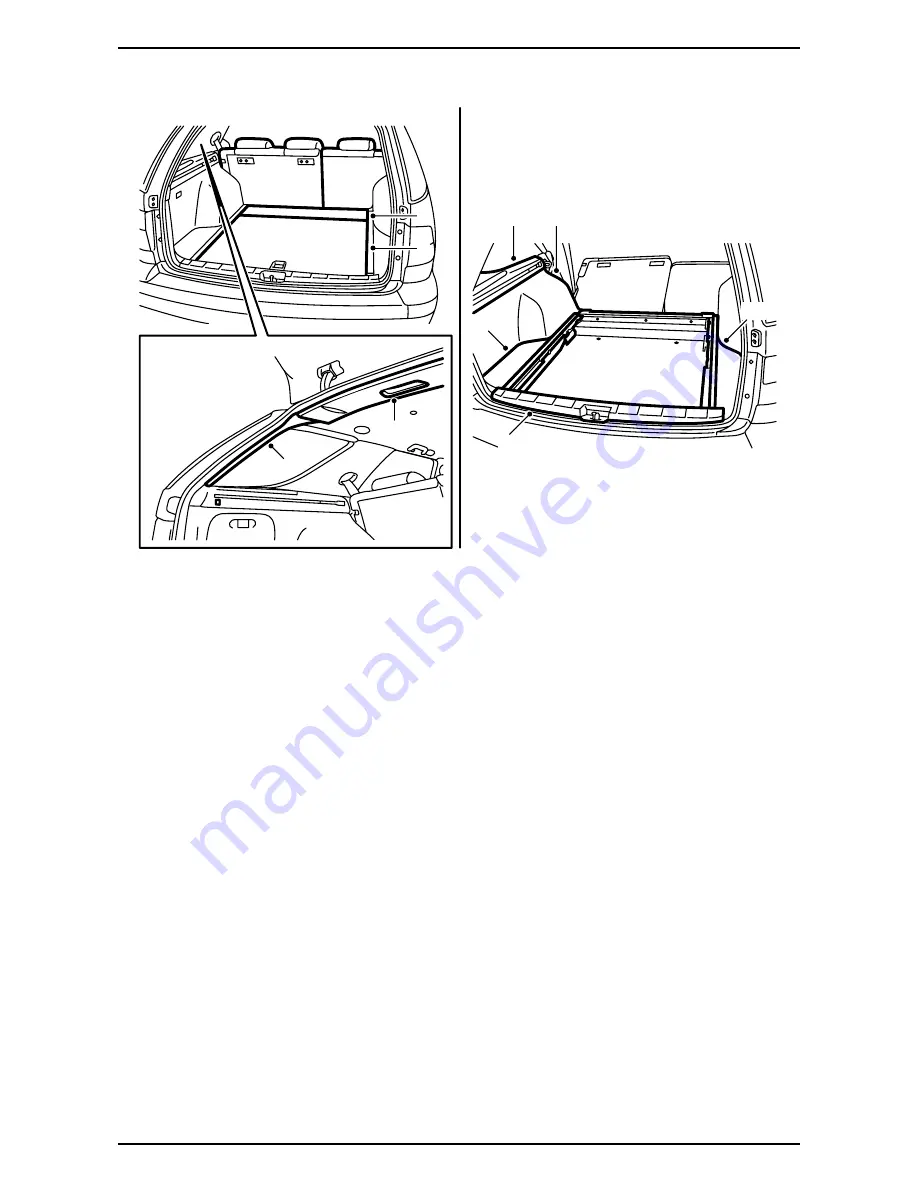
 Prepare the luggage compartment:  

·

Fold forward the left-hand section of the rear
seat seat cushion and the left-hand section of
the rear seat backrest. Remove the cover
between the left-hand rear door and the back-
rest.

·

Lift out the cargo guard.

·

Lift away the covers (A) over the storage
compartments and lift out the storage boxes
(B).

·

Remove the insulation pads from the rear
edge of the body. 

·

Remove the luggage compartment floor (C).

·

Remove the scuff plate (D), 2 covers, screws
and clips.

The following points apply to the left-hand
side: 

·

Detach the rear roof cover (E) at the edge to
obtain access to the D-pillar trim (F).

·

Remove the D-pillar trim, secured with clips.

·

Remove the parcel shelf support (G), 1 cover
and 3 screws.

·

Remove the side bolster (H) by first pulling its
top edge so that the lock tongue releases.
Then unhook the lower edge.

·

Remove the screws in the top edge of the
side trim (I).

·

Fold out the side trim and unplug the connec-
tor to the CD changer if the car was equipped
with one. Lift out the side trim.

E930A516

A,B

D

A,B

C

C

F

E

H

G,I

Содержание 32 026 005

Страница 1: ...default MONTERINGSANVISNING INSTALLATION INSTRUCTIONS MONTAGEANLEITUNG INSTRUCTIONS DE MONTAGE SITdefault Saab 9 5 Parking assistance SPA Accessories Part No Group Date Instruction Part No Replaces 32 026 005 9 89 33 Jan 07 32 026 006 E930A513 ...

Страница 2: ...ensor x4 6 Connector bracket 7 Wiring harness distance sensor sensor 8 Adapter harness 9 Connector 10 Cable tie x20 11 Cable tie x2 12 Cable tie 13 Cable tie rubber grommet 14 Rubber grommet 15 Fuse holder with 7 5 A fuse 16 Fuse holder with 10 A fuse E930A514 8 7 1 2 3 9 6 11 14 16 15 12 10 13 4 5 ...

Страница 3: ... Open the boot lid and remove the luggage compartment floor A Remove the scuff plate B Remove the left hand side trim C in the lug gage compartment and the insulation pads x2 in the rear edge of the body Loosen and move aside the right hand side trim D in the luggage compartment and remove the insulation pads x2 in the rear edge of the body Important The layer of paint must not be thicker than 90m...

Страница 4: ...ge compartment floor C Remove the scuff plate D 2 covers screws and clips The following points apply to the left hand side Detach the rear roof cover E at the edge to obtain access to the D pillar trim F Remove the D pillar trim secured with clips Remove the parcel shelf support G 1 cover and 3 screws Remove the side bolster H by first pulling its top edge so that the lock tongue releases Then unh...

Страница 5: ...hous ings 7 Cars with towbar Unplug the connector for the towbar wiring harness and remove the four bolts holding the towbar to the body 8 Lower the car 9 With help from an assistant pull the bumper out from the clips Lift the bumper out backwards Important Work carefully during removal so that paint dam age is avoided Important The outer bolts B are fitted in loose nut plates Important Place the ...

Страница 6: ...oute the wiring harness in the centre foam section F The connector comes out on the left hand side Connect the wiring harness to the sensors 17 Fit the connector holder to the left hand side of the bumper rail and fit the connector into the holder G 18 Fit the cellular block B with wiring harness in the bumper shell 19 Guide the bumper rail A in toward the bumper shell s guide pin Fit the bumper r...

Страница 7: ...cure the rubber grommet to the wiring har ness using a cable tie Remove the rubber plug below the left hand tail lamp Guide the wiring harness out through the hole and fit the kit s rubber grommet Insert the cable terminals in the connector B as follows 1 Black BK 2 Brown BN 3 Yellow YE 4 Blue BU 5 Orange OG 6 Grey GY Important Check that the cable terminals lock firmly and that the whole of the s...

Страница 8: ... from the end of the cable terminal taping Insert the cable terminals C as follows 1 Black BK 2 Brown BN 3 Yellow YE 4 Blue BU 5 Orange OG 6 Grey GY Affix tape and fit a new cable tie B on the rubber grommet Fit the left hand mounting bracket A for the bumper shell under the left hand tail lamp The wiring harness must be routed inside the bracket D Important Check that the cable terminals lock fir...

Страница 9: ...ghtening torque 40 Nm 30 lbf ft 27 Raise the car 28 Fit the bumper bolts at the wheel housings 29 Cars with towbar Plug in the connector for the towbar wiring harness 30 Cars with towing bracket Fit the bolts C and nut plates holding the towing bracket to the body Tightening torque 40 Nm 30 lbf ft Important Work carefully during fitting so that paint damage is avoided E930A521 B C A ...

Страница 10: ...ule holes connect the wiring harness to the control module B and fit the control module with connectors facing down onto the plate behind the rear seat backrest Tighten the screws Secure the wiring harness the whole way using cable ties C WARNING Check that the wiring harness is not trapped Incorrect fitting could damage the wiring harness and cause a short circuit fire Important Secure the wiring...

Страница 11: ...eel housing Connect the wiring harness to the control module B and mount the control module on the floor Tighten the plastic nuts Secure the wiring harness the whole way using cable ties C CA and CB CA Cable tie for mounting weld screw CB Cable tie with clip for mounting in holes WARNING Check that the wiring harness is not trapped Incorrect fitting could damage the wiring harness and cause a shor...

Страница 12: ...o the screws for the lower panel section B on the left hand side and fold down 35 Remove the centre console side trim C on the left hand side 36 RHD Remove the panel lower section D and the centre console side trim E on the driver s side 37 Remove the cover F for the fuse box E930A524 A F B C E D F ...

Страница 13: ... tilation and cigarette lighter switches Remove the rear section of the centre con sole by removing the screw on the top F Then lift straight up and unplug the connector Select reverse gear manual or P position automatic and remove the key Turn and lift up the theft protection antenna unit G bayonet fitting from the ignition switch and unplug the connector Insert the key and select neutral positio...

Страница 14: ...rews I holding in the centre console upper section and lift it away Fold aside the front carpets and undo the front screws J Undo the rear screws K Lift up and remove the centre console L Cut apart the carpet M E930A526 I I I M I J L K ...

Страница 15: ...HD Route the thin section of the wiring har ness RD and VT cables up to the fuse box and the thicker section under the instrument panel along the left hand side of the instru ment panel under the carpet and on to the centre console RHD Route the wiring harness under the glove box Route the thicker section of the wiring harness along the left hand side of the instrument panel under the carpet and o...

Страница 16: ...t the adapter harness to the fuse box Remove the fuse from pos 8 in the fuse box Connect the fuse holder with 10 A fuse to pos 8 in the fuse box A Fit the fuse just removed into the fuse holder A Remove the fuse from pos 26 in the fuse box Connect the fuse holder with the 7 5 A fuse to pos 26 in the fuse box B Fit the fuse just removed into the fuse holder B Unplug and separate the front connector...

Страница 17: ...so that it will not become trapped or damaged WARNING Check that the wiring harness is not trapped Incorrect fitting could damage the wiring harness and cause a short circuit fire Important Secure the wiring harness so that there is no risk of chafing and rattling E930A529 ...

Страница 18: ...t at left hand front which is the guide Fold up the carpets Lift back the upper section of the centre con soles At the same time carefully route the cables into place Fit the screws I holding the upper section of the centre console Important Make sure that no cables or connectors are trapped E930A526 I I I M I J L K ...

Страница 19: ...hes for seat heating seat ventilation and cigarette lighter Fit the gear lever cover C 2 clips in the rear edge and 2 screws in the front edge Fit the storage compartment ashtray B Manual transmission Fit the gear lever gai ter A Automatic transmission Fit the surround around the gear lever housing Plug in the connector and fit the theft protec tion antenna unit G Important Be careful to connect t...

Страница 20: ...lower section D and the centre console side trim E on the driver s side 45 Fit the centre console side trim C on the left hand side 46 Fit the panel lower section B onto the left hand side 47 Fit the scuff plates at the left hand rear door and front door A E930A524 A F B C E D F ...

Страница 21: ...crews and the D pillar trim Connect the ceiling lighting and press the rear ceiling cover E into place Fit new insulation pads in the rear edge of the body Fit the storage compartments B and the outer sections of the luggage compartment A Fit the scuff plate D Fit the luggage compartment floor C Lift in the cargo guard Fit the cover between the left hand rear door and the backrest Fold the rear se...

Страница 22: ... With the ignition key in the ON position and reverse gear engaged check that the system warns against objects in the rear by using tones The first tone is given when an object is at a dis tance of about 1 8 metres The signal then has a frequency of 2 tones per second but the number of tones per second increases the closer the object becomes to the vehicle and changes as follows 1 8 1 3 m 2 tones ...

Отзывы: