


35
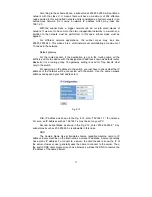
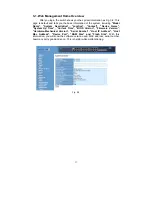
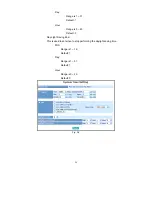
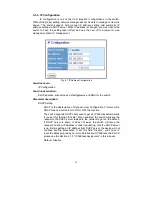
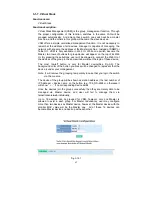
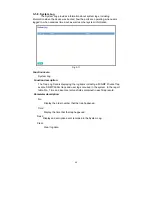
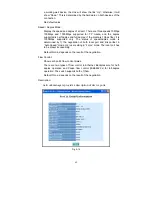
3-1-4. IP Configuration
IP configuration is one of the most important configurations in the switch.
Without the proper setting, network manager will not be able to manage or view the
device. The switch supports both manual IP address setting and automatic IP
address setting via DHCP server. When IP address is changed, you must reboot the
switch to have the setting taken effect and use the new IP to browse for web
management and CLI management.
Fig. 3-7 IP Address Configuration
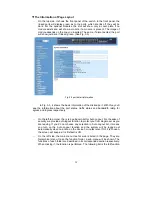
Function name:
IP Configuration
Function description:
Set IP address, subnet mask, default gateway and DNS for the switch.
Parameter description:
DHCP Setting:
DHCP is the abbreviation of Dynamic Host Configuration Protocol. Here
DHCP means a switch to turn ON or OFF the function.
The switch supports DHCP client used to get an IP address automatically
if you set this function “Enable”. When enabled, the switch will issue the
request to the DHCP server resided in the network to get an IP address.
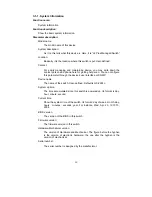
If DHCP server is down or does not exist, the switch will issue the
request and show IP address is under requesting, until the DHCP server
is up. Before getting an IP address from DHCP server, the device will not
continue booting procedures. If set this field “Disable”, you’ll have to
input IP address manually. For more details about IP address and DHCP,
please see the Section 2-1-5 “IP Address Assignment” in this manual.
Default: Disable
Содержание GS-2224L
Страница 1: ......
Страница 2: ......
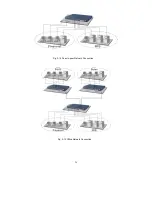
Страница 34: ...24 Fig 2 15 Office Network Connection Fig 2 14 Peer to peer Network Connection ...
Страница 78: ...68 Fig 3 28 ...
Страница 83: ...73 Fig 3 31 ...
Страница 91: ...81 Fig 3 39 Fig 3 40 Fig 3 41 ...
Страница 103: ...93 Fig 3 54 Set up Typical Network Application Rules Finish Fig 3 55 Set up Typical Network Application Rules Finish ...
Страница 113: ...103 Fig 3 67 Ingress Port Fig 3 68 ...
Страница 115: ...105 Fig 3 71 Fig 3 72 Fig 3 73 ARP Fig 3 74 ARP ...
Страница 116: ...106 Fig 3 75 ARP Fig 3 76 ARP Fig 3 77 ARP Fig 3 78 ARP ...
Страница 117: ...107 Fig 3 79 ARP Fig 3 80 ARP Fig 3 81 ARP Fig 3 82 ARP ...
Страница 118: ...108 Fig 3 83 ARP Fig 3 84 ARP Fig 3 85 ARP Fig 3 86 ARP Fig 3 87 ARP ...
Страница 119: ...109 Fig 3 88 IPv4 Fig 3 89 IPv4 Fig 3 90 IPv4 ...
Страница 120: ...110 Fig 3 91 IPv4 Fig 3 92 IPv4 Fig 3 93 IPv4 Fig 3 94 IPv4 Fig 3 95 IPv4 ...
Страница 121: ...111 Fig 3 96 IPv4 Fig 3 97 IPv4 Fig 3 98 IPv4 Fig 3 99 IPv4 Fig 3 100 IPv4 ...
Страница 122: ...112 Fig 3 101 IPv4 Fig 3 102 IPv4 Fig 3 103 IPv4 Fig 3 104 IPv4 ...
Страница 123: ...113 Fig 3 105 IPv4 Fig 3 106 IPv4 Fig 3 107 IPv4 ...
Страница 124: ...114 Fig 3 108 IPv4 Fig 3 109 IPv4 Fig 3 110 IPv4 Fig 3 111 IPv4 ...
Страница 125: ...115 Fig 3 112 IPv4 Fig 3 113 IPv4 Fig 3 114 IPv4 ...
Страница 126: ...116 Fig 3 115 IPv4 Fig 3 116 IPv4 Fig 3 117 IPv4 ...
Страница 127: ...117 Fig 3 118 Action Fig 3 119 Rate Limiter ...
Страница 128: ...118 Fig 3 120 Port Copy Fig 3 121 DMAC Filter ...
Страница 129: ...119 Fig 3 122 VLAN ID Filter Fig 3 123 VLAN ID Filter Fig 3 124 Tag Priority ...
Страница 141: ...131 Fig 3 126 Set up Policy Rules Fig 3 127 Set up Policy Rules Fig 3 128 Set up Policy Rules ...
Страница 142: ...132 Fig 3 129 Set up Policy Rules Finish Fig 3 130 Set up Port Policies Fig 3 131 Set up Port Policies ...
Страница 143: ...133 Fig 3 132 Set up Port Policies Fig 3 133 Set up Port Policies Finish ...
Страница 144: ...134 Fig 3 134 Set up Typical Network Application Rules Fig 3 135 Set up Typical Network Application Rules ...
Страница 150: ...140 Delete Select one of entry from the table then click on Delete to delete this entry Fig 3 143 ...
Страница 159: ...149 Fig 3 145 ...
Страница 204: ...194 Fig 4 1 Fig 4 2 ...


