background image


37 


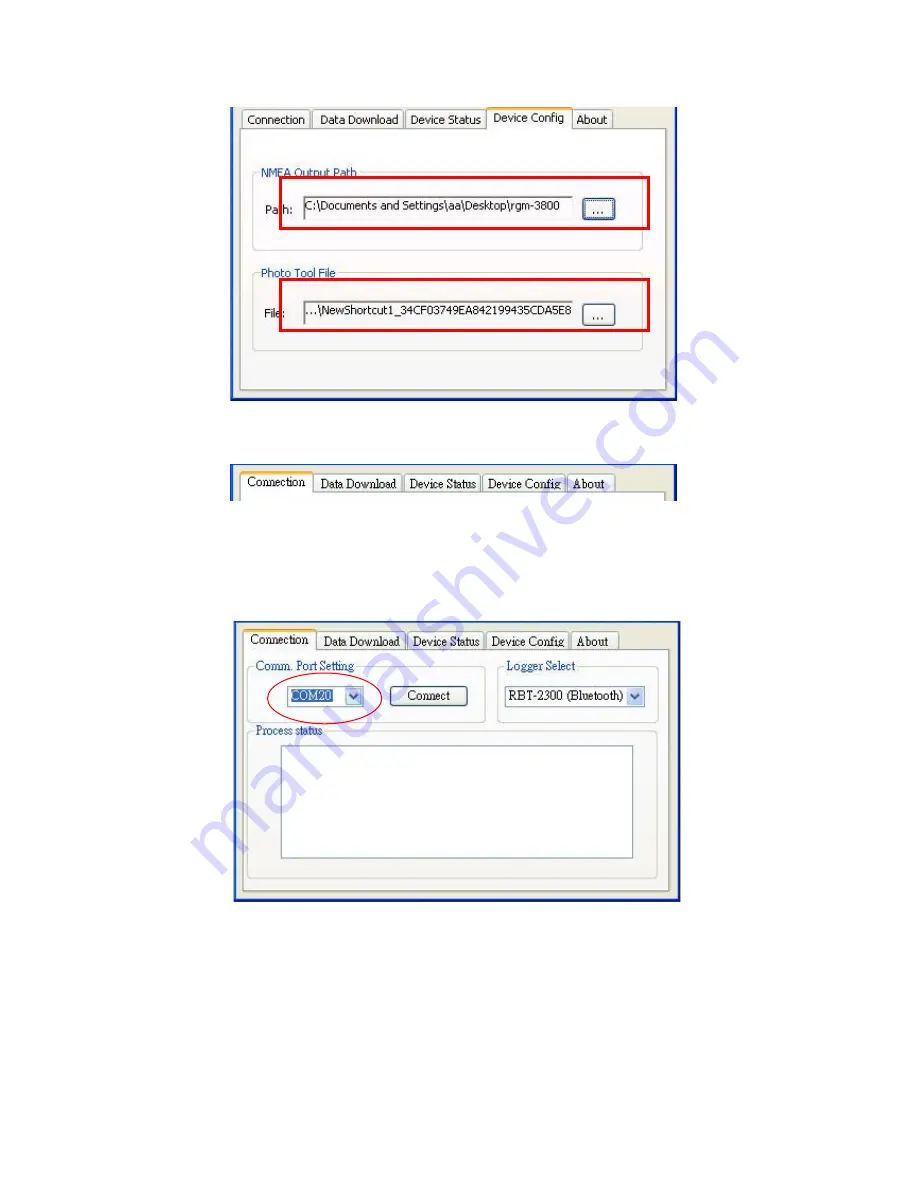
Step 3: Change page to “Connection” menu bar 


Step 4:Select the BT COM Port. User should choose the BT port to 

connect.   

                Logger Select. User should check the right logger to connect. 


Step 5: Push the “Connect” Button 
Step 6: Wait the “Get All Datalogger Head” finished then change to 

the “Data Download” menu bar 


If you don’t want to download the logger data, please choose 

the “Dis-Connect” button 

Содержание RBT-2300

Страница 1: ...oyalTek Bluetooth GPS Datalog Receiver RBT 2300 User Manual V1 0 SiRF Star III GPS Engine Inside Published on July 2007 by RoyalTek Company Ltd Design and specification are subject to change without notice ...

Страница 2: ...Status LED Amber Yellow 8 2 5 Getting Started 8 2 5 1 STEP 1 Charge the Battery 8 2 5 2 STEP 2 Turn on Receiver and Wait for GPS Fix 8 2 5 3 STEP 3 Connect to Bluetooth Enabled Devices 8 2 5 4 STEP 4 Connect to your Navigation Software 9 2 6 How to replace Lithium ion Battery 9 2 7 How to use Car Charger to charge your handheld device 9 3 Software Installation 10 3 1 Install Data download Utility ...

Страница 3: ...29 5 2 1 GPS Port 29 5 2 2 Baud Rate 29 5 2 3 About 29 5 2 4 Action 29 5 2 5 30 5 3 Cold Warm Hot Start 30 5 4 NMEA Configuration 31 5 5 About 31 5 6 Next Screen 32 6 GPS Test on PDA of Palm OS 33 6 GPS Test on PDA of Palm OS 33 6 1 Execute GPS Demo Program 33 6 2 GPS Demo Screen 33 6 2 1 GPS Port 33 6 2 2 Baud Rate 33 6 2 3 About 34 6 2 4 Action 34 6 2 5 34 6 3 Cold Warm Hot Start 34 6 4 About 35...

Страница 4: ...4 7 1 Connect RBT 2300 36 7 2 How to use data download Utility 36 8 Explanation of GPS Terminology 41 9 Photo match Tool locr GPS Photo introduction 42 ...

Страница 5: ...lution to carry everywhere 1 2 Main Features SiRF Star III GPS chipset 20 parallel channels NMEA0183 compliant protocol Extreme fast TTFF at low signal level Adopt TCXO as GPS core clock source Industrial Standard Selectable Baud Rate WAAS ENGOS is supported 1 3 Product Notification Operating temperature range 10 ºC to 60 ºC Charger operating temperature range 0 ºC to 60 ºC Battery Storage tempera...

Страница 6: ... following items If any item is damaged or missed please contact your reseller at once RBT 2300 Bluetooth GPS datalog receiver Car Charger optional CD AC Adapter optional External antenna optional Backup battery optional 2 2 Power Switch Power Jack External Antenna Port External Antenna Port Optional Power Switch Power Jack ...

Страница 7: ...nnected Blinking Blue LED indicates Bluetooth is not connected 2 4 Hardware Features 2 4 1 Power Switch Power ON Power OFF 2 4 2 Power Jack The power jack allows you to connect to either a DC included or AC power charger to recharge the internal battery 2 4 3 Bluetooth Status LED Blue Glowing Bluetooth is on and ready to transmit 2 4 4 GPS Status LED Green Glowing Position is fixed Steady light De...

Страница 8: ...ellow LED will be lighted up When the battery is fully charged the Yellow LED will be turned off Unplug car charger from power jack and cigar lighter separately 2 5 2 STEP 2 Turn on Receiver and Wait for GPS Fix If the position has not been fixed yet the Green LED will be still If the position has been fixed the Green LED will be Glowing You are ready to connect to your Bluetooth enabled mobile de...

Страница 9: ...y be necessary Refer to the following software application user manual to set up the parameters of the device via Bluetooth radio 2 6 How to replace Lithium ion Battery Open the bolt on the bottom cover of RBT 2300 and take the Lithium ion battery out Place new Lithium ion battery into the room of RBT 2300 The RBT 2300 Lithium ion battery is replaceable and rechargeable The RBT 2300 Lithium ion ba...

Страница 10: ...plication Click the Software for Pocket PC to install the PDA software application Click the Software for Palm OS to install Palm software application Click the User Manual to open the user manual of Bluetooth GPS Click the View Royaltek Website to link our http www royaltek com please make sure your PC connects to Internet first Click the Browse CD Contents to open the explorer to browse the file...

Страница 11: ...xt to next page or click Back to back last stage or Cancel to give up installation To the License Agreement page Click I accept the terms in the license agreement then click Next to next page or click Back to back last stage or Cancel to give up installation ...

Страница 12: ...12 Click Install to start installation Or click Back to back last stage or Cancel to give up installation ...

Страница 13: ...13 Start installation Please click Finish to finish the Installation ...

Страница 14: ...windows desk 3 2 Install locr GPS Photo Utility Before you install the Utility please check the Internet connection is ok To the License Agreement page Click Accept to start installation or click Don t Accept to give up installation Then ...

Страница 15: ...15 Start installation Click Next to next page or click Back to back last stage or Cancel to give up installation ...

Страница 16: ...ect Installation folder and Click Next to next page or click Back to back last stage or Cancel to next step Click Next to start installation or click Back to back last stage or Cancel to give up installation ...

Страница 17: ...17 locr GPS Photo is being installed Installation Complete Finally you will see the icon on the windows desk ...

Страница 18: ...18 ...

Страница 19: ...cket PC to install the PDA software application from CD you have to synchronize the PDA and your system Then the following window will show in your system as below Click Yes to continue Or click No to select the other destination to install or Cancel to give up installation ...

Страница 20: ...20 Click OK to complete the installation ...

Страница 21: ...21 You can also see the Installing RoyakTek message box Note About to install the software application to your PDA please refer to your user manual of your PDA manufacturer ...

Страница 22: ...re application from CD When screen shows the installation window as follows Click Next to next page or click Back to back last stage or Cancel to give up installation To the License Agreement page Click I accept the terms of the license agreement then click Next ...

Страница 23: ...k to back last stage or Cancel to give up installation Click Install to start installation Or click Back to back last stage or Cancel to give up installation Then start installation And finish installation will ask you to restart ...

Страница 24: ...24 your computer as follow window Please click Finish to finish the Installation 3 5 Install Palm Software Application Note To execute this Palm Software Application please install Palm software in ...

Страница 25: ...25 advance 4 GPS Test on PDA 4 1 Execute GPS Demo Program Execute RoyalTek GPS Demo program by double clicking RoyalTek GPS Demo icon on Programs menu ...

Страница 26: ...PS port automatically or select COM1 as the default COM port 4 2 2 Baud Rate Select baud rate 57600 4 2 3 About Displays software version 4 2 4 Action Select GPS action 4 2 5 Next screen 4 3 Cold Warm Hot Start GPS Data View Signal View Satellite View ...

Страница 27: ...oll bar then click Action to initialize Cold Warm Hot Start function 4 4 NMEA Configuration Selecting NMEA CFG in function scroll bar then click Action to do NMEA sentence setting 4 5 About This page shows the software version and the copyright claim ...

Страница 28: ...28 4 6 Next Screen Clicking to switch GPS bar chart image to have more GPS data ...

Страница 29: ...RoyalTek GPS Demo icon on Programs menu 5 2 GPS Demo Screen 5 2 1 GPS Port Searching GPS port automatically or select COM1 as the default COM port 5 2 2 Baud Rate Select baud rate 57600 5 2 3 About Displays software version 5 2 4 Action Select GPS action GPS Data View Signal View Satellite View ...

Страница 30: ...30 5 2 5 Next screen 5 3 Cold Warm Hot Start Selecting Cold Warm Hot Start in function scroll bar then click Action to initialize Cold Warm Hot Start function ...

Страница 31: ...31 5 4 NMEA Configuration Selecting NMEA CFG in function scroll bar then click Action to do NMEA sentence setting 5 5 About This page shows the software version and the copyright claim ...

Страница 32: ...32 5 6 Next Screen Clicking to switch GPS bar chart image to have more GPS Data ...

Страница 33: ...RoyalTek GPS Demo program by double clicking RoyalTek GPS Demo icon on Programs menu 6 2 GPS Demo Screen Signal View 6 2 1 GPS Port Searching GPS port automatically or select COM1 as the default COM port 6 2 2 Baud Rate Select baud rate 57600 GPS Data View Satellite View ...

Страница 34: ...t Displays software version 6 2 4 Action Select GPS action 6 2 5 Next screen 6 3 Cold Warm Hot Start Selecting Cold Warm Hot Start in function scroll bar then click Action to initialize Cold Warm Hot Start function ...

Страница 35: ...35 6 4 About This page shows the software version and the copyright claim 6 5 Next Screen Clicking to switch GPS bar chart image to have more GPS data ...

Страница 36: ... Click Start Control Panel Performance and Maintenance System and you will see the System Properties dialog box click on Hardware tab and then the Device Manager button Expand the Ports COM LPT item and select the BT Port of your RBT 2300 7 2 How to use data download Utility 7 2 1 Open Data download Utility For the First using Step 1 Change to Device Config menu bar Step 2 Select Folder or set a n...

Страница 37: ...ose the BT port to connect Logger Select User should check the right logger to connect Step 5 Push the Connect Button Step 6 Wait the Get All Datalogger Head finished then change to the Data Download menu bar If you don t want to download the logger data please choose the Dis Connect button ...

Страница 38: ... page to Data Download menu bar Step 2 Select the download data items which you want to load from RBT 2300 Step 3 Wait the get Data action Finish Data from RBT 2300 was transferred to NMEA sentence 7 2 3 Get and Set RBT 2300 Device Status ...

Страница 39: ...r to choose these data items to be saved in the RBT 2300 1 UTC Time Longitude Latitude will be saved 2 UTC Time Longitude Latitude Altitude will be saved 3 UTC Time Longitude Latitude Altitude Velocity will be saved Memory Full Option user adjustable The default memory operation setting is overwrite If the memory is full then the system will erase the oldest sector G Mouse button user adjustable D...

Страница 40: ...t to 115200 n 8 1 Current Flash Usage This bar only shows the rough current flash usage status You should check the LED to see if the flash is full Step 3 User adjustable Memory Full Option key in the Time Interval and G Mouse Enable Disable Option When you done the configuration setup press the Set Log Config button to save the setting to the receiver Finally these setting take effect 7 2 4 Get t...

Страница 41: ...on 7 2 5 How to connect the Photo Match Tool Step1 Change to Data download menu bar and Press the Photo Match Tool button Step 2 You can connect to the Photo match tool 8 Explanation of GPS Terminology TTFF Time to first fix cold start warm start and hot start ...

Страница 42: ...emarks of their respective holders locr GmbH has written this manual to the best of its knowledge but does not guarantee that the programs will fulfill the users intended applications No warranty is made as to the specifications of features locr GmbH retains the right to make alternations of the content of the manual without obligation to inform third parties All quotes sales supply and manufactur...

Страница 43: ...t page please fill the compulsory fields with The Anti spam verification is obligatory too Therefore in the list box please select the place name in the middle of the map Click on Create to complete the registration Having successfully signed up locr will send you an e mail You can change the password at any time If you have already signed up just click Log in ...

Страница 44: ...e double click the locrGPSPhoto exe file Follow the instructions on the screen Geotagging with locr GPS Photo To geotag your photos automatically you have to download and install the locr GPS Photo software Manual or automatic geotagging There are two ways to geotag your photos The photos can be tagged manually or automatically For automatic geotagging you need a datalog GPS receiver in addition t...

Страница 45: ...try Example Zugspitze Germany Please note The correct order is important whereas a comma is not needed between the search criteria Tip If a location cannot be found omit the street information Or in addition specify the country If you specify the country you should always use the English spelling Doing so the location will be found reliably If you are not sure of the right English spelling there i...

Страница 46: ...rth and then the Yes button Now select the photo s you want to upload and click the Upload Photos button At least determine the privacy status click OK and then have a look at the locr web site Please note Uploading the photos may take a while Geotagging via zoom and click Sure geotagging using the address is the easiest way But if you do not know the exact address or rather prefer to look where t...

Страница 47: ...cessary you can drag the marker to the desired position for a final adjustment and click Manual geotagging again Clicking the Show Photos on Map button shows your photos in combination with their position on the map Note To show the position on the map locr uses Google Maps which means you need a fast internet connection The Clear EXIF location tags button allows you to delete the latitude and lon...

Страница 48: ... On the left you see the Photos area To open a photo click Add and select a photo photos Photos which already contain GPS information in the EXIF header will be flagged by an x already uploaded photos by a u Now you need the GPS information In the GPS Tracks area click on Add to read the needed files from the datalog Matching photos will be marked green and the calculated latitude and longitude wi...

Страница 49: ...s you need a fast internet connection The Clear EXIF location tags button allows you to delete the latitude and longitude information This button is helpful in combination with the Time Adjust option see page 9 Caution The information will be deleted for all photos not only for the selected one s To view the photos in Google Earth first click the Show in Google Earth and then the Yes button Now se...

Страница 50: ...p s reload Upload a resized copy of the original photo During the upload your photos will be uploaded with a maximum resolution of 1024 pixels as default This accelerates the upload procedure If you d like to upload your photos with maximum quality and resolution you ll have to de activate the Upload a resized copy of the original photo option in the Settings tab The Time Adjust tab You made a lot...

Страница 51: ...over It will be written into the EXIF header automatically and will be saved on your hard disk as a part of the photo Important note For an exact calculation of the position during the automatic geotagging you should always set and keep the camera time set according to the system time of your computer regardless where you are driving or flying to The locr GPS Photo software and Google Earth To be ...

Страница 52: ...o the desired direction Zooming and panning using the buttons Zooming in magnifying the map Mouse click the Magnifying button The map view will be enlarged Zooming out de magnifying the map Mouse click the Minimize button The map view will be reduced Moving the segment of the map Mouse click on one of the respective buttons The visible section of the map will be moved left right up or down Note Yo...

Страница 53: ...ut the place where the photo was taken just have a look at the Wikipedia articles which are also automatically assigned to the picture on the locr website Note Uploading photos is only possible if you have signed up or are logged in You haven t signed up yet Have a look at How to sign up at locr Help FAQs In case you need some help or find some answers simply click the Help tab and you will find a...

Страница 54: ...e software can read and use this information What is a datalog GPS receiver and how does it work A datalog GPS receiver is a device which as long as it is switched on continuously receives and logs stores data concerning its current position The operating mode of a datalog GPS receiver is based on the principle of the global satellite based positioning system GPS GPS GPS Global Positioning System ...

Страница 55: ...ogged data can be read and saved on e g a PC So the data is also available for other applications like the locr PGS Photo software Note Different datalog GPS receivers create log files in different formats How these files can be used with locr GPS Photo is explained in the FAQs Which GPS datalogger can I use for automatic geotagging anyway ...

Страница 56: ...Part 15 of the FCC Rules Operation is subject to the following two conditions 1 This device may not cause harmful interference and 2 This device must accept any interference received including interference that may cause undesired operation ...

Страница 57: ...ote July 2007 V1 0 Final Release Contact information Headquarters 1071 Chung Cheng RD Suite 9F 1 Tao Yuan City Taiwan Tel 886 3 256 9666 FAX 886 3 358 0050 Http www royaltek com Sales Http www royaltek com contact FAE fae royaltek com ...

Отзывы: