background image

14

15

Aiming and Shooting Video:

  This is where the simplicity of the 

Roscoby Riser Cam will turn your hunt into something you’ve 

never seen before. We’ve designed the camera to give the user a 

“line of sight” camera view. At 15 yards from your target, you will

have a field of view approximately 10 yards wide. This insures that

whatever you see through the peep and sight of your bow will be

captured in the video.


We recommend that you get outside and begin target shooting to 

understand the range and functions of the camera. With practice 

the user will develop better shooting habits and improve the quality 

of their recorded video.


When you are ready to view your clips, you will need to study the 

following pages relating to viewing clips on your TV or PC.

A D D I T I O N A L   S D  C A R D   I N F O R M A T I O N


•   Always follow proper safety precautions for use.
•  Always install fresh SD cards prior to going into the field.
•  The Roscoby Riser Cam supports 1GB, 2GB and 4GB SD cards.
•  1GB is equal to approximately 50 minutes of record time.
•  Make sure the Write-Protect switch is not in the “Locked” position.
•  SD card may be damaged if not properly inserted.
•  Do not touch the metal contacts of the SD card.
•  SD card and data may be damaged by moisture.
•  Turn off the camera before inserting or removing a card.
•  Data on the SD card may be damaged or lost if placed near 


strong magnets or luggage scanning equipment.

•  Reformatting the SD card may be necessary if the SD card 


appears to have corrupted data or if so prompted by your PC.

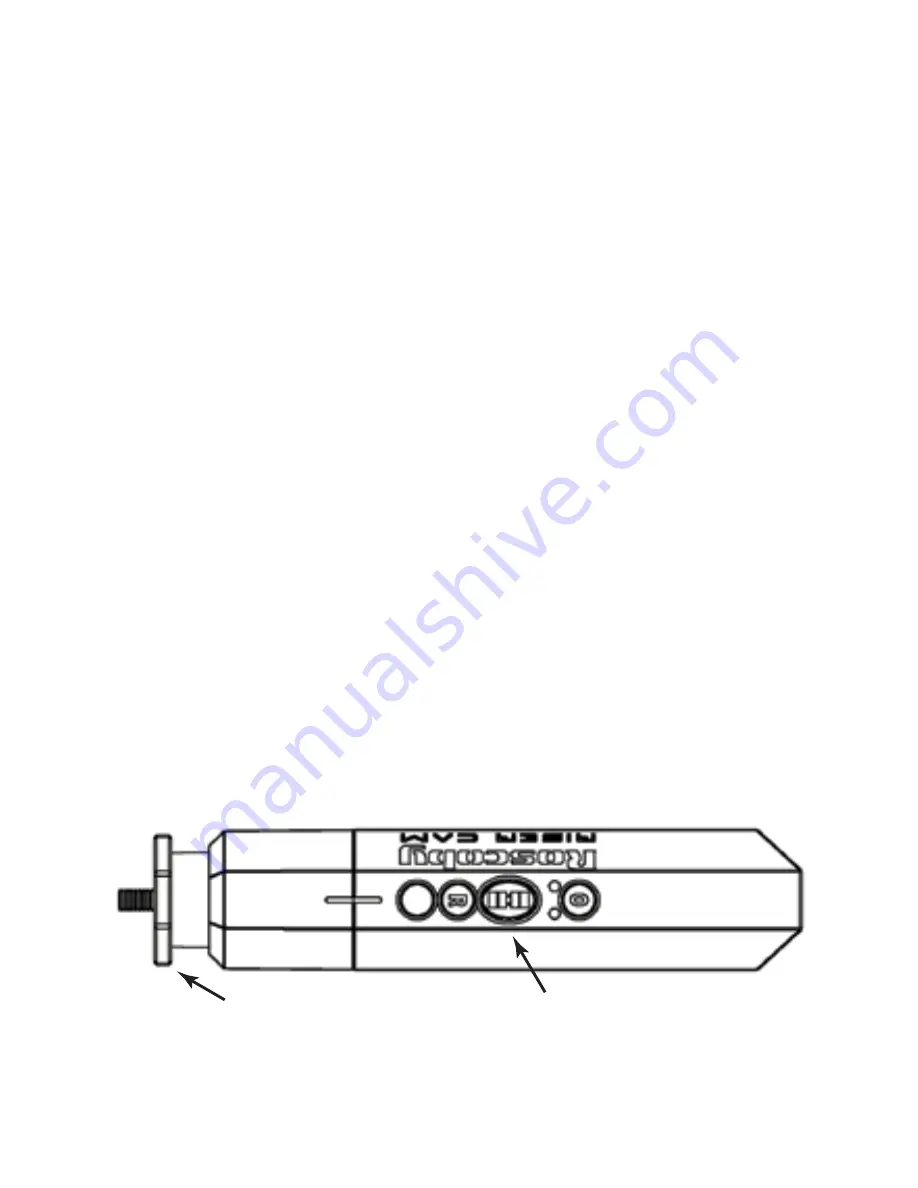
adjust the Jam Nut for fine-tuning the camera position on the bow.

Each bow is unique and will require a bit of “fit and feel” testing 

to get the camera properly oriented on the bow.


Thread the Mounting Stud into the Stabilizer mount on the bow 

until it comes tight against the Riser. It is unlikely that the camera 

will be properly oriented on your bow. This is where the Jam Nut 

needs to be adjusted slightly (loosened or tightened) and the camera 

re-tightened back to the Riser. It may take a few attempts to adjust 

the Jam Nut just enough to bring the camera to almost vertical 

alignment on your bow.


With the camera almost vertical, use 

ONLY

 the Jam Nut to firmly 

tighten and secure the camera into place. 

DO NOT

 hold the camera 

body to tighten the unit to your bow or damage to the Mounting 

Stud and Isolator will occur.


Proper installation of the Roscoby Riser Cam on a bow will have 

the controls on top of the camera, the camera vertically aligned 

with the string of your bow with both the Jam Nut tight against 

both the Riser and the Rubber Isolator.


With the camera properly positioned and secured you are ready 

to get out and use the Roscoby Riser Cam in the field. 

Jam Nut tight against the 
Riser and Rubber Isolator.

Properly positioned, you will
see the camera controls on top
as you look down.

Содержание Riser Cam

Страница 1: ...U S E R S M A N UA L We got your shot...

Страница 2: ...rating Notes 4 6 Product Overview 7 8 Quick Start Guide 9 10 Detailed Use Instructions 11 14 Additional SD Card and 15 16 Battery Information Connecting to a TV or PC 17 18 Installing the XviD Codec 1...

Страница 3: ...erly install and use the Roscoby Riser Cam Similarly children may end up helping their parents with video sharing and editing footage Safety is of the utmost concern at RiserCam LLC Please use the pro...

Страница 4: ...batteries or SD card Improper removal of the SD card may result in lost or damaged data Re formatting of the SD card may be required Visit our website for details if this should occur Use the lens clo...

Страница 5: ...able to play the latest video format MPEG 4 A codec software patch from the fine people at XviD org is available on the Roscoby It is also available on our website www roscoby com If you experience a...

Страница 6: ...the camera gets wet wipe it dry as soon as safely possible Note The Camera should never be submerged under water RiserCam LLC assumes no responsibility for malfunction of the camera caused by water ge...

Страница 7: ...in Camera Housing 2 Power ON OFF Button 3 Green LED Power Indicator 4 Record ON OFF Button 5 Red LED Record Indicator 6 LCD Time Indicator 7 Function Button 8 End Cap 9 R A T Isolator 10 Jam Nut 11 Mo...

Страница 8: ...U C T O V E R V I E W 12 Lens Cover 13 Microphone Rain Flap 14 Tripod Insert 15 Mini USB Port 16 A V Port 17 SD Card Slot 18 Battery Compartment Door 19 Battery Magazine 20 O Rings 2 12 13 14 16 15 17...

Страница 9: ...t Properly install 2 AA Energizer e2 Lithium batteries into the Battery Magazine and slide it back into the compartment Rotate the door down over the Catch mechanism and push up until it is locked int...

Страница 10: ...gain on the R button and the Red LED will turn OFF indicating that recording has ended Note In order to properly save a video clip you must cycle through the Record Mode starting and stopping the reco...

Страница 11: ...s not to cross thread the cap onto the Housing When the cap is tight and properly installed you will notice the embossed notch in the Camera Housing and End Cap will be perfectly aligned at the top of...

Страница 12: ...When the camera detects a loss of power that could prevent the unit from recording the Green LED will begin to blink once every second It is advised that the batteries be changed as quickly as practic...

Страница 13: ...ing the LED will blink once every 2 seconds These indicators are the same for all capacities of SD cards Please visit the FAQ section of our web site for more detailed information about the SD cards a...

Страница 14: ...the camera to almost vertical alignment on your bow With the camera almost vertical use ONLY the Jam Nut to firmly tighten and secure the camera into place DO NOT hold the camera body to tighten the u...

Страница 15: ...your clips you will need to study the following pages relating to viewing clips on your TV or PC A D D I T I O N A L S D C A R D I N F O R M A T I O N Always follow proper safety precautions for use A...

Страница 16: ...is plugged directly into the PC A D D I T I O N A L B A T T E R Y I N F O R MA T I O N Always install fresh batteries prior to going into the field Do not mix old and new batteries together Do not mi...

Страница 17: ...this mode you cannot record With the camera properly connected to your TV you will see up to 9 thumbnail images Each image is the first frame of each clip taken with the camera By default the first f...

Страница 18: ...on 3 Double click on the DCIM folder 4 Double click on the 100RSCBY folder 5 Double click on any RSBY file and the media viewer will open a new window and play the video clip Viewing Files from a PC C...

Страница 19: ...P or Computer Vista 2 Double click on the Removable Disk icon 3 Double click on the XviD CODEC folder 4 Double click on the XviD 1 1 3 file In Windows Vista click Allow Access to the Program 5 The Set...

Страница 20: ...le button and save the file to your Desktop 5 From your Desktop Double Click on the XviD Icon In Windows Vista click Allow Access to the Program 6 The Set up Wizard will appear click Next 7 Read Accep...

Страница 21: ...amera will not record Solution Make sure the SD card is properly inserted in the camera The SD card may be corrupted or not properly formatted Issue I can t view the clips recorded to my SD card on my...

Страница 22: ......

Страница 23: ...0 hrs mins Green LED Power Indicator with capacity alerts Red LED Record Indicator with capacity alerts Ambient Light operations to 5 LUX 3 5mm microphone jack microphone is included Battery Requireme...

Страница 24: ...charged at the cost of parts plus labor Please contact our customer service department regarding repairs This is the complete warranty for products manufactured by RiserCam All costs of shipping Produ...

Страница 25: ......

Страница 26: ...oscoby com Where did you hit it Was he standing or walking Which direction did he run Did the arrow hit something Did the buck jump the string Did you get good penetration Was it a shoulder hit Are yo...

Отзывы: