background image

35

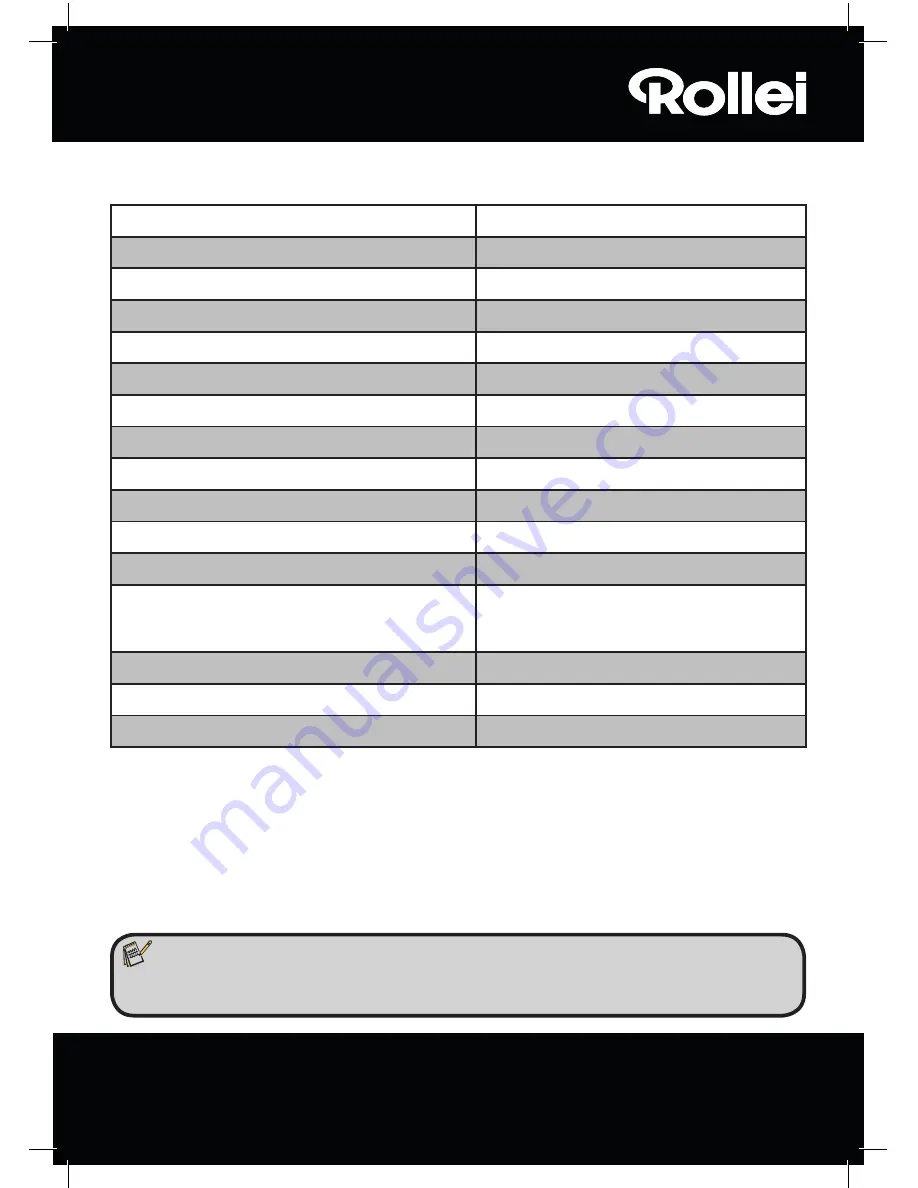
Modell

PDF-S 240 SE

Bildsensor

5.1 Megapixel CMOS Sensor

Objektiv

F=3,6; f=4,83

LCD

6,1 cm (2,4“ Zoll) LTPS LCD Display  

Scanner-Auflösung

1800 dpi und 2400 dpi (interpoliert)

Belichtungssteuerung

Automatisch

Farbbalance

Automatisch

Datenumwandlung 

24 Bit

Externer Speicher

SD-/SDHC- und MMC-Karten

Scan-Methode

Single Pass 

Lichtquelle

7x 2 weiße LED/Hintergrundlicht (3 weiße LED)

Stromversorgung:

Über den USB-Anschluss / 5V-Adapter

Netzadapter

Modell: TEKA 006-0501000EU

Eingang: 100 - 240V~, 50/60 Hz;

Ausgang: 5 V 

"

,1A

USB-Schnittstelle

USB 2.0 Verbindung

Abmessungen (HxBxT)

220 mm (H) X 208 mm (B) X 147 mm (T)

Gewicht

ca. 1200 Gramm

10. Technische Daten

 Hinweis:

  Im Zuge von Produktverbesserungen behalten wir uns technische und optische

  Veränderungen am Artikel vor.

Systemanforderungen Multi Scanner

Anschluss über USB 1.1 oder höher als Massenspeicher; Betriebssysteme Windows® ME, 2000, XP, 

Vista, Windows® 7; Mac OS 8.6 oder höher (OS 10.2.8 oder höher für USB 2.0).

Systemanforderungen der mitgelieferten Software

Intel Pentium® III;  700 Mhz; 256 MB RAM; Windows® ME, 2000, XP,  Vista, Windows® 7; mindestens 

500 MB freier Festplattenspeicher; Direct X 8.1 oder höher; CD-ROM Laufwerk.

Содержание PDF-S 240 SE

Страница 1: ......

Страница 2: ...ality Rollei product You have acquired a modern Multi Scanner with excellent technical features and respective accessories which is particularly easy to operate Please study this information in detail...

Страница 3: ...2 Main menu 12 6 3 Capture 13 6 3 1 Flipping an image 14 6 3 2 Adjusting image brightness and colors 14 6 3 3 Scanning and editing 15 6 3 4 Scanning more images 16 6 3 5 Memory full 16 6 4 Playback 1...

Страница 4: ...ge processing software 24 7 1 Installation 24 7 2 Editing functions 24 7 2 1 Import photos Get Photo 25 7 2 2 Preview 26 7 2 3 Edit 28 7 2 4 Create 28 7 2 5 Share 29 8 Disposal 29 9 Warranty and Servi...

Страница 5: ...if you are not using the device for some time during thunder and lightning prior to cleaning the device and in case of malfunctioning during the operation When the Multi Scanner is plugged into the so...

Страница 6: ...hat there is enough space for ventilation around the device Keep a safe distance to heat sources such as hobs or ovens Do not drop the Multi Scanner and do not subject it to strong impacts Do not plac...

Страница 7: ...and MMC memory card slot 8 Left button 9 ENTER button 10 Right button 11 MODE button 12 Insertion slot for photo holder 13 Slider for selecting scan template 14 6 1 cm TFT LCD colour monitor 15 Slide...

Страница 8: ...lide the slide holder into the Multi Scanner until it engages noticeably in the first slide position Note Caution Do not insert slide holder from the left side into the insertion slot of the scanner a...

Страница 9: ...insert negative holder from the left side into the insertion slot of the scanner and do not pull the holder out of the right side of the scanner Any damage resulting from such incorrect handling is no...

Страница 10: ...icture frame into slot in the top of the scanner see illustration Prior to scanning photos ensure that no slide or negative holder has been left in the scanner Note Handle photos with due care Dust sc...

Страница 11: ...power 1 Connect the Multi Scanner to a computer using the USB cable 2 Connect the device to the mains using the USB cable and the USB mains adaptor Push the On Off switch to switch on the Multi Scanne...

Страница 12: ...nner the main menu of the scan mode appears on the display When in submenus you can return to this Main menu at any time by pressing the MODE key The two illustrations below show the Main menu for the...

Страница 13: ...tart the mode by pressing the ENTER key In the next step the scan preview of the selected original is shown on the display Live display During the scan preview the live display symbol is shown in the...

Страница 14: ...orrectly inserted pictures Press the key to flip the image horizontally from left to right Press the key to flip the image vertically from top to bottom Note The set flipped alignment shall also remai...

Страница 15: ...d change the settings by pressing and within the range of 2 to 2 To apply the changes you have made press the SCAN button The settings will apply separately to slides negatives and photo prints and wi...

Страница 16: ...ed image and returns to the live display function Caution The scanned image will not be saved Home Using the buttons select the Home option to return from the edit menu to the Main menu and press ENTE...

Страница 17: ...to view images already scanned Whilst the scanner is switched on you can return to the Main menu by pressing the MODE button or the Menu symbol Using the buttons in the Main menu select the Playback...

Страница 18: ...st or next image with the and keys Instead of the symbol for individual picture display the top part of the display now shows the file name of the current image 6 4 3 Editing menu To edit an already s...

Страница 19: ...keys in the Edit menu and click on the ENTER key You can then continue turning the image or save it In the same manner you can turn an image counter clockwise by 90 degrees by selecting the option Rot...

Страница 20: ...option Delete with keys in the Edit menu After pressing the ENTER key the image is deleted and the next image is shown on the screen At the same time the selection changes automatically to Exit Select...

Страница 21: ...lm type only in film scanner mode Prior to scanning slides or negatives in the film scanner mode the respective film type must be set Use the keys in the Main menu to select the option Film type and c...

Страница 22: ...e Multi Scanner then changes directly to the capture mode 6 7 Selecting the photo format only in photo scanner mode The photo scanner mode allows you to set the Multi Scanner to the size of the insert...

Страница 23: ...ge size If 5 megapixels have been selected images with 2 592 x 1 728 9 x 13 cm 2 592 x 1 728 10 x 15 cm and 2 592 x 1 850 13 x 18 cm pixels are produced If the images are scanned at 10 megapixels 3 64...

Страница 24: ...and the images can be transferred to the computer from a card reader You can also connect the Multi Scanner directly to the computer to transfer the images from the inserted memory card First connect...

Страница 25: ...ually edited in three steps The images are first imported in the BlazePhoto program These images can be changed with various functions in the next step Images can for instance be rotated Red Eye can b...

Страница 26: ...ction Search local hard disk images can also be imported from the hard disk of the computer The program will automatically search the hard disc for existing images If the program BlazePhoto is already...

Страница 27: ...ed view with the available editing tools Accept a change by clicking on OK after every change Click on Reset to reject the change The general tools allow you to crop or change the orientation of an im...

Страница 28: ...e image sharpness Enhance By selecting the Enhance function the colours of an image are automatically adjusted Various types of adjustment are available There are also other tools available for correc...

Страница 29: ...e and the image files can be directly uploaded to the Internet 7 2 5 Share Export to file By selecting this option the resolution and file format of all images on the clipboard are adjusted simultaneo...

Страница 30: ...collection points in your local authority district or consult the retailer from whom the product was bought This will prevent potential detri mental effects on the environment and on health arising f...

Страница 31: ...is includes interference that can impair the function or cause malfunctioning In the event of the device causing radio or television interference this can be easily determined by switching the device...

Страница 32: ...Output 5 V 1A USB interface USB 2 0 connection Dimensions HxWxD 220 mm H x 208 mm W x 147 mm D Weight approx 1200 g 11 Technical Specification Note We reserve the right to make technical and optical...

Страница 33: ...otos 9 Insertion slot slides negatives 6 Installation software 24 Intended use 5 LED film scanner mode 6 10 LED photo scanner mode 6 10 Live display 13 14 Main features 1 Main menu 11 Memory full 16 M...

Страница 34: ...hwertigen Rollei Produktes Sie haben sich f r einen modernen Multi Scanner mit guter technischer Ausstattung und entsprechendem Zubeh r entschieden der sich besonders einfach bedienen l sst Bitte lese...

Страница 35: ...legen 11 4 2 Negative einlegen 12 4 3 Fotos einlegen 13 5 Allgemeine Bedienung 13 5 1 Scanvorbereitungen 14 5 2 Hauptmen 14 5 2 1 Hauptmen Filmscanner Modus 15 5 2 2 Hauptmen Fotoscanner Modus 16 5 3...

Страница 36: ...5 10 USB Modus 28 6 BlazePhoto Bildbearbeitungssoftware 28 6 1 Installation 28 6 2 Bearbeitungsfunktionen 28 6 2 1 Fotos importieren Fotos imp 29 6 2 2 Vorschau 30 6 2 3 Bearbeiten 32 6 2 4 Erstellen...

Страница 37: ...das Ger t l ngere Zeit nicht nutzen bei Gewitter bevor Sie das Ger t reinigen und wenn w hrend des Betriebes St rungen auftreten Wenn der Multi Scanner mit der Steckdose verbunden ist so ziehen Sie i...

Страница 38: ...t Halten Sie ausreichend Abstand zu W rmequellen wie z B Herdplatten oder fen Lassen Sie den Multi Scanner nicht fallen und setzen Sie ihn keinen starken St en aus Stellen Sie keine Kerzen oder ander...

Страница 39: ...und MMC Speicherkarten 8 Links Taste 9 Eingabe Taste ENTER 10 Rechts Taste 11 Modus Taste MODE 12 Eingabeschlitz f r Fotoschlitten 13 Schieber zur Auswahl der Scan Vorlage 14 6 1 cm TFT LCD Farbmonito...

Страница 40: ...Ausschalten Zum Einschalten des Multi Scanners dr cken Sie die Ein Aus Taste Daraufhin leuchtet eine der LEDs f r Photo scan oder Film scan auf und der Monitor schaltet sich ein Zum Ausschalten des Sc...

Страница 41: ...r zu entnehmen dr cken Sie erneut auf die Karte die Karte l st sich daraufhin und wird etwas aus dem Ger t heraus geschoben Wird die Speicherkarte bei eingeschaltetem Scan ner eingelegt so erfolgt ein...

Страница 42: ...benstehende Warnung angezeigt so ist die verwendete Speicherkarte voll Sie m ssen die Bil der dann zun chst auf den Computer bertragen oder eine neue Speicherkarte einsetzen bevor Sie weitere Bilder e...

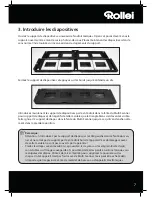
Страница 43: ...ter ein dass die wei e Dreiecks Markierung voran und sichtbar ist Schieben Sie den Dia Halter so weit in den Multi Scanner ein bis dieser sp rbar in der ersten Dia Position einrastet Hinweis Achtung F...

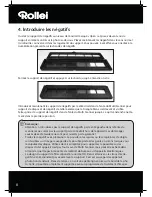
Страница 44: ...rung orientieren Schlie en Sie den Negativ Halter und dr cken Sie auf die R nder bis diese einrasten F hren Sie nun den Negativ Halter so von der rechten Seite in den Eingabeschlitz des Multi Scan ner...

Страница 45: ...n Fotoschlitten in den Schlitz an der Oberseite des Multi Scanners siehe Abbildung Ach ten Sie darauf dass sich beim Scannen von Papierfotos kein Dia oder Negativ Halter im Scanner befindet Hinweis Fo...

Страница 46: ...ber das USB Kabel mit dem USB Netzadapter zu einer Steckdose Dr cken Sie den Ein Aus Schalter um den Multi Scanner einzuschalten W hlen Sie im Men die gew nschte Option aus und best tigen diese mit de...

Страница 47: ...men k nnen Sie mit den Tasten die gew nschte Option ausw hlen best tigen Sie Ihre Auswahl mit der ENTER Taste 5 2 1 Hauptmen Filmscanner Modus In den nachfolgenden beiden Bildern wird das Hauptmen f r...

Страница 48: ...Hauptmen des Fotoscanner Modus mit Hinweisen auf die zur Verf gung stehenden Auswahlpunkte Im Fotoscanner Modus werden Papierbilder eingescannt Spracheinstellung USB Modus Aufnahmemodus Wiedergabe Ef...

Страница 49: ...ung wird zum Scannen von Schwarz Wei Negativbildern verwendet W hlen Sie mit den Tasten den gew nschten Filmtyp und best tigen Sie mit ENTER Der Multi Scanner wechselt danach direkt in den Aufnahmemod...

Страница 50: ...mit einer Aufl sung von 5 1 Megapixel Zus tzlich haben Sie die M glichkeit f r die Aufnahmen eine interpolierte Aufl sung von etwa 10 Megapixel zu w hlen Dias und Negative werden bei 5 Megapixeln 5M m...

Страница 51: ...er Multi Scanner wechselt danach direkt in den Aufnahmemodus 5 7 Aufnehmen W hlen Sie im Hauptmen die Option Aufnahmemodus und starten Sie diesen durch Bet tigen der ENTER Taste Daraufhin gelangen Sie...

Страница 52: ...olgende Bedeutungen Sichern Das aufgenommene Bild abspeichern Abbrechen Die Bearbeitung des Bildes abbrechen Men Zur ck zum Hauptmen Sichern W hlen Sie im Bearbeitungsmen mit den Tasten die Option Sic...

Страница 53: ...ck Sie k nnen dann den Dia bzw Negativ Halter zum n chsten Bild schieben oder das n chste Papierfoto einlegen und den Scan Vorgang wiederholen 5 7 3 Anpassen von Helligkeit und Farbe W hrend der Scan...

Страница 54: ...acht werden Dr cken Sie die Taste um das Bild horizontal von links nach rechts zu spiegeln Dr cken Sie die Taste um das Bild vertikal von oben nach unten zu spiegeln Hinweis Die eingestellte Spiegelun...

Страница 55: ...haben werden auf dem Bildschirm automatisch alle Bilder der Speicherkarte nacheinander in einem Abstand von etwa 2 Sekunden angezeigt Es werden nur solche Bilder wiedergegeben die durch den Multi Sca...

Страница 56: ...ie Einzelwiedergabe zu gelangen W hlen Sie nun mit den Tasten oder das Bild aus welches Sie bearbeiten m chten Dr cken Sie die ENTER Taste erneut um das Bearbeitungsmen angezeigt zu bekommen Die Symbo...

Страница 57: ...n Vorgehensweise k nnen Sie ein Bild mit der Option Drehen 90 um 90 Grad gegen den Uhrzeigersinn drehen Sichern Um ein gedrehtes Bild dauerhaft abzuspeichern wechseln Sie zun chst mit den Tasten auf d...

Страница 58: ...eut auf den Punkt L schen Kein Bild Wenn im Wiedergabemodus das letzte vorhandene Bild gel scht wurde so zeigt der Bildschirm das nebenstehende Bild als Hinweis darauf an dass kein Foto mehr vorhanden...

Страница 59: ...e MODE in das Hauptmen wechseln 5 9 Spracheinstellung Sie k nnen die Spracheinstellung der Men s jederzeit ndern W hlen Sie dazu im Hauptmen mit den Tasten den Punkt Sprache aus und best tigen diesen...

Страница 60: ...arte zu bertragen Verbinden Sie dazu den Multi Scanner ber das USB Kabel zun chst mit einem USB Anschluss des Computers und schalten das Ger t ein Im Hauptmen w hlen Sie dann mit den Tasten den Punkt...

Страница 61: ...Schritten Zun chst werden die Bilder in das Programm BlazePhoto eingelesen Diese Bilder k nnen Sie im n chsten Schritt mit verschiedenen Funktionen ver ndern So k nnen beispielsweise Bilder gedreht Ro...

Страница 62: ...latte durchsuchen ebenso Bilder von der Festplatte des Computers bernehmen Dabei durchsucht das Programm eigenst ndig die Festplatte nach vor handenen Bildern Wenn das Programm BlazePhoto bereits ge f...

Страница 63: ...g indem Sie nach jeder nderung jeweils OK anklicken Mit Reset verwerfen Sie die vorgenommenen nderungen wieder Die allgemeinen Werkzeuge erlauben es den Zuschnitt oder die Orientierung eines Bildes ab...

Страница 64: ...Anwendung der Funktion Verbessern wird eine automatische Anpassung der Farben eines Bildes durchge f hrt Dabei stehen verschiedene Arten der Anpassung zur Verf gung Dar ber hinaus stehen Ihnen weiter...

Страница 65: ...ie Daten ab Die so erzeugte Datei kann zusammen mit den Bilddateien direkt im Internet eingestellt werden 6 2 5 Verteilen In Ordner exportieren ber diese Funktion werden f r alle Bilder aus der Ablage...

Страница 66: ...n den H ndler bei dem das Produkt gekauft wurde Dies verhindert m gliche sch dliche Auswirkungen auf Umwelt und Gesundheit durch eine unsachgem e Entsorgung Auskunft erteilen die zust ndigen kommunale...

Страница 67: ...zulassen Dies schlie t St reinstreu ungen ein welche Beeintr chtigungen der Funktionsweise oder Betriebsst rungen verursachen k nnen Bei einer St rung des Radio und Fernsehempfangs durch dieses Ger t...

Страница 68: ...100 240V 50 60 Hz Ausgang 5 V 1A USB Schnittstelle USB 2 0 Verbindung Abmessungen HxBxT 220 mm H X 208 mm B X 147 mm T Gewicht ca 1200 Gramm 10 Technische Daten Hinweis Im Zuge von Produktverbesserung...

Страница 69: ...Modus 23 Entsorgung 33 EV Wert 20 Farbwerte ndern 20 Filmtyp 16 Foto einlegen 12 Fotoformat 17 Fotogr en 12 17 Garantie 33 Ger te bersicht 6 Hauptmen 14 Hauptmen aufrufen 20 26 Hauptmerkmale 1 Install...

Страница 70: ...rande qualit Votre d cision s est port e sur un Multi Scanner moderne avec un bon quipement technique et des accessoires correspondants Cet appareil est tr s facile manipuler Veuillez lire attentiveme...

Страница 71: ...arrage rapide 11 6 2 Menu principal 12 6 3 Enregistrer 13 6 3 1 Inverser 14 6 3 2 Ajuster la luminosit 14 6 3 3 Scanner et traiter 15 6 3 4 Scanner d autres photos 16 6 3 5 M moire pleine 16 6 4 Lectu...

Страница 72: ...mages 24 7 1 Installation 24 7 2 Fonctions de traitement 24 7 2 1 Importer des photos Imp Photos 25 7 2 2 Pr visualisation 26 7 2 3 Traitement 28 7 2 4 Cr er 28 7 2 5 Partager 29 8 limination 29 9 Gar...

Страница 73: ...rs d un orage avant de nettoyer l appareil et si des dysfonctionnements se produisent pendant le fonctionnement Lorsque le Multi Scanner est reli la prise lectrique d branchez le toujours en tirant su...

Страница 74: ...reil pour la ventilation Gardez suffisamment d espace par rapport aux sources de chaleur comme p ex des plaques de cuisson ou des fours Ne laissez pas tomber le Multi Scanner et ne le soumettez aucun...

Страница 75: ...SD SDHC et MMC 8 Touche de gauche 9 Touche de saisie ENTER 10 Touche de droite 11 Touche MODE 12 Fente pour supports de photo 13 Poussoir pour s lectionner le scan 14 cran couleur 6 1 cm TFT LCD 15 Su...

Страница 76: ...support de diapos dans la fente du Multi Scanner jusqu ce qu il s enclenche nette ment dans la premi re position Remarque Attention n introduisez pas le support de diapos par le c t gauche dans la fe...

Страница 77: ...duisez pas le support de n gatifs par le c t gauche dans la fente du scanner et ne sortez pas le support par le c t droit hors de l appareil Les dommages caus s de cette mani re ne sont pas couverts p...

Страница 78: ...photo dans la fente en haut du Multi Scanner cf photo Veillez ce que lors du scan des photos il n y ait aucun support de diapos ou de n gatifs dans le scanner Remarque Traitez les photos avec pr caut...

Страница 79: ...le c ble USB au bloc d alimentation USB branch une prise lectrique Appuyez sur la touche Marche Arr t pour mettre le Multi Scanner en marche Pour scanner suivez les instructions apparaissant sur l cr...

Страница 80: ...sque le scanner est mis en marche appara t alors sur l cran le menu principal du mode de scan choisir Vous pouvez tout moment sortir du sous menu et revenir ce menu principal avec la touche MODE Dans...

Страница 81: ...strement et d marrez celle ci en appu yant sur la touche ENTER Dans la prochaine tape la pr visualisation du scan affichage en direct de la photo s lectionn e est affich e Pendant la pr visualisation...

Страница 82: ...mauvais sens Appuyez sur la touche pour inverser horizontalement vers la gauche ou la droite la photo Appuyez sur la touche pour inverser verticalement vers le haut ou le bas la photo Remarque L inver...

Страница 83: ...a valeur s lectionn e et pour revenir la pr visualisation du scan appuyez de nouveau sur la touche ENTER 6 3 3 Scanner et traiter Pendant la pr visualisation du scan appuyez sur la touche SCAN pour sc...

Страница 84: ...t scann e est interrompu et on revient pr visualisation du scan Attention la photo scann e n est pas sauvegard e Menu Pour sortir du menu de traitement et revenir au menu principal s lectionnez Menu a...

Страница 85: ...tos d j scann es vous pouvez passer la lecture dans le menu principal Lorsque le scanner est en marche vous revenez tout moment dans le menu principal avec la touche MODE ou le symbole du menu L avec...

Страница 86: ...u suivante avec les touches et cet effet dans la partie sup rieure de l cran s affiche le nom du fichier de la photo actuelle au lieu du symbole de l affichage individuel 6 4 3 Menu de traitement Pour...

Страница 87: ...aitement et appuyez sur la touche ENTER Vous pouvez ensuite continuer de faire tourner la photo retourn e ou la sauvegarder De la m me mani re vous pouvez faire tourner une photo de 90 dans le sens in...

Страница 88: ...ent l option Effacer au moyen des touches et Apr s avoir appuy sur la touche ENTER la photo est effac e et la prochaine photo s affiche En m me temps la s lection passe automatiquement sur Terminer Po...

Страница 89: ...lm uniquement en mode scanner de films Avant de scanner des diapos ou des n gatifs en mode scanner de films il faut r gler le type de film pr sent Pour ce faire dans le menu principal avec les touches...

Страница 90: ...Multi Scanner passe ensuite directement en mode enregistrement 6 7 S lectionner le format des photos uniquement en mode scanner de photos En mode scanner de photos le Multi Scanner peut tre r gl sur...

Страница 91: ...glage de la taille de la photo En s lectionnant 5 m gapixels on obtient des photos avec 2 592 x 1728 9 x 13 cm 2 592 x 1 728 10 x 15 cm et 2 592 x 1 850 13 x 18 cm points Si les photos sont scann es a...

Страница 92: ...u sur un appareil de lecture de cartes Vous pouvez aussi raccorder directement le Multi Scanner un ordinateur pour transf rer les photos depuis la m moire interne ou depuis la carte m moire introduite...

Страница 93: ...t d abord les photos sont lues par le programme BlazePhoto Dans l tape suivante ces photos peuve nt tre modifi es avec diff rentes fonctions Ainsi par exemple vous pouvez retourner des photos supprime...

Страница 94: ...up rer des photos depuis le disque dur d un ordinateur Pour ce faire le programme recherche de lui m me les photos se trouvant sur le disque dur Si le programme BlazePhoto est d j ouvert et que vous t...

Страница 95: ...disponibles Effectuez les modifications en cliquant sur OK apr s chaque modification Avec Effacer vous rejetez les modifications effectu es Les outils principaux permettent de d couper et d orienter u...

Страница 96: ...ttet d une photo Am liorer en utilisant la fonction Am liorer on effectue une adaptation automatique des couleurs d une photo Il existe diff rents types d adaptation De plus vous disposez d autres out...

Страница 97: ...peut tre mis directement sur Internet avec les fichiers de photos 7 2 5 Partager Exporter dans un dossier avec cette fonction il se produit une adaptation de la r solution et du format du fichier pour...

Страница 98: ...ues dans l appareil sont remises au retraitement des d chets pour viter toute pollution de l environnement Pour avoir plus de renseignements veuillez vous adresser aux entreprises locales d limination...

Страница 99: ...t de diffusions parasites Ceci englobe les diffusions parasites qui peuvent causer des perturbations du fonctionnement ou des dysfonctionnements En cas de panne de r ception radio ou t l visuelle caus...

Страница 100: ...240V 50 60 Hz sortie 5 V 1A Interface USB Prise USB 2 0 Dimensions H x L x P 220 cm H x 208 mm L x 147 mm P Poids Environ 1200 grammes 11 Donn es techniques Remarque Du fait des am liorations du produ...

Страница 101: ...e photos 6 10 Logiciel de traitement 24 M moire interne 10 M moire pleine 16 Menu de traitement BlazePhoto 24 Menu de traitement Enregistrement 14 Menu de traitement Lecture 17 Menu principal 11 Mode...

Страница 102: ......

Отзывы: