background image


7


1.


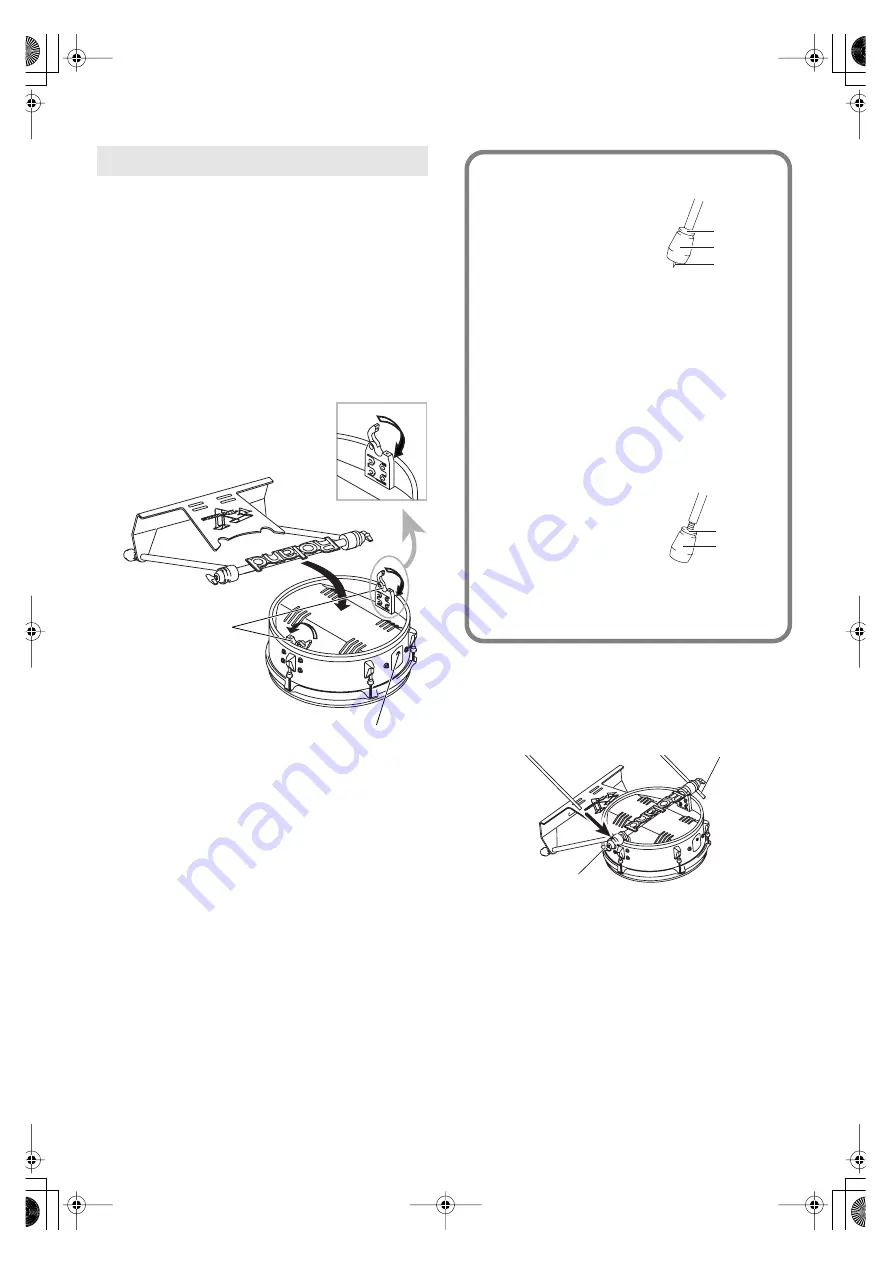
Place the KD-120 pad, with the head surface facing 
downward, on a flat surface such as the floor.


2.


Use the included drum key to loosen and remove 
the bolts for the brackets on the back of the KD-120 
pad.


3.


Mount the stand on the brackets so that the output 
jack for the KD-120 pad faces up.


Use the bolts you removed earlier to secure the KD-120 pad 

to the stand, tightening the bolts with the included drum 

key.


fig.08.e


* Take care not to pinch your fingers between the KD-120 pad 

and the stand plate.


4.


Adjust the ends of the legs to match the location 
where you’re installing the KD-120.


Adjust to use the spike legs when installing on carpeting or 

other soft surfaces, or the rubber legs when installing on 

flooring or other hard surfaces.

When shipped from the factory, the stand is adjusted for 

using the rubber legs. If you’re using the rubber legs, proceed 

to step 5 on the next page.


5.


Loosen the T-bolts for the stand and mount the 
legs on the stand.


Install the legs as shown in the figure so that the ends of the 

legs protrude by about 2 cm.


fig.11.e


6.


Tighten the T-bolts to secure the legs to the stand.


7.


Lift the KD-120 and place the stand and the four 
legs upright.


8.


Adjust the angle of the head surface so that it’s at a 
right angle to the floor.


Use the included drum key to loosen the bracket bolts you 

tightened in step 3, and adjust the angle of the KD-120 pad 

so that the head surface is at a right angle to the floor.


9.


Attach the included plastic beater on your kick 
pedal.


Assembling the KD-120

Output jack

Bracket

Adjusting for the Spike Legs

1.

Loosen the leg nut.

2.

Turn the rubber foot to 
adjust so that the spike 
portion sticks out from 
the rubber foot. Adjust the length of the spike 
to suit the location where installing and the 
length you prefer.

* The tip of the spike is sharp. Handle it with care.

3.

Tighten the nut to secure the rubber foot in 
place and keep it from loosening.

* When using on flooring, the spike legs may damage 

the floor. Adjust to use the rubber legs.

Adjusting for the Rubber Legs

1.

Loosen the leg nut.

2.

Turn the rubber foot to 
adjust so that the spike 
portion does not stick 
out from the rubber foot.

3.

Tighten the nut to secure the rubber foot in 
place and keep it from loosening.

Nut

Rubber foot

Spike

Nut

Rubber foot

Extend the leg by about 2 cm.

Mount the 
legs on the stand.

T-bolt

TD-12KX_e.fm 7 ページ 2009年11月10日 火曜日 午後12時6分

Содержание V-Drums TD-12KX

Страница 1: ...Owner s Manual TD 12KX_e fm 1...

Страница 2: ...ildren an adult should provide supervision until the child is capable of following all the rules essential for the safe operation of the unit 014 Do not drop the unit 104 Try to prevent cords and cabl...

Страница 3: ...ce a pad or component can fall unexpectedly Add Do not apply excessive force to the sensor and on the KD 120 the cushion located below the center of the head of the KD 120 PD 105 and PD 85 Doing so ca...

Страница 4: ...Additional Precautions 553 Use a reasonable amount of care when using the unit s buttons sliders or other controls and when using its jacks and connectors Rough handling can lead to malfunctions 554 N...

Страница 5: ...n changing the parts or cables for repairing Attach the stand holder included with the drum stand MDS 12X to the TD 12 Using the screws attached to the bottom panel attach the holder so the unit is or...

Страница 6: ...on Be sure to tighten each tuning bolt a little at a time as described in the above explanation 4 Adjust bolt 2 so that the tension is the same as the tension of 1 5 Next adjust 3 and 4 and 5 and 6 in...

Страница 7: ...e T bolts to secure the legs to the stand 7 Lift the KD 120 and place the stand and the four legs upright 8 Adjust the angle of the head surface so that it s at a right angle to the floor Use the incl...

Страница 8: ...xpendable item that eventually will wear out and need to be replaced Replace the head when the following occurs The head surface is torn Slack portions remain in the head even after the head tension i...

Страница 9: ...lutions each thus tightening them Tighten each tuning bolt one by one observing the numerical order shown in the figure When attaching the PD 105 to the mount be sure to tighten the stand fixing screw...

Страница 10: ...ill make it impossible to tension the head evenly and will cause malfunctions such as failure to accurately detect the striking location fig PD 85 Head2 2 Tension the head evenly while checking the fe...

Страница 11: ...from the hoop as you play 2 Remove the hoop 3 Remove the old head 4 Place the new head on the frame 5 Place the hoop onto the head 6 Pass the tuning bolts through the washers then attach them to the...

Страница 12: ...iagram bolt should be opposite the output jacks 4 Tighten the wing nut to obtain the desired movement Use the included felt washer and the wing nut Double sounding may occur if the wing nut is loose D...

Страница 13: ...anual p 20 and p 52 Adjust the VH 11 s offset See the VH 11 Owner s Manual p 6 Do not pull or stretch the cables too tight Connecting the Pads and the Cymbals T1 T2 PD 85 PD 85 T3 RD BOW BELL RDE BOW...

Страница 14: ...of the pad Placing your hand on the head center area of the pad might prevent the cross stick sound from being played properly Brush Sweep You can express a sweep sound using brushes brush sweeps When...

Страница 15: ...0 D x 500 H mm 19 5 16 W x 15 3 4 D x 19 11 16 H inches Weight 7 7 kg 17 lbs Accessory Beater PD 105 V Pad Pad size 10 inches Triggers 2 Head Rim Dimensions 280 W x 360 D x 112 H mm 11 1 16 W x 14 3 1...

Страница 16: ...ales J E Olear y ESQ Manduvira Asuncion PARAGUAY TEL 595 21 492147 PERU Audionet Distribuciones Musicales SAC Juan Fanning 530 Mira ores Lima Peru TEL 511 4461388 TRINIDAD AMR Ltd Ground Floor Maritim...

Отзывы: