background image

®ÂØÒňÎ

Supplemental Notes

JV-2080 Frequently Asked Questions

The JV-2080 has eight expansion slots for SR-JV80

Expansion Boards. Some of these expansion boards (e.g.,

SR-JV80-10 Bass & Drums, SR-JV80-11 Techno, SR-JV80-

12 Hiphop) have phrase/beatloops that are set to play at a

specified tempo. The JV-2080 allows each tone [1]-[4] used

in a Patch to be synced to a sequencer’s clock so that the

tempos match. This ‘sync’ feature enables you to manipu-

late beatloop tempos to match the tempo of your song. Use

the following procedure to set the JV-2080 to sync a

phrase/beatloop to an external MIDI clock source:
1) Hold PERFORM and press PATCH.

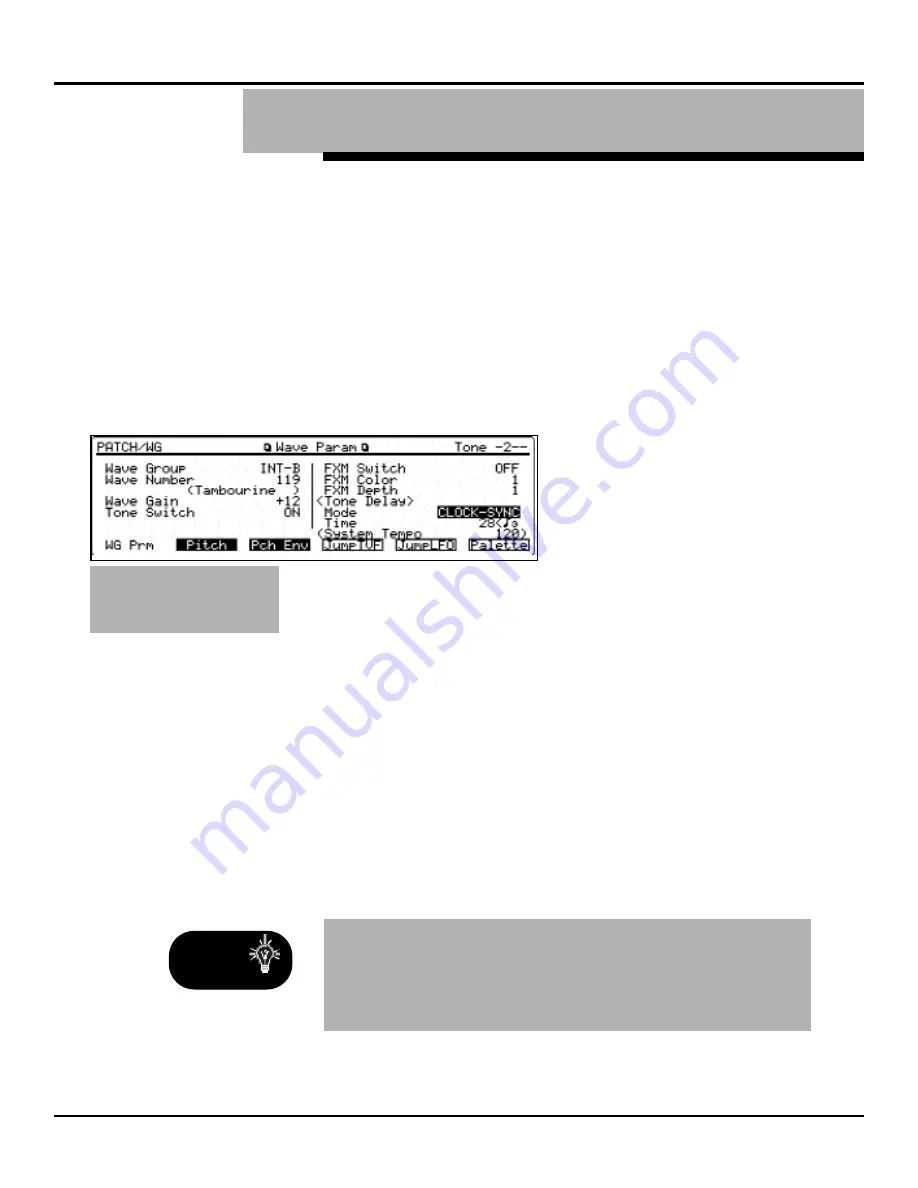
2) Press F2[WG] to select the Waveform Display page.

3)

Press F1[WG Prm] to 

select the Waveform 

Parameter page (see 

Fig.6).

4)

Use the CURSOR buttons 

to select a Tone [1]-[4] 

which uses a wave 

(phrase/beatloop) that has

a tempo (BPM) display.

5) Use the VALUE dial to set the Tone Delay Mode to 

“TEMPO-SYNC.”

6) Press PERFORM.

7) Press F1[COMMON] to display the Performance 

Common parameters.

8) Use the CURSOR buttons to select “Clock Source.”

9) Use the VALUE dial to select “SYSTEM.”

10) Press SYSTEM.

11) Press F1[SETUP] to display the global system 

parameter page.

12) Use the CURSOR buttons to select “Clock Source.”

13) Use the VALUE dial to set the Clock Source to MIDI.

©1999 Roland Corporation U.S.        JV-2080 Frequently Asked Questions    

Faxback # 21074

Page 8

F

Fiig

g.. 


6

6

W

Wa

avve

effo

orrm

m

P

Pa

arra

am

me

ette

err 


P

Pa

ag

ge

e

VII.

How do I sync Phrase/Beatloops to a 

Sequencer (External Clock Source)?

T

Tiip

p

IItt 


iiss 


a


g

go

oo

od


iid

de

ea


tto


ssa

avve


tth

hiiss 


P

Pa

attc

ch


tto


a


U

Usse

err

llo

oc

ca

attiio

on

n,, 


a

ass 


d

de

etta

aiille

ed


iin


tth

he


p

prre

evviio

ou

uss 


sse

ec

cttiio

on

n

((““S

Syyn

nc

ciin

ng


tth

he


L

LF

FO

O”” 


-- 


p

pa

ag

ge


7

7)),, 


ffo

orr 


ffu

uttu

urre


u

usse

e.. 


Содержание JV-2080

Страница 1: ...wner s Manual We will cover the following topics in this document I How do I set up a Performance for sequencing II How do I select Patches via MIDI III How do I create a custom drum kit IV How do I p...

Страница 2: ...t Parts at the same time see Fig 1 6 Use the CURSOR buttons to select the desired Part 1 16 7 Set the MIDI transmit channel on your keyboard to match the number of the Part you want to hear For exampl...

Страница 3: ...ig g 2 2 B Ba an nk k S Se el le ec ct t M Me es ss sa ag ge es s 80 0 0 127 10 240 User INT 1 128 82 0 0 127 10 496 User CRD 1 128 81 0 0 127 10 368 Presets A 1 128 81 1 0 127 10 369 Presets B 1 128...

Страница 4: ...Press F6 EXECUTE to store the current settings to a User location This will erase the settings for the User kit selected in step 8 and replace them with the current settings If you do not want to eras...

Страница 5: ...he external device so that pressing the pedal transmits Foot Controller messages CC 4 2 Press PATCH 3 Press PRESET 4 Press the TONE SWITCH 1 button under USER 5 Use the VALUE dial to select PR A 54 Ro...

Страница 6: ...the VALUE dial to specify the rate speed of the LFO cycle e g h q e 9 Press F1 for COMMON 10 Press F1 for GENERAL 11 Use the CURSOR buttons to select Clock Source 12 Use the VALUE dial to set the Cloc...

Страница 7: ...ct a Patch that uses external LFO sync as described previously 2 Press PERFORM 3 Press F1 Common 4 Use the CURSOR buttons to select Clock Source 5 Use the VALUE dial to set the Clock Source to SYSTEM...

Страница 8: ...at has a tempo BPM display 5 Use the VALUE dial to set the Tone Delay Mode to TEMPO SYNC 6 Press PERFORM 7 Press F1 COMMON to display the Performance Common parameters 8 Use the CURSOR buttons to sele...

Страница 9: ...Use the VALUE dial to select e an eighth note value 6 Use the CURSOR buttons to select Delay Right 7 Use the VALUE dial to select e an eighth note value 8 Use the CURSOR buttons to select Delay Left 9...

Страница 10: ...the Performance 10 Press EXIT twice to return to Performance Play Mode Once the Patch effects settings have been copied to the current Performance we need to ensure that Patches assigned to the desir...

Страница 11: ...ssors MIX Routes the sound to the MIX L R outputs without using the EFX insert processors Fx A Routes the sound to MIX L R outputs with the EFX insert A processor Fx B Routes the sound to MIX L R outp...

Страница 12: ...rt 1 And if we change the Patch assigned to Part 1 to an organ Patch the insert effect for Part 1 will change to match the default settings of the new Patch probably a Rotary effect Use the following...

Страница 13: ...or DIR2 depending on which set of direct outputs you wish to use The selected Part will use an insert effect EFX routed through the direct output 1 2 Certain effects parameters can be modified in real...

Страница 14: ...ur keyboard to transmit controller 16 to the JV 2080 it will con trol the rotation speed of the Rotary effect 1999 Roland Corporation U S JV 2080 Frequently Asked Questions Faxback 21074 Page 14 F Fi...

Страница 15: ...ups clearly that will make it easier to refer ence them for future use Use the following procedure to perform a Data Transfer of all temporary data to an external MIDI sequencer 1 Press UTILITY 2 Pres...

Страница 16: ...team here at Roland U S 1999 Roland Corporation U S JV 2080 Frequently Asked Questions Faxback 21074 Page 16 Supplemental Notes JV 2080 Frequently Asked Questions Get Connected For the latest info on...

Отзывы: