12
Patch Mode
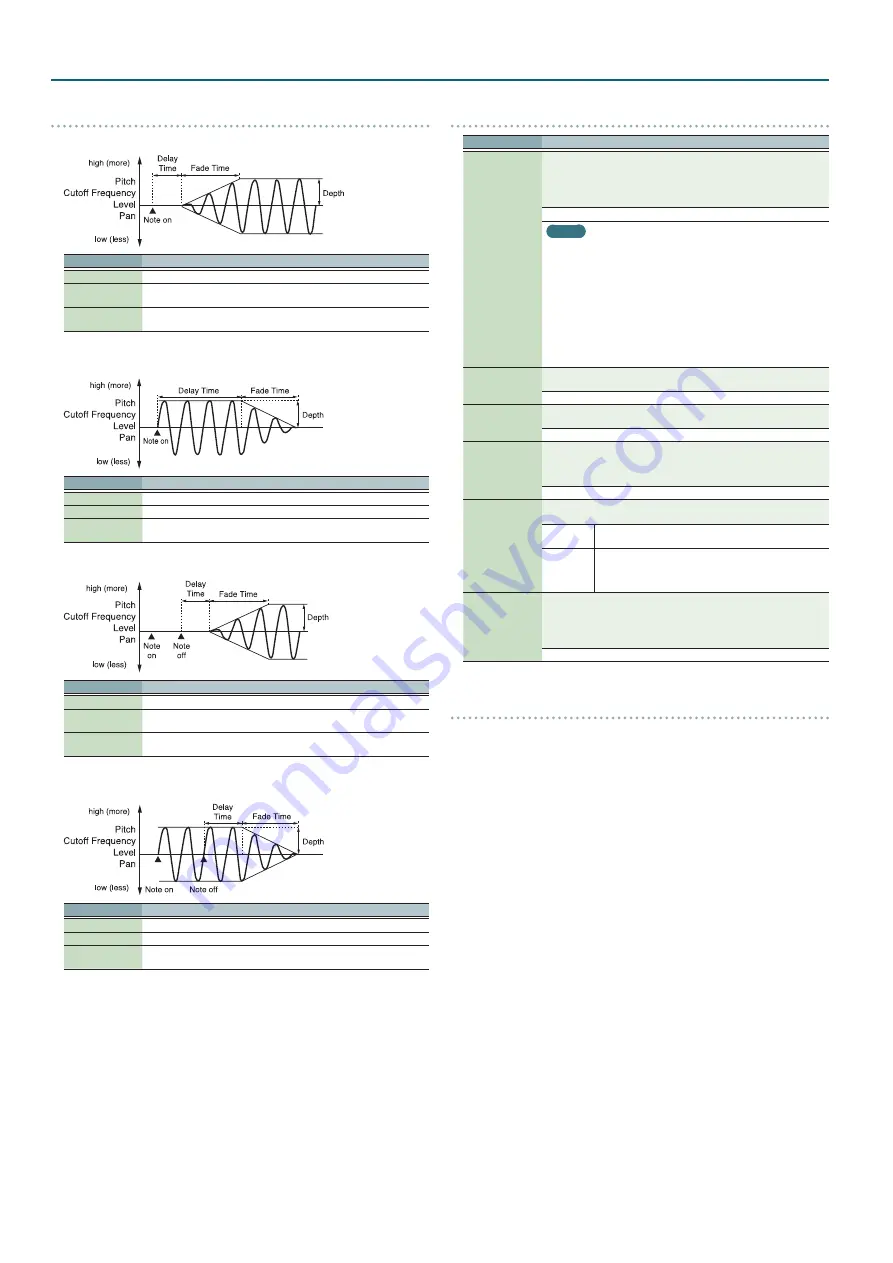
How to Apply the LFO
Apply the LFO gradually after the key is pressed
Parameter
Value/Explanation
Fade Mode
ON <
Delay Time
The time from when the keyboard is played until the LFO begins to be
applied.
Fade Time
The time over which the LFO amplitude will reach the maximum after the
Delay Time has elapsed.
Apply the LFO immediately when the key is pressed, and then gradually begin to
decrease the effect
Parameter
Value/Explanation
Fade Mode
ON >
Delay Time
The time that the LFO will continue after the keyboard is played.
Fade Time
The time over which the LFO amplitude will reach the minimum after the
Delay Time has elapsed.
Apply the LFO gradually after the key is released
Parameter
Value/Explanation
Fade Mode
OFF <
Delay Time
The time from when the keyboard is released until the LFO begins to be
applied.
Fade Time
The time over which the LFO amplitude will reach the maximum after the
Delay Time has elapsed.
Apply the LFO from when the key is pressed until it is released, and gradually begin
to decrease the effect when the key is released
Parameter
Value/Explanation
Fade Mode
OFF >
Delay Time
The time that the LFO will continue after the keyboard is released.
Fade Time
The time over which the LFO amplitude will reach the minimum after the
Delay Time has elapsed.
CTRL
Parameter
Value/Explanation
Env Mode
When a loop waveform is selected, the sound will normally continue as
long as the key is pressed. If you want the sound to decay naturally even if
the key remains pressed, set this to “NOSUS.”
*
If a one-shot type waveform is selected, it will not sustain even if this
parameter is set to “SUST.”
NOSUS, SUST
MEMO
5
One-shot:
These waveforms contain sounds that have short decays. A
one-shot waveform records the initial rise and fall of the sound. Some
of the JUNO-DS’s one-shot waveforms are sounds that are complete
in themselves, such as percussive instrument sounds. The JUNO-DS
also contains many other one-shot waveforms that are elements of
other sounds. These include attack components such as piano-hammer
sounds and guitar fret noises.
5
Looped:
These waveforms include sounds with long decays as well
as sustained sounds. Loop waveforms repeatedly play back (loop) the
portion of the waveform after the sound has reached a relatively steady
state. The JUNO-DS’s looped waveforms also include components of
other sounds, such as piano-string resonant vibrations and the hollow
sounds of brass instruments.
Rx Bender
For each tone, specify whether MIDI Pitch Bend messages will be received
(ON), or not (OFF).
OFF, ON
Rx Expression
For each tone, specify whether MIDI Expression messages will be received
(ON), or not (OFF).
OFF, ON
Rx Hold-1
For each tone, specify whether MIDI Hold-1 messages will be received (ON),
or not (OFF).
*
If “NOSUS” is selected for Env Mode parameter, this setting will have no
effect.
OFF, ON
Rx Pan Mode
For each tone, specify how pan messages will be received.
*
The channels cannot be set so as not to receive Pan messages.
CONT
Whenever Pan messages are received, the stereo position of
the tone will be changed.
K-ON
The pan of the tone will be changed only when the next
note is played. If a pan message is received while a note is
sounding, the panning will not change until the next key is
pressed.
Redamper Sw
You can specify, on an individual tone basis, whether or not the sound
will be held when a Hold 1 message is received after a key is released, but
before the sound has decayed to silence. If you want to sustain the sound,
set this “ON.” When using this function, also set the Rx Hold-1 “ON.” This
function is effective for piano sounds.
OFF, ON
Matrix control
Ordinarily, if you wanted to change tone parameters using an external MIDI device,
you would need to send System Exclusive messages—MIDI messages designed
exclusively for the JUNO-DS. However, System Exclusive messages tend to be
complicated, and the amount of data that needs to be transmitted can get quite
large.
For that reason, a number of the more typical of the JUNO-DS’s tone parameters
have been designed so they accept the use of Control Change (or other) MIDI
messages for the purpose of making changes in their values. This provides you with
a variety of means of changing the way patches are played. For example, you can
use the Pitch Bend lever to change the LFO cycle rate, or use the keyboard’s touch
to open and close a filter.
The function which allows you use MIDI messages to make these changes in
realtime to the tone parameters is called the Matrix control. Up to four Matrix
Controls can be used in a single patch.
To use the Matrix control, specify which MIDI message (Source) will be used to
control which parameter (Dest), and how greatly (Sens), and the tone to which the
effect is applied (Switch).


