background image

10

3.5A  OSCILLATING SPINDLE SANDER  

 ENG

TECHNICAL DATA

Voltage: 120V~60Hz

Amps: 3.5A

No load speed: 

2000rpm

Protection class: 

 /II

Table size: 

14-1/2˝ x 11-3/8˝

Spindle stroke: 

5/8˝

Oscillations per minute: 

58 opm

Max sanding height: 

3-5/8˝

Weight: 34Ibs

OPERATING INSTRUCTIONS


NOTE:

 Before using the tool, read the 

instruction book carefully.

1. UNPACKING

When unpacking, check to make sure that the item is 

intact and undamaged.

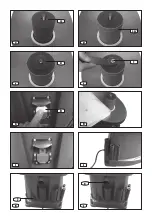
2. INSTALLING AND CHANGING SANDING SLEEVES (SEE 

A-F)


Remove the plug from the socket before 

carrying out any adjustment, servicing or 

maintenance.

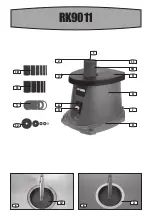
1) To install a Sanding Sleeve, you must first locate 

the corresponding Sanding Spindle and Drum Washer 

(12). 

EXAMPLE: 

The 3/4” Sanding Sleeve goes with the 3/4” 

Rubber Sanding Drum and the 3/4” Table Insert

2) First place the Drum Washer (12) over the Spindle, 

then place the Table Insert (3) on the worktable in the 

round recessed area. Next place the Rubber Sanding 

Drum drum (11) over the spindle.

 (See A, B, C)

NOTE:

 The 1/2” Sanding Sleeve is the only sanding 

sleeve that goes directly onto the spindle.

3) Place the Sanding Sleeve (10) over the rubber 

Sanding Drum, and put the correct size spindle 

washer (a) on top of that. Finally thread the hex nut 

(1) Onto the Spindle and secure it by using a wrench. 

(See D, E, F)

3. OPERATION (SEE G, H, I)

1) Turn the sander on by using the Switch (5). Always 

run the sander for a few seconds before contacting 

the workpiece. 

(See G)

2) Contact the workpiece with minimal pressure. If the 

spindle sander is not removing enough material, try 

a coarser grit sanding sleeve. Keep a firm grip on the 

stock material as you move the stock material into the 

spinning sanding sleeve.

3) Occasionally check the sanding sleeves for tears, 

wear or fraying. Replace if necessary. Stop using if 

sanding sleeve is damaged.

4) When finished working, turn off the switch. Remove 

the safety lock (b) and store it out of the reach of 

children.

 (See G, I)

MAINTAIN TOOLS WITH CARE


Remove the plug from the socket before 

carrying out any adjustment, servicing or 

maintenance.

1. STORING THE EXTRA RUBBER SANDING DRUMS:

The rubber sanding drums, which are not being used, 

can be stored on the rubber sanding drum storage 

area (7). (See J, K)

2. DUST EXTRACTION PORT (SEE L)

The Dust Extraction Port (C) maintains a clean 

working environment.  Attach a dust bag or a shop 

vac to the dust extraction port.

Your power tool requires no additional lubrication or 

maintenance.

There are no user serviceable parts in your power 

tool. Never use water or chemical cleaners to clean 

your power tool. Wipe clean with a dry cloth. Always 

store your power tool in a dry place. Keep the motor 

ventilation slots clean. Keep all working controls free 

of dust.

If the supply cord is damaged, it must be replaced 

by the manufacturer, its service agent or similarly 

qualified persons in order to avoid a hazard.

Содержание ShopSeries RK9011

Страница 1: ...RK9011 3 5A OSCILLATINGSPINDLESANDER PAGE5 ENG 3 5A LIJADORADEEJEOSCILANTE PAGE11 ESP 3 5A PONCEUSE CYLINDRE PAGE19 FRE...

Страница 2: ...producto y de que estar completamente satisfecho con su compra Lea cuidadosamente las instrucciones de seguridad y de operaci n para obtener mayor informaci n acerca de c mo utilizar ste producto cor...

Страница 3: ...1 2 11 3 10 11 3 12 4 5 10 9 8 7 12 3 6 B A RK9011...

Страница 4: ...12 11 a b 7 c 3 10 1 C E G I B D F H J A K L...

Страница 5: ...HEX NUT TABLE INSERT SWITCH FRAME ON OFF SWITCH BASE RUBBER SANDING DRUM STORAGE AREA HOUSING WORKTABLE SANDING SLEEVE RUBBER SANDING DRUM DRUM WASHER Not all the accessories illustrated or described...

Страница 6: ...ersonnel if the grounding instructions are not completely understood or if in doubt as to whether the tool is properly grounded Use only 3 wire extension cords that have 3 prong grounding plugs and 3...

Страница 7: ...he gage number the heavier the cord 10 WEAR PROPER APPAREL Do not wear loose clothing gloves neckties rings bracelets or other jewelry which may get caught in moving parts Nonslip footwear is recommen...

Страница 8: ...wing grinding drilling and other construction activities contain chemicals known to cause cancer birth defects or other reproductive harm Some examples of these chemicals are a Lead from lead based pa...

Страница 9: ...ls WARNING Use of this tool can generate and or disburse dust which may cause serious and permanent respiratory or other injury Always use NIOSH OSHA approved respiratory protection appropriate for th...

Страница 10: ...sing the Switch 5 Always run the sander for a few seconds before contacting the workpiece See G 2 Contact the workpiece with minimal pressure If the spindle sander is not removing enough material try...

Страница 11: ...RRUPTOR INTERRUPTOR ENCENDIDO APAGADO BASE REA DE ALMACENAMIENTO DE LOS TAMBORES DE LIJADO DE GOMA COMPARTIMENTO DEL MOTOR MESA MANGAS DE LIJA TAMBORES DE LIJADO DE GOMA ARANDELAS DE TAMBOR No todos l...

Страница 12: ...rgas el ctricas El conductor con aislamiento que tiene una superficie exterior de color verde con o sin franjas amarillas es el conductor de conexi n a tierra del equipo Si es necesario reparar o reem...

Страница 13: ...ue las llaves de ajuste no se encuentren en lugar de la herramienta antes de encenderla 3 Mantenga limpia el rea de trabajo Las reas de trabajo y bancos desordenados podr an causar accidentes 4 No uti...

Страница 14: ...as partes m viles la sujeci n de las partes m viles la rotura de partes el montaje y cualquier otra condiciones que podr a afectar el funcionamiento de la herramienta Cualquier guarda o parte que se e...

Страница 15: ...do CCA por sus siglas en ingl s que puede ser t xico Al lijar estos materiales se deben extremar las precauciones para evitar una inhalaci n y minimizar el contacto con la piel INSPECCI N MANTENIMIENT...

Страница 16: ...LAS MANGAS DE LIJA VER A F Extraiga el enchufe de la toma el ctrica antes de llevar a cabo cualquier reparaci n o ajuste 1 Para instalar la manga de lija deber identificar primero el eje de lijado e a...

Страница 17: ...xtraiga el enchufe de la toma el ctrica antes de llevar a cabo cualquier reparaci n o ajuste 1 ALMACENAMIENTO DE TAMBORES DE LIJADO DE GOMA ADICIONALES Es posible almacenar en el rea de almacenamiento...

Страница 18: ...INTERRUPTEUR INTERRUPTEUR MARCHE ARR T BASE LOGEMENT POUR LE TAMBOUR DE PON AGE EN CAOUTCHOUC CAISSON MOTEUR TABLE MANCHONS DE PON AGE TAMBOURS DE PON AGE EN CAOUTCHOUC RONDELLES DE TAMBOUR Lesaccesso...

Страница 19: ...te prises correctement mise la terre Une mauvaise connexion du conducteur de mise la terre de l quipement peut entra ner un risqu de d charge lectrique Le conducteur avec isolant dont la surface ext r...

Страница 20: ...surface de travail 6 Prenez toutes les pr cautions n cessaires pour que les enfants n aient pas acc s votre atelier fermez avec des cadenas mettez des disjoncteurs et retirez les clefs de d marrage d...

Страница 21: ...rde ou toute autre pi ce endommag e doit tre r par e ou remplac e 20 Direction de l alimentation du mat riel N alimentez les pi ces ouvrer que dans le sens contraire de la rotation de la lame ou du co...

Страница 22: ...t riaux il vous faudra prendre d avantage de pr cautions pour viter de respirer ces substances et r duire le contact avec la peau INSPECTION MAINTENANCE ET NETTOYAGE AVANT CHAQUE UTIISATION inspectez...

Страница 23: ...ez la prise de la prise murale avant d effectuer n importe quel travail de r glage de r paration ou d entretetien 1 Pour installer un manchon de pon age vous devez tout d abord rep rer le cylindrre de...

Страница 24: ...I PRENEZ SOIN DE VOS OUTILS ET ENTRETENEZ LES BIEN Retirez la prise de la prise murale avant d effectuer n importe quel travail de r glage de r paration ou d entretetien 1 RANGEMENT DES TAMBOURS DE PO...

Страница 25: ......

Страница 26: ......

Страница 27: ......

Страница 28: ...Copyright 2016 Positec All Rights Reserved Derechos reservados 2016 Positec Todos los derechos reservados Copyright 2016 Positec Tous droits r serv s...

Отзывы: