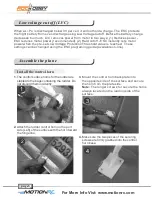
Roc Hobby Beechcraft Скачать руководство пользователя страница 7

page3

Kit inspection

Caution:

 All instructions and warnings must be followed exactly. Mishandling of Li-Po 

batteries can result in fire, personal injury, or property damage.
  

 Battery warning: 

  By handling, charging or using the included Li-Po battery 
   you assume all risks associated with lithium batteries.
   If at any time the batteries begin to swell, or balloon, discontinue use immediately!
   Charging or discharging a swelling or ballooning battery can result in fire.
   Always store the batteries at room temperature in a dry area to extend the life of 
   the battery. Always transport or temporarily store the battery in a temperature range of

o

   40-120 F. Do not store battery or model in a car or in direct sunlight. If stored in a hot car,

   the battery can be damaged or even catch fire.
   Never use a Ni-Mh charger. Failure to charge the battery with a compatible charger may
   cause fire resulting in personal injury and property damage.
   Never discharge Li-Po cells to below 3V.
   Never leave charging batteries unattended.
   Never charge damaged batteries.   


BC-3S10

 Balance Charger

To correctly use the charger, please read the instructions before use.

The Battery Charger included with your aircraft is designed to safely charge the Li-Po battery, 

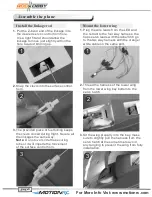
Charging the flight battery

RTF kits come with a DC balancing charger. You must charge the battery with 
a Li-Po specific charger only (such as the included 

BC-3S10 

DC charger). When charging

the battery, make certain the battery is on a heat-resistent surface, charge the battery 
before assembly of the airplane. Install the fully charged battery to perform control tests
and binding.

Charging the Flight Battery

Before starting to build, inspect the parts to make sure they are acceptable quality. If any
parts are missing or are not in good shape or acceptable quality, or if you need assistance
with setup and assembly, please feel free to contact Motion RC. Please write down the
name of the parts when you are reporting defective or missing of them.
Motion RC Product Support
ADDRESS: 28W039 Commercial Ave, Unit 8
                     Lake Barrington, IL 60010
Tel:  224-633-9090
Email: [email protected]
Web

:

www

.

motionrc.com 

For More Info Vist: www.motionrc.com

Содержание Beechcraft

Страница 1: ...Email info motionrc com Http www motionrc com...

Страница 2: ...Beechcraft...

Страница 3: ...rol This interference can cause momentary loss of control so it is advisable to always keep a safe distancein all directions around your model as this margin will help avoid collisions or injury Age R...

Страница 4: ...flying 20 Find a suitable flying site Perform the range check of your plane Monitor your flight time Flying course 21 Take off Flying Landing Maintenance Troubleshooting 22 AMA 23 Get your model ready...

Страница 5: ...tor the canopy the electronic parts ESC 2 Main wing set The top wing and the lower wing 3 Vertical stabilizer assembly 4 Horizontal stabilizer with the elevator 5 Propeller and spinner 6 Spare parts b...

Страница 6: ...h clevis KK 115 Decal Sheet KK 116 Motor Shaft KK 201 Electronic Retract KK 202 Motor D3536 KV 850 KK 203 9g Servo For flaps KK 204 9g Servo With arm KK 205 ESC 35A 4A SBEC KK 206 Battery 11 1v 1800mA...

Страница 7: ...ing batteries unattended Never charge damaged batteries BC 3S10 Balance Charger To correctly use the charger please read the instructions before use The Battery Charger included with your aircraft is...

Страница 8: ...ll not start and the charge LED will shine 2 If the voltage of one battery or some batteries is lower than 0 7V charging will not start If the voltage of the first battery of a 3S battery pack is lowe...

Страница 9: ...n t connected correctly Please check the polarity and reconnect adapter 2 Charging abruptly stops and tries to restart constantly during charging Output power of the adapter is not sufficient please r...

Страница 10: ...uide available on line Low voltage cut off LVC Assemble the plane Install the control horn 1 The control surface horns for the rudder are stapled to the bags containing the rudder Do not discard them...

Страница 11: ...side of the stabilizer mount the horn on the opposite side 7 Secure the control horns the same with the rudder 8 The control horn and the linkage rods for the main wing are contained in the bag with t...

Страница 12: ...abel Ch6 go to the two way harness with the orange white cable on the same port 3 The provided piece of fuel tubing keeps the clevis closed during flight Secure all the linkages the same way Note Do n...

Страница 13: ...ing to position the struts Note Not any glue are allowed to use in this step 1 Thread the aileron leads from the top wing saddle to the receiver hatch before sliding the top wing into place 3 Apply gl...

Страница 14: ...tapping screws 1 Apply glue to the horizontal top slot where it fits with the vertical fin 2 Insert the vertical fin into place Make sure the two stabilizer are perpendicular to each other Adjust any...

Страница 15: ...glue to the tail slot where it fits with the horizontal stabilizer 2 Slide the assembly into place as the picture shows 3 Make sure the horizontal stabilizer is parallel to the wing Adjust any misalig...

Страница 16: ...ervo hatch Make sure the wires do not interfere with the servo arm moving path Receiver Throttle Channel 1 Aile Channel 2 Elev Channel 3 Thro Channel 4 Rudd Channel 5 Gear Aux 1 2 3 Aileron Elevator 4...

Страница 17: ...page13 Assemble the plane 3 Slide the battery all the way into the hatch in front of the cockpit and snap in the shield 3 2 3 For More Info Vist www motionrc com...

Страница 18: ...ake switched off and we recommended that the sky trainer be flown with the brake off However the brake could be accidentally switched on if the motor battery is connected to the ESC while the throttle...

Страница 19: ...anual instructs you to do so Tips Make sure all control sticks on your radio are in the neutral position rudder elevator ailerons and the throttle in the OFF position Make sure both ailerons move up a...

Страница 20: ...to increase control surface travel and increase the aerobatics of the airplane 4 Align aileron and flap with the wing root by turning the clevis clockwise and counterclockwise on the linkage carefull...

Страница 21: ...The first time you use high rates be sure to fly at low to medium speeds High rates as listed are only for EXTREME maneuvering 1 The motor should rotate counter clockwise when viewing the plane from t...

Страница 22: ...pring hook and hook the springs the top wing root eyelets Note Close the hook which connect with the wire using a needle nose pliers and make sure the wire is tension enough to hook firmly on the eyel...

Страница 23: ...leading edge of the main wing as shown with the battery pack installed Mark the location of the CG on top of the wing 2 When balancing your model support the plane at the marks made on the bottom of t...

Страница 24: ...are securely connected to the receiver and the transmitter batteries have a good connection Find a flying site clear of buildings trees power lines and other obstructions Until you know how much area...

Страница 25: ...e wind and fly down to the ground Fly the airplane down to the ground using 1 4 1 3 throttle to keep enough energy for proper flare Before the model touches down always fully decrease the throttle to...

Страница 26: ...not respond to the throttle but responds to other controls ESC is not armed Throttle channel is reversed Lower throttle stick and throttle trim to lowest settings Reverse throttle channel on transmitt...

Страница 27: ...nd a spotter must be used when appropriate AMA Document 540 D See and Avoid Guidance c Not fly higher than approximately 400 feet above ground level within three 3 miles of an airport without notifyin...

Страница 28: ...cies 4 RC model aircraft will not operate within three 3 miles of any pre existing flying site without a frequency management agreement AMA Documents 922 Testing for RF Interference 923 Frequency Mana...

Отзывы: