Roc Hobby Beechcraft Скачать руководство пользователя страница 24

page20

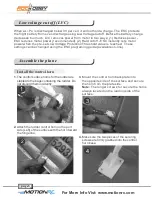
Before the model flying

As a precaution, an operational ground range test should be performed before the 
first flight each time you go out. Performing a range test is a good way to detect 
problems that could cause loss of control such as low batteries, defective or 
damaged radio components, or radio interference.  This usually requires an 
assistant and should be done at the actual flying site you will be using.

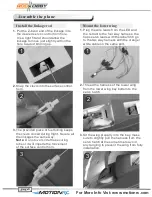
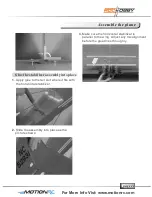
First turn on the transmitter, then install a fully-charged battery into the fuselage.  
Connect the battery and install the hatch.

Remember, use care not to bump the throttle stick, otherwise, the propeller / fan 
will turn and possibly cause damage or injury.  

Note: Please refer to your Transmitter Manual that came with your radio control 
system to perform a ground range check. If the controls are not working correctly 
or if anything seems wrong, do not fly the model until you correct the problem.  
Make certain all the servo wires are securely connected to the receiver and the 
transmitter batteries have a good connection.

Find a flying site clear of buildings, trees, power lines and other obstructions. Until you 
know how much area will be required and have mastered flying your plane in confined 
spaces, choose a site which is at least the size of two to three football fields – a flying
field specifically for R/C planes is best. Never fly near people– especially children who
can wander unpredictably. 

Find a suitable flying site

Monitor and limit your flight time using a timer (such as one on a wrist watch or in your 
transmitter if available). When the batteries are getting low you will usually notice a
performance drop before the ESC cuts off motor power, so when the plane starts flying
slower you should land. Often (but not always) power can be briefly restored after the
motor cuts off by holding the throttle stick all the way down for a few seconds.

To avoid an unexpected dead-stick landing on your first flight, set your timer to a
conservative 4 minutes. When your alarm sounds you should land right away.

Monitor your flight time

For More Info Vist: www.motionrc.com

Содержание Beechcraft

Страница 1: ...Email info motionrc com Http www motionrc com...

Страница 2: ...Beechcraft...

Страница 3: ...rol This interference can cause momentary loss of control so it is advisable to always keep a safe distancein all directions around your model as this margin will help avoid collisions or injury Age R...

Страница 4: ...flying 20 Find a suitable flying site Perform the range check of your plane Monitor your flight time Flying course 21 Take off Flying Landing Maintenance Troubleshooting 22 AMA 23 Get your model ready...

Страница 5: ...tor the canopy the electronic parts ESC 2 Main wing set The top wing and the lower wing 3 Vertical stabilizer assembly 4 Horizontal stabilizer with the elevator 5 Propeller and spinner 6 Spare parts b...

Страница 6: ...h clevis KK 115 Decal Sheet KK 116 Motor Shaft KK 201 Electronic Retract KK 202 Motor D3536 KV 850 KK 203 9g Servo For flaps KK 204 9g Servo With arm KK 205 ESC 35A 4A SBEC KK 206 Battery 11 1v 1800mA...

Страница 7: ...ing batteries unattended Never charge damaged batteries BC 3S10 Balance Charger To correctly use the charger please read the instructions before use The Battery Charger included with your aircraft is...

Страница 8: ...ll not start and the charge LED will shine 2 If the voltage of one battery or some batteries is lower than 0 7V charging will not start If the voltage of the first battery of a 3S battery pack is lowe...

Страница 9: ...n t connected correctly Please check the polarity and reconnect adapter 2 Charging abruptly stops and tries to restart constantly during charging Output power of the adapter is not sufficient please r...

Страница 10: ...uide available on line Low voltage cut off LVC Assemble the plane Install the control horn 1 The control surface horns for the rudder are stapled to the bags containing the rudder Do not discard them...

Страница 11: ...side of the stabilizer mount the horn on the opposite side 7 Secure the control horns the same with the rudder 8 The control horn and the linkage rods for the main wing are contained in the bag with t...

Страница 12: ...abel Ch6 go to the two way harness with the orange white cable on the same port 3 The provided piece of fuel tubing keeps the clevis closed during flight Secure all the linkages the same way Note Do n...

Страница 13: ...ing to position the struts Note Not any glue are allowed to use in this step 1 Thread the aileron leads from the top wing saddle to the receiver hatch before sliding the top wing into place 3 Apply gl...

Страница 14: ...tapping screws 1 Apply glue to the horizontal top slot where it fits with the vertical fin 2 Insert the vertical fin into place Make sure the two stabilizer are perpendicular to each other Adjust any...

Страница 15: ...glue to the tail slot where it fits with the horizontal stabilizer 2 Slide the assembly into place as the picture shows 3 Make sure the horizontal stabilizer is parallel to the wing Adjust any misalig...

Страница 16: ...ervo hatch Make sure the wires do not interfere with the servo arm moving path Receiver Throttle Channel 1 Aile Channel 2 Elev Channel 3 Thro Channel 4 Rudd Channel 5 Gear Aux 1 2 3 Aileron Elevator 4...

Страница 17: ...page13 Assemble the plane 3 Slide the battery all the way into the hatch in front of the cockpit and snap in the shield 3 2 3 For More Info Vist www motionrc com...

Страница 18: ...ake switched off and we recommended that the sky trainer be flown with the brake off However the brake could be accidentally switched on if the motor battery is connected to the ESC while the throttle...

Страница 19: ...anual instructs you to do so Tips Make sure all control sticks on your radio are in the neutral position rudder elevator ailerons and the throttle in the OFF position Make sure both ailerons move up a...

Страница 20: ...to increase control surface travel and increase the aerobatics of the airplane 4 Align aileron and flap with the wing root by turning the clevis clockwise and counterclockwise on the linkage carefull...

Страница 21: ...The first time you use high rates be sure to fly at low to medium speeds High rates as listed are only for EXTREME maneuvering 1 The motor should rotate counter clockwise when viewing the plane from t...

Страница 22: ...pring hook and hook the springs the top wing root eyelets Note Close the hook which connect with the wire using a needle nose pliers and make sure the wire is tension enough to hook firmly on the eyel...

Страница 23: ...leading edge of the main wing as shown with the battery pack installed Mark the location of the CG on top of the wing 2 When balancing your model support the plane at the marks made on the bottom of t...

Страница 24: ...are securely connected to the receiver and the transmitter batteries have a good connection Find a flying site clear of buildings trees power lines and other obstructions Until you know how much area...

Страница 25: ...e wind and fly down to the ground Fly the airplane down to the ground using 1 4 1 3 throttle to keep enough energy for proper flare Before the model touches down always fully decrease the throttle to...

Страница 26: ...not respond to the throttle but responds to other controls ESC is not armed Throttle channel is reversed Lower throttle stick and throttle trim to lowest settings Reverse throttle channel on transmitt...

Страница 27: ...nd a spotter must be used when appropriate AMA Document 540 D See and Avoid Guidance c Not fly higher than approximately 400 feet above ground level within three 3 miles of an airport without notifyin...

Страница 28: ...cies 4 RC model aircraft will not operate within three 3 miles of any pre existing flying site without a frequency management agreement AMA Documents 922 Testing for RF Interference 923 Frequency Mana...

Отзывы: