background image

3-Finger Adaptive Robot Gripper Instruction Manual

RS485 communication is standard on all 3-Finger Grippers, see the Serial Communication Protocol section. If not using RS485 communication,
simply leave the two wires unconnected.

The 3-Finger Gripper should be supplied with cables that have the following specifications:

l

Approximate length of 5 meters.

l

DeviceNet standard cable.

l

Power pair :

l

two (2) #22 AWG (black and red).

l

Data pair :

l

two (2) #22 AWG (blue and white).

l

Shield :

l

Foil (data only) #22 AWG.

3.5.2 Communication connection

By default, the power receptacle of the 3-Finger Adaptive Robot Gripper handles the communication via the MODBUS RTU protocol (RS232 or
RS485). The following table summarizes the communication protocols available through the communication receptacle of the Gripper. Note that only
one other protocol option is available in a given Gripper unit (MODBUS RTU protocol always being included). The Gripper that you have was configured
before shipment with only one of the following protocols.

Family

Protocol

Real-Time-Ethernet

EtherNet/IP

Modbus TCP/IP

PROFINET

EtherCAT

Fieldbus

DeviceNet

CANopen

The communication cable and connectors provided with the 3-Finger Gripper model vary with the communication protocol option choice. Each protocol
has its own pin-out and cable. Provided cable has an approximate length of 5m. See details in the following sections for your communication pinout.

Warning

Be sure to use the appropriate cables and pin-outs for your communication protocol as any other setup may damage the Gripper.

DeviceNet communication protocol

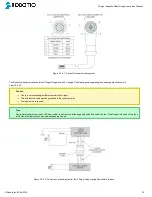
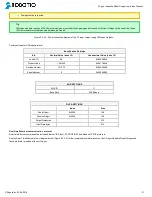
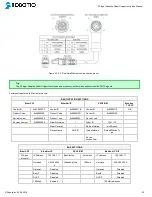
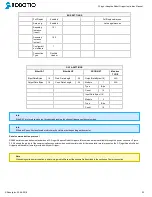
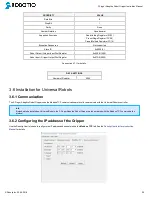
Figure 3.5.2.1 shows the pin-out for the DeviceNet communication protocol for the receptacle (male) present on the 3-Finger Adaptive Robot Gripper
and the cable (female) provided with your Gripper.

©Robotiq inc. 2008-2018

18

Содержание 3-Finger Adaptive Robot Gripper

Страница 1: ...Get the latest version of the manual at support robotiq com...

Страница 2: ...kage 26 3 6 5 Setting the Gripper s IP address in the UR controller 28 3 7 License Agreement 29 4 Control 31 4 1 Overview 31 4 2 Status LEDs 32 4 2 1 Supply LED 32 4 2 2 Communication LED 32 4 2 3 Fau...

Страница 3: ...eplacement and customization 72 6 3 2 Palm pad replacement and customization 74 6 3 3 Fingertip replacement and customization 76 6 4 Moment of inertia and center of mass 78 6 5 Electrical ratings 79 6...

Страница 4: ...Section added Troubleshooting Section added Communication with UR robots Minor modifications Revision 121031 Update for Robotiq Adaptive Gripper S 6 Revision 120209 Update for Robotiq Adaptive Grippe...

Страница 5: ...sale or not without prior written consent from Robotiq Under copyright law copying includes translation into another language or format Information provided by Robotiq in this document is believed to...

Страница 6: ...y features of the Gripper and should not be considered as being related to Gripper operation each feature is detailed in the appropriate section of the manual Safety guidelines must be read and unders...

Страница 7: ...pper changing the Operation Mode Operation Modes 1 The basic mode is the most versatile Operation Mode It is best suited for objects that have one dimension longer than the other two It can grip a lar...

Страница 8: ...igure 1 4 This action is performed with a single input from the user Each finger is not controlled independently the Gripper itself closes each finger until it reaches a stable configuration on an obj...

Страница 9: ...when the fingers touch the object with the distal phalanxes first Inversely for an encompassing grip the fingers must touch theobject with the proximal or the lower section of the distal phalanxes fi...

Страница 10: ...3 Finger Adaptive Robot Gripper Instruction Manual Figure 1 6 Operation Modes vs Types of Grip Robotiq inc 2008 2018 10...

Страница 11: ...Robot Gripper l Installation l Control l Maintenance l Inspection l Calibration l Programming l Decommissioning This documentation explains the various components of the 3 Finger Adaptive Robot Gripp...

Страница 12: ...nd speed accordingly based on your application l Keep fingers and clothes away from the Gripper while the power is on l Do not use the Gripper on people or animals l For welding applications make sure...

Страница 13: ...ntended for installation on a robot or other automated machinery and equipment Note Always comply with local and or national laws regulations and directives on automation safety and general machine sa...

Страница 14: ...e l 5m Communication cable according to your communication protocol option l Grease syringe ACC LUB SHC1500 for maintenance Note The following are not included with the delivery of the 3 Finger Adapti...

Страница 15: ...e running through the robot be sure to use a Coupling with a groove a If you are using an Adapter Plate it must be mounted first on the robot arm using the dowel pins for indexing and the screws to se...

Страница 16: ...COM for communication connection depends on your chosen protocol l USB for a standard USB male A jack present on all products Info Note that the communication connector COM shown in figure 3 5 1 will...

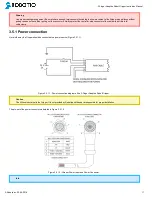
Страница 17: ...e cable with a strain relief cable clamp 3 5 1 Power connection Here is the way the Gripper should be connected to a power source Figure 3 5 1 1 Figure 3 5 1 1 Power connection diagram of the 3 Finger...

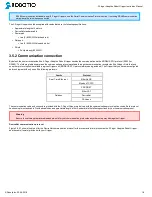
Страница 18: ...hat only one other protocol option is available in a given Gripper unit MODBUS RTU protocol always being included The Gripper that you have was configured before shipment with only one of the followin...

Страница 19: ...no terminating resistor mounted in the Gripper l The shield of the cable must be grounded in the robot controller l Fusing must be respected Tips DeviceNet standard requires a 120 Ohms resistor to be...

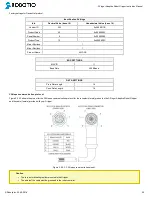
Страница 20: ...DNS BUS SETTINGS MAC ID 11 Baud Rate 250 KBaud DATA SETTINGS Prod Data Length 16 Cons Data Length 16 CANopen communication protocol Figure 3 5 2 3 shows the pin out for the CANopen communication proto...

Страница 21: ...0 Hexadecimal Value base 16 Vendor ID 68 0x00000044 Product Code 1541540 0x001785A4 Revision Number 131072 0x00020000 Serial Number 0 0x00000000 BUS SETTINGS MAC ID 11 Baud Rate 250 KBaud DATA SETTING...

Страница 22: ...0x0000010D Device ID 0x0000010A Serial Number 0x00000000 Product Type 0x0000000C Device Type Revision Number 0x00000000 Major Revsision 1 Order ID 1541 110 Minor Revision 1 Name of station nic50repns...

Страница 23: ...rCAT protocol uses inherent dynamic addressing thus bus settings cannot be customized Info Ethernet IP uses 4 bytes of header which may be visible or not depending on the master Serial communication p...

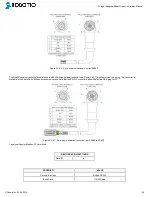
Страница 24: ...schematics of the wiring The converter is available in the Spare Parts Kits and Accessories section Note that the RS 232 converter ends with a female DB 9 plug for PC Figure 3 5 2 7 Serial communicat...

Страница 25: ...r details DATA SETTINGS Number of Register 5000 3 6 Installation for Universal Robots 3 6 1 Communication The 3 Finger Adaptive Robot Gripper uses the Modbus TCP communication protocol to communicate...

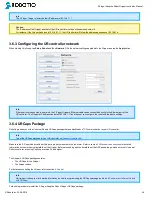
Страница 26: ...s 3 6 4 URCaps Package Robotiq provides you with a Universal Robots URCaps package that enables Modbus TCP communication to your UR controller Info To get the URCaps package for your UR controller vis...

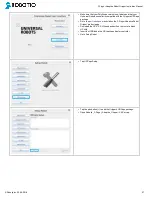
Страница 27: ...to support robotiq com and click on the 3 Finger Adaptive Robot Gripper product page l Download the UC3 X X X file and extract it on the root of a blank US stick l Insert the USB stick in the UR teac...

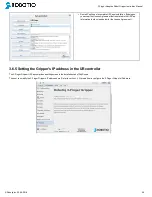
Страница 28: ...p Information text box see below for the License Agreement 3 6 5 Setting the Gripper s IP address in the UR controller The 3 Finger Gripper URCap comprises a setting screen in the Installation tab of...

Страница 29: ...be under no obligation to provide any upgrade or modification to the Software However the End User shall be entitled to receive free of charge all modifications and upgrades of the Software provided b...

Страница 30: ...alled deliver to the Licensor all CDs DVDs magnetic tapes cards and other tangible items and materials embodying the Software and return to the Licensor all copies thereof or destroy such copies and w...

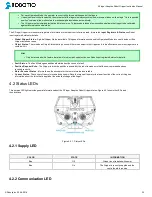
Страница 31: ...obotiq controller takes care of the regulation of the speed and the force prescribed while the mechanical design of the fingers automatically adapts to the shape of object s Figure 4 1 1 3 Finger Grip...

Страница 32: ...an object in the Gripper and in the affirmative how many fingers are in contact with it Hint l Object status is a built in feature that allows for object pick up detection see Robot input registers s...

Страница 33: ...ich do not intend to use the advanced option Otherwise a register mapping for the Advanced Control Mode containing all the Gripper functionalities is also provided From the Gripper standpoint there is...

Страница 34: ...CURRENT Byte 6 FINGER B POSITION REQUEST FINGER B POS REQUEST ECHO Byte 7 FINGER B SPEED FINGER B POSITION Byte 8 FINGER B FORCE FINGER B CURRENT Byte 9 FINGER C POSITION REQUEST FINGER C POS REQUEST...

Страница 35: ...l Control of Fingers Mode each finger receives its own command position request speed and force unless the Gripper is in the Scissor Grasping Mode and the Independent Control of Scissor rICS is not ac...

Страница 36: ...imum position open l 0xFF maximum position close Info In order to protect the Gripper from geometric interferences several software limits are implemented and therefore some positions are not reachabl...

Страница 37: ...m force 15 N Maximum force 60 N Force count 0 175 N approximate value relation non linear Register FINGER B POSITION REQUEST Address Byte 6 Bits 7 6 5 4 3 2 1 0 Symbols rPRB This register is used to s...

Страница 38: ...Address Byte 12 Bits 7 6 5 4 3 2 1 0 Symbols rPRS This register is used to set the scissor axis target position It is only applied if the Individual Control of Scissor option is selected bit rICS is s...

Страница 39: ...1 Bits 7 6 5 4 3 2 1 0 Symbols gDTS gDTC gDTB gDTA Hint Object status byte provides you with a built in object detection feature that can replace very complex algorithms gDTA l 0x00 Finger A is in mo...

Страница 40: ...must be completed prior to continuing action l 0x07 The activation bit must be set prior to action l Minor faults fault LED continuous red l 0x09 The communication chip is not ready may be booting l 0...

Страница 41: ...ctual position of the Gripper Finger B 0x00 is the minimum position fully open and 0xFF is the maximum position fully closed Register FINGER B CURRENT Address Byte 8 Bits 7 6 5 4 3 2 1 0 Symbols gCUB...

Страница 42: ...3 2 1 0 Symbols gPOS gPOS Returns the actual position of the Gripper scissor action 0x00 is the minimum position fully open and 0xFF is the maximum position fully closed Register SCISSOR CURRENT Addr...

Страница 43: ...ger 4 7 1 Connection setup The following table describes the connection requirements for controlling the Robotiq 3 Finger Gripper using the Modbus RTU protocol PROPRIETY VALUE Physical Interface RS485...

Страница 44: ...yclic Redundancy Check CRC 4 7 3 Preset single register FC06 Function code 06 FC06 is used to activate functionalities of the Gripper robot output Examples of such data are Action Request Velocity For...

Страница 45: ...gister 0x03EA EC7C Cyclic Redundancy Check CRC Response is 09 10 03 E9 00 02 91 30 where BITS DESCRIPTION 09 SlaveID 10 Function Code 16 Preset Multiple Register 03E9 Address of the firstregister 0002...

Страница 46: ...ter 07D0 0000 Content of register 07D1 4727 Cyclic Redundancy Check CRC Caution The 3 Finger Adaptive Gripper register values are updated at a 200Hz frequency It is thereforerecommended to send FC23 c...

Страница 47: ...ad Gripper status until the activation is completed Request is 09 03 07 D0 00 01 85 CF where BITS DESCRIPTION 09 SlaveID 03 Function Code 03 Read Holding Registers 07D0 Address of the first register 0...

Страница 48: ...le Registers 03E8 Address of the first register 0003 Number of registers to write to 06 Number of data bytes to follow 3 registers x 2 bytes register 6 bytes 0900 Value written to register 0x03E9 ACTI...

Страница 49: ...gister 0x07D1 FAULT STATUS 0x00 POSITION REQUEST ECHO 0xFF the position request echo tells that the command was well received and that the GRIPPER STATUS is valid 080F Content of register 0x07D2 FINGE...

Страница 50: ...of register 0x07D5 FINGER C POSITION 0xBD FINGER C CURRENT 0x00 0089 Content of register 0x07D6 SCISSOR POSITION REQUEST ECHO 0x00 SCISSOR POSITION 0x89 0000 Content of register 0x07D7 SCISSOR CURRENT...

Страница 51: ...Registers 10 Number of data bytes to follow 8 registers x 2 bytes register 16 bytes 39C0 Content of register 0x07D0 GRIPPER STATUS 0x39 OBJECT STATUS 0xC0 gSTA 0 for Gripper is in motion towards reque...

Страница 52: ...ITION REQUEST ECHO 0x00 0600 Content of register 0x07D5 FINGER C POSITION 0x06 FINGER C CURRENT 0x00 0089 Content of register 0x07D6 SCISSOR POSITION REQUEST ECHO 0x00 SCISSOR POSITION 0x89 0000 Conte...

Страница 53: ...1 4 8 2 Read Input Registers FC04 Function code 04 FC04 is used for reading the status of the Gripper robot input Examples of such data are Gripper Status Object Status Finger Position etc Ex This mes...

Страница 54: ...The number of registers to write 06 The number of data bytes to follow 09 00 00 64 00 ff Data Response is 01 00 00 00 00 06 02 10 00 00 00 03 where BITS DESCRIPTION 01 00 Transaction identifier 00 00...

Страница 55: ...ritten to register 0x0002 Response is 33 9A 00 00 00 06 02 10 00 00 00 03 where BITS DESCRIPTION 339A Unique transaction identifier chosen randomly 0000 Protocol Identifier Modbus 0006 Length 02 Slave...

Страница 56: ...ue transaction identifier chosen randomly 0000 Protocol Identifier Modbus 0005 Length 02 SlaveID 04 Function 04 Read Input Registers 02 Number of data bytes to follow 1 registers x 2 bytes register 2...

Страница 57: ...e is 71 EE 00 00 00 06 02 10 00 00 00 03 where BITS DESCRIPTION 71EE Unique transaction identifier chosen randomly 0000 Protocol Identifier Modbus 0006 Length 02 SlaveID 10 Function 16 Preset Multiple...

Страница 58: ...C POSITION 0x08 FINGER C CURRENT 0x0F 0089 Content of register 0x0006 SCISSOR POSITION REQUEST ECHO 0x00 SCISSOR POSITION 0x89 0000 Content of register 0x0007 SCISSOR CURRENT 0x00 Example of response...

Страница 59: ...10 Function Code 16 Preset Multiple Registers 03E8 Address of the first register 0003 Number of registers to write to 06 Number of data bytes to follow 3 registers x 2 bytes register 6 bytes 0900 Val...

Страница 60: ...Function Code 04 Read Input Registers 10 Number of data bytes to follow 8 registers x 2 bytes register 16 bytes 39C0 Content of register 0x07D0 GRIPPER STATUS 0x39 OBJECT STATUS 0xC0 gSTA 0 for Gripp...

Страница 61: ...T ECHO 0x00 FINGER B POSITION 0x06 0000 Content of register 0x07D4 FINGER B CURRENT 0x00 FINGER C POSITION REQUEST ECHO 0x00 0600 Content of register 0x07D5 FINGER C POSITION 0x06 FINGER C CURRENT 0x0...

Страница 62: ...er registers will be based on similar computations Also please note that theread write registers are not the same As an example writing to REGISTER0 will send a command to the Gripper whereas reading...

Страница 63: ...pecific opening distance in a specific mode and modify the speed and force applied by the Gripper l 3F Object Detected node This node is used to add a command sequence if an object is detected not det...

Страница 64: ...n mode in which all fingers of the Gripper close with fingers B and C travelling away one from the other Radio button Scissor Operation mode consisting in the lateral move of fingers B and C each one...

Страница 65: ...tivated nothing happens rq_stop Stops the current motion has no effect on activation auto release commands rq_reset Resets the activation bit To move the gripper will need to be activated again rq_aut...

Страница 66: ...ge to learn more The package stack also including support for the other Adaptive Grippers as well as the FT 300 Force Torque Sensor can be downloaded via Robotiq s Github repository provided by ros in...

Страница 67: ...Interface Visit support robotiq com to get the latest installer of the Robotiq User Interface along with appropriate documentation See the Robotiq User Interface Instruction Manualfor details on usag...

Страница 68: ...3 Finger Adaptive Robot Gripper Instruction Manual 6 Specifications 6 1 Technical dimensions Figure 6 1 1 Robotiq 3 Finger Adaptive Robot Gripper technical dimensions Robotiq inc 2008 2018 68...

Страница 69: ...mm Gripper Approximate Weight 5 lbs 2 3 kg Recommended Payload Encompassing Grip 22 lbs 10 kg Recommended Payload Fingertip Grip 1 5 5 lbs 2 5 kg Maximum Grip Force Fingertip Grip 13 5 lbf 70 N Maximu...

Страница 70: ...motors of the Gripper while the Break Away Force is the force that the Gripper can sustain l Because the Gripper is self locking the Break Away Force is higher than the Actuation Force see Figure 6 2...

Страница 71: ...lifted is defined by Where l F is the force that is applied to the load by the Gripper Note that at the fingertips the maximum force that can be applied is when Fingers B and C force against Finger A...

Страница 72: ...obot Gripper Finger Pads are a usable part meant for frequent change after a maximum of 1 Mio cycles that can be customized The Finger Pad S 013 and Finger Pad S 014 are fixed to the Gripper Finger as...

Страница 73: ...edian Pads thread pattern for custom design Note Custom pads must be fixed with both available thread patterns never modify the Fingers without Robotiq s consent first Figure 6 3 1 2 Bolt pattern of t...

Страница 74: ...wn in figure 6 3 2 1 For a list of available parts see section 8 Spare Parts Kits and accessories To assemble standard or custom Palm Pad 1 Align the Palm Pad S 071 with the correct emplacement 2 Fix...

Страница 75: ...Palm Pad thread pattern for custom design Caution Custom pads must be fixed with the illustrated thread pattern never modify the Gripper without Robotiq s consent first Figure 6 3 2 2 Bolt pattern of...

Страница 76: ...the Gripper Finger as shown in figure 6 3 3 1 For a list of available parts see section 8 Spare Parts Kits and accessories To assemble standard or custom Fingertip 1 Align the Fingertip S 016 with th...

Страница 77: ...for custom design Caution Custom fingertips must be fixed with the thread pattern illustrated a minimum of two SHCS are required never modify the Gripper without Robotiq s consent first Figure 6 3 3 2...

Страница 78: ...n Figure 6 1 1 This represents a configuration where the fingers are fully open in Wide Mode Info All values are approximate Actual coordinates may vary according to fingertip type and various options...

Страница 79: ...ratings SPECIFICATION VALUE Operating Supply Voltage 24 V Absolute Maximum Supply Voltage 28 V Quiescent Power minimum power consumption 4 1 W Peak Power at maximum gripping force 36 W Maximum RMS Su...

Страница 80: ...custom coupling between the Gripper Universal Wrist and your robot Provided screw clearance and dowel pin hole are meant for installation on the Universal Wrist Top face shown in figure 6 6 1 1 is me...

Страница 81: ...ripper Universal Wrist and Yaskawa SDA 5D or Yaskawa SDA 10D robots Provided screw clearance and dowel pin hole are meant for installation on the Universal Wrist Top face shown in figure 6 6 2 1 is me...

Страница 82: ...ippers Your custom coupling must be designed for fixation on the provided wrist Figure 6 6 3 1 3 Finger Adaptive Robot Gripper dimensions for custom coupling Info The Gripper must be secured with all...

Страница 83: ...done by Robotiq Operation Daily Weekly Monthly Semiannually or 1 M cycles Annually or 2 M cycles Gripper Cleaning Dirty conditions Normal conditions Applying Grease Dirty conditions Normal conditions...

Страница 84: ...h a dry towel Caution Always turn off robot and Gripper power supply before doing maintenance operations on the Gripper Procedure 1 Insert the 2 0 mm precision screwdriver into the hole under the fing...

Страница 85: ...nger manually see Manual Opening of Fingers for details or by using the Robotiq User Interface see the User Interface section for details 2 When the finger is closed the finger base cogs are visible c...

Страница 86: ...movement must be symmetric and fluid i Test the return movement by pushing open the fingers the fingers must come back to their initial position on their own ii Test the general movement of the finger...

Страница 87: ...d Machine Screws Philips zinc coated See Spare Parts Kits and Accessories section to order Robotiq 3 Finger Adaptive Robot Gripper replacement parts Note Always turn off robot and Gripper power supply...

Страница 88: ...der Robotiq 3 Finger Adaptive Robot Gripper replacement parts Note Always turn off robot and Gripper power supply before performing maintenance operations on the Gripper Procedure 1 Remove the Gripper...

Страница 89: ...ger Adaptive Robot Gripper replacement parts Caution Always turn off robot and Gripper power supply before performing maintenance operations on the Gripper Procedure 1 Remove the Gripper from the robo...

Страница 90: ...snap rings Procedure 1 Remove the Gripper from the robot following schematics in section 3 3 Mechanical connections 2 Clean the Gripper following instructions in 7 1 Gripper cleaning 3 Remove the Fin...

Страница 91: ...terval Tools you need Parts you need 2 M cycles 1 year or at warranty expiration l None l None Gripper overhaul is necessary when the Gripper reaches 2 M cycles or at warranty expiration Overhaul is d...

Страница 92: ...ts AGS CPL S101 Schunk Coupling Coupling for use between 3 Finger Adaptive Gripper Universal Wrist and Schunk FWA Tool Changer AGS CPL S102 ATI Coupling Coupling for use between 3 Finger Adaptive Grip...

Страница 93: ...Adapter plate for six 6 M5 screws on 35 mm square pattern one 20 mm passing hole center AGS APL 167 New Design of your new custom adapter plate AGS APL NEW Power serial cable 5 m power cable for 3 Fi...

Страница 94: ...6 Finger includes l one 1 replacement Finger for the 3 Finger Adaptive Robot Gripper pads and gear included AGS FIN S A09 Rotating Finger Tip2 includes l one 1 distal pivot l three 3 bushings l one 1...

Страница 95: ...occurred reset activate the Gripper see section 5 4 1 c It s ON Automatic release or booting in process wait until it s off if blinking reset is needed 4 Communication Networking issues a Only use one...

Страница 96: ...cation protocol panel will show current address default IP address for Robotiq Grippers are IP 192 168 1 11 with Gateway 255 255 255 0 2 Use the same protocol options fixed IP auto neg full duplex etc...

Страница 97: ...such as the finger and palm pads are not covered by the warranty Caution The warranty will become null and void if the l Unit has been tampered with repaired or worked on by unauthorized individuals...

Страница 98: ...7 01 418 380 2788 Outside US and Canada Fax 1 418 800 0046 Technical support and Engineering extension 207 Sales extension 122 Head office Robotiq 966 chemin Olivier Suite 325 St Nicolas Qu bec G7A 2N...

Страница 99: ...3 Finger Adaptive Robot Gripper Instruction Manual EC Declaration of Conformity Robotiq inc 2008 2018 99...

Отзывы: