7
GB
5.
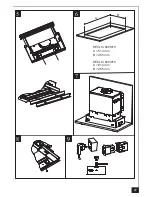
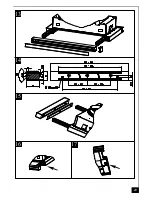
Insert the grommets into the screw holes (fig 8).
6.
Connect the ducting onto the round outlet on the top of the motor assembly.
7.
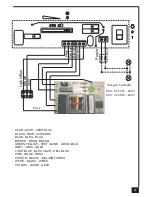
Connect both appliances together (fig 9) and connect them to the mains supply (See ELECTRICAL
WIRING chapter).
CAUTION : If the kitchen cabinet does not have a door you must execute points 6 and 7 before
point 4.
C - REPLACING THE DECORATIVE FRONT STRIP
You can replace the strip in the front trim with a matching strip of kitchen furniture finish or with a complete
piece of cornice.
1.
Remove the glass (See chapter 6: MAINTENANCE).
2.
When replacing the front strip with matching laminate. Firstly, remove the right-hand end capping from
the front trim and slide out the aluminium front strip plate. Secondly, insert the cut piece of laminate
and replace the right-hand end capping.
3.
When replacing the whole front trim with a piece of lighting pelmet or similar. Firstly, remove the right-
hand end capping and the aluminium strip to access to the front fixing screws. Secondly, cut the new
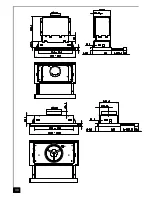
front trim in accordance with the dimension contained in fig.14 and machine finish the new strip before
fixing the trim and metal plate using the original screws (fig.15).
4
OPERATION
Access to the functions by opening of the side.
•
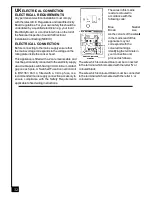
Lighting : By rock-switch ON / OFF ( Fig. 16 ).
•
Motor : By dimmer switch ( Fig. 17).
Automatic stop of the functions by closing of the side.
5
USEFUL HINTS
•
To obtain the best performance it is advisable to switch ‘ON’ the cooker hood a few minutes (in the boost
setting) before you start cooking and you should leave it running for approximately 15 minutes after finishing.
•
IMPORTANT: NEVER DO FLAMBÉ COOKING UNDER THIS COOKER HOOD
•
Do not leave frying pans unattended during use as over-heated fat and oil might catch fire.
•
Do not leave naked flames under this cooker hood.
•
Switch ‘OFF’ the electric and gas before removing pots and pans.
•
Ensure heating areas on your hotplate are covered with pots and pans when using the hotplate
and cooker hood simultaneously.
6
MAINTENANCE
Before carrying out any maintenance or cleaning isolate the cooker hood from the mains supply.
The cooker hood must be kept clean; a build up of fat or grease can be a fire hazard.
Remove the glass.
It is possible to remove the glass for ease of cleaning by sliding the glass to the left, which will allow it to
hinge down and be removed as illustrated (fig.12).
Casing
•
Wipe the cooker hood frequently with a clean cloth, which has been immersed in warm water containing
a mild detergent and wrung out.
•
Never use excessive amounts of water when cleaning particularly around the control panel.
•
Never use scouring pads or abrasive cleaners.
•
Always wear protective gloves when cleaning the cooker hood.
Metal Grease Filters :
The metal grease filters absorb grease and dust during cooking to help keep the
cooker hood clean inside. The grease filters should be cleaned once a month or more frequently if the
hood is used for more than 3 hours per day.
Содержание DECLIC 609
Страница 2: ...DECLIC 609 610 Composants Components Bauelemente Componenti Componentes Onderdelen...
Страница 3: ...DECLIC 909 910 Composants Components Bauelemente Componenti Componentes Onderdelen...
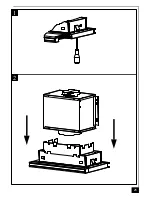
Страница 13: ...25 2 1...
Страница 14: ...26 3 4...
Страница 15: ...27 8 5 DECLIC 609 610 A 514 mm B 255 mm DECLIC 909 910 A 814 mm B 255 mm A B 9 6 7...
Страница 16: ...28 11 10 12...
Страница 17: ...29 16 13 14 17 15...
Страница 18: ...30...
Страница 21: ...33 GU10 50 W 230 V Code 12EC006 ACCESSOIRES ACCESSORI ACCESSORIES ACCESORIA ZUBEH RE ACCESSOIRES 5403003...
Страница 22: ...34 A B C D E F F...
Страница 23: ...35 G H I J K L...

