background image

4

2. Operating determination

This device is a moving head for creating decorative effects  and was designed for indoor use only.

If the device has been exposed to drastic temperature fluctuation (e.g. after transportation), do not switch it on 

immediately. The arising condensation water might damage your device. Leave the device switched off until 

it has reached room temperature.

Never run the device without lamp!

Do not shake the device. Avoid brute force when installing or operating the device.

Never lift the fixture by holding it at the projector-head, as the mechanics may be damaged. Always hold the 

fixture at the transport handles.

When choosing the installation-spot, plea

se make sure that the device is not exposed to extreme heat, moisture 

or dust. There should not be any cables lying around. You endanger your own and the safety of others!

The minimum distance between light output and the illuminated surface must be more than 3 meters.

Make sure that the area below the installation place is blocked when rigging, derigging or servicing the fix

-

ture.

Always fix the fixture with an appropriate safety rope. Fix the safety rope at the correct holes only.

Only operate the fixture after having checked that the housing is firmly closed and all screws are tightly fas

-

tened.

The lamp must never be ignited if the objective-lens or any housing-cover is open, as discharge lamps may 

explode and emit a high ultraviolet radiation, which may cause burns.

The maximum ambient temperature 45°C must never be exceeded. 

CAUTION!

The lens has to be replaced when it is obviously damaged,

so that its function is impaired, e. g. due to cracks or deep scratches!

Operate the device only after having familiarized with its functions. Do not permit operation by persons not 

qualified for operating the device. Most damages are the result of unprofessional operation!

CAUTION!

The lamp has to be replaced when it is damaged

or deformed due to the heat!

Please use the original packaging if the device is to be transported.

Please consider that unauthorized modifications on the device are forbidden due to safety reasons!

If this device will be operated in any way different to the one described in this manual, the product may suffer 

damages and the guarantee becomes void. Furthermore, any other operation may lead to dangers like short-

circuit, burns, electric shock, burns due to ultraviolet radiation, lamp explosion, crash etc.

Содержание Robin 600E Beam

Страница 1: ... Version1 3 ...

Страница 2: ...p hats 8 4 6 Rigging the fixture 8 4 7 DMX 512 connection 10 4 8 Ethernet connection 11 5 Remotely controllable functions 13 6 Control menu map 14 7 Control menu 17 7 1 Tab Address 18 7 2 Tab Information 18 7 3 Tab Personality 20 7 5 Tab Stand alone 22 7 6 Tab Service 23 7 7 Icon Lamp menu 25 8 RDM 25 9 Wireless DMX operation 26 10 Error and information messages 26 11 Technical Specifications 28 1...

Страница 3: ... caution Make sure that the available voltage is not higher than stated on the rear panel Always plug in the power plug least Make sure that the power switch is set to off position before you connect the device to the mains The power plug has to be accessible after installing the device Make sure that the power cord is never crimped or damaged by sharp edges Check the device and the power cord fro...

Страница 4: ...afety rope Fix the safety rope at the correct holes only Only operate the fixture after having checked that the housing is firmly closed and all screws are tightly fas tened The lamp must never be ignited if the objective lens or any housing cover is open as discharge lamps may explode and emit a high ultraviolet radiation which may cause burns The maximum ambient temperature 45 C must never be ex...

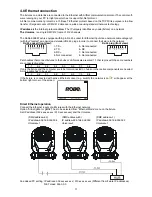
Страница 5: ...ESCAPE button 3 NEXT button 4 ENTER DISPLAY ON button 5 PREV button The head should be locked for transportation the tilt lock latch 2 and the pan lock latch 3 have to be in the locked positions To unlock the head move these latches to unlock positions before operating the fixture 1 Front lens 2 Tilt lock 3 Pan lock 4 Base 5 Moving head 6 Arm The ENTER DISPLAY ON button also serves for switching t...

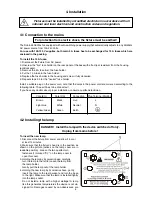
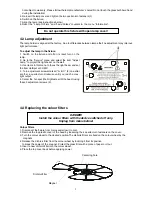
Страница 6: ...ured according to the following table The earth has to be connected If you have any doubts about proper installation consult a qualified electrician Core EU Core US Connection Plug Terminal Marking Brown Black Live L Light blue White Neutral N Yellow Green Green Earth 4 2 Installing the lamp DANGER Install the lamp with the device switched off only Unplug from mains before To insert the new lamp 1...

Страница 7: ...t beam and set the item HotSpot at 0 DMX 3 Turn adjustment screws marked A B C 2 one after another a quarter turn clockwise until you reach a max light output 4 Center the hot spot the brightest part of the beam using these 3 adjustment screws 2 4 4 Replacing the colour filters DANGER Install the colour filters with the device switched off only Unplug from mains before Colour filters 1 Disconnect ...

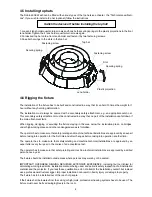
Страница 8: ...perator has to make sure that safety relating and machine technical installations are approved by an expert before taking into operation for the first time and after changes before taking into operation another time The operator has to make sure that safety relating and machine technical installations are approved by an expert after every four year in the course of an acceptance test The operator ...

Страница 9: ...te ristics For securing a fixture to the truss install a safety wire that can hold at least 10 times the weight of the fixture Use only safety wire with screw on carabine Pull the safety wire through the carrying handles and around the truss as shown on the pictures below Note If the safety wire is too long whip it several times around the trusss in order to attach the fixture tight In case of an ...

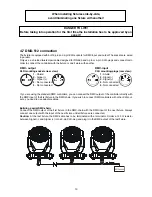
Страница 10: ...view If you are using the standard DMX controllers you can connect the DMX output of the controller directly with the DMX input of the first fixture in the DMX chain If you wish to connect DMX controllers with other XLR out puts you need to use adapter cables Building a serial DMX chain Connect the DMX output of the first fixture in the DMX chain with the DMX input of the next fixture Always conne...

Страница 11: ... RX 3 RX 7 Not connected 4 Not connected 8 Not connected Patch cables that connect fixtures to the hubs or LAN sockets are wired 1 1 that is pins with the same numbers are connected together 1 1 2 2 3 3 4 4 5 5 6 6 7 7 8 8 If only the fixture and the computer are to be interconnected no hubs or other active components are needed A cross cable has to be used 1 3 2 6 3 1 4 8 5 7 6 2 7 5 8 4 If the f...

Страница 12: ...t the DMX output of this fixture with the input of the next fixture until all fixtures are connected to the DMX chain Caution At the last fixture the DMX chain has to be terminated with a terminator Solder a 120 Ω resistor between Signal and Signal into a XLR plug and connect it in the DMX output of the last fixture Example DMX address 1 DMX address 20 DMX address 60 IP addres 002 168 002 002 Univ...

Страница 13: ... This wheel contains 7 replaceable SLOT LOCK dichroic filters open The colour wheel can be positioned between two adjacent colours in any position It is also possible to rotate the colour wheel continuously at dif ferent speeds Rainbow effect in both directions CMY CTO colour mixing system The CMY color mixing system is based on graduated cyan magenta and yellow colour filters A continuous range o...

Страница 14: ...Hours Lamp Strikes Total Strikes Resetable Strikes Air Filters Elapsed Time Alert Period 10 300 Fixture Temperatures Head Temperature Current Maximum NonRes Maximum Res Ambient Temperature Current Maximum NonRes Maximum Res Base Temperature Current Maximum NonRes Maximum Res DMX Values Pan Dimmer Fine Wireless State Linked To a Transmitter Software Versions Display System Module M Module S Module ...

Страница 15: ...55 Dimmer Fine 0 255 Screen Settings Display Intensity 1 10 Screen Saver Delay Off 10min Touchscreen Lock Off 10min Recalibrate Touch screen Display Orientation Normal Inverted Auto Temperature Unit C F Fan Mode Auto High Silent Fan Noise Level 0 100 Magenta Correction On Off Date Time Settings Unlink Wireless Adapter Default Settings Manual Control Reset Functions Reset All Systems Pan Tilt reset...

Страница 16: ...rogram 3 Edit Program Edit Program 1 Start Step 1 100 End Step 1 100 Edit Program Steps Step 1 Pan 0 255 Dimmer Fine 0 255 Step Time 0 25 5s Step 100 Pan 0 255 Dimmer Fine 0 255 Step Time 0 25 5s Service Adjust DMX Values Pan 0 255 Dimmer Fine 0 255 Adjust Lamp Pan 0 255 Calibrations Calibrate Effects Pan 0 255 Dimmer 2 0 255 Load Default Calibra tions Update Software ...

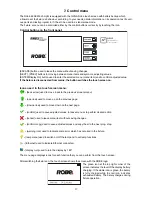
Страница 17: ...d to move back to the previous screen menu up arrow used to move up on the previous page down arrow used to move down on the next page confirm used to save adjusted values to leave menu or to perform desired action cancel used to leave menu item without saving changes confirm copy used to save adjusted values and copy them to the next prog step warning icon used to indicate some error which has oc...

Страница 18: ...AI Fixture receives MANet I protocol gMA2 Fixture receives MANet 2 protocol Art2DMX Fixture receives Artnet protocol from the Ethernet input and sends DMX data to its DMX output fixture works as an Artnet DMX converter next fixture can be connected to its DMX output and you can build a standard DMX chain by connecting another fixtures Only one fixture has to be connected to the Ethernet IP Address...

Страница 19: ...emperature The menu shows temperature in the fixture base on the display PCB Current A current temperature in the fixture base Maximum NonRes A maximum temperature in the fixture base since the fixture has been fabricated Maximum Res A maximum temperature in the fixture base since the counter was last reset In order to reset this counter to 0 touch the text box next to the item Maximum Res Ambient...

Страница 20: ... States Recorded following actions Fixture On Fixture Off Lamp On Lamp Off Fixture Position Recorded installation positions of the fixture Fixture Temperatures Recorded temperatures which have exceeded defined levels 7 3 Tab Personality User mode The Robin 600E Wash allows you to recall up to 3 user settings After switching the fixture on for the first time the User A settings is active Now all ch...

Страница 21: ... to control the intensity of the screen 1 min 10 max Screen saver Delay The item allows you to keep the screen on or to turn it off automatically after 1 10 minutes after last touch or pressing any button on the control panel Touchscreen Lock The item allows you to lock the screen after last touch or pressing any button on the control panel The time delay can be set in range of 1 10 minutes To unl...

Страница 22: ...program via the built in micro phone Preset Playback This menu allows you to select the program which will be played in a loop after switching the fixture on the option is commonly used in a stand alone operation without an external controller None The option disables Presetting playback function Test The option starts the test sequences Prog 1 The option starts user program No 1 Prog 2 The option...

Страница 23: ...an Tilt Macro Speed No macro generation Macro generation from fast to slow forwards No macro generation Macro generation from slow to fast backwards 7 6 Tab Service Adjust DMX Values The menu allows you to set all effects to desired positions before fine calibration of the effects Adjust Lamp This item opens the light output of the fixture and enables to aim the light beam on the wall to perform t...

Страница 24: ... an USB port of PC Note 1 Software update should execute a qualified person If you lack qualification do not attempt the update yourself and ask for help your ROBE distributor Note 2 DMX address IP address programs 1 3 and all items in the menu Personality will be set to their default factory values To update software in the fixture I Installation of the DMX Software Uploader 1 DMX Software Upload...

Страница 25: ...u to set rules for automatic switching on off the lamp Lamp On Power On If the item is on the lamp will be automatically turn on after switching the fixture on Lamp Off via DMX The item enables to switch the lamp off via DMX command from DMX controller Lamp On if DMX Present The item allows you to strike the lamp automatically after 26 seconds if DMX signal is present on the fixture s DMX input La...

Страница 26: ...te Information Wireless State To unlink the fixture from DMX transmitter The fixture can be unlinked from receiver via the menu item Unlink Wireless Adapter Personality Unlink Wireless Adapter 10 Error and information messages Occurred errors during fixture operation are signalled by the yellow warning icon at the bottom line of the screen Touch the warning icon or press the ESCAPE button to displ...

Страница 27: ...the default posi tion Cyan Lamella Error 1 Cyan Error 2 The messages will appear after the reset of the cyan flag if the flag is not located in the default position Magenta Lamella Error 1 Magenta Error 2 The messages will appear after the reset of the magenta flags if the flag is not located in the default position Yellow Lamella Error 1 Yellow Error 2 The messages will appear after the reset of ...

Страница 28: ...c Dimmer Smooth dimmer from 0 100 Electronics Graphic touch screen for fixture setting and addressing Gravitation sensor for auto screen positioning Battery backup of the touch screen Readout fixture and lamp usage receiving DMX values temperatures etc Built in analyzer for easy fault finding error messages Remotely switching on off the lamp Built in demo sequences Black out while head moving or c...

Страница 29: ...nting points 2 pairs of 1 4 turn locks Mounting horizontally or vertically via 2 Omega brackets Temperatures Maximum ambient temperature 45 C Maximum housing temperature 80 C Minimum distances Min distance from flammable surfaces 1 m Min distance to lighted object 5 m Total heat dissipation 2423 BTU h calculated Weight net 21 kg Dimensions mm Accessories Omega holder No 99010420 2 pcs Optional Acc...

Страница 30: ... from the mains before starting any maintenance work The front fresnel lens will require weekly cleaning as smoke fluid tends to building up residues reducing the light output very quickly The cooling fans should be cleaned monthly The interior of the fixture should be cleaned at least annually using a vacuum cleaner or an air jet Dichroic colour filters CMY lamellas and the internal lenses should...

Страница 31: ...31 ...

Страница 32: ... 0 0 1 1 2 3 4 5 6 0 0 7 1 1 2 3 8 8 9 3 1 0 3 ...

Страница 33: ... 0 2 0 1 1 10 1 3 1 2 0 0 0 0 1 A 0 1 5 4 1 0 4 2 B 4 1 3 C4 1 C 2 0 1 1 1 1 1 0 1 0 0 0 00 1 1 0 1 1 1 0 ...

Страница 34: ... 0 01 0 1 0 1 1 0 1 1 1 1 8 D 8 2 4 3 5 7 5 E 1 4 2 1 1 4 4 2 0 1 3 F 5 F 4 D 7 A 1 4 G G 1 1 ...

Отзывы: