background image

Administrator Settings

Managing Custom Queue

69

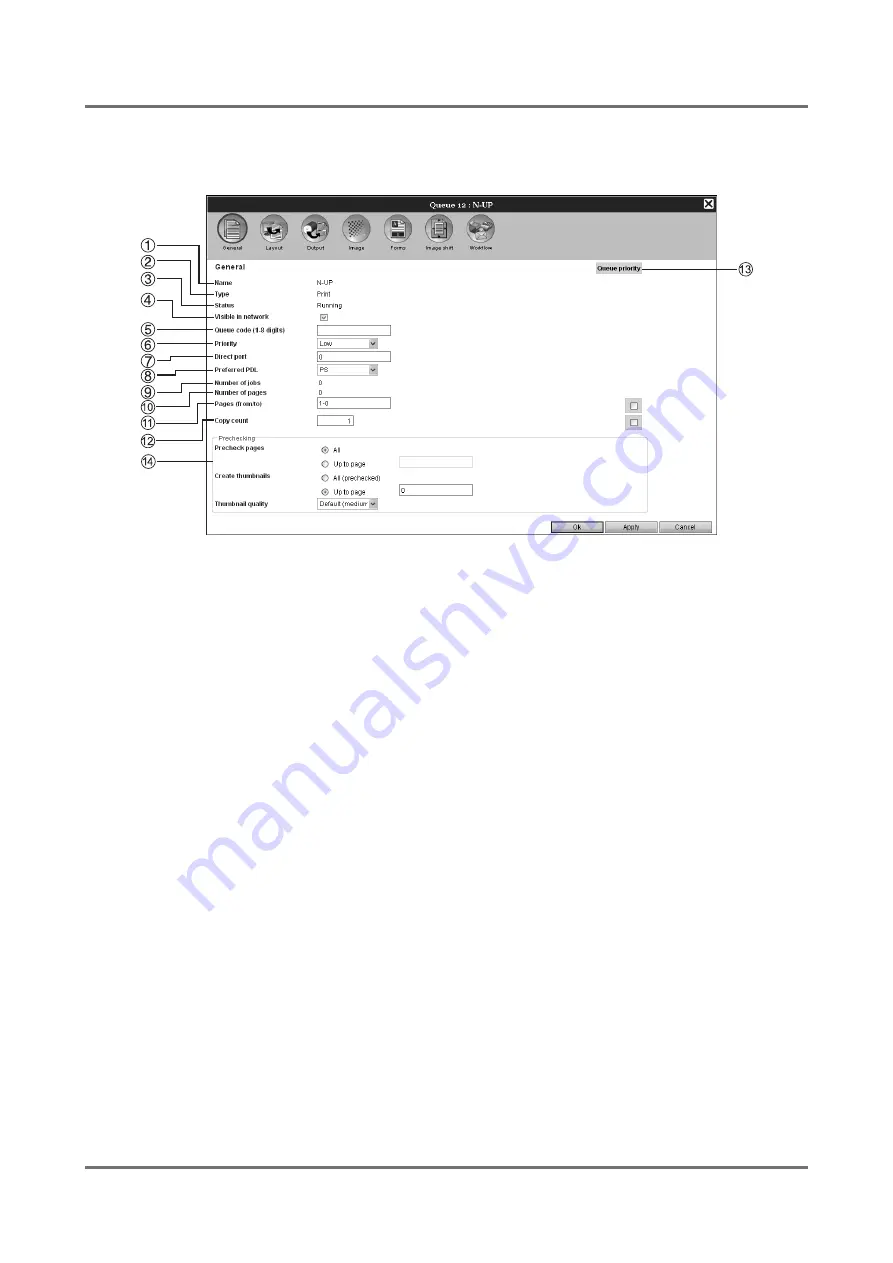
[General] screen

The outline information and basic settings of queues are displayed.

Information displayed / Settings
1) 

Name

Displays the name of the queue.

2) 

Type

Displays the type of queue (Print or Hold).

3) 

Status*

Displays the current status of the queue (whether or not 
it has been stopped).

4) 

Visible in network

When placing a checkmark, the queue is displayed in the 
network.
To hide the queue display on the network, remove the 
checkmark.

5) 

Queue code (1-8 digits)

Set the password of queue if necessary.
When the password is set, the job sent to the queue from 
the computer can be added to the queue only when the 
correct password has been input in 

[Workflow]

 of the 

printer driver. When the password is incorrect, the job is 
stored in the 

[Hold]

 queue.

For the print settings from the computer, refer to the separate 
manual, “RISO Controller IS300 Printer Driver Guide.”

6) 

Priority*

Sets the priority (low, normal, high) of the queue.

7) 

Direct port*

Sets the port number (9100-9999) of the RAW port.

8) 

Preferred PDL*

Sets the page description language (PDL) to be received 
by the RAW port (PS).
When a job received by a port other than the RAW port, 
PDL is automatically detected.

9) 

Number of jobs

Displays the number of jobs in the queue.

10) 

Number of pages

Displays the total number of pages of the jobs in the 
queue (the number of pages of each job x the number of 
copies).

11) 

Pages (from/to)

Specify the range of pages to be processed “From page” 
- “To page”.

Note:

• To specify all pages, enter “1-0.”

12) 

Copy count

Specifies the number of copies.

13) 

Queue priority

When placing a checkmark, the settings of queue are pri-
oritized over the settings for the printer driver.

14) 

Prechecking

Sets the pre-flight (the data check before output and the 
creation of thumbnails).

[Precheck pages]

: Specify the pages to check.

Select 

[All]

 or enter the last page in 

[Up to page]

.

[Create thumbnails]

: Set the thumbnails to create.

Select 

[All (prechecked)]

 or enter the last page in 

[Up 

to page]
[Thumbnail quality]

: Select the image quality of thumb-

nails from the following five levels.
Very low (fast) / Low / Default (medium) / High / Very high 
(slow)

* Displayed only when the type of queue is “Print”.

Содержание IS300

Страница 1: ......

Страница 2: ......

Страница 3: ...o not understand while using it Content of Instruction Manuals Notes 1 Unauthorized reproduction of all or part of this manual is strictly prohibited 2 Since there may be improvements to the product the content of this manual may change in the future without notice 3 RISO takes no responsibility for effects resulting from this manual or the operation of this product Copyrights and ComColorExpress ...

Страница 4: ...16 Printing a Job 17 Copying a Job to Another Queue 17 Moving a Job to Another Queue 18 Deleting a Job 18 Canceling a Processing Waiting Job 19 Rearranging Job Display Order 19 Displaying Thumbnails of a Job Job Preview 20 Viewing Editing Job Details 21 Using RIP Data Archived jobs 32 Creating Archived Jobs 32 Printing Archived Jobs 32 Editing Archived Jobs 33 Saving Archived Jobs to the Computer ...

Страница 5: ...4 Customization Settings 56 Custom forms 57 Custom paper sizes 58 Font management 59 Reports 60 Log settings 61 Checking the System Events Log 63 Checking Account Information 64 Managing Custom Queue 66 Creating New Queues New queue 66 Deleting Custom Queues Delete queue 67 Changing Detailed Settings of Queues Queue details 68 Stopping Queue Processing Stop 70 Resuming Queue Processing Start 70 Re...

Страница 6: ...twork 74 Displaying Print Controller Settings 74 Adding Print Controllers to the List 75 Deleting Print Controllers from the List 75 Starting Up Print Controllers 76 Displaying Latest Status 76 Starting Up the RISO Console 77 Using SMAP Windows only 78 Starting SMAP 78 Direct Printing by SMAP 79 Dragging and Dropping Files on the SMAP Icon on the Desktop 80 Appendix 82 Troubleshooting 82 Index 84 ...

Страница 7: ...ed a queue Login In order to access networks and specific device a login ID and password are required The act of inputting such information in order to access network and device is called login Important describes items where care is necessary or where there are prohibitions Note describes items where there is particularly helpful information and ones where there is something that should be known ...

Страница 8: ...rity guest user general user administrator see Logging in to the Print Controller p 9 Displaying the RISO Console Screen 1 Launch your Web browser See your computer operating manual or Help 2 Enter the IP address in the address bar of the URL In the address bar enter http the IP address of the IS300 The administrator sets the IP address Enter the IP address i e 192 168 9 51 confirmed by the admini...

Страница 9: ...nt controller 6 Job list The jobs in the print controller are listed according to the processing status Jobs in the queue Displays a list of jobs in the selected queue or jobs of the selected job type Waiting jobs Displays a list of jobs waiting in the print controller Active jobs Displays the jobs undergoing print processing while being processed by the print controller Finished jobs Displays a l...

Страница 10: ...Used to cancel a job becomes a job being processed p 19 Used to edit a job or queue p 21 p 68 Used to view and confirm queue settings p 11 Used to copy a job p 17 Used to move a job p 18 Used to upload a job p 13 Used to delete a custom queue p 67 Used to stop a queue for normal queues only p 70 Used to resume a queue for normal queues only p 70 Displayed after you click to stop a queue ...

Страница 11: ...tor can configure the administrator settings such as print controller settings p 44 How to Log In Enter the Login ID and Password in the input area and click the Log in but ton The Login ID and Password must be registered in the RISO Console by the administrator in advance p 48 For details confirm with your network administrator To log out click the Log out button Selecting Languages Selects the l...

Страница 12: ...eue settings p 11 When Others can see jobs p 48 has been set the following functions are available for both guest users and gen eral users Viewing the list of jobs p 16 Uploading jobs p 13 Viewing job details settings p 21 Copying jobs p 17 Editing job settings moving jobs p 18 p 21 Canceling waiting jobs p 19 Importing archived jobs p 41 Feeding back archived jobs p 37 Merging archived jobs p 40 ...

Страница 13: ... job from the RISO Console screen Note Normal and Hold queues are pre registered at the factory These queues cannot be deleted Moreover the fol lowing settings can be changed Normal Queue code priority direct port preferred PDL prechecking setting Hold Queue code prechecking setting The administrator can register various settings for processing jobs sent from the computer in the print controller a...

Страница 14: ... the queue is displayed Clicking the setting group icons at the top of the screen switches the details screen Note A details screen of the queue can be also dis played by moving the mouse pointer over the Queue menu button and then clicking Queue details in the displayed submenu For displayed items see Changing Detailed Settings of Queues p 68 3 After checking click the Close but ton ...

Страница 15: ...he screen Note When the target queue button is not displayed in the screen click the More queues button and select a queue from the list of queues The button of the selected queue is displayed 2 With no job selected click of the job queue information display on the right side of the screen 3 Select the file to add After clicking the Browse button select the file on the file selection dialog box an...

Страница 16: ...ue 14 4 Click the Upload job button The job is added to the queue Note The job can also be added to the queue by moving the mouse pointer over the Queue menu button and then clicking Upload job in the displayed submenu ...

Страница 17: ...ocol and FTP protocol are supported for accessing the hotfolder 1 Open Windows Explorer 2 Enter the IP address of the IS300 hotfolder i e 192 168 9 51 hotfolder or ftp the IP address of the IS300 queue i e ftp 192 168 9 51 queue in the address bar The hotfolder is displayed For SMB For FTP Note We recommend creating a desktop shortcut as an easy way of displaying the hotfolder 3 Drag and drop the ...

Страница 18: ...ctory PS Font Sample Page and Settings Page Any user can copy and print these sample pages but they cannot be deleted Checking Job Status 1 Click the queue button in which the job is stored from the Job Queue selection button on the left side of the screen A list of jobs stored in the queue is displayed 2 Click the job to check in the job list The information of the job is displayed in the Queue J...

Страница 19: ...obs For details see Checking Job Status p 16 2 Click of the Job Queue infor mation display on the right side of the screen Note Jobs can also be printed by moving the mouse pointer over the Job menu button and then clicking Print in the displayed submenu Jobs can also be printed by clicking the print icon in the job list Copying a Job to Another Queue 1 Select the job to copy from the job list For...

Страница 20: ...firmation box the job is deleted from the original queue and added to the destination queue Note To cancel job moving click the No button in the confirmation dialog box Deleting a Job 1 Select the job to delete from the job list For details see Checking Job Status p 16 2 Click of the Job Queue infor mation display on the right side of the screen Note The job can be also deleted by clicking the del...

Страница 21: ...n the Finished jobs list Note Canceled jobs can be reprinted or deleted Select the job from the Finished jobs list and print or delete it in the same way as normal jobs Rearranging Job Display Order The job list is normally displayed with the first job to process at the bottom When you click an item header displayed above the list the list of jobs is sorted according to that item The order of actu...

Страница 22: ...view 1 Select the job from the job list in the queue A piece of the job thumbnail is displayed in the Job Queue information display on the right side of the screen 2 Click the job preview image Thumbnails are displayed of all pages 3 After checking click the Close but ton ...

Страница 23: ...d oper ating the job is displayed By clicking this icon you can view detailed settings of the job Settings cannot be changed Job details settings screen Editing screen 3 Change the job processing settings if necessary Clicking the icon at the top of the screen switches the details screen OK Click to save setting changes and end edit ing Apply Click to save setting changes and con tinue editing Can...

Страница 24: ...r printing 5 Rotation Sets the orientation of the original for printing on paper 6 Input tray Selects the tray with the paper for printing 7 Auto process Sets the continuous mode for making a master and print ing 8 Preview Displays the layout processing image Also displays the coloring processing image with 2 color printers This setting cannot be displayed on 2 color printers Tray 1 or Tray 2 can ...

Страница 25: ...hrough which the job has been received 7 Pages Displays the number of pages of the job 8 Print pages 1 Specifies the pages to print 9 Copy count 1 Specifies the number of copies to print 10 Pages to print Displays the total number of pages of the job the number of pages of the original x the number of copies 11 Prechecking 1 2 Displays the data precheck data quality check before output setting Cli...

Страница 26: ... Up If N Up is selected at Imposition set the arrange ment of pages and the number of pages per sheet for imposition 6 Page size Displays the size of the original 7 Orientation Selects the orientation of printing the original 8 Output size Selects the paper size for printing 9 Zoom Specifies the enlargement reduction ratio for printing 10 Rotation Sets the orientation of the original for printing ...

Страница 27: ...er print speed 9 High speed 6 Prints at high speed set in the RISO printer 10 Interval printing Extends the paper feed interval to prevent ink marks on the next sheet 1 The settings on the Basic screen apply here 2 This function is available when a sorter option is installed 3 This function is available when a sorter option with a stapler is installed 4 This function is available when a Job separa...

Страница 28: ...e color Sets the screen angle 4 Brightness Adjusts the density of images 5 Contrast Adjusts the contrast of images 6 Text to solid look Text is given a solid look 7 Line to solid look Illustrations are given a solid look 8 Print density color Sets the print density With 2 color printers Color 1 and Color 2 can individually be set Note For details of settings refer to the separate manual RISO Contr...

Страница 29: ... texts illustrations and photos in the printing data are separately printed in two colors 3 Color separation setting Sets the color separation method 4 Coloring Displays the image of the original data or printing data according to the settings 5 Installed drum colors Displays the ink color name set for Color 1 and Color 2 in the printer The ink color of the printer drum registered on the Options s...

Страница 30: ...ata is printed 2 Form selection Selects the form archived job printed in the output data 3 Prepend Selects the form archived job added before the output data 4 Append Selects the form archived job added after the output data 5 Preview The selected form is previewed The setting is displayed only with 2 color printers Note For details of settings refer to the separate manual RISO Controller IS300 Pr...

Страница 31: ...Adjusts the print position horizontally between 254 mm 10 and 254 mm 10 2 Vertical shift Adjusts the print position vertically between 254 mm 10 and 254 mm 10 3 Print position Selects a standard position allocated to the original image on the paper Note For details of settings refer to the separate manual RISO Controller IS300 Printer Driver Guide ...

Страница 32: ...letes Activates the confidential mode after printing 3 Output data after initializing printer Resets the printer settings before sending the output data to the printer 4 Job delegation Distributes jobs to other IS300s that are connected on the network 5 Job splitting Splits one job into multiple jobs 6 Send E mail Sends a job status email message to a specified email address 7 Comment Enter commen...

Страница 33: ...ontroller processing for the selected job Information displayed 1 Logging Displays the time when each processing was executed processing conditions and detailed information 2 PostScript output Displays information such as error codes that occurred during PostScript conversion ...

Страница 34: ...er to create archived jobs the following methods are available When printing the original data from the computer set the Destination to Archive or Print archive on the Workflow screen of the printer driver For details refer to the separate manual RISO Controller IS300 Printer Driver Guide For jobs sent to the print controller set the Destination to Archive or Print archive on the Workflow screen o...

Страница 35: ...ng will start at the new settings The job can also be printed by clicking the print icon on the job list Editing Archived Jobs 1 Click the Archive jobs button from the Job Queue selection button on the left side of the screen and select the job to edit from the list of Archive jobs For details see steps 1 and 2 in Printing Archived Jobs p 32 2 Click Overview in the Job preview Thumbnails are displ...

Страница 36: ...obs p 40 4 Save the edited archived data 1 Click the Save changes button on the pre view screen 2 Enter the new job name and click the OK button After the job is processed it is added to the list of Archive jobs Note To not save the edited archived data click the Close button on the preview screen and click the Yes button in the confirma tion dialog box Moving Pages Select the page on the preview ...

Страница 37: ... copied page is added after the original page Inserting Blank Pages Insert blank page 1 Select the location next page where to insert the blank page on the preview screen of the archived job 2 Click Insert blank page The blank page is added in front of the selected page Note To add a blank page as the last page click Insert blank page without selecting a page ...

Страница 38: ...review color Select a color from the Preview color pull down menu on the preview screen of the archived job Note With a 2 color printer you can select from Color 1 and Color 2 Double clicking the page opens an enlarged image of the page in a different screen and the selected color is applied as the display color of the preview Note The display color of the preview can be registered by the administ...

Страница 39: ...cify the page to download from the archived data Pack to zip file When placing a checkmark a zip compressed job The extension is zip is saved This cannot be set for PDF format Resolution Screen Downloads the image with the reso lution for screen display 75dpi Two color separation data shows the 2 color overlapped image Full Downloads the image with the resolution for printing This image can be use...

Страница 40: ... ton The data is saved in the specified folder Exporting Archived Jobs to the Computer 1 Click Export job in the feedback setting screen Note The archived data can be also downloaded by moving the mouse pointer over the Job menu button and then clicking Export in the dis played submenu 2 Click the Save button 3 Specify the destination folder and file name and click the Save but ton The data is sav...

Страница 41: ...of the computer With Macin tosh computers holding down the Alt key You can also select them by specifying the range of jobs while holding down the Shift key Note Archived jobs are merged in the order of selec tion To cancel the selection click the jobs to cancel while holding down the Ctrl key With Macin tosh computers holding down the Alt key 2 Move the mouse pointer over the Job menu button and ...

Страница 42: ...ved Jobs p 33 2 In the same way display the preview screen of the archived jobs to merge 3 Select the page to copy then drag and drop the page at the merging location The selected page is added to the merging loca tion before the specified page 4 Save the merged archived data 1 Click the Save changes button on the pre view screen 2 Enter the new job name and click the OK button After the job is pr...

Страница 43: ...on of archived jobs p 38 p 55 1 Click the Archive jobs button from the Job Queue selection button on the left side of the screen 2 Click of the Job Queue infor mation display on the right side of the screen The Import archive job screen is displayed 3 Click the Browse button and select the archived job After specifying the archived job on the file selec tion screen click the Open button 4 Click th...

Страница 44: ...button and then clicking Printer details in the displayed submenu After the checking is completed click the Close button Note The displayed content varies according to each printer model General Clicking General displays information on the printer and printer status Paper trays Clicking Paper trays displays the paper size and paper quantity set in the paper trays ...

Страница 45: ...so be registered Note After registering the ink color of the print drum on the Installable options screen Preview color can be selected from the preview screen of the archived job p 36 The ink color of the print drum can be registered after logging in as the administrator Consumables Clicking Consumables displays the remaining amount of the master and ink and master disposal capacity of the printe...

Страница 46: ...for the administrator is set to Admin and the password is set to 0000 Be sure to set a password after the logging in as the administrator p 48 Available functions for administrator After logging in as the administrator in addition to the available functions for general users the following operations are enabled Changing the detailed settings of the print controller p 45 Configuring the network set...

Страница 47: ... print controller The detailed setting screen for the print controller can be displayed by moving the mouse pointer over the RIP menu button and then clicking RIP details in the displayed submenu Clicking the icon at the top of the screen switches to the corresponding setting screen OK Click to save setting changes and end editing Apply Click to save setting changes and continue editing Cancel Cli...

Страница 48: ...queue Note Jobs in the Hold queue and jobs in stopped process ing status are not included 4 Comment The comment concerning the print controller can be entered 5 Detailed information Displays an outline and network settings of the print con troller 6 Status report The detailed information of the print controller can be downloaded in text format Actions Inputting comments When you click the input ar...

Страница 49: ...sk Enter the subnet mask of the network to which the print controller is connected 7 Ether Talk zone When using the printer via AppleTalk enter the Apple Talk zone name of the network to which the print control ler is connected indicates that the print controller is enabled for all zones 8 NetBIOS workgroup When the communications are conducted using Net BIOS enter the NetBIOS workgroup name 9 Nam...

Страница 50: ...sers 1 Select the user name to delete from the list of registered user names 2 Click the Delete user button The user is deleted Changing the Language of Notifications 1 Select the user name from the list of registered user names 2 Select a language from the Notification language combo box 3 Click the Change language button Set the language to be used for the e mail notification function sent to se...

Страница 51: ...ob list 2 Enter the password in the Password input area Enter the password in 0 to 31 characters using alphanumeric characters and symbols _ 3 Re enter the password in the Retype password input area 4 Click the Create button The user is registered and the user name is added to the list of registered user names on the left side of the screen Changing General User Settings When a checkmark is placed...

Страница 52: ...ing for print jobs stored in the print controller Setting Default Page Size Default page size From the Default page size combo box select the page size applied to jobs for which a page size has not been set Note Jobs for which a page size has not been set are for example sample pages stored in the print controller and print jobs created by printer drivers except the printer driver of this print co...

Страница 53: ...Manual is selected other settings are not required 2 Select the unit of deletion timing in When By hours When the set time elapses jobs are automatically deleted By days When the set number of days elapses jobs are automatically deleted By amount When the number of stored jobs exceeds the set number jobs are automatically deleted in chron ological order with the oldest job deleted first 3 Enter th...

Страница 54: ...esh RIP list from network Searches for IS300 connected to the network 2 Direct input and addition of Name IP address Adds the name and IP address of the print controller to the list by direct input 3 Deletion from the controller list Deletes the print controllers from the list 4 Job delegation setting Load balancing Sets whether or not the print controller in the list is used for distributed proce...

Страница 55: ...side of Name IP address of the print controller the print controller is deleted from the list Click OK or Apply to confirm the settings Time settings Synchronizes the print controllers time settings with the computer s time settings Displayed information 1 PC time Displays time settings of the computer 2 RIP time Displays time settings of the print controller Actions Synchronize When clicking the ...

Страница 56: ...en importing data data for which Clear before import is marked with a checkmark will be deleted then imported Exporting queue settings to the computer Export queues Click the Export queues button and enter the destination folder and file name and then execute the save All the queue settings currently registered in the print controller are saved The file is saved in text format file exten sion txt ...

Страница 57: ...xport archive jobs button and enter the destination folder and file name and then execute the save All archived jobs currently saved in the print controller are saved in one file The file is saved with a shae extension Note Files can be saved up to 2 GB in size Importing multiple archived jobs from the computer Import archive jobs Click the Browse button and specify the archived jobs file to impor...

Страница 58: ...n setting screen can be displayed by moving the mouse pointer over the RIP menu button and then clicking Custom preferences in the displayed submenu Clicking the icon at the top of the screen switches to the corresponding setting screen OK Click to save setting changes and end editing Apply Click to save setting changes and continue editing Cancel Click to cancel setting changes and end editing ...

Страница 59: ...nd on the Forms screen of the Job details menu Forms screen p 28 Settings Custom form 1 to 10 Archived jobs saved in the print controller are allocated to custom forms Setting up custom forms In the combo box of the custom form you want to set select the name of the archived job to allocate Note Data to be used as a custom form must first be archived p 32 Only 1 color data can be used as a custom ...

Страница 60: ...Controller IS300 Printer Driver Guide Settings Custom 1 10 Registers the Width in mm or Width in inch and Height in mm or Height in inch to the paper names Setting custom paper sizes user defined sizes Enter a numeric value mm or inch in the Width in mm or Width in inch box and the Height in mm or Height in inch box on the right side of the paper name Note Set the custom paper sizes within the ran...

Страница 61: ...d Click the Download button and execute the download to the print controller Note The names of downloaded fonts are added to the list of installed fonts After the installing is completed click the Close button to close the screen To download multiple fonts select multiple fonts image file compressed as zip format and click the Download button Deleting a font Delete Select the font to delete from t...

Страница 62: ... report screen can be displayed by moving the mouse pointer over the RIP menu and then clicking Reports in the displayed submenu Clicking the icon at the top of the screen switches to the corresponding setting screen OK Click to save setting changes and end editing Apply Click to save setting changes and continue editing Cancel Click to cancel setting changes and end editing ...

Страница 63: ... for accounting infor mation stored in the print controller Setting the Destination of E mail Notification Notification to E mail address In the Notification to E mail address input area enter the e mail address to notify event information to When e mail is not used for notification entry into the input area is not required Preventing duplicated notification of the same event No duplicates within ...

Страница 64: ...on timing in When By hours When the set time elapses jobs are automatically deleted By days When the set number of days elapses jobs are automatically deleted By amount When the number of stored event information exceeds the set number jobs are automatically deleted in chronological order with the oldest job deleted first 3 Enter the reference number in the Value input area The timing of automatic...

Страница 65: ...ms Time Type Event class Details To save the event log click the Download button and specify the destination folder and file name to save The data is saved in CSV file format When you click an event in the list the Remove all older entries button is displayed To delete all old entries at once click the Remove all older entries button to delete the event After the checking is completed click the Cl...

Страница 66: ...ems Job Owner name Modification time Processing time Print time Total page count Output count Final status When you click an entry in the list the Remove selected entry button the Remove all older entries button and the Show details button are displayed Remove selected entry When clicked the selected entry is removed Remove all older entries When clicked all information prior to the selected entry...

Страница 67: ...the selected job Click the Back to overview button to return to the list screen To save the account information click the Download button and specify the destination folder and file name to save The data is saved in CSV file format After the checking is completed click the Close button to close the screen ...

Страница 68: ...ller IS300 Printer Driver Guide Creating New Queues New queue 1 Move the mouse pointer over the Queue menu button and then click New queue in the displayed sub menu The Create new queue screen is displayed 2 Enter the name of the new queue in the Queue name input area Enter a name up to 12 characters long using alphanumeric characters and symbols _ 3 Select Queue type Print The job sent to this qu...

Страница 69: ...er over the Queue menu button and then click Delete queue in the displayed sub menu Note After selecting the queue button the queue can be also deleted by clicking of the Job Queue information display on the right side of the screen in the state that the job is unse lected 3 Click the Yes button in the confir mation dialog box The selected custom queue is deleted Note Normal and Hold queues cannot...

Страница 70: ...p of the screen switches the screen Note The queue details screen can be also displayed by moving the mouse pointer over the Queue menu button and then clicking Queue details in the displayed submenu Queue details screen Edit screen 2 Changing queue processing settings Clicking the icon at the top of the screen switches the screen Queue priority When placing a checkmark the settings of queue are p...

Страница 71: ...ts the port number 9100 9999 of the RAW port 8 Preferred PDL Sets the page description language PDL to be received by the RAW port PS When a job received by a port other than the RAW port PDL is automatically detected 9 Number of jobs Displays the number of jobs in the queue 10 Number of pages Displays the total number of pages of the jobs in the queue the number of pages of each job x the number ...

Страница 72: ...g of the Job Queue information display on the right side of the screen in the state that the job is unselected Resuming Queue Processing Start Processing of a queue that has been stopped can be resumed Move the mouse pointer over the Queue menu button and then click Start in the displayed submenu Note After selecting the queue button processing can be also resumed by clicking of the Job Queue info...

Страница 73: ... down the print controller and turn the power off from the RISO Console 1 Move the mouse pointer over the RIP of menu button and then click RIP shutdown in the displayed sub menu 2 Click the Yes button in the confir mation dialog box The print controller will shut down Note If Active jobs are undergoing processing when the print controller is rebooted or shut down the jobs are canceled and moved t...

Страница 74: ... the IP address of the IS300 on the network and starting the print controller by remote control SMAP Windows only Direct print utility that allows printing by the dragging and dropping files This chapter describes the functions and how to operate the RISO Management Tool and SMAP Note For software installation refer to the separate manual RISO Controller IS300 Setup Guide For information on the RI...

Страница 75: ... Tool in the RISO IS300 group For Windows 10 select Start All apps RISO IS300 RISO Management Tool For Macintosh Select Applications folder RISO IS300 RISO Management Tool Basic screen 1 Menu When clicking the corresponding function is executed For details see the next page onward 2 Language selection From the language selection box on the right side of the screen select the language for messages ...

Страница 76: ...he computer and the print controllers are not con nected to the same network segment the print con trollers will not be found Add the printer controller to the list as explained in Adding Print Controllers to the List p 75 Displaying Print Controller Settings 1 On the basic screen of the RISO Management Tool select the name of a connected controller from the list 2 Click Display The communication ...

Страница 77: ...Tool The communication settings screen is displayed 2 Enter the RIP Name or IP address of the print controller to add to the list and click the OK but ton Note For the RIP Name and IP address confirm with your network administrator When the relevant print controller is detected it is displayed in the list Deleting Print Controllers from the List 1 On the basic screen of the RISO Management Tool se...

Страница 78: ...from the computer 1 On the basic screen of the RISO Management Tool select the RIP name of the sleeping print controller from the list 2 Click Wake Up The print controller starts up and the status is dis played in the list Displaying Latest Status Click Refresh on the basic screen of the RISO Management Tool The latest status of the print controllers displayed in the list is displayed ...

Страница 79: ...e RISO Console that manages jobs and queues can be started On the basic screen of the RISO Manage ment Tool select the target RIP name from the list and click WWW The Web browser starts and the RISO Console screen for the selected print controller is displayed For available functions and operation procedures of the RISO Console screen see RISO Console p 6 and Administrator Settings p 44 ...

Страница 80: ...sing settings registered in the queue of the specified print con troller Note This software cannot be used with Macintosh computers Starting SMAP From the Start menu of the Windows computer select All Programs or Programs Windows 2000 RISO RISO IS300 SMAP For Windows 8 Windows 8 1 open the Apps screen and click SMAP in the RISO IS300 group For Windows 10 select Start All apps RISO IS300 SMAP The b...

Страница 81: ...IP name Queue Example IS300G Normal 2 Click the Add Files button Note Files can also be added by dragging and drop ping them on the SMAP screen 3 Select the file to print and click the Open button Note The file formats that can be printed are as fol lows PostScript PDF file TIFF file If RAW port is set for a printer SMAP cannot be used to print PDF files to that printer To add multiple files repea...

Страница 82: ...eation of a SMAP shortcut icon on the desktop direct printing can be executed by simply dragging and dropping files on the shortcut icon 1 Drag and drop the file to print onto the SMAP icon The list of print controllers printer drivers is dis played as a popup 2 Select the print controller including the queue to send the original data The original data is sent to the specified queue of the print c...

Страница 83: ...Using the Included Utility Software Using SMAP Windows only 81 ...

Страница 84: ...en sent the Queue priority is set to on When you want to prioritize the settings of the printer driver either change the processing settings of the queue administrator setting or select a different queue before executing the print operation The job you have sent cannot be canceled deleted or edited in the RISO Console The job manager has been used without logging in or was logged into with an ID t...

Страница 85: ...Appendix Troubleshooting 83 ...

Страница 86: ...b details settings 21 Job Display Order 19 Job manager 16 Job ownership 16 Job Preview 20 Job settings 50 L Log in 9 44 Log settings 61 Login ID 49 M Merging Multiple Archived Jobs 39 Merging Pages from Multiple Archived Jobs 40 Moving a Job to Another Queue 18 N Network settings 47 Normal queue 11 O Others can see jobs 49 P Password 49 Printer Status 42 Printing a Job 17 Printing Archived Jobs 32...

Страница 87: ......

Страница 88: ......

Отзывы: