


7 Maintenance
7-4. Parts replacement
- 37 -
7-4. Parts replacement
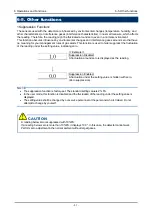
<Sensor Replacement>
Gas sensor replacement is according to the following procedures.
(1) Turn off the power supply (24VDC) to the detector.
(2) After loosened set screw by hex wrench (nominal size 2),remove sensor guard by hex wrench (nominal
size 6).
(3) Remove the sensor. Pinch top of sensor (sintered metal portion) by using finger, and pull out it.
(4) Mount a new sensor. There are five pins for sensor, but a pin is longer than the others to show the
reference, and equip detection unit with sensor .When put on the sensor, do NOT scratch mating portion
of side of the sensor and adapter inside.
(5) After replacing a sensor, put on a sensor guard and set screw firmly. When installing the sensor guard,
make sure that the guard mounting part, set screw, and sensor guard are free of dust, and apply grease
specified by RIKEN KEIKI.
(6) After sensor replacement, turn on the power and warm – up, then do the zero - point adjustment and
span adjustment by [7-3
.
Gas calibration method].
Hex wrench
Sensor guard
Guard mounting part
Sensor
After the fixed, sets screw is
tightened in hex wrench (nominal
size 2)
Turning to
the main body front
When put on the sensor, do NOT
scratch mating portion of side of
the sensor and adapter inside.


