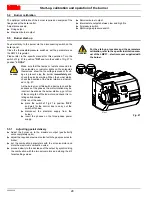
background image

Installation

21 

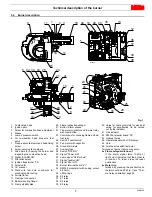
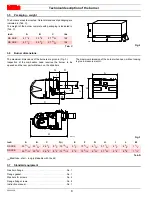
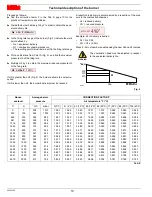
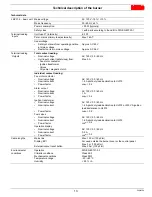
20044359

4.12 Electrical wiring

Notes on safety for the electrical wiring

If the hood is still present, remove it and proceed with the elec-
trical wiring.

All the cables to be connected to the burner are fed through the
grommets.

The use of the cable grommets can take various forms. 

By the way of example we indicate the following mode (Fig. 18)
(according to 

UL795

):

1

Three phase power supply with 

1

/

2

” cable grommet (no single

phase);

2

Single phase power supply with 

1

/

2

” cable grommet.

Available:
Consents/safety, minimum gas pressure switch, gas valves
and other devices with 

3

/

8

” cable grommet.

3

Available: maximum gas pressure switch (kit) and other

4

Horn 

5

Available: step down transformer

The electrical wiring must be carried out with the electrical supply disconnected.

Electrical wiring must be carried out by qualified personnel and in compliance with the regulations currently in force in
the country of destination. Refer to the electrical layouts.

The manufacturer declines all responsibility for modifications or connections different from those shown in the electri-
cal layouts.

Check that the electrical supply of the burner corresponds to that shown on the identification label and in this manual.

Do not invert the neutral with the phase in the electrical supply line. 
Any inversion would cause a lockout due to firing failure.

The electrical safety of the device is obtained only when it is correctly connected to an efficient earthing system, made
according to current standards. 
It is necessary to check this fundamental safety requirement. In the event of doubt, have the electrical system
checked by qualified personnel. 
Do not use the gas tubes as an earthing system for electrical devices.

The electrical system must be suitable for the maximum input power of the device,as indicated on the label and in the
manual, checking in particular that the section of the cables is suitable for the input power of the device.

For the main power supply of the device from the electricity mains:

- do not use adapters, multiple sockets or extensions;

- use an omnipolar switch with an opening of at least  

1

/

8

” (overvoltage category) between the contacts, as indicated

by the current safety standards.

Do not touch the device with wet or damp body parts and/or in bare feet.

Do not pull the electric cables.

WARNING

The control panel is in compliance with UL508A.

Fig. 18

1

2

5

2

4

3

D10369

Содержание RS 28/E

Страница 1: ...20044359 6 06 2015 Installation use and maintenance instructions Forced draught gas burner Progressive two stage or modulating operation CODE MODEL 20044216 RS 28 E 20105015 RS 38 E GB...

Страница 2: ...Original instructions...

Страница 3: ...io LMV37 4 12 3 11 Actuators SQM33 5 15 4 Installation 16 4 1 Notes on safety for the installation 16 4 2 Handling 16 4 3 Preliminary checks 16 4 4 Boiler plate 16 4 5 Blast tube length 17 4 6 Securin...

Страница 4: ...Contents 6 Maintenance 27 6 1 Notes on safety for the maintenance 27 6 2 Opening the burner 28 6 3 Closing the burner 28 A Appendix Spare parts 29 B Appendix Accessories 32 C Appendix Burner start up...

Страница 5: ...nerator is to be installed The instruction manual shows the serial number of the burner the address and telephone number of the nearest Assis tance Centre The system supplier carefully informs the use...

Страница 6: ...manual 1 2 1 Owner s responsibility Please pay attention to the Safety Warnings contained within this instruction manual Keep this manual for your records and provide it to your quali fi ed service a...

Страница 7: ...h the burner components is not allowed apart from the parts requiring maintenance Only those parts envisaged by the manufacturer can be replaced 2 2 Personnel training The user is the person body or c...

Страница 8: ...Low MBtu hr kW 198 58 266 78 Fuel Natural or propane gas Max delivery Pressure at maximum delivery 2 natural gas SCFH WC 1232 2 95 1665 2 6 Operation Low high low or modulating Standard application Bo...

Страница 9: ...remote 25 Fan motor with capacitor 26 Ground terminals 27 Auxiliary fuse 28 Switch OFF ON 29 Signal Power ON 30 Lamp signal Call for heat 31 Signal Ignition ON 32 Signal Fuel ON 33 Burner terminal bo...

Страница 10: ...maximum dimension of the burner when open without casing is give in measurement H Tab D 1 Blast tube short long obtainable with the kit 3 7 Standard equipment Gas train flange No 1 Flange gasket No 1...

Страница 11: ...e effect the expansion of the air volume i e the reduction of air density The burner fan s delivery remains substantially the same but the oxygen content per cubic meter and the fan s head are reduced...

Страница 12: ...respect to the equivalent delivery Qe H1r H1 x Qr Q 2 w c MBtu hr Qe H1 H3 H2 A Fig 5 D2617 Above sea level Average barom pressure CORRECTION FACTOR F Air temperature F C ft m WC mbar 0 0 C 41 5 C 50...

Страница 13: ...ce dimensions The firing rates were set in relation to certified test boilers Fig 6 indicates the diameter and length of the test combustion chamber Example Output 1388 MBtu hr diameter 20 inch length...

Страница 14: ...s via which it is possible to easily identify any causes of malfunctioning Mechanical design The following system components are integrated in the LMV37 4 basic unit Burner control with gas valve prov...

Страница 15: ...oltage Nominal current Power factor AC 120 V 50 60 Hz 1 6 A pilot duty load declaration to UL372 cos 0 4 Alarm output Nominal voltage Nominal current Power factor AC 120 V 50 60 Hz 1 A cos 0 4 Ignitio...

Страница 16: ...T P 10 Shutdown Operation Startup Valve proving OUTPUTS INPUTS Phase number Fuel Actuator 2 Air Actuator 1 Actuators Safety limit thermostat STB Control thermostat or pressurestat R Flame signal FS Ai...

Страница 17: ...s can be seen on the dis play of the Operator Panel Index 0 for fuel actuator index 1 for air actuator Installation notes Always run the high voltage ignition cables separate from the unit and other c...

Страница 18: ...carried out by qualified personnel as indicated in this manual and in compliance with the standards and regulations of the laws in force WARNING The handling operations for the burner can be high ly...

Страница 19: ...on of the blast tube For boilers having a water cooled front the insulation 4 5 Fig 11 is not required unless it is required by the boiler man ufacturer 4 6 Securing the burner to the boiler Secure th...

Страница 20: ...n notch 4 as in Fig 13 In this case the pressure load loss of the combustion head is given by column A Tab G page 20 Diagram Fig 14 shows the ideal settings for the ring 2 Fig 13 If the gas supply pre...

Страница 21: ...afety time range The pilot gas train must be connected to the gas attachment 5 Fig 15 and can enter the burner from the right or left side 4 10 Gas train It must be type approved according to UL Stand...

Страница 22: ...t operation Gas ring 2 Fig 13 adjusted as indicated in diagram Fig 14 Gas pressure at test point 1 Fig 17 3 WC Pressure in combustion chamber 0 8 WC 3 0 8 2 2 WC A maximum output of 990 MBtu hr shown...

Страница 23: ...ts Check that the electrical supply of the burner corresponds to that shown on the identification label and in this manual Do not invert the neutral with the phase in the electrical supply line Any in...

Страница 24: ...e motor is 400V To reset in the case of an intervention of the thermal relay press the button RESET Fig 19 The button STOP Fig 19 opens the NC 95 96 contact and stops the motor To test the thermal rel...

Страница 25: ...mum safe ty i e with gas delivery at the minimum 5 3 Burner firing Having completed the checks indicated in the previous heading the pilot of the burner should fire If the motor starts but the flame d...

Страница 26: ...ombustion value proceed slowly to the decrease of the output by synchronizing the combustion with the two servomotors and storing the dif ferent setting values DANGER Make sure that the lamps or teste...

Страница 27: ...e knob counter clockwise about 20 of the set point and start up the burner again to ensure the set point is correct If the burner locks out again turn the knob counter clockwise a little bit more 5 7...

Страница 28: ...ght the flame s intensity is displayed as a percentage Example 954 0 0 5 9 Final checks with the burner working S8171 P V h min s Fig 31 Open the control limit operation Open the high limit operation...

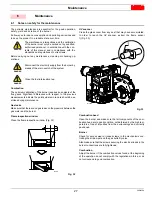
Страница 29: ...e sensor 1 Fig 33 Combustion head Open the burner and make sure that all components of the com bustion head are in good condition not deformed by the high tem peratures free of impurities from the sur...

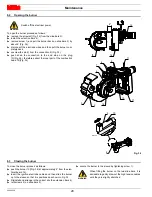
Страница 30: ...n head 12 Fig 34 6 3 Closing the burner To close the burner proceed as follows push the burner 13 Fig 34 at approximately 4 from the elec trical board 14 insert the ignition electrode cables and then...

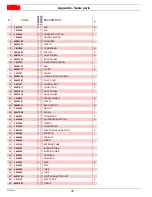
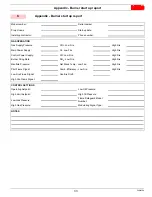
Страница 31: ...Appendix Spare parts 29 20044359 A Appendix Spare parts...

Страница 32: ...CONTROL BOX B 17 20027017 CONTACTOR C 18 20027018 LIGHT SIGNAL 19 20027020 LIGHT SIGNAL 20 3012956 TRANSFORMER B 21 20027021 SWITCH C 22 20008601 SERVOMOTOR B 23 3012993 MOTOR C 24 20027028 SCREW 25 3...

Страница 33: ...ONT PIECE 48 3003799 SQUARE 48 3003801 SQUARE 49 3003805 SHUTTER C 50 3003807 END CONE C 50 3003809 END CONE C 51 20091984 SPACER 52 3003893 TEST POINT 53 3006211 FUSE A 54 20026791 SUPPORT 55 2002703...

Страница 34: ...r to operate on LPG Gas train according to UL Standards B Appendix Accessories Burner MBtu hr Code RS 28 E 358 1232 3010270 RS 38 E 437 1665 3010271 WARNING The installer is responsible for the supply...

Страница 35: ...Fire High Fire Control Power Supply CO Low Fire High Fire Burner Firing Rate NOX Low Fire High Fire Manifold Pressure Net Stack Temp Low Fire High Fire Pilot Flame Signal Comb Efficiency Low Fire High...

Страница 36: ...URNERS NORTH AMERICA 35 Pond Park Road http www riello ca 2165 Meadowpine Blvd Hingham Massachusetts Mississauga Ontario U S A 02043 1 800 4 RIELLO Canada L5N 6H6 RIELLO S p A I 37045 Legnago VR Tel 3...

Отзывы: