background image

31 

20033090

GB

Maintenance

Nozzles

Do not clean the nozzle opening; do not even open it. The nozzle
filter however may be cleaned or replaced as required. Replace
the nozzle every 2-3 years or whenever necessary. After chang-
ing the nozzle, the combustion must be checked.

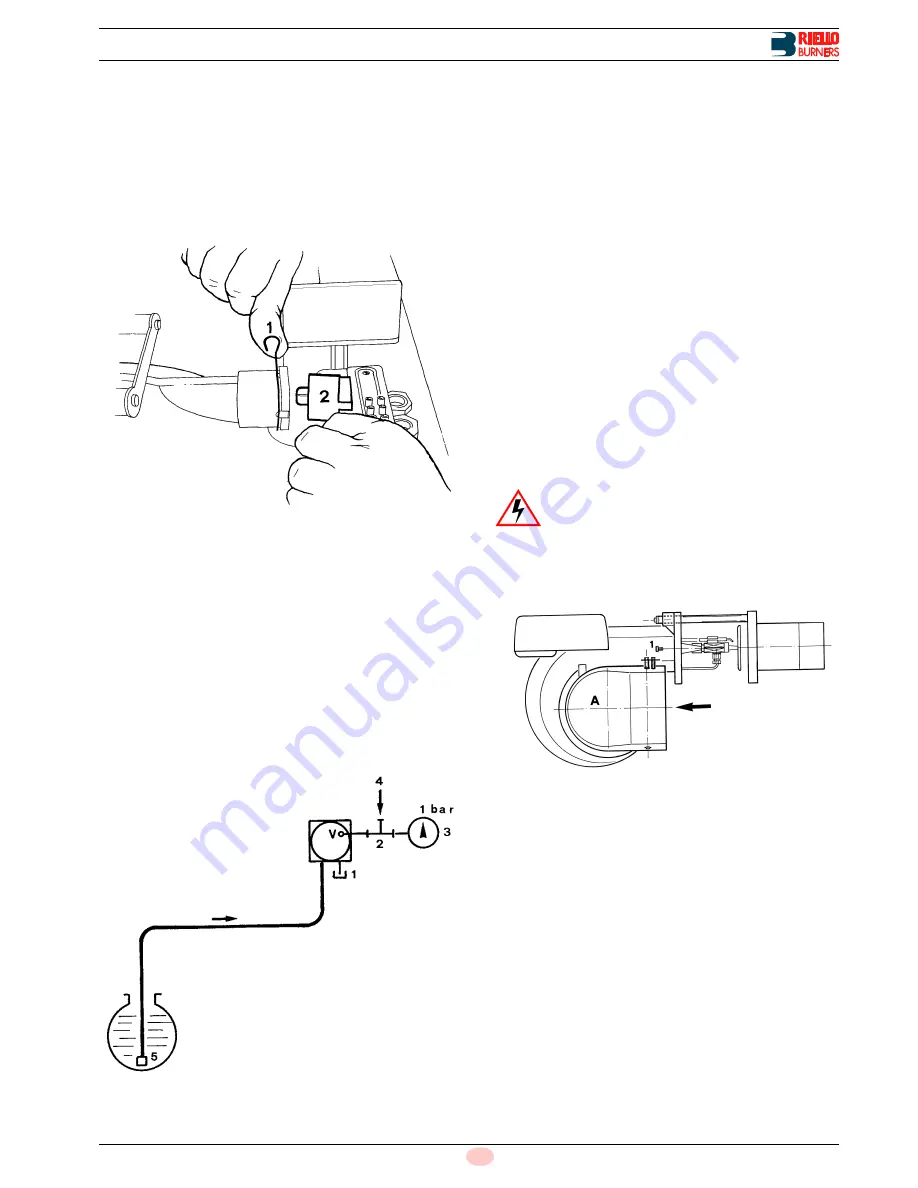
Photocell (Fig. 33)

Clean the glass cover from any dust that may have accumulated.
In order to extract the photocell 2) from its seat, raise the spring
1).

Hoses

Check to make sure that the hoses are still in good condition and
that they are not crushed or otherwise deformed. Check periodi-
cally the flexible pipes conditions. Using kerosene, they have to
be replaced at least every 2 years.

Gas oil fuel supply line (Fig. 34)

If the previous checks have suggested that air may be entering
the circuit somewhere, pressurize the circuit piping. Plug the
pump's return line connector 1)(Fig. 34) after removing the hose.
Install a union T 2)(Fig. 34) on the vacuum meter attachment. On
one branch of the T install the pressure gauge 3) and on the other
branch 4) inject air at a pressure of 1 bar. After the injection of air
has stopped, the gauge reading should remain stable. The suc-
tion piping must be equipped with a foot valve 5).

Fuel tank

Approximately every 5 years, or whenever necessary, suck any
water or other impurities present on the bottom of the tank using
a separate pump.

Boiler

Clean the boiler as indicated in its accompanying instructions in
order to maintain all the original combustion characteristics in-
tact, especially the flue gas temperature and combustion cham-
ber pressure. Lastly, check the condition of the flue gas stack.
Close the burner and apply power.
If the combustion characteristics measured at the beginning of
the control operation do not match the values listed in the previ-
ous inspection's technical report sheet or fail to provide satisfac-
tory combustion, the burner must be re-calibrated.Write the new
values down on the data sheet illustrated on page 33 or a similar
document. These values will be useful for comparison during fu-
ture checks. Lastly, check to make sure that the fan air gate valve
is in good condition and that the screws are tightly locked. The
tightness of the screws that fasten the cables to the burner termi-
nal block must also be checked. Clean the outside surfaces of the
burner and spray all parts that show signs of rusting with silicon
rust-preventer.

8.2.3

Opening the burner

Unscrew the screws 1)
Pull back part A while keeping it slightly lifted.

Other control measurements

Check the parameters listed in the data sheet on page 33.
Significant differences with respect to the previous measure-
ments indicate the points where more care should be exercised
during maintenance. 
Once these controls and measurements have been performed,
stop the burner, disconnect the power supply, and close the man-
ual valves on the fuel lines and open the burner.

Fig. 33

D2561

Fig. 34

D387

DANGER

Disconnect the electrical supply from the
burner.

D421

Fig. 35

Содержание PRESS GBV

Страница 1: ...20033090 1 02 2011 Installation use and maintenance instructions Gas oil burners Single stage operation CODE MODEL TYPE 20032884 PRESS GBV 604T50 GB PRESS GBV...

Страница 2: ......

Страница 3: ...minary checks 14 5 4 Installer Servicer notes for the use of Gas oil with Bio blends up to 10 15 5 5 Operating position 15 5 6 Boiler plate 15 5 7 Blast tube length 16 5 8 Securing the burner to the b...

Страница 4: ...20033090 2 GB Contents 9 Faults Possible causes Solutions 32 9 1 Burner start up cycle diagnostics 33 9 2 Operating fault diagnostics 33 9 3 Control card 34 A Appendix Accessories optional 35...

Страница 5: ...re in compliance with the following Technical Standards EN 267 EN 292 and according to the European Directives MD 2006 42 EC Machine Directive LVD 73 23 EEC 2006 95 EC Low Voltage Directive EMC 89 336...

Страница 6: ...livered to the user by the system manufacturer with the recommendation to keep it in the room where the heat generator is to be installed The instruction manual shows the serial number of the burner t...

Страница 7: ...ump safety value and nozzle The Riello war ranty is dependent upon the use of Riello genuine compo nents including the oil lines being used 3 Riello warranty does not cover defects arising from incorr...

Страница 8: ...pliance applica tion and commissioned checking that all combustion param eters are as recommended in the appliance technical manual Riello recommends that the in line and burner oil pump fil ters are...

Страница 9: ...nd maintenance errors or to improper use 3 3 Basic safety rules Children or inexpert persons must not use the appliance Under no circumstances must the intake grids dissipation grids and ventilation v...

Страница 10: ...ol system FS1 Standard 1 stop every 24 h FS2 Continuous working 1 stop every 72 h Electrical supply of the system 1 230 50 1 230V 50Hz 1 210 60 1 210V 60Hz 1 220 60 1 220V 60Hz 1 200 50 60 1 200V 50 6...

Страница 11: ...604T50 Power 1 Output 1 kW Mcal h kg h 178 356 153 306 15 30 Fuel Gas oil and Blends of gas oil and bio fuel FAME in accordance with EN 14214 up to 10 Gas oil net calorific value density viscosity at...

Страница 12: ...0 kg h delivery line the 0 3 mbar combustion chamber pressure line the combustion chamber maximum pressure curve The work point may be found by plotting a vertical line from the desired delivery and a...

Страница 13: ...5 Multiply H2 by F to obtain the maximum reduced pressure H3 of the firing rate If H3 is greater than H1 as shown in Fig 4 the burner deliver the output required If H3 is lower than H1 the burner s de...

Страница 14: ...ngth 1 m Whenever the burner is operated in a much smaller commercial ly available combustion chamber a preliminary test should be performed kg h B mbar 4 6 5 7 23 21 1 5 5 5 6 1 A mbar kg h C 4 5 22...

Страница 15: ...hotocell for flame presence control 15 Fan rotation direction 16 Indexed selector NOTE If the control box 22 Fig 7 push button lights up it indi cates that the burner is in lock out To reset hold the...

Страница 16: ...and regula tions of the laws in force WARNING The handling operations for the burner can be highly dangerous if not carried out with the great est attention keep any unauthorised people at a distance...

Страница 17: ...flexible oil lines must be suitable for bio fuel use check with Riello if in doubt Riello have carefully chosen the specification of the bio compatible components including the flexible oil lines to p...

Страница 18: ...action of the blast tube 5 8 Securing the burner to the boiler Disassemble the blast tube 6 from the burner by proceeding as follows Remove the screws 2 from the two slide bars 3 Remove the screws 1 t...

Страница 19: ...rner s exact delivery can only be determined by weighing Suck the fuel from a recipient mounted on a weighing machine or attach hoses to the nozzles and weigh the fuel that flows out A liter counter c...

Страница 20: ...tly but not to the maximum torque value provided by the wrench Be careful to avoid damaging the nozzle sealing seat Lastly close the burner by screwing in the two screws 1 Fig 15 WARNING Do not use an...

Страница 21: ...oiler sur faces Use two wrenches to screw in the hoses nip ples one to grip the hose connector and the other to grip the nipple in order to apply the op posite force Fig 16 D413 PUMP WARNING Where gas...

Страница 22: ...the regular flow of fuel and quick checking of the state of the filter The return pipe does not require an on off valve but if the user desires to insert one a lever type valve should be selected whi...

Страница 23: ...n line connector must be plugged This solution is possible only with low pump depression values max 0 2 bar and perfectly sealed piping Key Fig 18 H Pump Foot valve height difference L Piping length v...

Страница 24: ...d NPTF into the cylindrical thread G NOTE The pump is equipped with a bypass that connects return line and the suction line The pump is installed on the burner with the bypass closed by screw 6 Fig 31...

Страница 25: ...time required for this operation depends upon the diameter and length of the suction tubing If the pump fails to prime at the first starting of the burner and the burner locks out wait approx 40 secon...

Страница 26: ...able the control box to perform checks of its own start up efficiency Normally the boiler s thermostat pressure switch ensures the stopping of the burner If this is not the case it is necessary to app...

Страница 27: ...RR F All cables to be connected to the burner terminal strip 6 Fig 7 on page 13 should pass through fairleads 7 Fig 7 on page 13 The fairleads and precut holes can be used in various ways One example...

Страница 28: ...in this phase is the application of a pressure gauge on the apposite pump attachment indicated in Tab F at page 17 7 2 3 Fan gate adjustment The fan gate is set using the indexed selector 1 Fig 27 af...

Страница 29: ...DIN Fig 6 on page 12 emissions of Bachar ach CO2 CO CxHy NOx obtained in laboratory tests with our burners proved to be lower than the limits defined by EC Norms EN 267 under the operating conditions...

Страница 30: ...gnificantly higher than expected and the burner s delivery is correct make sure that the boiler is not dirty that the flue gas duct is not obstructed and that the flue gas stack has been correctly siz...

Страница 31: ...sec The ignition transformer switches off After 39 sec The starting cycle comes to an end 7 9 2 Steady State Operation When the temperature or pressure increases until control device TL opens the bur...

Страница 32: ...ty The vacuum meter is installed upstream from the filter and consequently will not indicate whether the filter is clogged or not Contrarily if the problem lies in the suction line check to make sure...

Страница 33: ...accompanying instructions in order to maintain all the original combustion characteristics in tact especially the flue gas temperature and combustion cham ber pressure Lastly check the condition of t...

Страница 34: ...e Presence of electromagnetic disturbance Use the radio disturbance protection kit The burner goes to lock out right after flame appearance Delayed firing by electrodes or poorly adjusted head Adjust...

Страница 35: ...open gate valve Blast tube length unsuited to boiler Contact boiler manufacturer Sequences Colour code Pre purging Ignition phase Operation flame ok Operating with weak flame signal Electrical supply...

Страница 36: ...re at stack T1 Temperature PV Fan pressure RT Combustion head adjustment RS Fan gate valve adjustment T P Temperature or pressure PC Comb chamber pressure Qs Heat loss at stack BURNER MODEL TYPE CODE...

Страница 37: ...re provided in two versions Code 20034277 without filter Code 20034281 with filter For burner deliveries higher than 80 kg h install two parallel de gassing units Kit for lengthening the combustion he...

Страница 38: ......

Страница 39: ......

Страница 40: ...Subject to modifications RIELLO S p A I 37045 Legnago VR Tel 39 0442 630111 http www rielloburners com...

Отзывы: