


• If a ring gauge is not available to inspect thread
size, it is possible to use a new clean fitting repre-
sentative of those used on the job to gauge thread
size. For 2" and under NPT threads, the threads
should be cut to obtain 4 to 5 turns to hand tight
engagement with the fitting and for BSPT it should
be 3 turns. For 2
1
/
2
" to 3" NPT threads the hand tight
engagement should be 5.5 to 6 threads, and for
BSPT it should be 4 threads.
4.
See “Adjusting Thread Size” under “Die Head Set-
Up and Use”
heading to adjust thread size
.
5. Test the piping system in accordance with local codes
and normal practice.
Preparing Machine for Transport
1. Make sure that the REV/OFF/FWD switch is in the
OFF position and the cord is unplugged from the
outlet.
2. Clean the chips and other debris from the chip tray.
Remove or secure all equipment and material from
the machine and stand prior to moving to prevent
falling or tipping. Clean up any oil or debris on the
floor.
3. Place the cutter, reamer and die head in the operat-
ing position.
4. Coil up the power cord.
5. If needed, remove the machine from the stand. Use
proper lifting techniques, be aware of the machine
weight. Machine is equipped with four hand grips at
corners. Use care in lifting and moving.
Maintenance Instructions
WARNING
Make sure that the REV/OFF/FWD switch is in the
OFF position and the machine is unplugged before
performing any maintenance or making any adjust-
ments.
Always wear eye protection.
Maintain threading machine according to these
procedures to reduce the risk of injury from elec-
trical shock, entanglement and other causes.
Cleaning
After each use, empty the threading chips from the chip
tray and wipe out any oil residue. Wipe oil off exposed sur-
faces, especially areas of relative motion like the car-
riage rails.
If the jaw inserts do not grip and need to be cleaned, use
a wire brush to remove any build up of pipe scale, etc.
Lubrication
On a monthly basis (or more often if needed) lubricate all
exposed moving parts (such as carriage rails, cutter
wheels and rollers, cutter feed screw, jaw inserts and
pivot points) with a light lubricating oil. Wipe any excess oil
from exposed surfaces.
Clean the lubrication points to remove dirt and prevent
contamination of the oil or grease. Lubricate on a month-
ly basis.
300 Compact:
Use a grease gun to add a Lithium EP
(Extreme Pressure) grease through the grease fittings in
the lubrication points.
1233:
Fill the lubrication points with lubricating oil. Press
the ball in the lubrication point to allow the oil to reach
bearings.
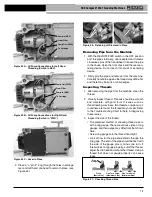
Figure 28 – Lubrication Points
Oil System Maintenance
Keep the oil filter screen clean for sufficient oil flow. Oil fil-
ter screen is located in the bottom of oil reservoir. Loosen
the screw that secures filter to base, remove filter from oil
line and clean. Do not operate machine with oil filter
screen removed.
Figure 29 – Filter Screen Assembly
16
300 Compact/1233 Threading Machines
Lubrication Points
Filter
Screen
Chip Tray
Oil Pan
Liner
Oil Drain
Содержание 300 Compact
Страница 22: ...20 300 Compact 1233 Threading Machines ...
Страница 44: ...42 Fileteuses 300 Compact et 1233 ...
Страница 67: ...300精致型 1233型电动套丝机 操作手册 电动套丝机操作手册 300 Compact 1233 300精致型 1233型电动套丝机 在下面空格内记下产品序列号 并妥善保存写有产品序列号的铭牌 序列号 ...
Страница 85: ...83 300精致型 1233型电动套丝机 ...
Страница 86: ...84 300精致型 1233型电动套丝机 ...


