


Die heads using Mono or Bolt dies require a dedicated set
of dies for each specific thread size. High speed dies
are recommended for use on 52 rpm machines.
See the RIDGID catalog for dies available for your die
head.
Always cut a test thread to confirm proper thread size after
changing/adjusting the dies.
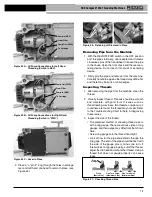
Removing/Installing Die Head
Insert/remove Die Head Post into mating hole in car-
riage. When fully inserted, the Die Head will be held in
place. When it is installed, the Die Head can be pivoted on
post to align it with pipe or it can be swung up and out of
the way to allow use of cutter or reamer.
Quick-Opening Die Heads
Quick opening die heads include Model 811A and 531/532
Bolt. Quick opening die heads are manually opened and
closed for user specified thread length.
Figure 6 – Quick-Opening Die Head
Inserting/Changing the Dies
1. Place the die head with numbers facing up.
2. Move throwout lever to OPEN position
(Figure 7)
.
Figure 7 – Open/Closed Lever Position
3. Loosen clamp lever
(Hex nut on Mono die
heads) approximately
three turns.
4. Lift tongue of wash-
er out of slot in size
bar. Move washer to
end of slot
(Figure 8)
.
5. Remove dies from the
die head.
6. Insert appropriate dies into the die head, numbered
edge up until the in di cator line is flush with the edge of
the die head
(see Figure 8)
. Numbers on the dies
must correspond with those on the die head slots.
Always change dies as sets – do not mix dies from dif-
ferent sets.
7. Move link index mark to align with desired size mark
on size bar. Adjust die insertion as needed to allow
movement. Washer tongue should be in slot to left.
8. Tighten clamp lever (Hex nut on Mono die heads).
Adjusting Thread Size
1. Install the die head per the Threading Machine instruc-
tions and move the die head into threading position.
2. Loosen clamp lever (Hex nut on Mono die heads).
3. Start with link index mark a ligned with desired size
mark on size bar. On Mono
and Bolt die heads, set link
mark at line in size bar. For
bolt threads with Universal
die head, set all bolt dies at
BOLT line on size bar
(Fi -
gure 9)
.
4. If thread size needs to be ad -
justed, set the link index mark
slightly off the mark on size
bar in the direction of OVER
(larger dia meter thread, less
turns of fitting engagement) or UNDER (small er thread
diameter, more turns of fitting engagement) mark ings.
5. Tighten clamp lever.
Opening the Die Head at the End of the Thread
At the end of the thread:
• Pipe Threads – End of threaded pipe is flush with the
end of the number 1 die.
• Bolt Threads – Thread the desired length – watch
closely for any interference between the parts.
9
300 Compact/1233 Threading Machines
Throwout Lever
Size Bar
Washer Tongue
Link
Clamp Lever (Hex Nut
on Mono Dies)
Post
Dies
Hole for Locking Pin (LH Die Heads)
Throwout
Lever
Throwout
Lever
Open
Closed
Indicator
Line
Figure 8 – Inserting Dies
Indicator
Line
Figure 9 – Adjusting
Thread Size
Link
Index
Mark
Size
Bar
“Under”
“Over”
Содержание 300 Compact
Страница 22: ...20 300 Compact 1233 Threading Machines ...
Страница 44: ...42 Fileteuses 300 Compact et 1233 ...
Страница 67: ...300精致型 1233型电动套丝机 操作手册 电动套丝机操作手册 300 Compact 1233 300精致型 1233型电动套丝机 在下面空格内记下产品序列号 并妥善保存写有产品序列号的铭牌 序列号 ...
Страница 85: ...83 300精致型 1233型电动套丝机 ...
Страница 86: ...84 300精致型 1233型电动套丝机 ...


