Ricoh SP C260SFNw Скачать руководство пользователя страница 93

7.

Enter the password, and then press [OK].

8.

Press [OK].

• You cannot print a Locked Print file while the machine is currently printing. The machine beeps if

you try to do so.

• While entering a password using the control panel, the machine cannot process other print jobs.
• The Locked Print file is automatically erased from the machine's memory when it is printed out, or

when the machine's power is turned off.

Deleting a Locked Print file

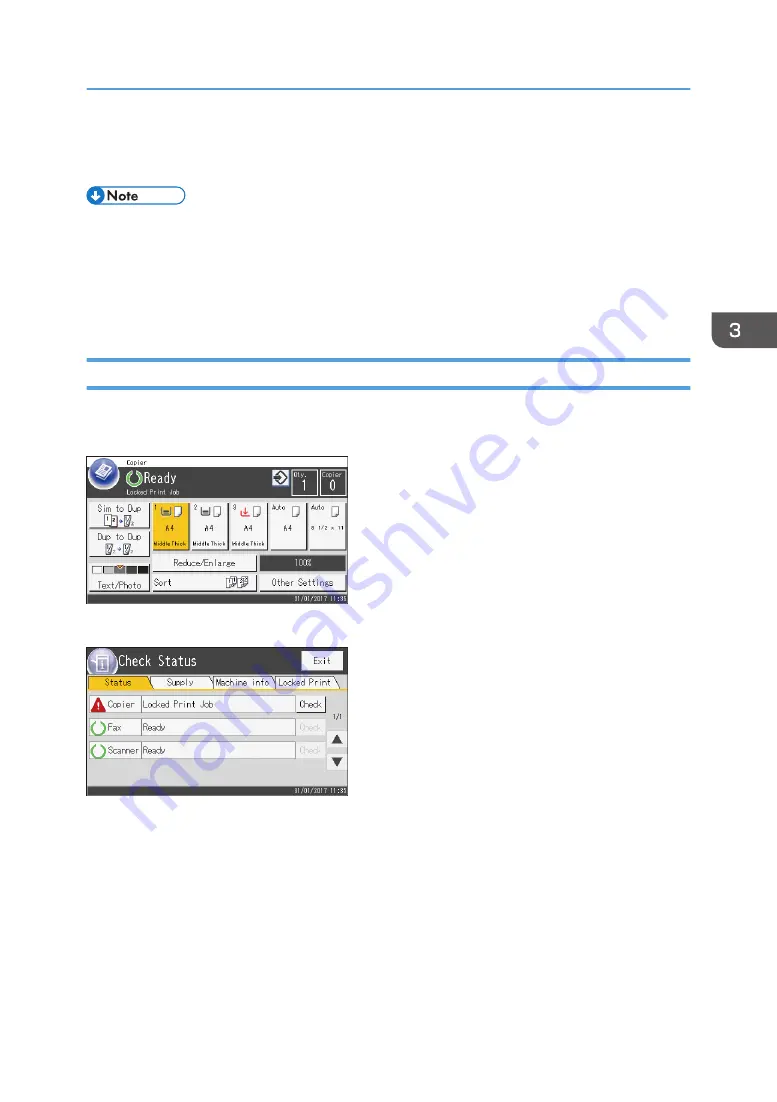
When there is a Locked Print file stored in the machine, “Locked Print Job” appears on the machine's
control panel display when the machine is in the copier, fax, scanner, or ID card copy mode.

Also, "Locked Print Job" appears on the [Status] screen.

Use the following procedure to delete a Locked Print file. You do not need to enter a password to delete
a Locked Print file.

Printing Confidential Documents

91

Содержание SP C260SFNw

Страница 1: ...twork Settings Using OS X Troubleshooting Maintaining the Machine Con guring the Machine Using Utilities Con guring the Machine Using the Control Panel Sending and Receiving a Fax Scanning Originals C...

Страница 2: ......

Страница 3: ...17 Exterior Rear View 19 Interior 21 Control Panel 22 Installing Option 25 Attaching Paper Feed Unit 25 How to Use the Home Screen 28 Displaying the Home Screen 28 How to Use the Home Screen 28 Custom...

Страница 4: ...ng Paper into Tray1 and 2 48 Loading Paper into Bypass Tray 53 Loading Envelopes 54 Specifying Paper Type and Paper Size Using the Control Panel 57 Specifying the Paper Type 57 Specifying the Standard...

Страница 5: ...Canceling a Print Job 87 Printing Confidential Documents 89 Storing a Locked Print file 89 Printing a Locked Print file 90 Deleting a Locked Print file 91 Direct Printing from a Digital Camera PictBr...

Страница 6: ...ing Transmission 135 Basic Operation of Scan to Folder 137 Printing the Check Sheet 137 Confirming the User Name and Computer Name 138 Creating a Shared Folder on a Computer 140 Specifying Access Priv...

Страница 7: ...nning 169 Specifying Scan Settings for Scanning 170 Specifying the Scanning Size According to the Size of the Original 170 Adjusting Image Density 171 Specifying Resolution 172 6 Sending and Receiving...

Страница 8: ...l Senders 216 Lists Reports Related to Fax 218 7 Configuring the Machine Using the Control Panel Basic Operation 219 Menu Chart 220 Copier Features Settings 221 Scanner Features Settings 226 Fax Featu...

Страница 9: ...tions 287 Registering Fax Special Senders 288 Restricting Machine Functions According to User 289 Enabling the User Restriction Settings 289 When Machine Functions are Restricted 293 Configuring the N...

Страница 10: ...ons When Cleaning 327 Cleaning the Toner Density Sensor 328 Cleaning the Friction Pad and Paper Feed Roller 330 Cleaning the Registration Roller and Paper Tray 333 Cleaning the Exposure Glass 336 Clea...

Страница 11: ...ied via a Report or E mail 384 Error Code 386 Common Problems 391 11 Configuring Network Settings Using OS X Connecting the Machine to a Wired Network 393 Using a USB Cable 393 Using an Ethernet Cable...

Страница 12: ...mainly Europe and Asia 422 Note for the Battery and or Accumulator Symbol For EU countries only 423 Environmental Advice for Users mainly Europe 423 Notice To Wireless LAN Interface Users mainly Euro...

Страница 13: ...e packaging and how to connect it to a computer Operating Manual Digital Format Operating manuals can be viewed from Ricoh s website or from the provided CD ROM Viewing from a web browser Access the I...

Страница 14: ...5 Click the manual you want to refer to The PDF file manual opens 12...

Страница 15: ...at may result in the product or service becoming unusable or result in the loss of data if the instructions are not obeyed Be sure to read these explanations Indicates supplementary explanations of th...

Страница 16: ...losses of the registered data or the use or non use of this product and operation manuals provided with it Make sure that you always copy or have backups of the data registered in this machine Docume...

Страница 17: ...ing Web Image Monitor without a password by factory default The setting for creating a password can be found in Administrator Settings For details about creating passwords see page 310 Configuring the...

Страница 18: ...About IP Address In this manual IP address covers both IPv4 and IPv6 environments Read the instructions that are relevant to the environment you are using 16...

Страница 19: ...using the machine and its operating instructions Guide to Components This section introduces the names of the various parts on the front and rear side of the machine and outlines their functions Exte...

Страница 20: ...of plain paper can be stacked here Open this to replace the print cartridges 6 Front Cover Open this cover to replace the waste toner bottle or remove jammed paper 7 Front Cover Open Lever To open the...

Страница 21: ...etwork using a network interface cable 4 USB Port For connecting the machine to a computer using a USB cable 5 Stop Fences Pull up this fence to prevent paper falling off when printing a large amount...

Страница 22: ...ray is difficult to retrieve As shown slide the ADF while pressing the button for sliding the ADF Be sure to check that the ADF is closed in advance Be careful not to trap your fingers when sliding DU...

Страница 23: ...DUE207 2 1 3 Interior 1 2 3 4 5 DUE212 Guide to Components 21...

Страница 24: ...er to the paper You might have to move this unit to check for or remove jammed paper 4 Waste Toner Bottle Collects toner that is wasted during printing 5 Transfer unit You need to remove this when you...

Страница 25: ...main power To turn off the machine press and hold down this key for at least three seconds This indicator lights up blue when the machine is turned on If the machine s system is busy the power may no...

Страница 26: ...e machine is processing a job you cannot display the menu for configuring the machine You can confirm the machine s status by checking messages on the screen If you see messages such as Printing B W C...

Страница 27: ...the machine use the inset grips on both sides and lift slowly in pairs SP C261SFNw SP C262SFNw The machine weighs approximately 30 kg 66 2 lb When moving the machine use the inset grips on both sides...

Страница 28: ...feed unit Align the holes of the machine with the pins and then lower the machine slowly DUE323 5 Plug the machine s cord back into the wall outlet and then turn on the power After installing the opt...

Страница 29: ...talled properly try to install it again by repeating the procedure If the problem persists contact your sales or service representative For details about printing the configuration page see page 263 P...

Страница 30: ...displayed on the Home screen For details see page 28 How to Use the Home Screen To use a different function press the icon of the function you want to use How to Use the Home Screen The icons of each...

Страница 31: ...amount of toner 2 Scanner Press to scan originals and save images as files For details about how to use the scanner function see page 125 Scanning Originals 3 Fax Press to send or receive faxes For d...

Страница 32: ...ine s maintenance information 8 Card Press to make ID card copies 9 Copier Press to make copies For details about how to use the copy function see page 221 Copier Features Settings 10 Shortcut icon Yo...

Страница 33: ...m appears on Home screens 2 or 3 If Home screens 2 and 3 do not have enough space for more icons registering any more favorite items becomes impossible You can register a total of 12 icons for shortcu...

Страница 34: ...g an Icon on the Home Screen Delete unused favorite item icons You can only display icons and shortcuts that you use When a shortcut to a favorite item on the Home screen is deleted the registered fav...

Страница 35: ...ons you want to register to a favorite item are selected on the Copier Fax Scanner or ID Card Copy screen 2 Press the favorite item icon in the upper right of the screen 3 Press the Input favorite ite...

Страница 36: ...avorite item description Effect Departmental fax transmission In TX Settings specify Fax Header This setting can be used if the receiver specifies forwarding destinations by senders The names of favor...

Страница 37: ...favorite item icon Using the favorite item causes the previous settings to be cleared Deleting a Favorite Item 1 Press the Home key DUE302 2 Press until the favorite item icon you want appears 3 Press...

Страница 38: ...when System Reset mode is turned on 1 Press the Home key DUE302 2 Press the Setting icon 3 Press Administrator Tools 4 Press 5 Press Function Priority 6 Specify the mode to be displayed preferentially...

Страница 39: ...anning Fax memory transmission Fax memory reception Printing 1 PictBridge printing 7 Printing a fax received in the machine s memory 8 Fax immediate printing 8 Receiving a LAN Fax job from a computer...

Страница 40: ...ing Internet Fax reception 9 Scanning 6 Fax memory reception storing a received fax into the machine s memory Copying Scanning Printing a Fax job in the machine s memory Internet Fax transmission Inte...

Страница 41: ...Receiving a LAN Fax job from a computer LAN Fax transmission Internet Fax transmission Internet Fax reception 9 Scanning 8 Fax immediate transmission scanning and sending 8 Copying 10 Scanning 10 Fax...

Страница 42: ...ictBridge printing might fail if the free memory space is low 5 Printing may be canceled if Gradation is set to Standard or Fine PCL DDST printer driver or when printing from the PostScript 3 printer...

Страница 43: ...machine s various settings For details about how to use the control panel see page 219 Configuring the Machine Using the Control Panel Web Image Monitor You can check the machine s status and configu...

Страница 44: ...r are displayed on the text field 2 Cancels the entered text and closes the character entry display 3 Deletes the character to the left of the cursor 4 Confirms text and closes the character entry dis...

Страница 45: ...erals 0123456789 Entering Text When you enter a character it appears at the position of the cursor Entering letters 1 Press the letters you want to enter Entering alphanumeric characters and symbols 1...

Страница 46: ...Deleting characters 1 Press or C to delete characters 1 Guide to the Machine 44...

Страница 47: ...OH Smart Device Connector 1 Press the Home key DUE302 2 Press the Status icon on the Home screen 3 Press the Machine info tab The QR code is displayed on the screen 4 Start the application on the smar...

Страница 48: ...Press the Home key DUE302 4 Press the Status icon on the Home screen 5 Press the Machine info tab The QR code is displayed on the screen 6 Start the application on the smart device and then read the...

Страница 49: ...e paper tray Specify the paper type and size Specify the paper type and size on the printer driver For details about the procedures refer to the next page Procedure Reference See page 48 Loading Paper...

Страница 50: ...ms This machine does not detect the paper size automatically Be sure to select the correct paper size and feed direction using the paper size dial on the tray Otherwise the printer might be damaged or...

Страница 51: ...refully with both hands DUE214 Place the tray on a flat surface 2 Push the metal plate down until it clicks DUE215 3 Pinch the clip on the side fence and the end fence and slide them to the maximum ex...

Страница 52: ...inside the tray Make sure the paper is not stacked higher than the projection on the side fences Tray 1 only DUE218 6 Check there are no gaps between the paper and the fences both side and end fences...

Страница 53: ...er indicator on the right front side of the paper tray shows approximately how much paper is remaining Extending Tray 1 to load paper This section explains how to load paper longer than A4 297 mm into...

Страница 54: ...en pull out the extender until it clicks DUE222 After extension check that the arrows on the extender and tray are aligned DUE223 5 Follow Steps 3 to 6 in Loading Paper into Tray1 and 2 To reinsert th...

Страница 55: ...while the machine is printing Load paper with the print side down and in the short edge feed direction Curled paper may jam Straighten curled paper before loading Duplex printing is not possible Tray...

Страница 56: ...hesive envelopes They may cause machine malfunctions Check there is no air in the envelopes before loading Load only one size and type of envelope at a time Before loading envelopes flatten their lead...

Страница 57: ...227 2 1 2 Lower the fusing unit levers DUE228 3 Using both hands carefully push up the front cover until it closes DUE229 For details about loading an envelope see page 48 Loading Paper into Tray1 and...

Страница 58: ...flap is on a short side place the envelope with the flap side in the tray recess If the envelope flap is on a long side place the envelope with the flap side on the right DUE230 When Using the Bypass...

Страница 59: ...ray Priority see page 250 Paper Settings If Auto Continue under System Settings is enabled printing stops temporarily if a paper type size error is detected The printing restarts automatically with th...

Страница 60: ...the Home key Specifying a Custom Paper Size This section describes how to specify a custom paper size Custom size paper cannot be loaded in tray 2 When you perform printing make sure that the paper s...

Страница 61: ...e 5 Press twice 6 Press Custom Size 7 Select mm or inch 8 Press the box next to Horiz 9 Enter the horizontal size and then press OK 10 Press the box next to Vert 11 Enter the vertical size and then pr...

Страница 62: ...the paper type and paper size for the tray you want to use 5 Enter the administrator password if required 6 Click OK 7 Close the web browser Specifying a Custom Paper Size 1 Start the web browser and...

Страница 63: ...ting system you are using 1 Open the Printing Preferences dialog box from the printer driver For information of how to open the printer driver properties from Devices and Printers see page 84 Displayi...

Страница 64: ...1 The actual procedure may vary depending on the operating system you are using 1 Start System Preferences 2 Click Printers Scanners 3 Select the printer you are using 4 In the Default paper Size list...

Страница 65: ...nt without specifying the paper type or paper size from the control panel depending on the settings for Bypass Tray Priority Tray 1 Type Size Weight Capacity 1 Plain Paper Middle Thick Paper Recycled...

Страница 66: ...mm in length 3 54 to 8 50 inches in width 5 83 to 14 0 inches in length 60 to 160 g m2 16 to 43 lb 250 80 g m2 20 lb 1 The number of envelopes that can be loaded is up to 10 Tray 2 option Type Size W...

Страница 67: ...DL Env 81 2 132 5 81 2 133 5 60 to 160 g m2 16 to 43 lb 1 Plain Paper Middle Thick Paper Recycled Paper Thick Paper 1 Thick Paper 2 Thin Paper Letterhead Envelope Label Paper Prepunched Paper Bond Pap...

Страница 68: ...recommended paper contact your sales or service representative Plain Paper Item Description Paper thickness 66 to 74 g m2 18 to 20 lb Supported paper tray Can be used with any of the paper trays Duple...

Страница 69: ...ets that can be printed per minute is approximately half that of middle thick paper Thin Paper Item Description Paper thickness 60 to 65 g m2 16 to 17 lb Supported paper tray Can be used with any of t...

Страница 70: ...per Thick Paper 1 or Thick Paper 2 Preprinted Paper Item Description Paper thickness 75 to 90 g m2 20 to 24 lb Supported paper tray Tray 1 and tray 2 Duplex supported size A4 B5 JIS 81 2 14 81 2 11 71...

Страница 71: ...2 5 81 2 133 5 Notes Paper that has a thickness outside the specified range cannot be printed onto Bond Paper Item Description Paper thickness 106 to 160 g m2 28 to 43 lb Supported paper tray Tray 1 a...

Страница 72: ...use paper feed problems deterioration in print quality or premature wear of the print cartridge s photo conductor unit Envelope Item Description Supported paper tray Tray 1 and bypass tray Duplex supp...

Страница 73: ...striping can occur as a result of the envelopes overlapping To correctly specify the length of an envelope whose flap opens along its short edge be sure to include the open flap when measuring CER112...

Страница 74: ...e following cases PCL printer driver DDST printer driver When Gradation in Print Quality is set to Fine PostScript 3 printer driver When Print Quality in Printer Features is set to Best Quality Non Re...

Страница 75: ...h glue or base paper is exposed Paper with clips or staples When loading paper take care not to touch the surface of the paper Even if paper is adequate for the machine poorly stored paper can cause p...

Страница 76: ...int area 2 Feed direction 3 Approx 4 2 mm 0 2 inches 4 Approx 4 2 mm 0 2 inches Envelope 4 1 2 3 3 3 DAC577 1 Print area 2 Feed direction 3 Approximately 10 mm 0 4 inches 4 Approximately 15 mm 0 6 inc...

Страница 77: ...4 4 DAC580 1 Print area 2 Feed direction 3 Approx 4 mm 0 2 inches 4 Approx 3 mm 0 1 inches Fax function 2 3 3 1 4 4 DAC580 1 Print area 2 Feed direction 3 Approx 4 2 mm 0 2 inches 4 Approx 2 mm 0 08 i...

Страница 78: ...may vary depending on the paper size printer language and printer driver settings For better envelope printing we recommend you set the right left top and bottom print margins to at least 15 mm 0 6 in...

Страница 79: ...u place originals both in the ADF and on the exposure glass Be careful not to hold the input tray when lifting the ADF for the tray might be damaged 1 Lift the ADF 2 Place the original face down on th...

Страница 80: ...up in the ADF The last page should be on the bottom DUE234 When placing originals longer than A4 or 81 2 11 pull out the ADF tray s extenders About Originals This section describes the types of origin...

Страница 81: ...lines appearing on prints Originals larger or heavier than recommended Stapled or clipped originals Perforated or torn originals Curled folded or creased originals Pasted originals Originals with any...

Страница 82: ...m 4 mm 0 2 inches 0 mm 0 inches 2 mm 0 08 inches Margins when using ADF In copier mode In scanner mode In fax mode Top 4 mm 0 2 inches 0 mm 0 inches 0 mm 0 inches Right 3 mm 0 1 inches 0 mm 0 inches 1...

Страница 83: ...ments What You Can Do with the Printer Function Duplex printing You can print on both sides of a sheet of paper For details see the printer driver Help DSG261 Combined printing You can combine multipl...

Страница 84: ...hine must be connected to the computer s USB port using the USB interface cable The computer must support bidirectional communication Enable bidirectional support must be selected and Enable printer p...

Страница 85: ...8 Click OK to close the printer properties window When Using OS X The following procedure is explained using OS X 10 11 as an example 1 Start System Preferences 2 Click Printers Scanners 3 Select the...

Страница 86: ...nt print settings for each user The settings configured in this dialog box are used as the default 1 On the Start menu click Devices and Printers 2 Right click the icon of the printer you want to use...

Страница 87: ...the Printing Preferences Dialog Box in an Application When Using OS X The following procedure is explained using OS X 10 11 as an example 1 Open the document to print 2 Select Print on the File menu...

Страница 88: ...alog box closes 3 Click Print When printing a job Color B W or B W only is restricted specify the user code in the printer properties of the printer driver before printing For details about user code...

Страница 89: ...enabled the machine ignores the paper type and size settings and prints on whatever paper is loaded Printing stops temporarily when the error is detected and restarts automatically after about ten sec...

Страница 90: ...processed printing may continue for a few pages before being canceled It may take a while to cancel a large print job Canceling a print job while printing 1 Press the Clear Stop key DUE308 2 Press Pr...

Страница 91: ...available The User ID text box contains the login user name of your computer account or the user code used for the previous Locked Print job 5 Type the password containing 4 to 8 digits and user ID co...

Страница 92: ...ode Also Locked Print Job appears on the Status screen Use the following procedure to unlock and print the Locked Print file 1 Press the Home key DUE302 2 Press the Status icon on the Home screen 3 Pr...

Страница 93: ...he machine s memory when it is printed out or when the machine s power is turned off Deleting a Locked Print file When there is a Locked Print file stored in the machine Locked Print Job appears on th...

Страница 94: ...Print tab 4 Select the file you want to delete Identify the Locked Print file by checking its time stamp and user ID 5 Press Delete Jobs The Locked Print file is deleted You can also display the Lock...

Страница 95: ...specifiable parameters depend on the digital camera For details see the manuals provided with the digital camera This function is compatible with USB 2 0 PictBridge Printing Use the following procedur...

Страница 96: ...tal camera Some digital cameras need to be switched off when connecting to the printer For details see the manual provided with the digital camera What Can Be Done on this Machine This machine can per...

Страница 97: ...t the USB cable 2 Check the PictBridge settings are enabled 3 Disconnect the USB cable and then turn off the machine Turn the machine back on When the machine has fully booted up reconnect the USB cab...

Страница 98: ...to use paper that is not of the specified size perform continue printing using mismatched paper or cancel the print job For details see page 87 If a Paper Mismatch Occurs Cannot print The specified pa...

Страница 99: ...Printing with Mopria This machine supports Mopria For more information about Mopria please visit http mopria org how to print Printing with Mopria 97...

Страница 100: ...You can select to print with priority on print quality or print speed When printing images the higher the resolution of images is the longer the time is required for printing Changing the dither patte...

Страница 101: ...multiple sets prints will be output in page batches P1 P1 P2 P2 This function is useful when for example making presentation materials Changing orientation or rotating the image You can change the ori...

Страница 102: ...the same as or different from the remaining pages Printing on custom size paper You can print using non standard size paper by specifying the size of the paper as custom size To specify the custom pa...

Страница 103: ...ing and page 114 Copying 2 Sided Originals with 2 Sided and Combined Printing DUE293 Combined copying You can copy multiple pages onto a single sheet of paper For details about the settings see page 1...

Страница 104: ...ntity Displays the numbers of copies set and copies made You can change the copy quantity using the number keys 5 Reduce Enlarge ratio You can specify the enlargement and reduction ratios if Reduce En...

Страница 105: ...The start up mode can be specified in the Function Priority setting under Administrator Tools For details see page 255 Administrator Tools Settings Copier Mode Screen 103...

Страница 106: ...the original on the exposure glass or in the ADF To place the original see page 77 Placing Originals If necessary configure advanced photocopy settings 4 To make multiple copies enter the number of c...

Страница 107: ...ypass tray For Sort see page 221 Copier Features Settings If a paper jam occurs printing stops after the current page has been printed out After the jammed paper is removed printing restarts from the...

Страница 108: ...2 Press the Copier icon on the Home screen 3 Press the Clear Stop key DUE308 When the Cancel Jobs screen appears proceed to Step 4 4 Press Copy Jobs 4 Copying Originals 106...

Страница 109: ...ratio using a preset ratio or manually specifying a customized ratio Preset ratio CES103 mainly Europe and Asia 50 71 82 93 122 141 200 400 mainly North America 50 65 78 93 129 155 200 400 Custom rati...

Страница 110: ...specified ratio For details see page 221 Copier Features Settings Temporary job settings are cleared in the following cases When no input is received for the period of time specified in System Reset...

Страница 111: ...ies must be set to A4 B5 JIS Legal Letter Executive 8 13 81 2 13 Folio or 16K The paper for 2 sided copy is fed from Tray 1 or 2 but not from the bypass tray The types of paper that can be used for 2...

Страница 112: ...Left to Right Top to Bottom CMF251 Combined copy on both sides In this mode a multiple page original is combined and printed on both sides of paper 1S 4Org Cmb 2on1 2S Portrait Landscape Original Copy...

Страница 113: ...o Bottom CMF255 8 7 6 5 8 6 7 5 6 5 8 7 7 5 8 6 Landscape Original Copy Left to Right Top to Top Left to Right Top to Bottom Top to Bottom Top to Top Top to Bottom Top to Bottom DCT004 1S Orig 2S Copy...

Страница 114: ...and 2 sided Copies 1 Press the Home key DUE302 2 Press the Copier icon on the Home screen 3 Press Other Settings 4 Press Simplex to Duplex 5 Select the desired copy mode and then press OK 6 Press OK...

Страница 115: ...put is received for the period of time specified in System Reset Timer while the initial screen is displayed For details see page 255 Administrator Tools Settings When the Clear Stop key is pressed wh...

Страница 116: ...4on1 2S is available for copying using the ADF but not using the exposure glass Copy to the front and back of the sheet in the same color mode If you try to copy in a different mode an alarm sounds Ma...

Страница 117: ...1 2S Copies four 2 sided originals to one sheet with four pages per side Manual 2Sd Scan Mode Select this mode to make 2 sided copies using the exposure glass Duplex Copying Using the ADF 1 Press the...

Страница 118: ...nts facing up DUE237 DUE238 8 Press the B W Start key or Color Start key DUE312 To make black and white photocopies press the B W Start key To make color photocopies press the Color Start key When usi...

Страница 119: ...the B W Start key or Color Start key within the time specified in System Reset Timer Otherwise the job is canceled For details see page 255 Administrator Tools Settings If the memory becomes full whi...

Страница 120: ...key A message prompting you to place the original back side down on the exposure glass appears on the display 12 Place the original on the exposure glass with the back side faced down and with the top...

Страница 121: ...glass not when it is set in the ADF To use this function the paper size used for printing copies must be set to A6 A5 A4 or Letter Printed paper size Scanned paper size A4 A5 148 210 mm Letter Half L...

Страница 122: ...r both sides For the ID card copy function you can set the machine to print a line in the middle of the printed paper Specify ID Card Center Line under Copier Features You can change the scanning size...

Страница 123: ...ial screen is displayed For details see page 255 Administrator Tools Settings When the Clear Stop key is pressed while the initial screen is displayed When the machine s mode is changed When the power...

Страница 124: ...etting to always make copies with a specific density level For details see page 221 Copier Features Settings Temporary job settings are cleared in the following cases When no input is received for the...

Страница 125: ...Select the desired document type and then press OK You can change the machine s default Original Type setting to always make copies with a specific document type For details see page 221 Copier Featu...

Страница 126: ...4 Copying Originals 124...

Страница 127: ...screen Files are sent directly to shared folders Distribute the document as a file attached to an e mail For details see Basic Operation for TWAIN Scanning Scanning Documents from a Client Computer S...

Страница 128: ...der is selected you can specify folder destinations When FTP is selected you can send scanned documents to an FTP server When USB is selected you can save scanned files to the USB flash memory device...

Страница 129: ...e Email screen is displayed The machine s default mode at power on can be specified in the Function Priority setting under Administrator Tools For Function Priority see page 255 Administrator Tools Se...

Страница 130: ...sword to be correctly entered in the destination information In such cases after registering destinations check that the user name and password are correctly entered by sending test documents to those...

Страница 131: ...nsmission Can contain up to 64 characters Subject Required Subject of the e mail Can contain up to 64 characters Sender s Name Optional Name of e mail sender The name specified here will be shown unde...

Страница 132: ...olution from 100 100 150 150 200 200 300 300 400 400 or 600 600 dpi Density Optional Specify the image density by clicking the right or left button is the lightest and is the darkest Scan to FTP Setti...

Страница 133: ...red Can contain up to 64 characters Notification E mail Address Optional E mail address to which a notification is sent after transmission Can contain up to 64 characters Original Optional Select the...

Страница 134: ...s and name of the shared folder can contain up to 32 characters Domain Optional Specify the name of the domain to which the computer belongs Can contain up to 15 characters Login User Name Optional Us...

Страница 135: ...ional Specify the image density by clicking the right or left button is the lightest and is the darkest Connection Test A connection test is performed to check whether the specified FTP server exists...

Страница 136: ...dify is set as a forwarding destination of received faxes For details about fax forwarding settings see page 282 Fax Tab Deleting Scan Destinations This section describes how to delete registered dest...

Страница 137: ...ress Address Book 5 Select the desired destination and then press OK When you specify a scan destination the machine s scan settings change automatically according to the information registered for th...

Страница 138: ...cuments will be stored in a shared folder If the machine fails to transmit the file confirm the following items The destination is registered to the Address Book correctly Disable the security softwar...

Страница 139: ...nly Windows You can create the shared folder under Windows Vista or later Windows Server 2008 or later and OS X 10 9 or later Files can be sent via SMB using the SMB 139 TCP 137 UDP or CIFS 445 TCP pr...

Страница 140: ...x ABCD NET USERDNSDOMAIN USERDOMAIN Computer s user name ex TYamada 3 Computer s login password ex Administrator 4 Computer s shared folder name ex scan Depending on the network environment USERDNSDOM...

Страница 141: ...creating a shared folder see page 140 Creating a Shared Folder on a Computer Depending on the operating system or security settings it might be possible to specify a user name that does not have a pas...

Страница 142: ...rity risk so we recommend that you give access rights only to specific users Use the following procedure to remove Everyone and specify user access rights 1 Create a folder just as you would create a...

Страница 143: ...ter s information OS X 10 11 is used in these examples You must log in as an administrator to create a shared folder 1 Create the folder that you want to send scan files to Write the folder name into...

Страница 144: ...ct either the Full control or Modify check box 9 Click OK twice Next register scan destinations For details about registering scan destinations see page 142 Registering a Shared Folder in the Machine...

Страница 145: ...etails contact your network administrator When there is not enough disk space on the destination computer the machine may fail to transfer the file Send Scanned Files to a Shared Folder Send scanned f...

Страница 146: ...hen press OK 7 Press the B W Start key or Color Start key DUE312 To scan in black and white press the B W Start key To scan in color press the Color Start key Depending on the machine s settings you m...

Страница 147: ...iginals are scanned 9 When all originals have been scanned press No to start sending the scanned file To cancel scanning press the Clear Stop key The scan files are discarded You can also specify a de...

Страница 148: ...SMTP server information contact the network administrator of your Internet service provider Configure SMTP and DNS information using Web Image Monitor 1 Start the web browser and access the machine by...

Страница 149: ...ut sending files to the registered destinations see page 147 Sending Scanned Files by E mail Sending Scanned Files by E mail This section explains how to send scanned files to the destinations registe...

Страница 150: ...hen press OK 7 Press the B W Start key or Color Start key DUE312 To scan in black and white press the B W Start key To scan in color press the Color Start key Depending on the machine s settings you m...

Страница 151: ...iginals are scanned 9 When all originals have been scanned press No to start sending the scanned file To cancel scanning press the Clear Stop key The scan files are discarded You can also specify a de...

Страница 152: ...Destination or Scan Destination 3 From the Destination Type list select FTP 4 Register information as necessary The information you must register are the following items For details see page 128 Regi...

Страница 153: ...n the exposure glass or in the ADF To place the original see page 77 Placing Originals 2 Press the Home key DUE302 3 Press the Scanner icon on the Home screen 4 Press the FTP tab 5 Press Address Book...

Страница 154: ...s Repeat this step until all originals are scanned 9 When all originals have been scanned press No to start sending the scanned file To cancel scanning press the Clear Stop key The scan files are disc...

Страница 155: ...ettings change automatically according to the information registered for that destination in the Address Book If necessary you can change the scan settings using the control panel For details see page...

Страница 156: ...if you place originals both in the ADF and on the exposure glass This machine does not support the use of external USB hubs Not all types of USB flash memory devices are supported When using Scan to...

Страница 157: ...Settings for Scanning 6 Press the B W Start key or Color Start key DUE312 To scan in black and white press the B W Start key To scan in color press the Color Start key Depending on the machine s setti...

Страница 158: ...ite scanning in halftone or grayscale by changing B W Scanning Mode setting under Scanner Features For details about B W Scanning Mode see page 226 Scanner Features Settings If the Limitless Scan sett...

Страница 159: ...connects to the network environment Configure the network settings under Network Settings Install RICOH Scan Utility To use the USB port install the TWAIN driver and WIA driver first which are on the...

Страница 160: ...2 3 4 5 6 7 1 Scanner Select the scanner you want to use 2 Original Select Exposure Glass to scan from the exposure glass or Automatic Document Feeder to scan from the ADF 3 Original type According t...

Страница 161: ...elect the scanning size If you select User defined enter the scanning size directly in the edit box Also you can change the scanning size with your mouse in the preview area You can select the unit of...

Страница 162: ...eries Scan to Scan from a Smart Device RICOH SP C260 series Scan is an application that allows you to use the Ricoh Scan Utility function from a smart device such as a smartphone or tablet By using th...

Страница 163: ...ADF Duplex Specify the orientation when scanning both sides of the original This function is available when you set the original in the ADF for SP C261SFNw SP C262SFNw File Format Select the file for...

Страница 164: ...ions for using the TWAIN scanner To use the TWAIN scanner you must install the TWAIN driver which is on the supplied CD ROM To use the TWAIN scanner a TWAIN compliant application must be installed To...

Страница 165: ...an Depending on the security setting if you press Scan a dialog box for entering the user name and password may appear If there are more originals to be scanned place the next original and then click...

Страница 166: ...ere the original is set When using the exposure glass 75 100 150 200 300 400 500 600 1200 2400 4800 9600 19200 dpi User defined When using the ADF 75 100 150 200 300 400 500 600 dpi User defined 6 Siz...

Страница 167: ...u on your computer click Devices and Printers 3 Right click the icon of the printer model you want to use and then click Start scan to open the dialog box for the scan settings 4 In the dialog box con...

Страница 168: ...e preparations and procedure for using the ICA scanner To use the network connection configure the network setting Install an ICA compliant application ICA Scanning Setting procedures using OS X 10 11...

Страница 169: ...the resolution also increases the file size and scanning time Selectable resolutions vary depending on where the original is set When using the exposure glass 75 100 150 200 300 400 500 600 1200 2400...

Страница 170: ...n data 9 Format Select the format of the scan data TIFF PNG PDF JPEG JPEG 2000 BMP 10 Image Correction By selecting Manual Threshold appears and you can adjust settings such as brightness and contrast...

Страница 171: ...Using SANE scanning This driver allows you to scan images and edit them using SANE compatible software Using SANE scanning 169...

Страница 172: ...u specify the last used destination the preset scan settings become effective again even if you have changed the settings for the previous job Specifying the Scanning Size According to the Size of the...

Страница 173: ...creen is displayed For details see page 255 Administrator Tools Settings When the Clear Stop key is pressed while the initial screen is displayed When the machine s mode is changed When the power is t...

Страница 174: ...displayed When the machine s mode is changed When the power is turned off When the machine s default for the same setting is changed Specifying Resolution This section describes how to specify the sc...

Страница 175: ...s When no input is received for the period of time specified in System Reset Timer while the initial screen is displayed For details see page 255 Administrator Tools Settings When the Clear Stop key i...

Страница 176: ...5 Scanning Originals 174...

Страница 177: ...ils see page 212 Forwarding or Storing Faxes in Memory DUE299 Send faxes by data to save paper By using a LAN Fax Driver you can send documents from your computer without printing them For details see...

Страница 178: ...n a client computer Connect the machine to a telephone line Set the date and time Specify the telephone line type Select either an external line or extension line Specify the number of the external li...

Страница 179: ...Fax tab is selected you can specify Internet Fax destinations 3 On Hook Allows you to dial while listening to the tone from the internal speaker You can send a fax checking the connection 4 Immed TX P...

Страница 180: ...number of a destination The machine s default mode at power on can be specified in the Function Priority setting under Administrator Tools For Function Priority see page 255 Administrator Tools Setti...

Страница 181: ...Press the box 8 Enter the current date and then press OK 9 Confirm the date you entered is displayed and then press OK 10 Press Set Time 11 Press the box 12 Enter the current time and then press OK 1...

Страница 182: ...e Administrator Settings The Address Book can contain up to 220 entries 20 Quick Dial entries and 200 Speed Dial entries Registering Fax Destinations Using the Control Panel 1 Press the Home key DUE30...

Страница 183: ...ess Number before the fax number For PBX Access Number see page 255 Administrator Tools Settings Use Web Image Monitor to register an Internet Fax destination an e mail address For details about regis...

Страница 184: ...sing Web Image Monitor 1 Start the web browser and access the machine by entering its IP address 2 Click Quick Dial Destination or Fax Speed Dial Destination 3 From the Destination Type list select Fa...

Страница 185: ...ause in the fax number The machine pauses briefly before it dials the digits following the pause You can specify the length of the pause time in the Pause Time setting under Transmission Setting For P...

Страница 186: ...mission is disabled if the confirmation fax number does not match the first fax number This function helps prevent users accidentally sending faxes to the wrong destination This function is available...

Страница 187: ...A password for accessing the Administrator Tools menu can be specified in Admin Tools Lock For Admin Tools Lock see page 255 Administrator Tools Settings Registering Fax Destinations 185...

Страница 188: ...is mode the machine scans several originals into memory and sends them all at once This is convenient when you are in a hurry and want to remove the document from the machine In this mode you can send...

Страница 189: ...Transmission select On or Next Fax Only 8 Press the Home key Internet Fax Transmission You can send faxes over the Internet When you send faxes to Internet Fax destinations the machine converts scann...

Страница 190: ...Detail resolution if Photo resolution has been specified If the faxes are received on a computer a viewer application needs to be installed in order to view the documents Basic Operation for Sending a...

Страница 191: ...case proceed to the next step 9 If you have more originals to scan press Yes within 60 seconds place the next original on the exposure glass and then press OK Repeat this step until all originals are...

Страница 192: ...ransmission or to send only the pages that have been scanned successfully You can scan 2 sided originals from the ADF in Memory Transmission mode Specify how to scan 2 sided originals in the Fax Origi...

Страница 193: ...ent after the original is scanned 1 Press the Clear Stop key while Transmitting is displayed on the display DUE308 2 Press Fax Job on the Cancel Jobs screen If you cancel a document while it is being...

Страница 194: ...r details about the initial screen see page 177 Fax Mode Screen 2 Press Tx File 3 Select the file you want to delete 4 Press Delete or Delete All Delete To delete a fax job select the desired job and...

Страница 195: ...ress OK For registering the Quick Dial entries see page 180 Registering Fax Destinations You can check the registered names and fax numbers by printing a report For printing the Quick Dial list see pa...

Страница 196: ...dress Book press the Quick Dial List tab select a destination and then press OK To add a Speed Dial destination press Address Book press the Speed Dial List tab select a destination and then press OK...

Страница 197: ...ions You can check the status of the other party s machine easily before sending a fax by using the On Hook Dial function Using an external telephone you can talk and send a fax in one call This funct...

Страница 198: ...then press the B W Start key For details about selecting the transmission mode see page 186 Selecting Transmission Mode For details about Fax No Confirmation see page 255 Administrator Tools Settings...

Страница 199: ...ent ask them to switch to facsimile mode 7 If you hear a high pitched tone press the B W Start key DUE315 8 If the original is placed on the exposure glass press TX and then press the B W Start key 9...

Страница 200: ...see page 228 Fax Features Settings Specifying the resolution This section describes how to specify the scan resolution for the current job There are three resolution settings Standard Select this whe...

Страница 201: ...olution 5 Select the desired resolution and then press OK 6 Confirm the resolution you selected is displayed and then press OK You can change the machine s default Resolution setting to always scan wi...

Страница 202: ...es full while storing this data the fax transmission will be canceled If this happens lower the resolution or reduce the number of pages and try again 1 Open the file you want to send 2 On the File me...

Страница 203: ...ion From the View list you can select the types of destinations to display All Displays all destinations Group Displays groups only User Displays individual destinations only If sending faxes via LAN...

Страница 204: ...e Setup tab 4 Configure settings as necessary and then click OK For details about the settings see the LAN Fax driver help Configuring the LAN Fax Address Book This section describes the LAN Fax addre...

Страница 205: ...that contain similar information To close the dialog box without modifying the original destination click Cancel 3 Confirm the setting and then click OK Registering groups 1 Open the LAN Fax address B...

Страница 206: ...ick Delete A confirmation message appears 2 Click Yes 3 Confirm the setting and then click OK A destination is automatically deleted from a group if that destination is deleted from the LAN Fax Addres...

Страница 207: ...t empty cannot be selected for Name and Fax 4 Click OK For details about the settings see the LAN Fax driver help CSV files are exported using Unicode encoding LAN Fax Address Book data can be importe...

Страница 208: ...eption Mode The following explains the reception modes of the fax function and how to select them In FAX TAD mode the machine receives the fax automatically after the external telephone answering devi...

Страница 209: ...oming calls in fax reception mode after the external telephone rings the number of times specified It is convenient for those who only use telephones for outgoing calls FAX TAD mode auto reception In...

Страница 210: ...eive faxes after the external telephone answering device rings the number of times specified in No of Rings TAD under Fax Features Make sure to set the external telephone answering device to answer ca...

Страница 211: ...matically if a fax calling tone is detected from an incoming call If you answer a call with the external telephone while the machine is ringing a normal telephone call starts If you hear a fax calling...

Страница 212: ...ving an Internet Fax You can set the machine to periodically check for e mails Internet Faxes and receive them automatically or you can manually check and receive them Specify the e mail address of th...

Страница 213: ...achine by entering its IP address 2 Click Network Settings 3 Click the Internet Fax tab 4 Select Automatic POP to Active or Inactive Active Automatic reception Inactive Manual reception 5 Click OK 6 C...

Страница 214: ...deletes the fax from memory Success On On The machine prints out the fax and deletes it from memory Success On Off The machine stores the fax in memory for later manual printing Failure Off Not applic...

Страница 215: ...Press Fax Features 4 Press Reception Settings 5 Press 6 Press Reception File Sett 7 Select Forward To send e mail notifications after faxes are forwarded proceed to Step 8 8 Press Notify Forwarding 9...

Страница 216: ...ine as follows 1 Press the Home key DUE302 2 Press the Setting icon on the Home screen 3 Press Fax Features 4 Press Reception Settings 5 Press 6 Press Reception File Sett 7 Select Print or Forward 8 P...

Страница 217: ...screen 3 Press RX File 4 Select the file and then press Print 5 Press Yes The machine prints out the stored fax and deletes it from memory 6 Press the Home key Selecting On here will enable Print Rece...

Страница 218: ...ou screen out unwanted documents such as junk faxes and prevents the wasting of fax paper To use this function you must first register Special Senders using Web Image Monitor and then select whether t...

Страница 219: ...Senders 1 Start the Web browser and access the machine by entering its IP address 2 Click System Settings 3 Click the Fax tab 4 For Authorized Reception click Active 5 For Receive Conditions click Sp...

Страница 220: ...the list with the entries sorted by Speed Dial registration number By Name Prints the list with the entries sorted by name Special Sender List Prints a list of fax Special Senders Power Failure Report...

Страница 221: ...e key DUE302 2 Press the Setting icon on the Home screen 3 Select the settings you want to use For a list of available items see page 220 Menu Chart If you select Address Book Network Settings or Admi...

Страница 222: ...es For details see page 226 Scanner Features Settings Fax Features For details see page 228 Fax Features Settings Address Book For details see page 237 Address Book Settings System Settings For detail...

Страница 223: ...e paper of the specified size the machine starts to print from the tray specified as the priority tray in Paper Tray Priority under Paper Settings If that tray runs out of paper the machine automatica...

Страница 224: ...ures Photo Select this when the original contains photographs or pictures Use this mode for the following types of original Photographs Pages that are entirely or mainly photographs or pictures such a...

Страница 225: ...4 93 100 122 A5 B5J 141 A5 A4 B6 B5 200 A6 A4 400 50 65 78 93 100 129 155 200 400 Zoom 25 400 Default 100 Color Adjustment Specify the color balance of red green and blue Increase the level black squa...

Страница 226: ...ing Note that enabling combined copying automatically disables ID card copying Off 1S 2Org Cmb 2on1 1S 1S 4Org Cmb 4on1 1S 1S Org 2S Copy 1S 4Org Cmb 2on1 2S 1S 8Org Cmb 4on1 2S 2S 1Org Cmb 2on1 1S 2S...

Страница 227: ...rd copy scanning size Vertical 50 to 148mm 1 90 to 5 83 inches Horizontal 50 to 216mm 1 90 to 8 50 inches Default horizontal vertical 96 64mm 3 78 2 52inches ID Card Center Line Specify whether to dra...

Страница 228: ...nd white images Images contain only black and white colors Gray Scale The machine creates 8 bit black and white images Images contain black and white and intermediate gray colors Default Halftone Maxi...

Страница 229: ...glass Off On Default Off Single Multi Page Specifies whether to create a multi page file containing all pages or separate single page files when scanning multiple pages Note that a scanned file can co...

Страница 230: ...only when you manually receive faxes FAX TAD The machine receives faxes automatically when a fax call is received Otherwise the connected telephone answering device answers the call FAX TEL Auto The...

Страница 231: ...chine rings before it starts to receive faxes in Fax Only mode 3 to 5 times Default 3 times RX Mode Switch Time Specifies how long the machine rings before it starts to receive faxes in FAX TEL Auto m...

Страница 232: ...manual printing This setting appears only for SP C261SFNw SP C262SFNw On Automatically print out the received faxes and delete from memory The machine prints out the received faxes and deletes them f...

Страница 233: ...page 278 Configuring the System Settings This setting appears only for SP C261SFNw SP C262SFNw Inactive Active Default Inactive Manual POP Connects to the POP3 server to receive e mail messages manual...

Страница 234: ...ine automatically switches to the other tray to continue printing Tray 1 Tray 2 Default Auto Delete TX Stand File Deletes unsent fax jobs remaining in the machine s memory The machine can store up to...

Страница 235: ...ation automatically Detect Not Detect Default Detect Transmission Speed Specifies the transmission speed for the fax modem 33 6 Kbps 14 4 Kbps 9 6 Kbps 7 2 Kbps 4 8 Kbps 2 4 Kbps Default 33 6 Kbps Rec...

Страница 236: ...ter size paper Error Only Prints a report when a transmission error occurs Error Only Image Prints a report with an image of the original when transmission error occurs Every TX Prints a report for ev...

Страница 237: ...ing Detail resolution if Photo resolution has been specified Standard Select this when the original is a printed or typewritten document with normal sized characters Detail Select this when the origin...

Страница 238: ...minute intervals Off On Default On Print Fax Header Sets the machine to add a header to every fax you send The header includes the current date and time user fax name and fax number of the machine job...

Страница 239: ...to 9 pause and space Name Specifies the name for Quick Dial entries The name can contain up to 20 characters Speed Dial List Specifies the fax number and name for Speed Dial entries You can register u...

Страница 240: ...e ringing tone Off Low Middle High Default Middle On Hook Mode Specifies the volume of the sound from the speaker during on hook mode Off Low Middle High Default Middle Job End Tone Specifies the volu...

Страница 241: ...the machine only prints the data it has received If printing is frequently interrupted by data from other ports increase the timeout period 15 sec 60 sec 300 sec Default 60 sec Network Specifies how...

Страница 242: ...appears only for SP C261SFNw SP C262SFNw 0 to 300 seconds in increments of 1 second Default 60 seconds User Auth Copy Specifies how many seconds a user stays authenticated after paper is output when...

Страница 243: ...er than the one originally used for installation if the machine is of the same model Default Off Auto Continue Item Description Value Auto Continue Sets the machine to ignore an error with paper size...

Страница 244: ...ettings under Administrator Tools or Reset Menu Settings under Administrator Tools of Web Image Monitor Off Level 1 Weak Select this mode if printouts are blurred Level 2 Medium Select this mode if pr...

Страница 245: ...ute color registration adjustment Press No to exit to the previous level of the menu tree without adjusting color registration Auto Cleaning Item Description Value Auto Cleaning Sets the machine to ex...

Страница 246: ...lso the amount of color toner consumed during warm up time for maintenance will also be lowered Note that the default value for this setting will not be restored by performing Reset All Settings under...

Страница 247: ...mber of pages that can be printed with the remaining toner is approximately 300 Normal Low toner level notification will be made when the number of pages that can be printed with the remaining toner i...

Страница 248: ...ng the single sided printing condition The test page contains network settings PCL Font List Prints installed PCL font list PS Font List Prints installed PostScript font list System Item Description V...

Страница 249: ...ault None Blank Page Print Sets the machine to print blank pages When cover sheet printing is enabled from the printer driver cover sheets are inserted even if you select Off Note that this setting ha...

Страница 250: ...h Specifies the number of characters per inch for the default font This setting is effective only for fixed space fonts 0 44 to 99 99 Default 10 00 pitch Symbol Set Specifies the character set for the...

Страница 251: ...Off PCL Resolution Specifies the print resolution in dots per inch 600 600 1bit 600 600 2bit 600 600 4bit Default 600 600 1bit PS Menu Specifies conditions when using PostScript for printing Item Des...

Страница 252: ...1 2 11 Paper Size Tray 2 Specifies the paper size for Tray 2 This setting appears only when the optional paper feed unit is installed A4 8 1 2 x 11 Default A4 Default 8 1 2 11 Paper Size Bypass A4 B5...

Страница 253: ...ched Paper Label Paper Bond Paper Cardstock Envelope Thick Paper 2 Default Middle Thick Paper Paper Type Tray 2 Specifies the paper type for Tray 2 This setting appears only when the optional paper fe...

Страница 254: ...y 1 are handled Machine Setting s The paper settings configured on the machine s control panel are applied to all print jobs An error occurs when the paper settings specified by the printer driver or...

Страница 255: ...paper size type settings of the machine and printer driver do not match However if the paper is too small for the print job the printed image will be cropped Bypass Tray Priority Specifies how print...

Страница 256: ...s specified for the print job and both tray 1 and tray 2 contain paper that matches the print job the machine starts to print from the specified tray Tray 1 Tray 2 Copier Selects a tray to check first...

Страница 257: ...ar Day Month Year or Year Month Day Year 2000 to 2099 Month 1 to 12 Day 1 to 31 Set Time Sets the time of the machine s internal clock Default date format 24 hour Format Time format 12 hour Format 24...

Страница 258: ...lic switched telephone network PSTN or a private branch exchange PBX PSTN PBX Default PSTN PBX Access Number Specifies the dial number to access the outside line when the machine is connected to a PBX...

Страница 259: ...The machine recovers from Energy Saver mode when it receives a print job prints a received fax or one of the keys on the control panel is pressed Regardless of the settings for EnergySaverMode 1 or En...

Страница 260: ...of the settings for EnergySaverMode 1 or EnergySaverMode 2 the machine enters EnergySaverMode 1 after being idle for 10 minutes EnergySaverMode 2 The machine enters Energy Saver mode 2 after the perio...

Страница 261: ...ng is the language you have specified during the Initial Setup which is required after turning on the machine for the first time English German French Italian Spanish Dutch Swedish Norwegian Danish Fi...

Страница 262: ...ael Italy Japan Jordan Kuwait Latvia Lebanon Liechtenstein Lithuania Luxembourg Malaysia Malta Mexico Montenegro Morocco Netherlands New Zealand Nicaragua Nigeria Norway Country Region Selects the cou...

Страница 263: ...Press No to exit to the previous level of the menu tree without clearing the settings Clear Address Book Clears the fax Quick Dial Speed Dial destinations Press Yes to execute Press No to exit to the...

Страница 264: ...tered twice when specifying a destination manually When this function is enabled you cannot use the On Hook Dial function This function appears only when a password is specified under Admin Tools Lock...

Страница 265: ...izes of paper into the tray before printing reports Configuration Page Prints general information and the current configurations of the machine Fax Journal Prints a fax transmission and reception jour...

Страница 266: ...ed by name Scanner Dest List Prints a list of scan destinations Scanner Journal Prints a scanner journal for the last 100 Scan to E mail Scan to FTP and Scan to Folder transmissions Maintenance Page P...

Страница 267: ...escription Value MAC Address Displays the machine s MAC address Ethernet Speed Displays the current Ethernet speed setting 100Mbps Full Duplex 100Mbps Half Duplex 10Mbps Full Duplex 10Mbps Half Duplex...

Страница 268: ...t subnet mask when DHCP is used Default XXX XXX XXX XXX The numbers represented by X vary according to your network environment Gateway Address Specifies the machine s default gateway address when DHC...

Страница 269: ...ters Prefix Length Specifies the prefix length using a value between 0 and 128 Gateway Address Specifies the IPv6 address of the default gateway Can contain up to 46 characters For details about enter...

Страница 270: ...rmation about the SSID Setup Wizard Displays the procedure for manually connecting to a wireless LAN It leads you step by step through configuring the settings for connecting with a wireless LAN WPS C...

Страница 271: ...aying the machine s status or settings Configuring the machine s settings Registering the scan and fax destinations Registering the fax Special Senders Configuring the user restriction settings Config...

Страница 272: ...l Recommended web browsers Internet Explorer 6 or later Firefox 3 0 or later Safari 3 0 or later To operate the machine via Web Image Monitor you must first configure the machine s TCP IP or wireless...

Страница 273: ...instead of the IP address The top page of Web Image Monitor appears Top page Every Web Image Monitor page is divided into the following areas DUE316 1 2 3 4 1 Menu area Clicking a menu shows its cont...

Страница 274: ...okies disabled display and operation problems may occur If you are using a proxy server configure the Web browser settings as necessary For details about the settings contact your network administrato...

Страница 275: ...achine s display Toner Item Description Black Shows the amount of black toner remaining Magenta Shows the amount of magenta toner remaining Yellow Shows the amount of yellow toner remaining Cyan Shows...

Страница 276: ...indicated The information about intermediate transfer unit fusing unit and transfer roller appear only for SP C261SFNw SP C262SFNw The information about Tray 2 appears only when it is installed Counte...

Страница 277: ...ages printed using the printer copier and fax functions and lists reports Accumulated value of black toner A4 page coverage in percent Accumulated value of black toner consumption converted into fully...

Страница 278: ...on converted into fully covered A4 pages Cyan Shows the following for pages printed in Economy Color Printing mode using the printer function Accumulated value of cyan toner A4 page coverage in percen...

Страница 279: ...n Shows the version of firmware installed on the machine Engine FW Version Shows the version of firmware for the machine engine PCL Version Shows the version of the PCL interpreter PS Version Shows th...

Страница 280: ...ct the volume of the sound from the speaker during on hook mode from Off Low Middle or High Job End Tone Select the volume of the beep that sounds when a job is complete from Off Low Middle or High Jo...

Страница 281: ...Thick Paper 75 90g m2 Thick Paper 1 91 105g m2 Recycled Paper Color Paper Letterhead Preprinted Paper Prepunched Paper Bypass Tray Item Description Paper Size Select the paper size for the bypass tray...

Страница 282: ...d to all print jobs An error occurs when the paper settings specified by the printer driver or the print command do not match the machine s settings Driver Command When executing a print job specifyin...

Страница 283: ...eeds even if the paper size type settings of the machine and printer driver do not match but if the paper is too small for the print job the printed image will be cropped Any Custom Size Type The mach...

Страница 284: ...ay to continue printing The information about Tray 2 appears only when it is installed Fax Tab Select Paper Tray Item Description Select Paper Tray Select the tray for printing faxes from the followin...

Страница 285: ...es or not Email notification destination depends on how Forwarding Destination is specified If specified with E mail Address the notification will be sent to the administrator e mail address specified...

Страница 286: ...tion about Tray 2 appears only when it is installed Priority Tray Tab Priority Tray Item Description Printer Select the tray that the machine checks first for paper that can be used for the job from T...

Страница 287: ...nter LAN Fax driver can be used for multiple machines or not under USB connection If this setting is enabled the same printer LAN Fax driver you have installed in your computer can be used with any ma...

Страница 288: ...ty Tab B W Print Priority Item Description B W Print Priority Enable this setting to suppress the consumption of color toner when printing black and white pages Also amount of color toner consumed dur...

Страница 289: ...nd 200 Speed Dial destinations can be registered See the scan and fax sections for more information on registering destinations For details about registering scan destinations see page 128 Registering...

Страница 290: ...ders Fax Special Senders can be registered using Web Image Monitor Up to 30 Special Senders be registered For details about registering Special Senders see page 206 Receiving a Fax 8 Configuring the M...

Страница 291: ...ion explains how to configure settings to permit only authorized users to use certain machine functions Using Web Image Monitor enable user restriction for all or some of the functions listed below an...

Страница 292: ...wing steps to register users 6 Click Available Functions per User A list of currently registered user entries appears 7 Select a user entry and then click Change The following window appears 8 Enter t...

Страница 293: ...password if required 4 Click Apply 5 Click Available Functions per User A list of currently registered user entries appears 6 Select the entry to modify and then click Change 7 Modify settings as nece...

Страница 294: ...9 Close the Web browser 8 Configuring the Machine Using Utilities 292...

Страница 295: ...ck and white Color copying Sending faxes Scan to E mail FTP Folder Scan to USB The machine requests for a user code when a user presses the B W Start or Color Start key The user must enter a valid use...

Страница 296: ...uter 2 On the File menu click Print 3 In the Select Printer area select the name of this machine and then click Preferences 4 Click the Valid Access tab PCL printer driver or check the User Code check...

Страница 297: ...nter Name Shows the name used to identify the machine on the network Network Version Shows the version of the machine s network module a part of the machine firmware Ethernet MAC Address Shows the Eth...

Страница 298: ...rom the DHCP server when DHCP is set to Active Stateless Address Displays up to four stateless auto addresses Gateway Address Displays the machine s default gateway address Link local Address Displays...

Страница 299: ...to use for raw printing The valid range is 1024 to 65535 except 53550 and 49999 default is 9100 LPR Select to enable network printing using LPR LPD via TCP port 515 mDNS Setting Item Description mDNS...

Страница 300: ...to 32 characters DNS Resolve Priority Select whether to give priority to IPv4 or IPv6 for DNS name resolution DNS Timeout seconds Enter the number of seconds the machine waits before considering a DN...

Страница 301: ...machine to send traps to the management host NMS When disabled SNMP Management Host 1 and SNMP Management Host 2 below become unavailable SNMP Management Host 1 Enter the IP address or host name of a...

Страница 302: ...SMTP The machine supports NTLM and LOGIN authentication POP before SMTP The POP3 server is used for authentication When sending e mails to an SMTP server you can enhance the SMTP server security level...

Страница 303: ...Password Enter the password for logging in to the POP3 server Can contain up to 32 characters Authentication Select an authentication method from the following None Password will not be encrypted APOP...

Страница 304: ...hem Save E mail Leave e mails on the server after receiving them Save Only Error Info Delete e mails that are successfully received from the server only POP Interval minutes Specifies how many minutes...

Страница 305: ...tion key WEP Transmit Key ID Select an ID number to identify each WEP key in case multiple WEP connections are configured WEP Key Format Select a format for entering the WEP key WEP Key Enter the WEP...

Страница 306: ...iption SSID Enter the SSID name The SSID can contain up to 32 characters WPA Passphrase Enter the passphrase for Wi Fi Direct connection You can enter 8 to 32 characters for a passphrase 8 Configuring...

Страница 307: ...pply IPsec from the following DHCPv4 DHCPv6 SNMP mDNS NetBIOS UDP Port 53550 All ICMP Bypass Select whether to apply IPsec to ICMP packets IPv4 and IPv6 from the following Active All ICMP packets will...

Страница 308: ...Activity Select whether to enable or disable the policy Name Enter the name of the policy Can contain up to 16 characters Address Type Select IPv4 or IPv6 as the type of IP address to be used in IPsec...

Страница 309: ...gorithm for AH Specify the authentication algorithm to be applied when AH or ESP AH is selected for Security Protocol from the following MD5 SHA1 Encryption Algorithm for ESP Specify the encryption al...

Страница 310: ...hm from the following MD5 SHA1 IKE Life Time Specify the life time of the ISAKMP SA as a time period Enter a number of seconds IKE Diffie Hellman Group Select the IKE Diffie Hellman Group to be used i...

Страница 311: ...bs remaining in the machine s memory to be printed sent or forwarded Quick Dial Destination List Prints a list of Quick Dial entries Fax Speed Dial Destination List Prints a list of Speed Dial entries...

Страница 312: ...e the administrator e mail address Administrator E mail Address Enter the administrator e mail address If the machine s e mail address is not configured in the SMTP page this address will be used as t...

Страница 313: ...r the Network Settings and Administrator Tools Note that however Max E mail Size setting under Network Application will not be backed up here it will be backed up by Back up Menu Settings instead Back...

Страница 314: ...tting Item Description File to Restore Enter the path and name of the file to restore or click Browse to select the file Follow the procedure below to restore configuration backup files 1 Click Browse...

Страница 315: ...e 1 if the machine has been idle for about 30 seconds It takes less time to recover from Energy Saver mode 1 than from power off state or Energy Saver mode 2 but power consumption is higher in Energy...

Страница 316: ...e 2 the machine enters Energy Saver mode 1 after being idle for 10 minutes PCL6 Mode PCL6 Mode Item Description PCL6 Mode Set this to Universal when using the Universal Driver and to SP C260 C262 when...

Страница 317: ...be responsible for any damage or expense that might result from the use of parts other than genuine parts from the manufacturer with your office products If you try to print while the message Replacem...

Страница 318: ...e using the machine s driver If black toner runs out you cannot print in black and white or color until the black print cartridge is replaced Messages on the screen Replace the indicated print cartrid...

Страница 319: ...of cyan C magenta M yellow Y and black K DUE259 Do not shake the removed print cartridge Doing so can cause remaining toner to leak Place the old print cartridge on paper or similar material to avoid...

Страница 320: ...261 Even distribution of toner within the bottle improves print quality 5 Remove the protective cover from the print cartridge DUE262 6 Check the toner color and corresponding location and then carefu...

Страница 321: ...h the protective cover for recycling and environmental purposes mainly Europe and Asia If you want to discard your used toner container please contact your local sales office If you discard it by your...

Страница 322: ...cannot be reused When removing the waste toner bottle make sure not to tilt it Make sure the transfer unit is installed If the transfer unit is not installed install it before turning on the power Bef...

Страница 323: ...ft it up DUE267 2 1 4 Holding the handle at the center of the waste toner bottle carefully pull it partially out without tilting it DUE268 5 Pull the waste toner bottle halfway out hold the bottle fir...

Страница 324: ...ottle from coming into contact with the intermediate transfer unit the position shown by the arrow in the illustration below do not lift the bottle while pulling it out DUE271 6 Close the bottle cap D...

Страница 325: ...vent the waste toner bottle from coming into contact with the intermediate transfer unit the position shown by the arrow in the illustration below do not lift the bottle while inserting it DUE275 8 Pu...

Страница 326: ...9 Place the transfer unit on the front cover Slide the transfer unit along the guide rails into the machine DUE277 10 When it stops push on the PUSH mark until it clicks DUE278 9 Maintaining the Machi...

Страница 327: ...per area of the cover firmly For easy replacement we recommend you purchase and store extra waste toner bottles Comply with the waste toner bottle recycling program whereby used waste toner bottles ar...

Страница 328: ...Unit message appears on the display contact your sales or service representative Replacing the Fusing Unit and Transfer Roller This function is available for SP C261SFNw SP C262SFNw only If the Alert...

Страница 329: ...dry wipe the area and allow it to dry To avoid deformation discoloration or cracking do not use volatile chemicals such as benzine and thinner or spray insecticide on the machine If there is dust or g...

Страница 330: ...the control panel Density Sensor Require Cleaning 1 Pull up the lever on the top cover and then carefully raise the top cover Make sure that the ADF is closed DUE257 2 Remove the rearmost print cartri...

Страница 331: ...the print cartridge removed in Step 2 vertically DUE263 5 Using both hands hold the center of the top cover and close the cover carefully Be careful not to trap your fingers DUE264 Cleaning the Toner...

Страница 332: ...llows Do not use chemical cleaning fluids or organic solvents such as thinner or benzine 1 Turn off the power 2 Unplug the power cord from the wall outlet Remove all the cables from the machine 3 Pull...

Страница 333: ...ate down until it clicks DUE215 7 Reload the removed paper into the tray and then push the tray carefully into the machine until it clicks into place DUE220 8 Insert the plug of the power cord into th...

Страница 334: ...ccur after cleaning the friction pad contact your sales or service representative If the optional Tray 2 is installed clean its friction pad and paper feed roller in the same way as you did for Tray 1...

Страница 335: ...o not use chemical cleaning fluids or organic solvents such as thinner or benzine Do not touch the transfer roller as shown below DUE282 1 Turn off the power 2 Unplug the power cord from the wall outl...

Страница 336: ...paper tray with a cloth DUE283 5 Push the metal plate down until it clicks DUE215 6 Reload the removed paper into the tray and then push the tray carefully into the machine until it clicks DUE220 9 Ma...

Страница 337: ...if prints are smeared after a paper jam is cleared 8 Clean the registration roller by applying a soft damp cloth while turning it 9 Using both hands carefully push up the front cover until it closes D...

Страница 338: ...ot to hold the input tray when lifting the ADF for the tray might be damaged 2 Clean the parts indicated with arrows with a soft damp cloth and then wipe the same parts with a dry cloth to remove any...

Страница 339: ...he tray might be damaged 2 Clean the parts indicated with arrows with a soft damp cloth and then wipe the same parts with a dry cloth to remove any remaining moisture DAC005 When using SP C261SFNw SP...

Страница 340: ...5 Clean the parts indicated below DUE322 6 Close the ADF cover 9 Maintaining the Machine 338...

Страница 341: ...so do not install the machine in places where chemical reactions are likely laboratories etc as doing so will cause the machine to malfunction Ventilation When you use this machine in a confined space...

Страница 342: ...uring transit Toner might spill inside the machine if the machine is not kept level during transit For more information about moving the machine contact your sales or service representative Disposal A...

Страница 343: ...ine s memory reached capacity while receiving a fax because the document was too large The paper tray was empty Load paper in the paper tray See page 48 Loading Paper The paper tray did not contain A4...

Страница 344: ...2 Sided Copy A4 B5 LG LT EXE 8 13 8 25 13 8 5 13 16K 2 sided copy could not be performed because the tray does not contain the valid size paper which are A4 B5 Letter Legal Executive 8 13 inches 81 2...

Страница 345: ...ier Features Settings Check Paper Size The paper size set for the document differs from the size of the paper in the indicated tray Press FormFeed to begin printing or press JobReset to cancel the job...

Страница 346: ...exceeds the size limit for files that can be sent through e mail Configure Resolution under Scan Settings to reduce the scanning resolution See page 226 Scanner Features Settings Configure Max E mail...

Страница 347: ...aper See page 351 Removing Paper Jams Memory Overflow The number of fax jobs in memory unsent or unprinted faxes has reached maximum so new jobs cannot be stored Wait until pending jobs have been tran...

Страница 348: ...storing a fax in memory in Memory Transmission mode Resend the fax in parts as several smaller individual faxes or send at a lower resolution Misfeed Duplex Unit Remove Paper Paper has been jammed in...

Страница 349: ...print on paper open the front cover and then raise the left and right levers to the plain paper mark Out of Paper X The indicated tray has run out of paper Load paper to the indicated tray See page 4...

Страница 350: ...them to resend it Scan NW Disconnected A scanned file could not be sent because the Ethernet cable was not connected properly Reconnect the Ethernet cable properly and then try the operation again Sc...

Страница 351: ...reached capacity while originals were being scanned from the ADF to perform sort copying Press Exit to print the originals that were successfully scanned into memory Then copy again the originals left...

Страница 352: ...key The Scan to USB function failed because the USB flash disk was removed before the operation could be completed Check that the USB flash disk is securely inserted in the machine Do not pull out the...

Страница 353: ...over and Remove paper See page 359 Removing Scanning Jams See the section identified by the message and remove the jammed paper accordingly Removing Printing Jams The inside of this machine becomes ve...

Страница 354: ...Main unit DUE292 1 3 2 1 DUE288 2 DUE289 10 Troubleshooting 352...

Страница 355: ...3 DUE290 Paper feed unit DUE320 1 1 DUE291 Removing Paper Jams 353...

Страница 356: ...damage the machine Paper jam can cause pages to be lost Check your print job for missing pages and reprint any pages that did not print out If paper jams inside the fusing unit If paper jams inside th...

Страница 357: ...DUE243 Pull the paper downward to remove it Do not pull it upward DUE244 If you cannot find the jammed paper check for it by pulling down the guide DUE245 Removing Paper Jams 355...

Страница 358: ...osing the front cover push the upper area of the cover firmly After closing the cover check that the error is cleared If paper jams inside a tray If paper jams in Tray 1 or 2 follow the procedure belo...

Страница 359: ...jammed paper carefully DUE247 Do not touch the fusing unit DUE243 If paper has jammed inside the transfer unit holding both sides of the paper pull the paper carefully forward and out DUE248 Removing...

Страница 360: ...the paper tray Tray 1 If paper is jammed in Tray 2 but is difficult to locate pull out Tray 2 to remove it After removing the paper carefully push Tray 2 all the way back inside the machine If paper j...

Страница 361: ...nt cover until it closes DUE229 When closing the front cover push the upper area of the cover firmly After closing the cover check that the error is cleared Removing Scanning Jams Be careful not to ho...

Страница 362: ...hard as it may rip DUE251 3 Close the ADF cover and the cover of the input tray for ADF DUE252 4 Lift the ADF and if there is any original remaining in the ADF gently pull the jammed paper to remove i...

Страница 363: ...DUE253 5 Close the ADF Removing Paper Jams 361...

Страница 364: ...ble and network cable are connected correctly Also confirm that they are not damaged The port connection is not established correctly 1 On the Start menu click Devices and Printers 2 Right click the i...

Страница 365: ...rse the top and bottom of the paper and put it back in the tray Paper jams occur frequently If there are gaps between the paper and the side or end fences of the paper tray or the paper guides of the...

Страница 366: ...See page 63 Supported Paper Paper is too thin See page 63 Supported Paper If there are gaps between the paper and the side or end fences of the paper tray or the paper guides of the bypass tray adjus...

Страница 367: ...er size See page 48 Loading Paper Images are printed diagonally to the pages DAC572 If there are gaps between the paper and the side or end fences of the paper tray or the paper guides of the bypass t...

Страница 368: ...matches the type of paper loaded See page 61 Specifying Paper Type and Paper Size Using the Printer Driver A non genuine print cartridge is being used Refilled or non genuine print cartridge reduces...

Страница 369: ...ab select Raster in the Graphics Mode list When printing graphics the output and the screen are different To print accurately specify the printer driver setting to print without using the graphics com...

Страница 370: ...ar Change the dithering settings on the printer driver For details about the dithering settings see the printer driver Help If the problem persists specify the settings of the application in which the...

Страница 371: ...the latest printer driver is being used A print job is canceled Printing on Legal size paper may be canceled if the printing is performed with a certain print quality setting If using the PCL printer...

Страница 372: ...ystem Settings A Locked Print file is canceled Only when using PCL 5c 6 The Locked Print file has too many pages or it is too large Reduce the number of pages to print or print with a lower setting fo...

Страница 373: ...n the computer s display When you use some functions such as enlargement and reduction the layout of the image might be different from that displayed in the computer display Check that the page layout...

Страница 374: ...n If the color still appears different on the printout perform the Color Registration under System Settings For details see page 238 System Settings If this procedure fails to resolve the problem cont...

Страница 375: ...Help The print cartridge is almost empty If Replacement Required Toner Cartridge X X indicates the toner color appears on the screen replace the indicated print cartridge Condensation may have occurr...

Страница 376: ...rform the print job again The print color is different from the color specified If a specific color is missing turn the power switch off and on If this does not resolve the problem contact your sales...

Страница 377: ...s almost empty If an error message appears on the control panel replace the print cartridge of the color indicated See page 315 Replacing the Print Cartridge The backs of printed sheets are blemished...

Страница 378: ...t CMY K for Gray Reproduction in the printer driver s dialog box See the printer driver Help If rubbed with your finger the print smears The setting of the paper may not be correct For example althoug...

Страница 379: ...from the output tray more frequently The paper being used may be damp Use paper that has been stored properly Select Level 1 Weak Level 2 Medium or Level 3 Strong in Anti Humidity Level under System...

Страница 380: ...ty Place the original on the exposure glass and then place two or three sheets of white paper on top of it Leave the ADF open when copying A moire pattern is produced The original probably has heavily...

Страница 381: ...ied pages are not in correct order On the control panel change the Sort setting under copy settings to collate pages as you require For details about Sort see page 221 Copier Features Settings Copied...

Страница 382: ...ginal was moved during scanning Do not move the original during scanning The scanned image is upside down The original was placed upside down Place the original in the correct orientation See page 77...

Страница 383: ...e the original in the correct orientation See page 77 Placing Originals Printed or sent images are spotty The exposure glass exposure glass exposure glass cover or guide plate of the ADF is dirty Clea...

Страница 384: ...ne may be disconnected Check if the telephone line is properly connected to the machine For details see Setup Guide The Receiving File indicator lights up and the received document is not printed The...

Страница 385: ...e loading them Alternatively feed the sheets into the machine one at a time Printed copies are together resulting in jams Sheets are sticking together Fan the sheets thoroughly before loading them Alt...

Страница 386: ...achine Error Report An Error Report is printed if a document cannot be successfully sent or received Possible causes include a problem with the machine or noise on the telephone line If an error occur...

Страница 387: ...ation is not sent to the sender You can select to send Error Notification Email using Web Image Monitor For details see page 295 Configuring the Network Settings If Error Notification Email cannot be...

Страница 388: ...als 1XXX21 The line could not be connected correctly Check if the telephone line is properly connected to the machine Disconnect the telephone line cord from the machine and connect the cord to a tele...

Страница 389: ...ain A4 Letter or Legal size paper Load valid size paper in the tray and configure the paper size settings under Paper Settings accordingly A cover or tray was open Close the cover or tray There was a...

Страница 390: ...work Settings 3XXX13 E mail transmission failed while sending an Internet Fax There was an error in the part header of the e mail Check if the network settings such as the IP address DNS and SMTP sett...

Страница 391: ...l reception failed while receiving an Internet Fax There was an error in the part header of the e mail Ask the sender to check the e mail settings The e mail had an invalid Content Type or an unsuppor...

Страница 392: ...was not supported or the width of the TIFF file was that of A3 or B4 paper Ask the sender to check the TIFF file 4XXX45 A TIFF file could not be received via Internet Fax properly The format of the T...

Страница 393: ...interface cable is not connected correctly Reconnect the cable Check that the interface cable is the correct type Strange noise is heard The supplies are not properly installed Confirm that the suppli...

Страница 394: ...If any of these problems persist turn off the power pull out the power cord and contact your sales or service representative 10 Troubleshooting 392...

Страница 395: ...a CD ROM drive download a setup file from our website 3 Double click the CD ROM drive icon 4 Double click the macOS folder 5 Double click the folder of driver you want to install 6 Follow the instruc...

Страница 396: ...Bonjour indicated in the Kind column If the printer name is not displayed select the icon that corresponds to your network environment TCP IP etc 13 Select the printer you are using from the Use pop...

Страница 397: ...26 Turn off the machine and then turn it back on Setup is completed Connecting the Machine to a Wired Network 395...

Страница 398: ...acOS folder 5 Double click the folder of driver you want to install 6 Follow the instructions in the setup wizard 7 Click Close in the Summary dialog box Using the Wi Fi Setup Wizard A router access p...

Страница 399: ...ord enter the password using the number keys and then press the OK A password for accessing the Wi Fi Configuration menu can be specified in Admin Tools Lock under Administrator Tools menu 12 Press th...

Страница 400: ...ssword using the number keys and then press OK A password for accessing the Network Settings menu can be specified in Admin Tools Lock under Administrator Tools menu 6 Press Wi Fi Enable 7 Press Enabl...

Страница 401: ...n try the connection again Using a PIN Code A router access point is needed to set up a connection To establish a connection using the PIN code use a computer that is connected to the router access po...

Страница 402: ...Tools menu 13 Press PIN 14 Check the PIN code Write down the PIN code in case you might forget it 15 Enter the machine s PIN code 8 digits on the router access point s web page The web page accessed i...

Страница 403: ...out specifying the IPsec settings using Web Image Monitor see page 305 Configuring the IPsec Settings For details about enabling and disabling IPsec using the control panel see page 255 Administrator...

Страница 404: ...ms use the term Compliance in place of Authentication Security Association This machine uses encryption key exchange as the key setting method With this method agreements such as the IPsec algorithm a...

Страница 405: ...ools on the control panel and then access Web Image Monitor For details about disabling IPsec using the control panel see page 255 Administrator Tools Settings Specifying Encryption Key Exchange Setti...

Страница 406: ...ivate the default response rule check box and then click Next 7 Select Edit properties and then click Finish 8 In the General tab click Settings 9 In Authenticate and generate a new key after every en...

Страница 407: ...tion ESP and configure the following settings Set the value of Integrity algorithm to the same value as the Authentication Algorithm for ESP specified on the machine Set the value of Encryption algori...

Страница 408: ...nd then click OK twice The new IP security policy IPsec settings is specified 40 Select the security policy that you have just created right click on it and then click Assign IPsec settings on the com...

Страница 409: ...If this cartridge is not initially used the following problems may occur Replace Required Soon Toner Cartridge XX will be displayed before the toner runs out Replacement Required Toner Cartridge XX w...

Страница 410: ...Configuration Desktop Print process Laser electrostatic transfer Maximum paper size for scanning using the exposure glass A4 Letter 81 2 11 inches Maximum paper size for scanning using the ADF Legal...

Страница 411: ...level when the main switch is turned off and the power cord is plugged into an outlet 1 W or less Maximum 1300 W or less Ready 60 7 W During printing Color 404W B W 331W Power consumption The power l...

Страница 412: ...inches Weight machine body with consumables SP C260SFNw 29 kg 64 lb or less SP C261SFNw SP C262SFNw 30 kg 66 2 lb or less Sound power level and sound pressure level are actual values measured in acco...

Страница 413: ...pt3 PictBridge Fonts PCL6 PCL5c PostScript3 80 fonts Copier Function Specifications Item Description Maximum resolution scanning and printing Exposure glass Scanning 600 600 dpi Printing 600 600 dpi A...

Страница 414: ...inute When copying multiple copies of two sided originals one by one duplex scanning simplex printing only for SP C261SFNw SP C262SFNw Black and white 20 pages per minute Full Color 12 pages per minut...

Страница 415: ...a computer TWAIN Exposure glass 19200 19200 dpi ADF 600 600 dpi Maximum resolution when scanning from a computer WIA 600 600 dpi Gradation Input 16 bit color processing Output 8 bit color processing...

Страница 416: ...an line density 8 dots per mm 3 85 line per mm 200 100 dpi 8 dots per mm 7 7 line per mm 200 200 dpi Transmission time 3 seconds 8 dots per mm 3 85 line per mm 33 6 kbps MMR ITU T 1 chart Transfer rat...

Страница 417: ...ail E mail format Single Multi part MIME Conversion Attached file forms transmission TIFF S MH encoding Attached file forms reception TIFF S TIFF F MH MR MMR encoding Authentication method SMTP AUTH P...

Страница 418: ...Multipart mixed text plain Image tiff attached file forms Data format Profile TIFF S Encoding MH Original size A4 Resolution dpi 200 100 200 200 Paper Feed Unit TK1220 Paper capacity 500 sheets Paper...

Страница 419: ...Weight Less than 4 kg 8 9 lb Specifications of the Machine 417...

Страница 420: ...horized dealer Print Cartridge Print cartridge Average printable number of pages per cartridge 1 Black SP C260DNw SP C260SFNw mainly Europe and Asia 2 000 pages SP C261DNw SP C261SFNw mainly Europe an...

Страница 421: ...America 2 300 pages SP C262DNw SP C262SFNw mainly Europe and Asia 4 000 pages 6 000 pages mainly North America 6 000 pages Magenta SP C260DNw SP C260SFNw mainly Europe and Asia 1 600 pages SP C261DNw...

Страница 422: ...me impossible For easy replacement we recommend you purchase and store extra print cartridges The actual number of printable pages varies depending on the image volume and density number of pages prin...

Страница 423: ...actual number of printable pages varies depending on the image volume and density number of pages printed at a time paper type and paper size used and environmental conditions such as temperature and...

Страница 424: ...environment and human health which could otherwise result from inappropriate handling Recycling of products helps to conserve natural resources and protect the environment For more detailed informati...

Страница 425: ...Manual for this information or the packaging of the consumable Recycled paper The machine can use recycled paper which is produced in accordance with European standard EN 12281 2002 or DIN 19309 For...

Страница 426: ...accessing the URL http www ricoh com products ce_doc2 and selecting the product applicable Operating frequency band 2400 2483 5 MHz maximum radio frequency power less than 20 0 dBm As this equipment...

Страница 427: ...This equipment has been tested and found to comply with the limits for a Class B digital device pursuant to Part 15 of the FCC Rules These limits are designed to provide reasonable protection against...

Страница 428: ...e telephone company 2 This equipment uses the RJ11C USOC jack 3 A plug and jack used to connect this equipment to the premises wiring and telephone network must comply with the applicable FCC Part 68...

Страница 429: ...n the line and briefly explain to the dispatcher the reason for the call before hanging up 2 Perform such activities in the off peak hours such as early morning hours or late evenings The Telephone Co...

Страница 430: ...les r gles d exposition aux fr quences radio lectriques RF CNR 102 de l IC Cet quipement doit tre install et utilis en gardant une distance de 20 cm ou plus entre le radiateur et le corps humain l exc...

Страница 431: ...r a certain period of time the machine automatically enters Energy Saver mode The machine recovers from Energy Saver mode when it receives a print job prints a received fax or when any key is pressed...

Страница 432: ...onsumption may differ depending on the conditions and environment of the machine 2 Achieves ENERGY STAR energy savings product fully qualifies when packaged with or used with a duplex tray and the dup...

Страница 433: ...et Explorer are either registered trademarks or trademarks of Microsoft Corporation in the United States and or other countries Mopria and the Mopria logo are trademarks of Mopria Alliance Inc PCL is...

Страница 434: ...t Windows Server 2008 Standard Microsoft Windows Server 2008 Enterprise Microsoft Windows Server 2008 Datacenter Microsoft Windows Server 2008 for Itanium based Systems Microsoft Windows Web Server 20...

Страница 435: ...Windows Server 2012 R2 Datacenter The product names of Windows Server 2016 are as follows Microsoft Windows Server 2016 Datacenter Microsoft Windows Server 2016 Standard Microsoft Windows Server 2016...

Страница 436: ...12 Appendix 434...

Страница 437: ...onfiguration page 263 Using the control panel 219 Confirming information Printer driver settings 84 Consumables 418 Control panel 22 Copier features 221 Copier mode screen 102 Copy 2 sided copy 109 11...

Страница 438: ...ncel 87 L LAN Fax 200 Language 272 List of Option 15 Lists 218 263 309 Loading paper 48 Locked Print 90 M Machine information 277 Maintaining the machine Cleaning the machine 327 330 336 337 Replacing...

Страница 439: ...153 Reset settings 310 Resolution 172 198 Restore settings 312 Restrict user function 289 293 S SA Security Association 402 Scan Registering destinations 128 SANE 169 Scan settings 170 Scan to E mail...

Страница 440: ...settings 250 278 Troubleshooting 378 380 381 Error and status messages on the screen 341 Other problems 362 363 366 369 391 TWAIN scanning 162 U User code 293 User restriction 15 W Waste toner bottle...

Страница 441: ...MEMO 439...

Страница 442: ...MEMO 440 EN GB EN US EN AU M0AX 8604C...

Страница 443: ...2017 2020...

Страница 444: ...M0AX 8604C AU EN US EN GB EN...

Отзывы: