Ricoh Priport JP5000 Скачать руководство пользователя страница 76

OPERATION

54

1

C

Press the 

[OK]

 key.

D

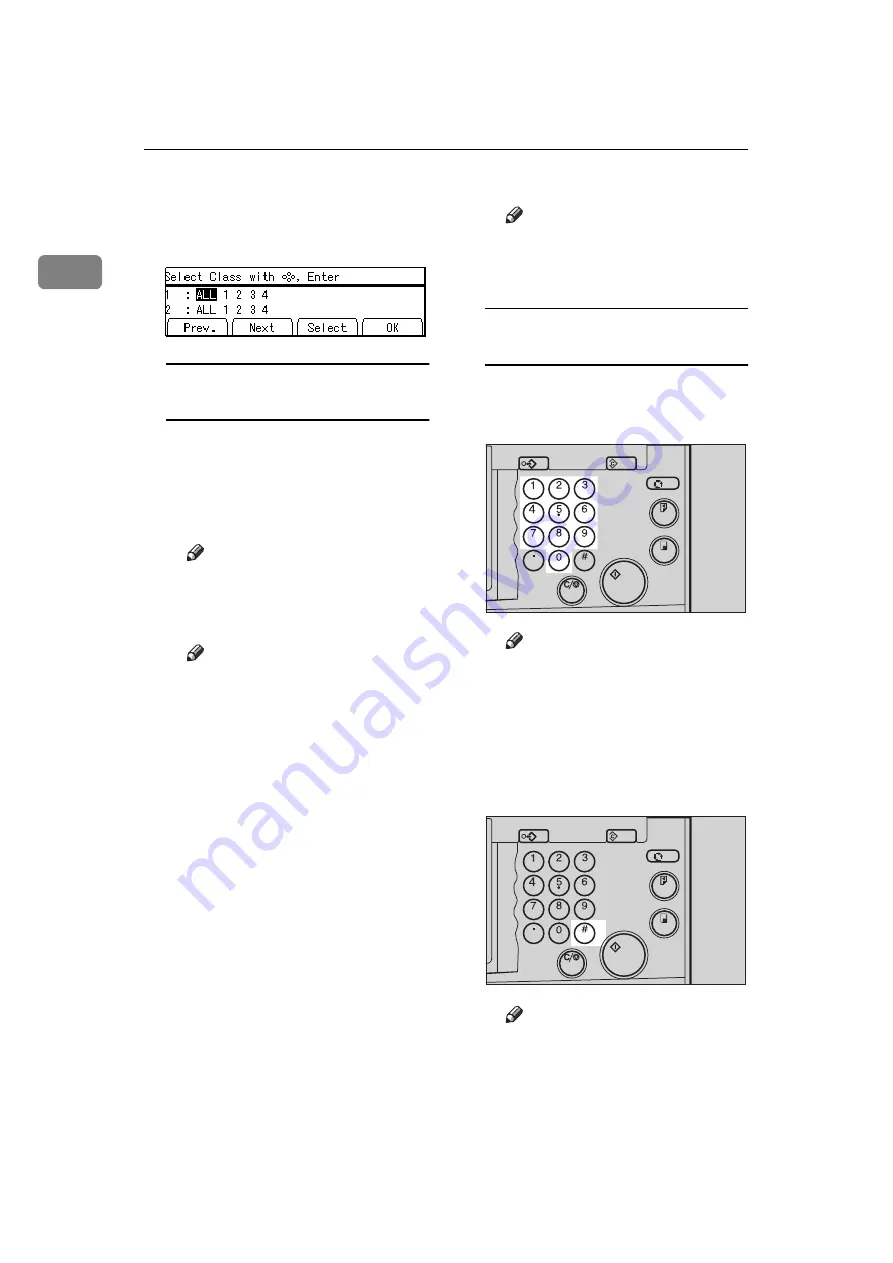
Select the desired classes for each
grade.

Selecting classes with the 

{

~

}

{

}

}

{

|

}

, or 

{

{

}

 key

A

Select the desired class for the
1

st

 grade with the 

{{{{

}

}

}

}

}}}}

 key.

You will find the number of stu-
dents is displayed on the
counter.

Note

When you want to select all
the classes, select 

[ALL]

.

B

Press the 

[Select]

 key.

Note

Repeat steps 

A

 and 

B

 until

you have finished designat-
ing classes for the 1st grade.

When you want to cancel a
class, select that class with
the 

{

~

}

{

}

}

{

|

}

, or 

{

{

}

key and press the 

[Cancel]

key.

When you want to select
many classes for one grade,
first select 

[ALL]

 and press the

[Select]

 key then deselect the

unnecessary classes with the

[Cancel]

 key.

C

Press the 

{{{{

{

{

{

{

}}}}

 key.

Now, you can select classes for
the 2

nd

 grade.

D

Select the desired class for the
2

nd

 grade with the 

{{{{

~

~

~

~

}}}}

{{{{

}

}

}

}

}}}}

,

{{{{

|

|

|

|

}}}}

, or 

{{{{

{

{

{

{

}}}}

 key.

E

Press the 

[Select]

 key.

Note

Repeat steps 

C

 to 

E

 until

you have finished designat-
ing all the desired classes.

Selecting classes with the 
number keys

A

Enter the desired number of
grade and class with the Num-
ber keys.

Note

For example, to select grade 2
class 4, enter 24.

When you want to select all
the classes for one grade, en-
ter the grade number fol-
lowed by 0.

B

Press the 

{{{{

Enter

}}}}

 key.

Note

When you want to cancel a
class, select that class with
the 

{

~

}

{

}

}

{

|

}

, or 

{

{

}

Program

Clear Modes

Auto Cycle

Proof

Print

Enter

Start

Clear/Stop

TPES040N

Program

Clear Modes

Auto Cycle

Proof

Print

Enter

Start

Clear/Stop

TPES020N

Содержание Priport JP5000

Страница 1: ...JP5000 OPERATING INSTRUCTIONS TPEH162N Read this manual carefully before you use this product and keep it handy for future reference For safety please follow the instructions in this manual...

Страница 2: ...any RICOH DEUTSCHLAND GmbH Mergenthaler Allee 38 40 65760 Eschborn Phone 49 0 6196 9060 France RICOH FRANCE S A 383 Avenue du G n ral de Gaulle BP 307 92143 Clamart Cedex Phone 33 0 1 40 94 38 38 Spai...

Страница 3: ...50 60 Hz 1 5 A or more Please be sure to connect the power cord to a power source as above For details about power source see P 194 Power connection Notes Some illustrations might be slightly differe...

Страница 4: ...In accordance with ISO Standard 7001 this machine uses the following symbols for the main switch a a a a means POWER ON b b b b means POWER OFF Copyright 1998 Ricoh Co Ltd...

Страница 5: ...cations R WARNING Ignoring this warning could cause serious injury or even death R CAUTION Ignoring this caution could cause injury or damage to property Symbols R mean a situation that requires you t...

Страница 6: ...lectric shock When the ma chine needs to be checked adjusted or repaired contact your service representative Do not take apart or attempt any modifications to this ma chine There is a risk of fire ele...

Страница 7: ...he socket grip the plug to avoid damaging the cord and causing fire or electric shock If you use the machine in a confined space make sure there is a continuous air turnover Do not reuse stapled paper...

Страница 8: ...red When your machine is equipped with the PC controller option Do not place this equipment on an unstable or tilted surface If you do it could fall Do not place heavy objects on top of this equipment...

Страница 9: ...instructions under this symbol Be sure to read the instructions all of which are described in the Safety Information section The statements above are notes for your safety Important If this instructi...

Страница 10: ...t originals in the optional document feeder A Set the originals face up B Press the Start key C Press the Proof key Check the print image Reference When you want to change the image position see P 25...

Страница 11: ...the Print key When the print job has finished press the Clear Modes key Previ ously entered job settings will be cleared Combine Class Slow Fast Speed 1 TPES100N Program Clear Modes Auto Cycle Proof...

Страница 12: ...t Mode Halftone Printing Changing The Printing Speed See P 28 Changing The Printing Speed Reducing And Enlarging Using Preset Ratios See P 30 Preset Reduce En large Reducing And Enlarging Us ing Prese...

Страница 13: ...Stroke See P 49 Auto Cycle Making Master And Prints At One Stroke Making Variable Numbers Of Prints From The Same Original Using All Stored Data See P 51 All Class Mode Mak ing Variable Numbers Of Pr...

Страница 14: ...mages Repeated On One Print Skip Feed Printing See P 70 Skip Feed Printing Storing Your Print Settings In Memory See P 72 Program Storing Your Print Settings In Memory Printing Secret Documents See P...

Страница 15: ...DE ABCDEABCDE ABCDE ABCDE ABCDE ABCDEABCDE ABCDE ABCDE ABCDE ABCDEABCDE ABCDE ABCDE ABCDE ABCDEABCDE ABCDE ABCDE ABCDE ABCDEABCDE ABCDE ABCDE ABCDE ABCDEABCDE ABCDE ABCDE ABCDE ABCDEABCDE ABCDE ABCDE...

Страница 16: ...e P 122 User Stamping Printing Your Own Messages On Your Prints Combining Originals Into One Print With The Memory Board See P 124 Memory Combine Combining Originals Into One Print With The Memory Boa...

Страница 17: ...25 Adjusting Print Image Density 26 Before Making A Master 26 After Making A Master 26 Tint Mode Halftone Printing 27 Changing The Printing Speed 28 Stopping The Machine During A Multi print Run 29 W...

Страница 18: ...red Data 53 Manual Class Mode With One Original Making Variable Numbers Of Prints From The Same Original 56 Manual Class Mode With 2 Or More Originals Making Variable Numbers Of Prints From Different...

Страница 19: ...as 94 Background Patterns 96 Making A Command Sheet For Make Up Printing 98 Command sheet 98 How To Make A Command Sheet 99 Command Sheets And Finished Prints 104 Make up Printing 105 Make up Printing...

Страница 20: ...Cannot Make Prints As You Want 167 Combine Originals Mode 167 x Clearing Misfeeds 168 x A Paper Misfeed In The Paper Feed Section 168 x A B Paper Misfeed In The Paper Feed Section 169 x B Paper Or Mas...

Страница 21: ...int Paper 191 Originals 191 Misfed Paper 191 PC Controller 192 Where To Put Your Machine 193 Environmental Conditions 193 Power connection 194 Access to machine 194 Maintaining Your Machine 196 Main F...

Страница 22: ...xviii This page is intentionally blank...

Страница 23: ...rols and indicators are lo cated here See P 6 Operation Panel 4 Master Feed Unit Open the master feed unit when install ing the master 5 Paper Feed Tray Down key Press to lower the paper feed tray 6 P...

Страница 24: ...nment wings 3 Paper Alignment Wings Lift or lower the wings depending on the paper type you use 4 Paper Delivery End Plate This plate aligns the leading edge of prints 5 Paper Delivery End Plate Knob...

Страница 25: ...ject unit 10 Ink Holder Set the ink cartridge in this holder 11 Drum Unit Lock Lever B1 Lower to unlock and pull out the drum unit 12 Drum Unit The master is wrapped around this unit 13 Exposure Glass...

Страница 26: ...ns 1 Document Feeder Note Other options Color Drums A3 11 17 drum red blue green and brown Color Drums A4 81 2 11 drum black red blue green and brown Key Counter Cabinet Memory Board PC Controller TPE...

Страница 27: ...5 This page is intentionally blank...

Страница 28: ...Image Overlay Merging Images 8 Edge Erase key Press to print originals that have an un necessary image on the edges See P 40 Edge Erase Erasing Edge Margins 9 Image Density key Press to make prints d...

Страница 29: ...e image forward back ward right or left See P 25 Adjusting Print Image Position They are also used to highlight the sec tion you wish to select 18 Program key Press to input or recall user programs Se...

Страница 30: ...Size 4 A4 81 2 11 Drum indicator This indicator is lit when the A4 81 2 11 drum unit is installed See P 90 Changing The Drum Size 5 Color Drum indicator This indicator is lit when the color drum unit...

Страница 31: ...a strong shock or force of about 30 N about 3 kgf or more to the panel display Otherwise the display might be damaged Note When you select or specify an item on the panel display it is highlighted ex...

Страница 32: ...quickly and easily Sample Display for Selecting the Original key 1 Operational status or message 2 Available functions 3 If you see a picture with a key whitened out it means Press this key kPress the...

Страница 33: ...rn paper Slippery paper Rough paper Paper with any kind of coating such as carbon Short grain paper Thin paper that has low stiffness The following types of envelopes If you make a print on rough grai...

Страница 34: ...h the curl face down If paper is curled it might wrap around the drum or stains might appear Do not store paper where it will be exposed to heat or direct sunlight Store on a flat surface Store paper...

Страница 35: ...The maximum original size you can set on the exposure glass contact glass is 304 8 432 mm 12 17 If you use originals that have bold letters or solid images at the leading edges you might get prints w...

Страница 36: ...0 mm 0 4 of the leading edge and the last 2 mm 0 08 of the trailing edge cannot be printed Make sure the leading edge margin is at least 10 mm 0 4 and the trailing edge margin is at least 2 mm 0 08 a...

Страница 37: ...the paper on the paper feed tray Note Correct the paper curl before setting the paper If you cannot do so stack the paper with the curl face down E Make sure that the paper feed side end plates make c...

Страница 38: ...the end plate to match the paper size scale on the op posite side of the operation panel B Grasp the side plate knobs and move the paper delivery side plates to match the print paper size Note The ins...

Страница 39: ...hicker paper A Lower the paper alignment wings When you use 81 4 g m2 21 6 lb or thinner and B5 or smaller paper A Lower the paper alignment wings When you use 81 4 g m2 21 6 lb or thinner and A4 81 2...

Страница 40: ...OPERATION 18 1 E Turn on the main switch Note You can have the machine dis play how much ink and master are left when you switch it on See User Tools Ink Master Left in P 139 4 Mode Set ting TPEH021E...

Страница 41: ...User Code s Note When the machine is set for user codes the machine will prompt you for your user codes when you turn the main switch on or when auto reset comes into effect A Input your user code 4 d...

Страница 42: ...Type key Reference See P 42 Printing On Various Kinds Of Paper E Enter the number of prints re quired with the Number keys Note Up to 9999 prints can be entered at one time To change the number entere...

Страница 43: ...eted the same number of prints is auto matically set for the next job To stop the machine during a multi print run press the Clear Stop key I Open the paper delivery side plate of the operation panel...

Страница 44: ...t remain be tween the feed rollers In this case remove the top sheet C Load paper on the paper feed tray Note If you wish to set a different kind of paper select the appro priate paper type with the P...

Страница 45: ...that the side end plates touch the paper lightly Make sure that the paper size and direction in the panel dis play correspond with the actual paper size and direction set on the paper feed tray If yo...

Страница 46: ...aper from the paper feed tray The paper feed tray will lower B Turn off the main switch C Adjust the side end plates to match A4L L L L paper and lower them D Close the paper feed tray E Push in the p...

Страница 47: ...mm 0 4 mar gin at the leading edge If there is no margin paper might wrap around the drum and cause a misfeed The and keys shift the image up to 15 mm 0 6 each way and the image is shifted about 0 5...

Страница 48: ...t key After Making A Master A To increase the image density press the W W W W key To reduce the image density press the V V V V key Note The faster the printing speed be comes the lighter the printing...

Страница 49: ...int tinted imag es A Press the Tint key B Press the Start key GRTINT0E Stamp Make Up Overlay Edge Erase Skip Feed Economy Mode Tint Darker 2 Darker 1 Normal On Line Job Separator Lighter Image Density...

Страница 50: ...The following speeds are avail able Setting 1 60 sheets minute Setting 2 75 sheets minute Setting 3 90 sheets minute Setting 4 105 sheets minute Setting 5 120 sheets minute The default is 90 sheets m...

Страница 51: ...he Completed Prints A Press the Clear Stop key B Change the number of prints or check the completed prints Note When you change the number of prints you can re enter the number with the Number keys af...

Страница 52: ...parts of the image might not be printed or margins will appear on prints You can change the fixed repro duction ratio with the user tools See Reproduction Ratio in P 148 3 4 Reproduction Ratio Prints...

Страница 53: ...he correct size E Set your original on the exposure glass contact glass or in the op tional document feeder F Press the Start key G Check the image position of the trial or proof print Note If the ima...

Страница 54: ...tion and the re production ratio selected depending on the original and paper sizes are as fol lows Metric version 1 When your machine is equipped with the optional memory board the machine automatica...

Страница 55: ...et these originals in the optional document feeder Depending on the original type you use the proper reproduction ratio might not be selected See P 13 Originals and P 81 Originals A Set your original...

Страница 56: ...heck the image position of the trial or proof print Note If the image position is not correct adjust it using the Image keys See P 25 Adjusting Print Image Position Program Clear Modes Auto Cycle Proo...

Страница 57: ...55 when you set originals in the optional docu ment feeder A Press the Ratio key Note To select a custom ratio select the closest ratio with the or key Then press the or key and go to step F B Select...

Страница 58: ...tional document feeder J Press the Start key K Check the image position of the trial or proof print Note If the image position is not cor rect adjust it using the Image key see P 25 Adjusting Print I...

Страница 59: ...lly Enter The Dimensions Of The Original And Print Paper Have the machine automatically selects the proper reproduction ra tio Note You can change the reproduction ratio from 50 to 200 when you set an...

Страница 60: ...Number keys D Press the Enter key G Press the OK key H Make sure that the original and the print paper are the correct size I Set your original on the exposure glass contact glass or in the op tional...

Страница 61: ...ter key I Enter the horizontal print size with the Number keys J Press the OK key The machine will select proper re production ratios for vertical and horizontal directions K Make sure that the origin...

Страница 62: ...erased Note You can adjust the erased margins with the user tools The default is 2 mm 0 1 See P 150 3 9 Margin Erase Area A Set your original on the exposure glass contact glass or in the op tional d...

Страница 63: ...Check the image position of the trial or proof print Note If the image position is not cor rect adjust it using the Image key see P 25 Adjusting Print Image Position H Make your prints Program Clear...

Страница 64: ...ry side plates to match the paper size scale on the main frame side Note If necessary lower the paper alignment wings See P 15 Preparation For Printing Printing On Thin Paper When you make prints on t...

Страница 65: ...y as shown in the illustra tion Paper feed direction Note When you use envelopes the paper feed tray capacity is about 150 sheets 85 g m2 22 lb or less than 105 mm 4 1 E If your envelopes do not feed...

Страница 66: ...isfeed condition with the or key E Press the OK key If the paper misfeeds occur frequent ly in the paper exit section even if you use standard or thin paper and select the Std do the following A Set t...

Страница 67: ...origi nals are written in pencil Note When using Photo mode to print originals with both text and photo graphs the text will appear lighter To avoid this select Letter Photo mode Alternatively use th...

Страница 68: ...not cor rect adjust it using the Image key see P 25 Adjusting Print Image Position K Make your prints Letter Photo Mode Printing A Press the Original key B Select Letter Photo with the or key C Press...

Страница 69: ...ure glass con tact glass A Press the Original key B Select Pencil with the or key C Press the OK key D Set your original on the exposure glass contact glass E Press the Start key F Check the image pos...

Страница 70: ...ment feeder C Press the Start key D Check the image position of the trial or proof print Note If the image position is not cor rect adjust it using the Image key see P 25 Adjusting Print Image Positio...

Страница 71: ...r keys C Press the Start key D Check the image position of the trial or proof print Note If the image position is not cor rect adjust it using the Image key see P 25 Adjusting Print Image Position E P...

Страница 72: ...OPERATION 50 1 If you set original in the option al document feeder originals are fed and prints are complet ed automatically...

Страница 73: ...each class into the machine memory beforehand with the user tools Then whenever you need to make print sets for all the classes set your original select All and press the Start key Print sets will be...

Страница 74: ...image position of the trial or proof print Note If the image position is not cor rect adjust it using the Image key see P 25 Adjusting Print Image Position G Make your prints Program Clear Modes Auto...

Страница 75: ...o store the number of students in each class into the ma chine memory beforehand with the user tools Then whenever you need to make print sets for several classes set your original select the classes...

Страница 76: ...key then deselect the unnecessary classes with the Cancel key C Press the key Now you can select classes for the 2nd grade D Select the desired class for the 2nd grade with the or key E Press the Sele...

Страница 77: ...sses E Press the OK key F Set one original on the exposure glass contact glass or in the op tional document feeder G Press the Start key H Check the image position of the trial or proof print Note If...

Страница 78: ...separator pulls the top sheet of the each set delivered to the paper delivery tray This marks the end of each printing set The next cycle begins automatically See P 77 Job Separation Sepa rating Prin...

Страница 79: ...I Set one original on the exposure glass contact glass or in the op tional document feeder J Press the Start key K Check the image position of the trial or proof print Note If the image position is n...

Страница 80: ...top sheet of the each set delivered to the paper delivery tray This marks the end of each printing set The next cycle begins automatically See P 77 Job Separation Sepa rating Printing Sets On The Pap...

Страница 81: ...t glass J Press the Start key K Check the image position of the trial or proof print Note If the image position is not cor rect adjust it using the Image keys see P 25 Adjusting Print Image Position L...

Страница 82: ...second original on the expo sure glass contact glass and press the Start key Note Repeat step N until you have finished printing Program Clear Modes Auto Cycle Proof Print Enter Start Clear Stop TPES...

Страница 83: ...ch set delivered to the paper delivery tray This marks the end of each printing set The next cycle begins automatically See P 77 Job Separation Separating Print ing Sets On The Paper Delivery Tray You...

Страница 84: ...der I Press the Start key J Check the image position is the trial or proof print Note If the image position is not cor rect adjust it using the Image key See P 25 Adjusting Print Image Position K Make...

Страница 85: ...Cancel Comb in P 139 4 Mode Setting Any image closer than 10 mm 0 4 to the leading edge of the first original will not be printed Also any image closer than 4 mm 0 16 to the leading edge of the second...

Страница 86: ...5K B6K A6K Paper Size A3L 100 115 141 163 200 B4L 87 100 122 141 173 A4L 71 82 100 115 141 B5L 61 71 87 100 122 A5L 50 58 71 82 100 Original Size 81 2 11 K 51 2 81 2 K Paper Size 11 17 L 100 129 81 2...

Страница 87: ...e Document Feeder A Set the first original face down Note When you set original sideways K the top should be toward the opera tion panel as shown above B Enter the number of prints using the Number ke...

Страница 88: ...32 Auto Magnification Selection Hav ing The Machine Choose The Reproduction Ratios D Press the Combine key E Select combine 2 or Quadruple with the or key F Press the OK key G Press the Start key Com...

Страница 89: ...he first original has been stored Set the second original face down I Press the Start key J Check the image position of the trial or proof print Note If the image position is not correct adjust it usi...

Страница 90: ...print Reference See P 63 Combine Originals Combining Originals Into One Print for details A Set your original on the exposure glass contact glass or in the op tional document feeder B Enter the number...

Страница 91: ...ress the OK key G Press the Start key H Check the image position of the trial or proof print Note If the image position is not cor rect adjust it using the Image key see P 25 Adjusting Print Image Pos...

Страница 92: ...ength of paper in Skip Feed mode is 460 mm 18 1 When you use paper longer than 432 mm 17 0 completed prints will not be delivered to the paper delivery tray properly so lower the end plate and receive...

Страница 93: ...f print Note If the image position is not cor rect adjust it using the Image key see P 25 Adjusting Print Image Position G Make your prints Note After printing is completed the Skip Feed setting retur...

Страница 94: ...rogram numbers 1 to 9 will be displayed in the panel display If a user program has been pro tected that program number will not appear in the display To change a protected user pro gram see P 73 Prote...

Страница 95: ...e exposure glass contact glass or in the op tional document feeder G Press the Start key Protecting A Program If you want to prevent someone from writing over your program do the following procedure A...

Страница 96: ...ogram key B Select Protect with the or key C Press the OK key Note Already protected program numbers are shown with a black background e g A D Select the program number you want to remove protection f...

Страница 97: ...ur prints B Press the Security key C Press the Yes key Note If you press the Proof key or the Print key after finishing one print job the machine lets you know that you cannot make prints Press the Ex...

Страница 98: ...ed for a long time Quality Start will be used for the print job By default Auto Quality Start mode is on You can turn it off with the user tools See Setting Q start in P 139 4 Mode Setting Note You ca...

Страница 99: ...er If the job separator touches the print image the completed prints might be dirty In this case it is not recommended to use Job Separation mode When you do not use Job Separation mode you can select...

Страница 100: ...printing set is fed out to the paper delivery tray the job separator pulls the last sheet of each group in Job Separation mode The next cycle begins Stamp Make Up Overlay Edge Erase Skip Feed Economy...

Страница 101: ...ster and ink Limitation The optional document feeder is required Note This function is turned on when you use A4 81 2 11 K or B5K paper and you set 2 or more origi nals in the optional document feeder...

Страница 102: ...r you need to select paper type with the Ppr Type key before pressing the On Line key A Press the On Line key When you use A5 51 2 81 2 K or non standard paper sizes A Press the Ppr size key B Select...

Страница 103: ...ls such as books Damaged originals Originals with glue on them Pasted originals Originals written in pencil Thin originals that have low stiff ness Originals with index tabs Translucent paper The foll...

Страница 104: ...ke sure the leading edge margin is at least 10 mm 0 4 and the trailing edge margin is at least 2 mm 0 08 Do not stack originals above the limit mark Setting Originals In The Document Feeder A Adjust t...

Страница 105: ...eference See P 63 Combine Originals Combining Originals Into One Print for details A Insert the 2 originals face up Note The top original will be printed on the leading part of print B Enter the numbe...

Страница 106: ...he first original has been scanned in Set the second original and the any print settings you require Then press the Start key Manual Class Mode With 2 Or More Originals Using The Document Feeder Refer...

Страница 107: ...quence with the first orig inal on the top J Press the Start key K Check the image position of the trial or proof print Note If the image position is not cor rect adjust it using the Image key see P 2...

Страница 108: ...OPTIONAL FUNCTIONS 86 2 M Press the Print key Program Clear Modes Auto Cycle Proof Print Enter Start Clear Stop TPES070N...

Страница 109: ...e gaining The Image Density When The Ink On The Drum Dries Making Color Prints A Make sure that the Color Drum indicator is lit B Press the Start key C Check the image position of the trial or proof p...

Страница 110: ...Close the front door Note Make sure that the Open Cover Unit indicator turns off and the Color Drum indicator lights Printing In Two Colors After printing in one color you can print in another color o...

Страница 111: ...e Position E Press the Print key F Remove the prints from the paper delivery tray and set them on the paper feed tray again as shown in the illustration G Exchange the drum unit See P 87 Changing The...

Страница 112: ...rsion Master Cut Length A3 drum 320 mm 530 mm 12 5 20 9 200 masters roll 11 17 drum 320 540 mm 12 5 21 3 200 masters roll Optional A4 81 2 11 drum 320 mm 325 mm 12 5 12 8 330 mas ters roll Note To cha...

Страница 113: ...e Metric version The machine automatically rotates the original image by 90 to match the pa per direction Set this original in the optional document feeder Inch version The machine automatically rotat...

Страница 114: ...OPTIONAL FUNCTIONS 92 2 It takes longer than usual to make masters in Image Rotation mode You can cancel Image Rotation mode with the user tools See Auto Rotation in P 139 4 Mode Setting...

Страница 115: ...t cutting and pasting up to 4 commands can be given for an original By combining Make up functions with color drums you can create a variety of printing effects Make up Modes For Designated Areas Mode...

Страница 116: ...Letter mode The area outside designated ar eas is printed in Letter mode 2 Photo mode The area outside designated ar eas is printed in Photo mode Mode Sample Designated Area Command sheet Original Cl...

Страница 117: ...eas and outside the designated area 3 Save Area mode The area outside the desig nated areas is deleted 4 Outline mode The area outside the designated area is printed in Out line mode Mode Sample Undes...

Страница 118: ...ic patterns 40 patterns similar to the basic patterns but with patterns elements at 4 times the size 90 rotations of all the basic and enlarged patterns 4 registered user patterns Paper Feed Direction...

Страница 119: ...Make up Printing Features 97 2 Note The basic patterns are numbered 1 to 40 You can make your own make up background patterns with the user tools See P 161 5 15 Make Chg Pattern...

Страница 120: ...ade on white or translucent paper and should be the same size as the origi nal You can designate areas within the following limits 1 5 mm 0 2 2 0 mm 0 3 0 mm 0 4 0 mm 0 Note Poor quality paper such as...

Страница 121: ...er You cannot use both the closed and diagonal line method on the same com mand sheet You can designate many areas on one sheet and there is no limit to the num ber of areas you can designate If desig...

Страница 122: ...the entire area Make a space of at least 2 mm 0 08 in front of the area sur rounded by 3 sides relative to the feed direction 1 2 2 mm 0 08 Double line pattern Only the outer line is recognized Make...

Страница 123: ...using a felt tip pen black red or blue with a thickness of at least 1 mm Note Make sure there is no break in the line The diagonal line can be drawn from left to right or vice versa Draw the line at l...

Страница 124: ...command sheet on top of the original B Using a black red or blue felt tip pen draw a line around the area to des ignate The line should have a thickness of at least 1 mm Note Make sure there is no br...

Страница 125: ...area b 2 mm 0 08 c Image within the designated area The line marking the designated area should be more than 2 mm 0 08 from any neighboring image a 2 mm 0 08 b Neighboring image c Line marking the des...

Страница 126: ...diagonal line The diagonal line method is easy to use for designating rectangular areas It is also more precise but it is difficult to use for designating complex areas When drawing a command sheet us...

Страница 127: ...the first command sheet with the or key Then press the OK key H If necessary select the size and direction of the pattern you se lected in step G G G G with the or key I Press the OK key Note Follow s...

Страница 128: ...e panel display reaches the setting you want to confirm M If you have selected Photo mode select the coarseness and the im age density with the or key Note Four coarseness settings are available Setti...

Страница 129: ...areas to be edited in Make up mode within the follow ing limits 1 3 mm 0 12 2 3 mm 0 12 3 3 mm 0 12 4 3 mm 0 12 Note When using coated paper or trans parent paper as a command sheet set the command sh...

Страница 130: ...To change the value entered press the Clear Stop key and enter the new value J After you have finished designat ing modes for all the command sheets select Outside Area with the or key Then press the...

Страница 131: ...1 coarser than the standard setting N Press the OK key O Set the command sheets and orig inal face up into the document feeder Note Make sure that the command sheets are set on the original P Press t...

Страница 132: ...PTIONAL FUNCTIONS 110 2 Make up Samples Sample 1 A Command Sheet No 1 Frame shape Designated area Delete Area mode B Outside area Letter mode C Print 1 Original 2 Command sheet No 1 3 Print 1 2 3 ZM 5...

Страница 133: ...Outline No 30 B Command Sheet No 2 Frame shape Designated area All page pattern No 17 C Outside area Fn1 D Print 1 Original 2 Command sheet No 1 3 Command sheet No 2 4 Print A A BB C A C C B B B C C...

Страница 134: ...riginal as it is B Change the drum unit for color printing C Command Sheet No 1 Frame shape Designated area All page pattern No 39 D Outside area Letter mode E Print 1 Original 2 Command sheet No 1 3...

Страница 135: ...DE ABCDE ABCDEABCDE ABCDE ABCDE ABCDE ABCDEABCDE ABCDE ABCDE ABCDE ABCDEABCDE ABCDE ABCDE ABCDE ABCDEABCDE ABCDE ABCDE ABCDE ABCDEABCDE ABCDE ABCDE ABCDE ABCDEABCDE ABCDE ABCDE ABCDE ABCDEABCDE ABCDE...

Страница 136: ...ginal for the template and press the Start key C Set the next original on the ex posure glass contact glass D Press the Start key Note When you select Form in step B repeat steps C and D Setting origi...

Страница 137: ...amping Date is Month Day Year You can change this setting with the user tools See Date Style Set in P 144 5 Stamp You can edit the preset Stamping Date position See P 158 5 11 Position Date The Stampi...

Страница 138: ...he Yes or No key Note Press the Yes key if you wish to set the other Stamp functions G Set your original and press the Start key Setting your original K on the exposure glass contact glass A Set your...

Страница 139: ...iority Note The Page Stamping direction on the panel display and actual print image are as follows You can edit the preset page num bering position with the user tools See P 160 5 14 Position Page P1...

Страница 140: ...and enter the new value B Press the OK key If you selected 1 5 2 5 A Enter the last page number of original with the or key Note You can also enter the page number with the Number keys To change the...

Страница 141: ...r Stamp functions I Set your original and press the Start key Setting your originals K on the exposure glass contact glass A Set the first original as shown in the illustration Note Repeat step I for...

Страница 142: ...g position size or density with the user tools See Type Size Stamp Density Stamp Posi tion in P 144 5 Stamp The message Confidential is se lected as a default You can change this default setting with...

Страница 143: ...Select the Yes or No key Note Press the Yes key if you wish to set the other Stamp functions K Set your original and press the Start key Setting your original K on the exposure glass contact glass A...

Страница 144: ...can be stamped at a time The registered user stamp cannot be deleted If you want to change the registered user stamp over write it Note You can change some User Stamp ing settings preset stamping pos...

Страница 145: ...Select the Yes or No key Note Press the Yes key if you wish to set the other Stamp functions K Set your original and press the Start key Setting your original K on the exposure glass contact glass A S...

Страница 146: ...One sided Print Of 8 Images 8 one sided pages are printed onto 1 one sided sheet 8 original images on one side 16 One sided Originals 1 One sided Print Of 16 Images 16 one sided pages are printed ont...

Страница 147: ...rint Of 4 Images 8 One sided Originals 1 One sided Print Of 8 Images 16 One sided Originals 1 One sided Print Of 16 Images Limitation When your machine is equipped with the optional document feeder yo...

Страница 148: ...job with the user tools See Cancel Comb in P 139 4 Mode Set ting Refer to the following table when you select the original and paper sizes When you set originals in the optional document feeder Metri...

Страница 149: ...hen you set originals on the exposure glass contact glass Inch version 1 You can use these original and paper sizes in Combine 4 8 Originals mode 2 You can use these original and paper sizes in Combin...

Страница 150: ...he OK key F Set your originals Setting your original K on the exposure glass contact glass A Set your original as shown in the illustration Setting your originals K in the optional document feeder A S...

Страница 151: ...n you set original on the exposure glass contact glass or set one sheet at a time in the optional document feeder repeat steps F and G After set ting the last original press the Enter key and the Star...

Страница 152: ...r For example when you use 81 2 11 K K K K originals and 11 17 L L L L paper For example when you set A5L L L L originals in the optional document feeder and you use A4K K K K paper The number of repe...

Страница 153: ...ect Memory Combine with the or key C Press the OK key D Select Repeat with the or key E Press the OK key F Select the proper reproduction ratio Reference See P 30 Preset Reduce Enlarge Reducing And En...

Страница 154: ...iginal K on the exposure glass contact glass A Set your original as shown in the illustration Setting your originals K in the optional document feeder A Set your originals as shown in the illustration...

Страница 155: ...user tool number of each function with the or key D Press the OK key Using the number keys A Enter the desired user tool number 1 to 6 with the Num ber keys B Press the OK or Enter key C Enter the des...

Страница 156: ...ress the User Tools key to re turn to the Ready condition Note The settings are not canceled even if the main switch is turned off or the Clear Modes key is pressed You can also return to the Ready co...

Страница 157: ...umber of masters and prints Note A trial print delivered to the paper delivery tray after pressing the Start key will not be counted 3 Reset R Counter Choose whether the total number of masters and pr...

Страница 158: ...Print Use to print out the following data Note Available settings Log Data Number of prints made how many times paper misfeeds occur and so on Reset Counters Number of prints and master made under ea...

Страница 159: ...STD When you press a key the beeper does not sound When warning messages appear on the panel display the beeper sounds ALL OFF The beeper does not sound when you press keys or when warning messages a...

Страница 160: ...1 4 30 Class 5 12 0 You can store student numbers for up to 9 grades with 12 classes in each giving a maximum of 108 classes Each class can have up to 9999 students Reference For how to register the n...

Страница 161: ...ode Note Default Std One original 3 Ignore Paper Size If you are making prints on non standard paper and the original image does not entirely appear on the print set pa per size detection to Ignore Th...

Страница 162: ...elect Automatic Auto Combine mode you can make two or four identical images on the one sheet by pressing the Combine key and Start key Note Default Normal Combine Originals mode Reference For how to u...

Страница 163: ...times the drum unit idles Note Default 45 13 Setting Q start If the machine is not used for a long period of time the ink on the drum might dry causing image quality to deterio rate The Auto Quality S...

Страница 164: ...n select the machine s condition after each printing set is fed out to the paper delivery tray Note Default Stop Available settings Start printing automatically After the last page of each printing se...

Страница 165: ...register its paper type in User 1 or User 2 Reference For how to register special paper type see P 154 4 19 Type of Paper 20 Auto Rotation When the direction in which your original is set is differen...

Страница 166: ...djustment values Double size 4 4 times 8 8 times 3 Stamp Density You can select the style of the stamps Note Default Solid fill 4 Stamp Position You can edit the preset stamp position co ordinates Not...

Страница 167: ...ser stamp overwrite it Reference For how to register a user stamp see P 158 5 8 Regist User 9 Date Style Set You can select the style of the date stamp Note Default Month Day Year 10 Date Position Set...

Страница 168: ...ur own background pattern in Make up mode Note You can edit the 40 preset patterns Reference For how to change the background pattern see P 161 5 15 Make Chg Pattern User Code If the machine is set to...

Страница 169: ...Code 5 Del User Code You can delete user codes Note The number of copies made under the deleted code is also deleted Reference For how to delete the user codes see P 164 6 5 Del User Code 6 Key Operat...

Страница 170: ...G Press the Enter key Note Follow steps F and G for the date hour minute and second H Press the OK key 3 4 Reproduction Ratio A Press the User Tools key B Enter 3 with the Number keys Then press the O...

Страница 171: ...atio with the Number keys G Press the OK key twice 3 5 Class Enter No A Press the User Tools key B Enter 3 with the Number keys Then press the OK or Enter key C Enter 5 with the Number keys Then press...

Страница 172: ...rase Area A Press the User Tools key B Enter 3 with the Number keys Then press the OK or Enter key C Enter 9 with the Number keys Then press the OK or Enter key D Select the original size you will use...

Страница 173: ...OK key twice 4 11 No of Skip Feed The following procedure explains how to change the number of drum rotations A Press the User Tools key B Enter 4 with the Number keys Then press the OK or Enter key...

Страница 174: ...ter key C Enter 14 with the Number keys Then press the OK or Enter key Time period 0 4 hours 4 24 hours 24 72 hours More than 72 hours Temperature Low Tmp 10 15 C 50 59 F 0 15 45 45 Normal Tmp 15 28 C...

Страница 175: ...u use this machine with the or key E Press the OK key F Select the time period you want to change how many times the drum unit idles with the or key G Press the OK key H Select the number of drum rota...

Страница 176: ...ss the Cancel key 5 4 Stamp Position Note The default position and available settings of each stamp are as fol lows User Tools Stamp Make Up Overlay Tint Darker 2 Darker 1 Normal On Line Lighter Image...

Страница 177: ...104 mm 0 32 4 16 b 72 72 mm 2 88 2 88 a 24 mm 0 96 b 24 mm 0 96 a 8 104 mm 0 32 4 16 b 8 144 mm 0 32 5 76 a 0 mm 0 b 24 mm 0 96 c center line a 52 52 mm 2 08 2 08 b 8 144 mm 0 32 5 76 a 0 mm 0 b 0 mm...

Страница 178: ...Clear Stop TPES040N Program Clear Modes Auto Cycle Proof Print Enter Start Clear Stop TPES020N a b GPSPOS0E a 24 mm 0 96 b 0 mm 0 c center line a 8 104 mm 0 32 4 16 b 72 72 mm 2 88 2 88 a 24 mm 0 96 b...

Страница 179: ...e vertical user stamp po sition with the Number keys I Press the Enter key J Press the OK key twice a 0 mm 0 b 0 mm 0 c center line a 52 52 mm 2 08 2 08 b 72 72 mm 2 88 2 88 a 0 mm 0 b 24 mm 0 96 a 52...

Страница 180: ...write it or not Select the Yes or No key E Press the OK key F Set the original you want to regis ter as a user stamp on the expo sure glass contact glass a 64 mm 2 5 b 32 mm 1 2 Note The image area as...

Страница 181: ...horizontal date stamp ing position with the Number keys Stamp po sitions Default Available settings a 8 mm 0 32 b 20 mm 0 80 a 8 40 mm 0 32 1 60 b 8 40 mm 0 32 1 60 a 20 mm 0 80 b 12 mm 0 48 a 20 mm...

Страница 182: ...keys Then press the OK or Enter key C Enter 14 with the Number keys Then press the OK or Enter key Stamp po sitions Default Available settings a 8 mm 0 32 b 12 mm 0 48 a 8 40 mm 0 32 1 60 b 8 40 mm 0...

Страница 183: ...in step D I Press the Enter key J Press the OK key twice 5 15 Make Chg Pattern A Press the User Tools key B Enter 5 with the Number keys Then press the OK or Enter key C Enter 15 with the Number keys...

Страница 184: ...keys Then press the OK or Enter key C Make sure that 1 is selected Then press the OK key Note The number of masters and prints made under the first user code will be displayed in the panel display D K...

Страница 185: ...ers and prints made under your user code B Press the OK key C Press the Yes key D Press the Cancel key twice If you selected All A Press the Yes key 6 4 Chg User Code A Press the User Tools key B Ente...

Страница 186: ...er 6 with the Number keys Then press the OK or Enter key C Enter 5 with the Number keys Then press the OK or Enter key D Keep pressing the or key to display your user code E Press the OK key F Press t...

Страница 187: ...number of prints does not exceed the minimum print quantity You can change the minimum number of prints that can be made in one operation with the user tools See Min Quantity in P 136 2 Set Operation...

Страница 188: ...your service representative Note If a service code appears on the panel display after you turn the main switch off and on a few times do not continue turning it on and off Leave the ma chine off When...

Страница 189: ...ee P 150 3 9 Margin Erase Area Edge margins of original are too narrow Prints are blank or parts of the image are not printed The paper feed side end plates are not set correctly Make sure that the pa...

Страница 190: ...rvice representative x x x x A Paper Misfeed In The Paper Feed Section A Remove the misfed paper To prevent paper misfeeds Check the following before restarting the printing run Did you select appropr...

Страница 191: ...he paper feed tray make sure that the paper edge touches the back fence and paper is placed on the proper paper size scale Only use paper where the leading edge has two right angle corners x x x x A B...

Страница 192: ...he Drum A Open the front door B Lower drum unit lock lever B1 C Take out the drum Note For how to take out the drum unit see P 87 Changing The Color Drum Unit D While pressing the drum lock grasp the...

Страница 193: ...er F Set the drum unit and close the front door When Paper Is Misfed Inside The Machine A Open the front cover B Lower drum unit lock lever B1 C Take out the drum Note For how to take out the drum uni...

Страница 194: ...mm 0 4 or there is a solid image on the leading edge insert the original with the widest margin first or make a leading edge margin by making a copy Less than 10 mm 0 4 x x x x C Paper Misfeed In The...

Страница 195: ...oll 1 Note The master roll must be posi tioned as shown in the illustra tion in step F F Close the master feed unit cover 2 G Insert the paper edge of the mas ter roll as shown in the illustra tion un...

Страница 196: ...front door B Lower drum unit lock lever B1 C Take out the drum Note For how to take out the drum unit see P 87 Changing The Color Drum Unit D If you find a misfed master on the drum unit grasp the edg...

Страница 197: ...ont door B Grasp handle E1 and pull out the master eject unit until it stops C Check where the misfed master is Remove the misfed master D Return the master eject unit to its original position and clo...

Страница 198: ...ls larger than 297 mm 864 mm 11 6 33 8 Stapled or clipped originals Perforated or torn originals Curled folded or creased origi nals Originals with any kind of coating such as thermal fax paper art pa...

Страница 199: ...4 When The Open Cover Unit Indicator M Lights MMake sure that the following door cover are closed Front Door Close the front door completely Document Feeder Cover Option Close the document feeder cov...

Страница 200: ...onditions Do not store ink where it will be exposed to heat or direct sunlight Store on a flat surface A Open the front door B Pull out the ink holder If ink comes into contact with your eyes rinse im...

Страница 201: ...D Remove the cap of the new ink cartridge E Insert the new cartridge into the ink holder Note Always supply ink of the same color F Return the ink holder to its original position until it clicks G Clo...

Страница 202: ...e master guide C Open the master feed unit cover 1 D Remove the used master roll 2 Note When the Master End indicator is lit it is necessary to replace the master roll even if some master remains on t...

Страница 203: ...End Indicator C Lights 181 4 G Insert the paper edge of the master roll as shown in the illustration until the master edge reaches the arrow mark H Close the master guide I Push in the master feed uni...

Страница 204: ...epare the trash box B Open the front door C Grasp handle E1 and pull out the master eject unit until it stops D Pull up handle E2 and pull out the master eject unit completely E Grasp the master eject...

Страница 205: ...key counter Metric version Inch version Color drum unit is installed Metric version Inch version A3 11 17 drum unit is set Metric version Inch version A4 81 2 11 drum unit is set TPES270E A3 A4 Color...

Страница 206: ...ou use small size paper prints might not be delivered in a neat stack In this case follow the steps below A Lower the end plate a little While holding the end plate lift the an gle adjustment screw B...

Страница 207: ...nd the like the background might be dirty because postcards do not absorb ink well In this case lower the printing speed or use Skip Feed mode to dry the ink on the prints A Turn off the main switch I...

Страница 208: ...Drum Unit C While pressing the drum lock turn the drum until you can see the trailing edge of the master D With a dry soft cloth remove any ink that has accumulated on the trailing edge of the drum un...

Страница 209: ...Poor Printing 187 4 E Insert the drum unit until it locks in position then lower the drum unit lock lever F Close the front door G Turn on the main switch TPEH091E TPEH021E...

Страница 210: ...of time or you change the color drum unit the ink on the drum might dry causing print quality to deterio rate To solve this problem use Qual ity Start Mode See P 76 Quality Start Mode Regaining The Im...

Страница 211: ...consistent slow the printing speed down to setting 1 or 2 When performing duplex or multicolored printing leave the printed paper for a while before the next printing in order to let the ink dry on th...

Страница 212: ...e paper might be wrapped around the drum or cause misfeeds If your hands are stained with ink Avoid prolonged or repeated contact with skin Cleanse skin thoroughly after contact before breaks and meal...

Страница 213: ...Size in P 139 4 Mode Setting When the paper is curled stack the paper with the curl face down otherwise the paper might wrap around the drum or stains might appear Postcards and the like do not absorb...

Страница 214: ...REMARKS 192 5 PC Controller Important Make sure that m indicator on the PC controller operation panel is off before unplugging the power cord...

Страница 215: ...an air turnover of more than 30 m3 hr person Environments to avoid Locations exposed to direct sunlight or strong light more than 1500 lux Do not put any metal objects or containers holding water e g...

Страница 216: ...nt cover of this manual Avoid multi wiring Do not damage break or make any modifications to the pow er cord Do not place heavy objects on it pull it hard or bend it more than necessary These actions c...

Страница 217: ...Where To Put Your Machine 195 5 Main Frame 1 More than 10 cm 4 0 2 More than 60 cm 23 7 3 More than 60 cm 23 7 4 More than 60 cm 23 7 1 3 2 4 GRINST0E...

Страница 218: ...p cloth and wipe it with a dry cloth Note If you do not clean the exposure glass contact glass marks on the glass will be printed Platen Cover A Lift the platen cover B Clean the platen cover with a d...

Страница 219: ...Machine 197 5 Optional Document Feeder Sheet A Lift the document feeder B Clean the sheet with a damp cloth and wipe it with a dry cloth Note If you do not clean the sheet marks on the sheet will be...

Страница 220: ...n Selection Directional Magnification Directional Magnification size Combine Originals 2 Images on one sheet Combine Originals 4 Images on one sheet Memory Combine mode 4 Originals Memory Combine mode...

Страница 221: ...1 Repeat 2 1 1 1 1 1 2 2 2 2 2 2 2 1 Make up 2 2 2 2 2 1 1 2 1 Skip Feed On Line 2 2 2 2 2 2 2 2 2 2 2 2 2 2 2 2 2 2 2 2 2 2 2 2 2 Image Rotation Master Saving Function to be specified later Letter P...

Страница 222: ...REMARKS 200 5 This page is intentionally blank...

Страница 223: ...17 0 Pixel Density 400 dpi Image Mode Photo mode Sand pattern Letter mode Standard mode Letter Photo mode Pencil mode Tint mode Reduction Ratios Inch version 93 77 74 65 Metric version 93 87 82 71 Enl...

Страница 224: ...m2to 209 3 g m2 12 5 lb to 55 6 lb Print Speed 60 120 rpm 5 steps First Copy Time Master Process Time Less than 15 5 seconds A3 11 17 L Less than 12 seconds A4 81 2 11 K Second Copy Time First Print T...

Страница 225: ...4 6 650 mm 25 6 575 mm 22 Stored with docu ment feeder 625 mm 24 6 650 mm 25 6 684 mm 26 9 Set up 1 405 mm 55 4 650 mm 25 6 575 mm 22 Set up with cabinet 1 405 mm 55 4 650 mm 25 6 1 010 mm 39 8 Set up...

Страница 226: ...t cover of this manual Power Consumption Master Making Less than 0 3 kW Printing Less than 0 28 kW Optional Equipment Drum unit Color Drums A3 11 17 red blue green and brown A4 81 2 11 black red blue...

Страница 227: ...al Size Max 297 mm 864 mm 11 6 33 8 Min 105 mm 128 mm 4 2 5 1 First Copy Time Master Process Time Less than 19 5 seconds A3 11 17 Less than 16 seconds A4 81 2 11 Second Copy Time First Print Time Less...

Страница 228: ...mm 16 5 2 Rolls case A3 drum More than 200 masters can be made per roll A4 drum 330 masters can be made per roll Ink Black 1 000 ml pack 600 ml pack 5 packs case Environmental conditions 5 to 40 C 10...

Страница 229: ...y Start 76 Auto Reset 135 Auto Rotation 143 Auto Separate 142 B Background ON OFF 140 Background Patterns 96 Black Line Stain 188 C Cancel 9 Cancel Comb 141 Caution iii Changing The Paper Size 23 Chan...

Страница 230: ...Printing 46 Loading Paper 15 Longer Paper 140 M Machine Exterior 1 Machine Interior 2 Main Switch 2 Maintaining Your Machine 196 Make Chg Pattern 146 161 Make Up key 6 Make up Printing 105 Make up Pri...

Страница 231: ...ter Wrapped Around The Drum 170 Paper Type 137 PC controller 80 113 Pencil Mode Printing 47 Photo Lightness 138 Photo Mode Printing 45 Photo Screen 138 Platen Cover 3 Poor Printing 185 Position Date 1...

Страница 232: ...144 Stamping Date 115 Stamping Function 120 Stamp key 6 Stamp Position 144 154 Standard Printing 20 Start key 7 Stopping The Machine During A Multi print Run 29 Storing Your Settings 72 Stretching An...

Отзывы: