background image

7,19

Getting Started

8

1

Connecting the Power Cord

The following explains the order for
connecting the Power Cord to this
unit.

R


WARNING:

R


CAUTION:

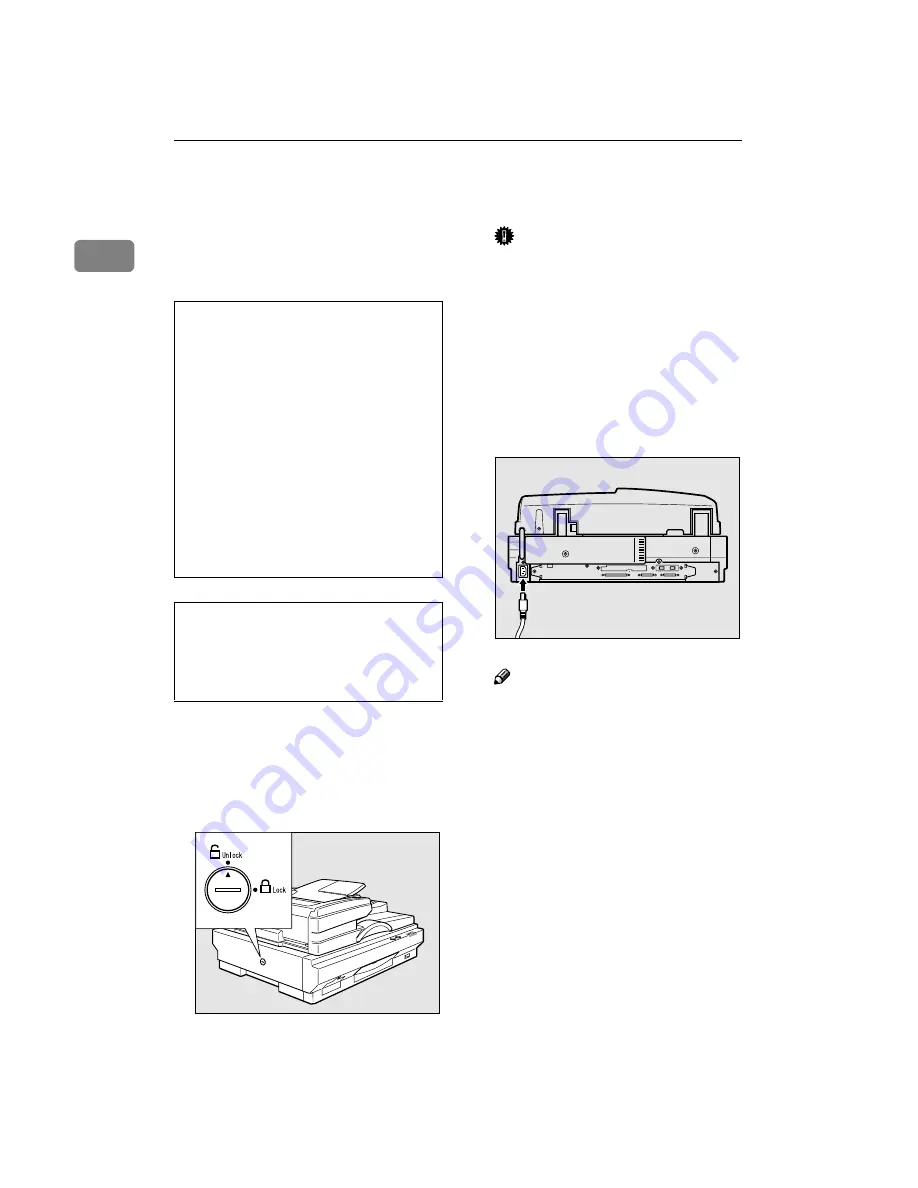
A

Make sure that the Power Switch
is set to the OFF position.

B

Make sure that the locking switch
on the left side panel of the main
unit is set to the 

{{{{

Unlock

}}}}

 position.

Important

Always make sure that the lock-
ing switch is in the 

{

Unlock

}

 po-

sition. Switching on the power
while this switch is not released,
the unit will not be able to per-
form scans and defects can oc-
cur.

C

Fully insert the Power Cord into
the Power Connector on the main
unit.

Note

For the Power Cord, use the ca-
ble that comes with this unit.

D

Insert the power plug into the
power outlet.

• Do not use with a power source with a 

voltage different from the specified volt-
age. Do not use a power outlet with multi-
ple devices plugged in. These could create 
the risk of fire or electric shock.

• Avoid the use of an extension cord.

• Do not damage, break, twist or modify the 

Power Cord. Placing heavy objects on the 
cord, pulling on or bending it excessively 
can damage the Power Cord, creating the 
risk of fire or electric shock.

• Never touch or unplug the power plug 

with wet hands. This can create the risk of 
electric shock.

• When unplugging from an outlet, be sure 

to grasp the plug when pulling. Never 
pull on the cord. This could damage the 
cord creating the risk of fire or electrical 
shock.

ZDLH220E

ZDLH100E

Содержание IS330DC - IS - Flatbed Scanner

Страница 1: ...7 19 Color Scanner Setup Guide ZDLH001E eps Read this manual carefully before you use this product and keep it handy for future reference For safety please follow the instructions in this manual...

Страница 2: ...7 19 Setup Guide Printed in the Japan EE GB G412 6661...

Страница 3: ...loyed in this manual With this machine refer to the metric version Important Parts of this manual are subject to change without prior notice In no event will the company be liable for direct indirect...

Страница 4: ...ments of the EMC Directive 89 336 EEC and the Low Voltage Directive 73 23 EEC In accordance with IEC 60417 this machine uses the following symbols for the main power switch a a a a means POWER ON b b...

Страница 5: ...t not be available in some countries For details please con tact your local dealer Note The proper names of the Windows operating systems are as follows Microsoft Windows 95 operating system Microsoft...

Страница 6: ...Connect the Power Cord directly into a wall outlet and never use an extension cord Disconnect the power plug by pulling the plug not the cable if the power cable or plug becomes frayed or otherwise da...

Страница 7: ...touch the parts with a label indicating the hot surface Otherwise it could cause a personal burn Our products are engineered to meet high standards of quality and functionality and we recommend that y...

Страница 8: ...cument is placed on the Document Tray Specifications As an ENERGY STAR Partner we have determined that this machine model meets the ENERGY STAR Guidelines for energy efficiency The ENERGY STAR Guideli...

Страница 9: ...and follow the instructions carefully Quick Installation Guide Describes how to install the scanner Setup Guide this manual Provides information about setting up the scanner and its options This man...

Страница 10: ...n is not followed paper might be misfed originals might be damaged or data might be lost Be sure to read this Preparation This symbol indicates the prior knowledge or preparations required before op e...

Страница 11: ...IEEE1394 Interface optional 10 Installing Options 12 Installing the IEEE 1394 Board IEEE 1394 Interface Board Type S 12 Installation of Image Processing Unit Image Processing Unit Type A 13 2 Install...

Страница 12: ...7 19 viii...

Страница 13: ...epending on the driver settings Preparations for the SCSI 2 3 Ultra SCSI Interface and IEEE1394 Interface option al An interface compatible with SCSI 2 3 Ultra SCSI is installed as standard In additio...

Страница 14: ...ed 5 Start key Used when starting manual scanning 6 Indicators For confirming the status of the unit 7 Power Switch For switching on and off the power to this unit 8 Rotary Switch Used for setting th...

Страница 15: ...eder ADF to be scanned here 3 Contact Glass Place the documents to be scanned here 4 Lock Switch Use to lock the internal scanning equip ment when transporting the scanner 5 Power Connector Where the...

Страница 16: ...1 2 3 4 ZDLH030E Description When switching on the power or when performing a hard reset for only a few seconds When the Automatic Document Feeder ADF contains no docu ments and scanning is not takin...

Страница 17: ...7 19 Understanding the Indicators 5 1 On Flashing Off When manual scan is in the standby mode during the Low Power mode...

Страница 18: ...t install on the following locations On locations exposed to di rect sun light On places exposed to direct radiation or hot air from an air conditioner or heater Near electronic equipment such as a ra...

Страница 19: ...an occur internally In case con densation has occurred allow the unit to acclimatize to the new envi ronment for at least one hour 89 6 F 54 80 6 F 80 50 F80 89 6 F 15 50 F 15 RH 80 60 40 20 50 70 80...

Страница 20: ...Power Cord use the ca ble that comes with this unit D Insert the power plug into the power outlet Do not use with a power source with a voltage different from the specified volt age Do not use a powe...

Страница 21: ...an one SCSI ID s exists simultaneous ly Adjust the settings such that the SCSI ID of this unit does not coin cide with the ID of another SCSI device Keep the total length of the SCSI cable including t...

Страница 22: ...lling the Scanner drivers Connecting to the IEEE1394 Interface optional Important Use the cable that comes with the IEEE1394 Board when using this unit When connecting multiple IEEE1394 compatible dev...

Страница 23: ...r is switched on be sure to perform a hard reset by pressing the Hard Reset Switch C Use a cable to connect the IEEE1394 connector of this unit to the IEEE1394 connector of the PC Connect the side of...

Страница 24: ...and tightening screws A Check the contents of the box for the following items IEEE 1394 Interface Board Type S Tools B Turn off the power of the scanner and unplug the Power Cord and all other cables...

Страница 25: ...ion of Image Processing Unit Image Processing Unit Type A Important Before touching the image process ing unit make sure to first touch a metal object to discharge any static electricity accumulated i...

Страница 26: ...r confirming that the image processing unit is securely at tached check to make sure that there are no metal or other foreign objects on the scanner control unit G Insert the scanner control unit into...

Страница 27: ...TI driver for Windows98 Me or Windows2000 using the Plug Play function of the OS Here examples of Windows98 are used for the explanations The basic operations are similar for Windows Me and Windows200...

Страница 28: ...RIV ERS SCSI STI INF98 or C DRIVERS SCSI STI INF2000 respectively D Click Next E Click Next The Insert disk message appears F Place the CD ROM included with this product into the CD ROM drive and clic...

Страница 29: ...eft SHIFT key while inserting the CD ROM Keep the SHIFT key held down until the computer has finished ac cessing the CD ROM A Close all applications that are running B Insert the CD ROM into the CD RO...

Страница 30: ...ng Windows95 WindowsNT4 0 To install the scanner driver for Win dows 95 WindowsNT4 0 refer to P 16 Installing the Scanner Driver by Auto Run Limitation To install the driver when using WindowsNT4 0 lo...

Страница 31: ...uded with this product into the CD ROM drive B Select Run from the File menu in the File Manager The Run dialog box appears C Inside the Command Line box in put DRIVERS SC SI TWAIN OTHERS SETUP after...

Страница 32: ...scan ning Files storing location Files are stored in the following location in the provided CD ROM DRIVERS SCSI TWAIN Others Operating environment PC The driver is compatible with the following operat...

Страница 33: ...It is also possible to use the driver when connecting a computer and the machine through a SCSI interface Files storing location Files are stored in the following location in the provided CD ROM DRIVE...

Страница 34: ...o This Scanner 2 H Hard Reset Switch 2 I IEEE1394 Connector optional 3 Indicators 2 Installing Options 12 Image Processing Unit 13 IEEE1394 Board 12 Installing the STI driver 15 ISIS Driver 21 L Lock...

Отзывы: