background image

23


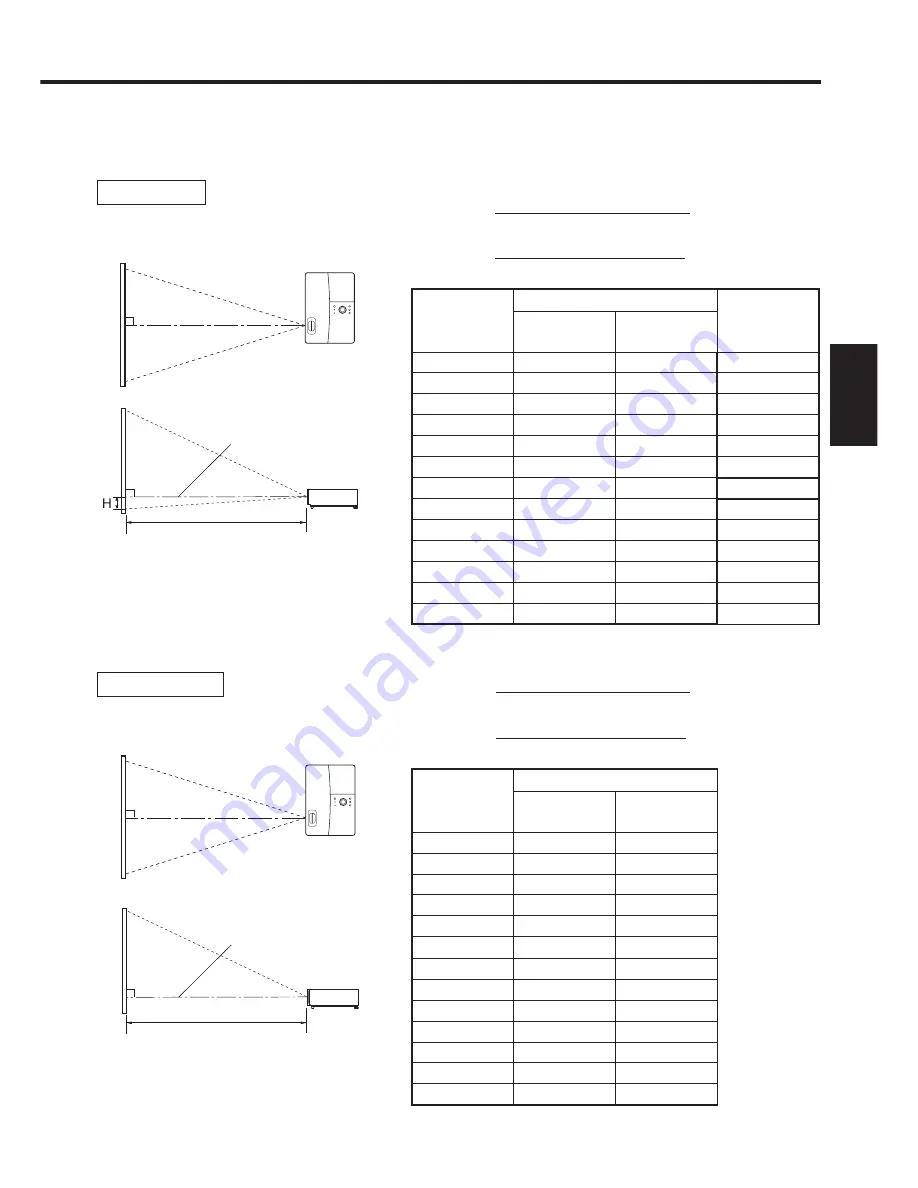
投写距離と画面サイズについて

下図と下表や計算式を参考にして画面サイズと投写距離を決めてください。(画面サイズ
は、フルサイズの映像を台形補正なしで投写したときのおよその値です)

a ( 最短 )= 

  投写画面サイズ ( 型 ) - 0.795 


32.885

a ( 最長 )= 

  投写画面サイズ ( 型 )- 0.673


27.397

画面サイズ 

型 (cm)

投写距離

a

 (m)

高さ (

H

) 

(cm)

最短 

( ズーム最大)

最長 

( ズーム最小)


30 (76)


0.89

  1.07


6.50

  40 (102)


1.19

  1.44


8.70

  50 (127)


1.50

  1.80


10.90 

  60 (152)

1.80

  2.17


13.10 

  70 (178)


2.10

  2.53


15.20 

  80 (203)


2.41

  2.90


17.40 

  90 (229)


2.71

  3.26


19.60 

 100 (254)


3.02

  3.63


21.80 

 120 (305)


3.63

  4.36


26.10 

 150 (381)


4.54

  5.45


32.70 

 200 (508)


6.06

  7.28


43.50 

 250 (635)


7.58

  9.10


54.40 

 300 (762)


9.10

  10.93


65.30

90°

上から見た図

横から見た図

スクリーン

90°

a

レンズの中心

a

はレンズからスクリーンまでの距離(m)

で、O.89  m~10.93  m  の範囲に対応し

ます。

H

は、画面下端からレンズ中心までの高さ

です。

PJ X3130

90°

a

画面サイズ 

型 (cm)

投写距離

a

 (m)

最短 

( ズーム最大)

最長 

( ズーム最小)


30 (76)


0.94


1.14

  40 (102)


1.27


1.52

  50 (127)


1.59


1.91

  60 (152)


1.91


2.30

  70 (178)


2.23


2.68

  80 (203)


2.55


3.07

  90 (229)


2.88


3.46

 100 (254)


3.20


3.84

 120 (305)


3.84


4.62

 150 (381)


4.81


5.78

 200 (508)


6.42


7.71

 250 (635)


8.03

  9.65

 300 (762)


9.65

  11.58

PJ WX3130

90°

上から見た図

横から見た図

スクリーン

レンズの中心

a

  はレンズからスクリーンまでの距離(m)

で、0.94  m~11.58  m  の範囲に対応し

ます。

レンズの中心が、画面の下端になります。

a ( 最短 )= 

  投写画面サイズ ( 型 ) - 0.758 


31.022

a ( 最長 )= 

  投写画面サイズ ( 型 )- 0.643


25.845

Содержание IPSiO PJ WX3130

Страница 1: ...IPSiO PJ X3130 IPSiO PJ WX3130...

Страница 2: ...1 2 3 1 2 3...

Страница 3: ...100V 100V...

Страница 4: ......

Страница 5: ......

Страница 6: ...IPSiO PJ 1...

Страница 7: ......

Страница 8: ......

Страница 9: ...1...

Страница 10: ...10 p 43...

Страница 11: ...11 24 p 42 20...

Страница 12: ...12 J55022 H14 B...

Страница 13: ...ion Microsoft Windows Windows 2000 Windows XP Windows Vista Win dows 7 PowerPoint Microsoft Corporation Mac Apple Computer Inc Adobe Acrobat Reader Adobe Systems Incorporated This Projector is designe...

Страница 14: ...14 2 11 12 14 16 17 18 20 21 22 24 26 28 31 31 31 32 33 33 33 34 34 36 36 37 38 41 43 44 45 45...

Страница 15: ...15 48 49 51 55 FAQ 56 56 56 57 57 57...

Страница 16: ...3 CD ROM 4 5 RGB 3m 6 7 8 CD ROM CD ROM PDF PDF Portable Document Format Acrobat Reader 5 Adobe Acrobat Reader Adobe Reader CD ROM Acrobat Reader PDF Acrobat Reader CD ROM PJX3130_WX3130_JPN pdf Acro...

Страница 17: ...17 16 15 15 14 14 13 10 11 12 9 5 4 8 7 6 1 3 2 1 p 18 2 p 29 3 p 29 4 p 46 5 6 7 8 9 p 21 10 AC IN 11 p 20 12 13 14 p 29 15 p 29 16 p 44...

Страница 18: ...18 1 2 INPUT p 28 3 MENU p 36 4 RETURN 5 ON STANDBY p 26 ON STANDBY p 26 6 TEMP p 48 7 LAMP p 48 8 1 8 3 2 4 6 5 7 7 9 8 10 11 12 13 1 2 3 4 6 5...

Страница 19: ...19 1 ON STANDBY p 26 2 FREEZE p 34 3 MENU p 36 4 5 RESIZE p 32 6 SCREEN SIZE p 33 7 MUTE p 33 8 AUTO SET p 31 9 INPUT p 28 10 RETURN 11 12 PICTURE p 33 13 1 2 3 4 5 6 7 8 9 0 1 7 2 8 3 9 4 5 6 0...

Страница 20: ...O IN COMPUTER 1 IN 2 IN VIDEO S VIDEO 2 S VIDEO S 3 COMPUTER1 IN Y PB PR1 RGB Y PB PR 4 COMPUTER 2 IN Y PB PR2 MONITOR OUT RGB Y PB PR 5 MONITOR OUT 5 COMPUTER 2 IN MONITOR OUT 6 AC IN 7 AUDIO OUT 8 V...

Страница 21: ...21 R03 2 R03 2...

Страница 22: ...22 4 2 p 42...

Страница 23: ...6 26 10 150 381 4 54 5 45 32 70 200 508 6 06 7 28 43 50 250 635 7 58 9 10 54 40 300 762 9 10 10 93 65 30 90 90 a a m O 89 m 10 93 m H PJ X3130 90 a cm a m 30 76 0 94 1 14 40 102 1 27 1 52 50 127 1 59...

Страница 24: ...24 RGB p 52 DVD DVD L R S S MONITOR OUT RS 232C p 54 RGB L R D sub15P BNC BNC Y CB CR Y CB CR RGB COMPUTER 2 COMPUTER p 20 L R...

Страница 25: ...25 COMPUTER 2 IN MONITOR OUT COM PUTER 1 IN MONITOR OUT AUDIO OUT Y PB PR AUDIO IN COMPUTER 1 IN COMPUTER 2 IN VIDEO S VIDEO AUDIO OUT AUDIO OUT VOL...

Страница 26: ...26 1 AC IN 2 ON STANDBY 100V 1 2 ON STANDBY ON STANDBY...

Страница 27: ...27 p 38 p 28 1 p 41 p 42 p 35 1 ON STANDBY 2 ON STANDBY ON STANDBY 3 4 5W 5...

Страница 28: ...28 1 p 26 2 6 2 p 42 p 38 1 p 41 3 4 INPUT INPUT...

Страница 29: ...29 1 p 41 INPUT INPUT 5 6 7...

Страница 30: ...30 RGB p 52 XGA X3130 WXGA WX3130 XGA X3130 WXGA WX3130 DVD p 44...

Страница 31: ...31 AUTO SET p 37 p 52 p 53 p 37...

Страница 32: ...32 1 RESIZE RESIZE 2 RESIZE RESIZE 3 4 RESIZE RETURN 4 3 1 2...

Страница 33: ...33 OHP MUTE MUTE PICTURE 1 2 3 1 2 3 p 37 SCREEN SIZE X3130 WX3130 4 3 4 3 Y PB PR S p 38...

Страница 34: ...34 FREEZE FREEZE 000000 1 2 2 3 6 000000 6 4 6 5...

Страница 35: ...35 1 2 2 3 4 OK 5 6 6 1 2 3 5 1 2 2 3 4 5 OK...

Страница 36: ...36 MENU p 18 30 3 4 MENU RETURN 1 MENU 2 p 37 1 p 41 p 38 2 p 42 p 43 5...

Страница 37: ...37 1 1 2 3 NTSC 2 US NTSC US JAPAN NTSC JAPAN 1 2 Y PB PR S 1 2 NTSC NTSC NTSC4 43 JAPAN US...

Страница 38: ...38 X3130 WX3130 4 3 X3130 1024 768 WX3130 4 3 1280 800 Indonesia...

Страница 39: ...39 1024 768 X3130 1280 800 WX3130 Y PB PR S 16 9 4 3 4 3 Y PB PR 16 9 X3130 4 3 WX3130 RICOH X3130 WX3130...

Страница 40: ...40 1 2 3 4 OK 5 6 512 384 X3130 640 400 WX3130 1...

Страница 41: ...41 1 30 ON STANDBY INPUT INPUT 1 Y PB PR 1 2 Y PB PR 2 S...

Страница 42: ...42 2 p 22 OK CC1 CC2 CC3 CC4 T1 T2 T3 T4 p 35 1500m RETURN 10 LAMP TEMP 2 3 CC1 CC4 T1 T4...

Страница 43: ...43 Y PB PR S RGB 1 2 Y PB PR 3 4 1 RGB p 52 2 P N 3 p 47 4 S FCC Federal Communications Commission...

Страница 44: ...44 1 2 3 4 100 100 30...

Страница 45: ...45 IPSiO PJ 1 1 p 10...

Страница 46: ...46 1 2 1 3 4 2 5 3 6 3...

Страница 47: ...47 7 4 2 8 3 1 9 p 43 1 2000 3000 p 41...

Страница 48: ...48 p 46...

Страница 49: ...49 p 48 p 46 p 48 p 48 p 41 p 33 p 37 p 24 INPUT p 28 p 33 p 29 p 24 p 52 p 53 p 45 p 29 p 23 p 29 p 37 p 37 p 43 p 37 p 38 p 43 p 42...

Страница 50: ...50 p 21 p 21...

Страница 51: ...19 2 23 00 mm 180W 30 300 X3130 0 89 m 10 93 m WX3130 0 94 m 11 58 m 1W COMPUTER 1 IN 15 RGB Y PB PR COMPUTER 2 IN 15 RGB Y PB PR MONITOR OUT S VIDEO DIN 4 VIDEO RCA 1V p p 75 AUDIO IN 3 5mm 1 5 V rms...

Страница 52: ..._70 70 069 56 476 75 000 XGA_75 75 029 60 023 78 750 XGA_85 84 997 68 667 94 500 MAC19 74 700 60 134 79 857 1152 x 864 SXGA1_75 75 000 67 500 108 000 1280 x 800 WXGA_60 59 880 49 580 83 300 1280 x 960...

Страница 53: ...00 1080p 1125p 50Hz 56 25 50 00 S fh kHz fv Hz fsc MHz NTSC 15 73 60 3 58 PAL 15 63 50 4 43 SECAM 15 63 50 4 25 or 4 41 PAL M 15 73 60 3 58 PAL N 15 63 50 3 58 PAL 60 15 73 60 4 43 NTSC4 43 15 73 60 4...

Страница 54: ...L D 9 1 DCD 2 TXD 3 RXD 4 DTR 5 GND 6 DSR 7 RTS 8 CTS 9 RI 1 RS 232C 9600bps 8 1 2 STX 02h Command 3Byte ETX 03h 1 3 ASC II 4 ACK 06h CR 0Dh Data ACK 06h ESC 1Bh NAK 15h PON POF OSD MO0 OSD MO1 RGB PA...

Страница 55: ...55 7 9 18 9 12 13 17 http www ricoh co jp SOUDAN index html http www ricoh co jp download index html...

Страница 56: ...56 FAQ FAQ http www ricoh co jp FAQ http www ricoh co jp support qa IPSiO PJ 1 IPSiO PJ 1 RGB...

Страница 57: ...57 2 1 http www ricoh co jp IPSiO regist...

Страница 58: ......

Страница 59: ...Preparations Operations Maintenance Others IPSiO PJ X3130 IPSiO PJ WX3130 PROJECTOR OWNER S MANUAL...

Страница 60: ...nd off 72 Basic operations 74 Using handy features 77 Using auto setting For computer input only 77 Correcting the keystone distortion 77 Resizing image 78 Cutting off the picture and sound temporaril...

Страница 61: ...61 Maintenance Lamp replacement 92 Air filter cleaning 95 Lens and main unit cleaning 96 Others Trouble indications 97 Troubleshooting 98 Specifications 100...

Страница 62: ...ection when shipping your projector repack the set as it was originally packed at the factory The Supplied CD ROM The supplied CD ROM contains an owner s manual including information not available for...

Страница 63: ...wn 7 Lens cap Replace the cap when not using the projector to protect the lens 8 Lens Projects expanded image 9 Infrared remote sensor Senses commands from the remote control p 67 10 AC IN socket Conn...

Страница 64: ...ETURN button Goes back one screen 5 ON STANDBY button Turns the power on off standby p 72 ON STANDBY indicator Displays whether power is on or off standby p 72 6 TEMP indicator Lights when internal te...

Страница 65: ...er p 77 9 INPUT button Selects input p 74 10 RETURN button Goes back one screen 11 Selection button Menu selections and adjustments volume control Keystone adjustment etc 12 PICTURE button Changes ima...

Страница 66: ...B PR from video equipment 4 COMPUTER 2 IN Y PB PR 2 terminal MONITOR OUT terminal Inputs analog RGB signal from a computer or a component video signal Y PB PR from video equipment It can also be used...

Страница 67: ...observe the Safety Precautions described in previous pages Remove batteries from remote control when not using for extended periods If the remote control stops working or if its range decreases replac...

Страница 68: ...ONS when placing the unit Attempting to clean and replace the lamp in a high location by yourself may cause you to fall resulting in injury If you wish to mount the projector on the ceiling be sure to...

Страница 69: ...ine the projection size and projection distance Projection sizes are approximate values for full size picture with no keystone adjustment a is the distance m feet between the lens and the screen and c...

Страница 70: ...pin not supplied To Y CB CR output Green Y Blue CB Red CR RGB cable supplied Video cable not supplied Audio cable not supplied To audio ouput White L Red R To RS 232C terminal p 103 Audio cable not s...

Страница 71: ...However from AUDIO OUT terminal no audio signal is output A computer monitor cannot accept Y PB PR signals correctly The AUDIO IN terminal can be used for devices connected to COMPUTER 1 terminal COM...

Страница 72: ...not place your hands face or other objects near the air exhaust the lamp cover or the bottom of the unit Doing so could result in injury and or damage the object Notes The start up screen will disapp...

Страница 73: ...projector goes into standby mode During cooling the ON STANDBY indicator flashes While the indicator is flashing the power can not be turned back on There is no problem with unplugging the power cord...

Страница 74: ...u for lamp power selection and configuration is displayed It is automatically set as Standard To change the setting follow the step 2 2 Use the or button to select the lamp power and press the button...

Страница 75: ...release button upward The foot adjuster extends Release the button to lock the position 2 To fine adjust the angle twist the foot adjuster To stow the foot adjuster hold up the projector while pressi...

Страница 76: ...e the computer s owner s manual If no signal is being input from the connected equipment or signal input is stopped while projecting the No signal message will appear If a signal not supported by the...

Страница 77: ...n This projector is capable of correcting this keystone distortion Before correction After correction The keystone distortion will be corrected automatically based on the projector s placement angle A...

Страница 78: ...riginal size To move the area to zoom in use the buttons You can keep pressing When the image returns to the original size by pressing RESIZE button several times the zoom will be reset Pressing the R...

Страница 79: ...urn 1 Bright 2 Standard 3 True color Note Picture mode of the Image adjustment menu has the same function p 83 Changing screen size The screen size for the projected image can be changed Press the rem...

Страница 80: ...y infringe the copyright protected by the copyright laws Setting the password How to change password The default password is 000000 1 Select Password in the Default setting 2 menu and press the or but...

Страница 81: ...operation If the password is wrong a message appears to prompt you to re enter the password and again the password entry screen is displayed If you enter a wrong password for more than 5 times the pro...

Страница 82: ...displays given for operation instructions purposes As the display may differ depending on the item refer to the following applicable pages for the menu item you desire To return to previous item pres...

Страница 83: ...n Enable Off Disable No Yes Yes Yes Picture mode Press Toggle the picture mode with 1 2 3 Yes Yes Yes Yes R level Adjust red of the image color Less red More red Yes Yes Yes Yes G level Adjust green o...

Страница 84: ...lse position Yes No No No Clamp 2 Adjusts the clamp pulse width Yes No No No 1 Noise reduction may not work depending on signal type 2 NTSC mode can be displayed and adjusted only when the video signa...

Страница 85: ...n a non screen surface select a color in accordance with the projecting surface Press and switch with and Off Green Black Brown Blue Beige Language Select one of the languages below to use for display...

Страница 86: ...ble for computer images For Y PB PR input screen size setting function is not available for the video signals with a 16 9 aspect ratio Note If you use the screen size setting function on commercial vi...

Страница 87: ...y logo prepare the image within the limit Only one logo can be registered When a new image is registered the old one is erased The time needed to register or display the image varies depending on the...

Страница 88: ...ly searches the signals that can be projected and switches input from the connected device that outputs the video signals each time the INPUT button is pressed The input from the connected device that...

Страница 89: ...with the control panel buttons is disabled To release the key lock set the Key lock to Off using remote control Pressing the RETURN button on the projector for 10 seconds also sets the Key lock to Of...

Страница 90: ...Yes Yes Yes Lamp reset count The count for lamp replacement Yes Yes Yes Yes Total time The total time that this projector is used Yes Yes Yes Yes Version Firmware version Note 4 Yes Yes Yes Yes Notes...

Страница 91: ...91 Operations...

Страница 92: ...than the specified one is used it may cause a malfunction or damage to the unit due to the difference in the connector shape or the lamp rate CAUTION If you have been using the projector the lamp will...

Страница 93: ...tach both screws removed in step 4 Tighten the screws until the inner lamp cover is fully immobile 8 Replace the outer lamp cover Reseat the outer lamp cover by sliding it in the direction of the arro...

Страница 94: ...lace the lamp with a new one The lamp is made out of glass Do not touch the glass surface with your bare hands bang it or scratch it Dirt jolts scratches and the like could break the lamp About lamp r...

Страница 95: ...ith your fingers as shown in the figure 3 Clean the filter Carefully remove the dust and dirt from the air filter with a vacuum cleaner or the like 4 Replace the air filter Insert the air filter firml...

Страница 96: ...ower and or lens cleaner The lens is easily scratched so do not rub it with hard objects or strike it Main unit cleaning Unplug the power cord before cleaning the main unit Wipe dirt off the main unit...

Страница 97: ...turn the power back on The icon will appear before the power goes out Power went out during use Problem with internal cooling fan Unplug the power cord and contact your sales representative The icon w...

Страница 98: ...tions set up correctly p 70 Are all the connected devices functioning properly Picture not displayed correctly Is the input signal supported by the projector p 101 p 103 Is there something generating...

Страница 99: ...ed Are the batteries inserted into the remote control correctly p 67 Is the remote control being used within the effective range p 67 Are there any obstructions between the remote control and projecto...

Страница 100: ...inches Projection distance X3130 0 89 m 10 93 m wx3130 0 94 m 11 58 m Speaker 1 W Mono Connection terminal COMPUTER1 IN terminal Mini D sub 15 pin RGB Y PB PR dual use COMPUTER 2 IN terminal Mini D s...

Страница 101: ...60 004 48 363 65 000 XGA_70 70 069 56 476 75 000 XGA_75 75 029 60 023 78 750 XGA_85 84 997 68 667 94 500 MAC19 74 700 60 134 79 857 1152 x 864 SXGA1_75 75 000 67 500 108 000 1280 x 800 WXGA_60 59 880...

Страница 102: ...8 PAL 60 15 73 60 4 43 NTSC4 43 15 73 60 4 43 Pin assignment of COMPUTER 1 IN COMPUTER 2 IN MONITOR terminals Pin No Pin description During RGB input During Y PB PR input 1 Video signal R Color differ...

Страница 103: ...1 bit 2 Communication format STX 02 h Command 3 Byte ETX 03 h Only 1 command valid per communication 3 Data format For input commands only ASCII compliant all uppercase alphanumeric characters suppor...

Страница 104: ...JA JP EN JP 2010 11 Y001 6121C...

Отзывы: